Transition Networks Stand-Alone Media Converter S4TEF10xx-11x User Manual Download Page 5

8

S4TEF10xx-11x

24-hour Technical Support: 1-800-260-1312  International: 00-1-952-941-7600

Installation — Continued

Hardware/software jumper

The jumper is located on the circuit board, inside the media
converter housing.

Hardware:

The media converter mode is determined by the  switch
setting 

(see pages 3 - 7)

.

Software:

The media converter mode is determined by the most-recently saved, on-board

microprocessor settings.

To set the jumper:
1.

Using a small screwdriver, remove the four (4) screws that secure the cover
and carefully remove the cover from the media converter.

2.

Locate the jumper near the back end on the upper circuit board.

3.

Using small needle-nosed pliers or similar device, move the jumper to the
desired position 

(see above)

.

4.

Carefully replace the cover on the media converter and replace the four (4)
screws that secure the cover to the media converter.

Power the media converter 

1.

Connect the barrel connector on the power adapter to the media converter’s
power port (

located on the back of the media converter)

2.

Connect the power adapter plug to AC power.

3.

Verify that the media converter is powered by observing the illuminated LED
power indicator light.

Note:  

For DC power, consult the user’s guide for the Transition Networks
SPS1872-xx DC external power supply.

Install the T1/E1 cable 

1.

Locate or build ITU-compliant copper cable with straight-through RJ-48
connectors installed at both ends.

(See pages 19 thru 21  for the proper cable

specifications for your network application.)

.

2.

Connect the RJ-48 connector at one end of the cable to one of the T1/E1 ports
on the S4TEF10xx-11x media converter.

3.

Connect the RJ-48 connector at the other end of the cable to the T1/E1 port on
the other device.

Hardware Mode

Software Mode

S

H

S

H

9

[email protected] -- Click the “Transition Now” link for a live Web chat.

Installation -- Continued

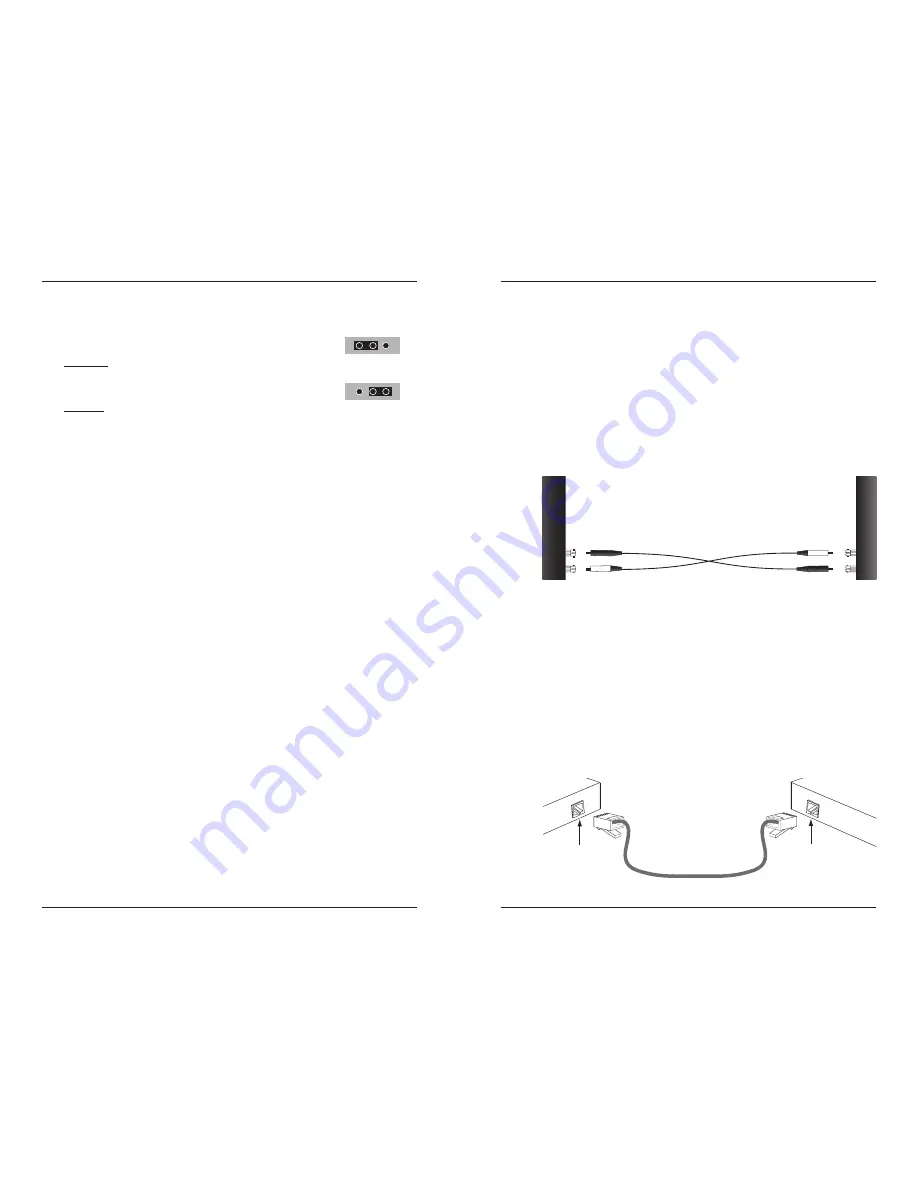
Install the fiber cable 

1.

Locate or build ITU-compliant fiber cable with male, two-stranded TX to RX
connectors installed at both ends.

2.

Connect the fiber cables to the local S4TEF10xx-11x media converter as
described: 

Connect the male TX cable connector to the female TX port.

Connect the male RX cable connector to the female RX port.

3.

Connect the fiber cables to the remote S4TEF10xx-11x media converter as
described: 

Connect the male TX cable connector to the female RX port.

Connect the male RX cable connector to the female TX port.

Install the ethernet cable 

Ensure that the correct cable type is installed to support the highest speed and mode
of operation to be selected. 

1.

Locate or build IEEE 803.2™ compliant 10Base-T or 100Base-TX cables,
with straight-through RJ-45 cable, and with straight-through RJ-45 connectors
installed at both ends.

2.

Connect the RJ-45 connector at one end of the cable to the RJ-45 port on the
S4TEF10xx-11x media converter.

3.

Connect the RJ-45 connector at the other end of the cable to the RJ-45 port on
the other device 

(switch, workstation, etc.).

Note:

The MDI 

(straight-through) 

or MDI-X 

(crossover) 

cable connection is

configured automatically, according to the network conditions.

RJ-45 port

on the other device

(switch, work station, etc.)

RJ-45 port

on the media 

converter

Connect the fiber cable 
to the local media
converter as shown.

Connect the fiber cable

to the remote media

converter as shown

RX

TX

RX

TX

Summary of Contents for Stand-Alone Media Converter S4TEF10xx-11x

Page 1: ...tics of the network The chassis version of the media converter is C4TEF10xx 11x For more information see the user s guide on line at www transition com Installation 2 Operation 10 Cable Specifications...

Page 2: ...Actual distance is dependent upon the physical characteristics of the network TX transmit RX receive The information in this user s guide is subject to change For the most up to date information on th...

Page 3: ...nal on loss of the carrier signal This function is un framed and applies to ALL channels both copper and fiber down Disable the transmit AIS function 10 RS 232 Port Mode up Data port mode normal opera...

Page 4: ...less than or equal to 512 BT the path is good For more information on the 512 bit rule see the white paper titled Collision Domains on the Transition Networks website at www transition com up down Eth...

Page 5: ...e to one of the T1 E1 ports on the S4TEF10xx 11x media converter 3 Connect the RJ 48 connector at the other end of the cable to the T1 E1 port on the other device Hardware Mode Software Mode S H S H 9...

Page 6: ...nk for a live Web chat Dry contact relay All four T1 E1 ports are equipped with an RJ 48 dry contact relay The relay closes if the power is lost or if any of the individual T1 E1 links are lost The op...

Page 7: ...x 11x 24 hour Technical Support 1 800 260 1312 International 00 1 952 941 7600 Operation Continued Remote management function The S4TEF10xx 11x can be remotely managed when connected via fiber cable t...

Page 8: ...Now link for a live Web chat Operation Continued To show the configuration menu for the local device 1 At the prompt type the letter C press the spacebar then type the letter L 2 Press the ENTER key...

Page 9: ...s FF Force Full Duplex FH Force Half Duplex S Save new Configuration and Exit Q Exit without saving Configuration 17 techsupport transition com Click the Transition Now link for a live Web chat Operat...

Page 10: ...Bm max 14 0 dBm Link Budget 11 0 dB S4TEF1014 110 1310 nm single mode Fiber optic Transmitter Power min 15 0 dBm max 8 0 dBm Fiber optic Receiver Sensitivity min 31 0 dBm max 8 0 dBm Link Budget 16 0...

Page 11: ...ve pairs in an Ethernet network Use only dedicated wire pairs for the active pins e g blue white white blue orange white white orange etc Do not use flat or silver satin wire Crossover Cable 1 2 3 6 S...

Page 12: ...ions 3 7 x 4 7 x 1 8 93 x 120 x 47 mm Weight 1 lb 0 45 kg approximate Power Consumption 6 0 watts Power Supply 12VDC 0 8A North Am Europe Japan Latin Am 12 VDC 1 25A UK Australia N Z South Africa The...

Page 13: ...941 7600 YES Amber The media converter has selected 10Mb s operation Green The media converter has selected 100Mb s operation If the speed is not correct disconnect and reconnect the twisted pair cabl...

Page 14: ...nd used in accordance with the instruction manual may cause harmful interference to radio communications Operation of this equipment in a residential area is likely to cause harmful interference in wh...

Page 15: ...e U S A 33301 F VCCI Class 1 compliance This equipment is in the 1st Class category information equipment to be used in commercial and or industrial areas and conforms to the standards set by the Volu...

Reviews: