Transduction TR-LCD1900-OCD User Manual Download Page 11

Self-Test Feature

The TR-LCD1900-OCD has a Self-Test feature that allows you to check whether your monitor is

functioning properly.

Self-Test Feature Check

1. Turn off both your computer and the monitor.

2. Unplug the video cable from the back of the computer .

3. Turn on the monitor.

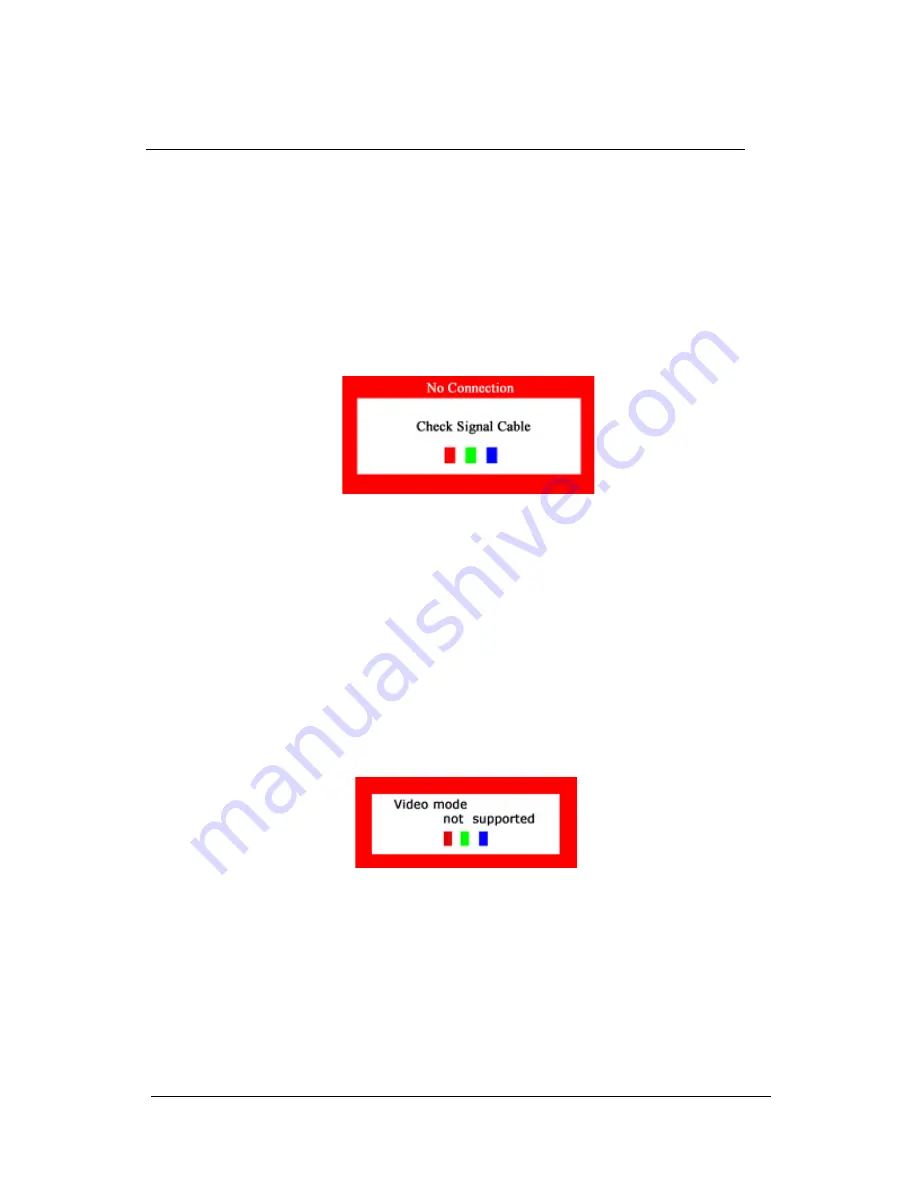
If the monitor is functioning properly, you will see a box with a border and text inside as shown in

the following illustration:

The three boxes inside the border are red, green and blue.

Failure of any of the boxes to appear indicates a problem with your monitor . This box also ap-

pears during normal operation if the video cable becomes disconnected or damaged.

1. Turn off your monitor and reconnect the video cable; then turn on both your computer and the

monitor.

If your monitor remains blank after following the previous procedure, check your video controller

and computer system; your monitor is functioning properly.

Warning Messages

If there is something wrong with the input signal, a message appears on the screen or the screen

goes blank. The message may indicate that the monitor is out of scan range or that you need to

check the signal cable.

Useful Tips

A monitor recreates visual signals received from the PC. Therefore, if there is trouble with

the PC or the video card, this can cause the monitor to become blank, have poor coloring,

noise, Video mode not supported, etc.

Judging the monitor’s working condition

If there is no image on the screen or “Video mode not supported” message comes up, discon-

nect the cable from the computer while the monitor is still powered on.

o

If there is a message coming up on the screen or if the screen goes white, this means

the monitor is in working condition.

o

In this case, check the computer for trouble.

9

TR-LCD1900-OCD User Manual

Summary of Contents for TR-LCD1900-OCD

Page 1: ...Version 1 0 07 02 09 TR LCD1900 OCD 19 Rack Panel Mount TFT LCD Monitor with Front LCD Controls 5155 23 Spectrum Way Mississauga ON Canada L4W 5A1 TEL 1 800 268 0427 905 625 1907 F AX 905 625 0531 Em...

Page 2: ...form or means without prior written permission from Transduction All other trademarks brand and product names are the property of their respective owners Return policy Products returned for repair mu...

Page 3: ...grounded plug or receptacle An improper ground may cause electric shock or equipment damage Do not excessively bend the plug and wire or place heavy objects on them This could cause damage and an ele...

Page 4: ...ack mount panel mount monitor Power Cord Video Signal Cable User s Manual and Driver Installation CD Remember to save your original box and packing material to transport or ship the monitor Power Cord...

Page 5: ...he DVI cable to the DVI port on the back of your monitor 4 Connect to a Macintosh Use the D sub connection cable An older model Macintosh may require a special Mac adaptor 5 Turn on your computer and...

Page 6: ...nothing to do with a real measurement 5 Press the Menu button once to return to the main menu to select another function or press twice to exit from the OSD The Control Panel Buttons give various and...

Page 7: ...sts the contrast of video Color Changes the richness of color Tint Changes the tone of color Adjustment Video This function is active if you select an input source other than PC DVD VCR Sharpness Adju...

Page 8: ...rd for your monitor to the power port on the back of the monitor 2 DVI port Connect the DVI Cable to the DVI Port on the back of your Monitor 3 Signal port Connect the signal cable to the 15 pin D sub...

Page 9: ...then reboot the system I cannot see the On Screen Display Have you locked the On Screen Display OSD Menu to prevent changes Unlock the OSD by pressing the MENU button for at least 5 seconds Is the sc...

Page 10: ...adjustment feature is not available in Game mode or Full Screen video mode 2 When activated in a mode in which the four edges of the display are black Game or DOS mode the Auto feature of the LCD mon...

Page 11: ...er following the previous procedure check your video controller and computer system your monitor is functioning properly Warning Messages If there is something wrong with the input signal a message ap...

Page 12: ...chable DVI D to DVI D connector detachable Dimensions W x D x H Weight Rack mount Panel mount 18 96 x 2 875 x 15 75 9U 14 3 lb 48 16cm x 7 3cm x 40 01cm 6 5 kg 17 75 x 3 00 x 15 25 14 lb 45 09cm x 7 6...

Page 13: ...76 75 025 135 00 SUN 1280 x 1024 81 129 76 106 135 00 Resolutions Supported Horizontal Frequency The time to scan one line connecting the right edge to the left edge of the screen horizontally is call...

Page 14: ...TRANSDUCTION 5155 Spectrum Way Bldg 23 Mississauga ON L4W 5A1 Canada 905 625 1907 www transduction com 12 TR LCD1900 OCD User Manual...

Page 15: ......

Page 16: ......

Page 17: ......

Page 18: ......

Page 19: ......

Page 20: ......

Page 21: ......

Page 22: ......

Page 23: ......

Reviews: