Transcend PF720 User Manual Download Page 10


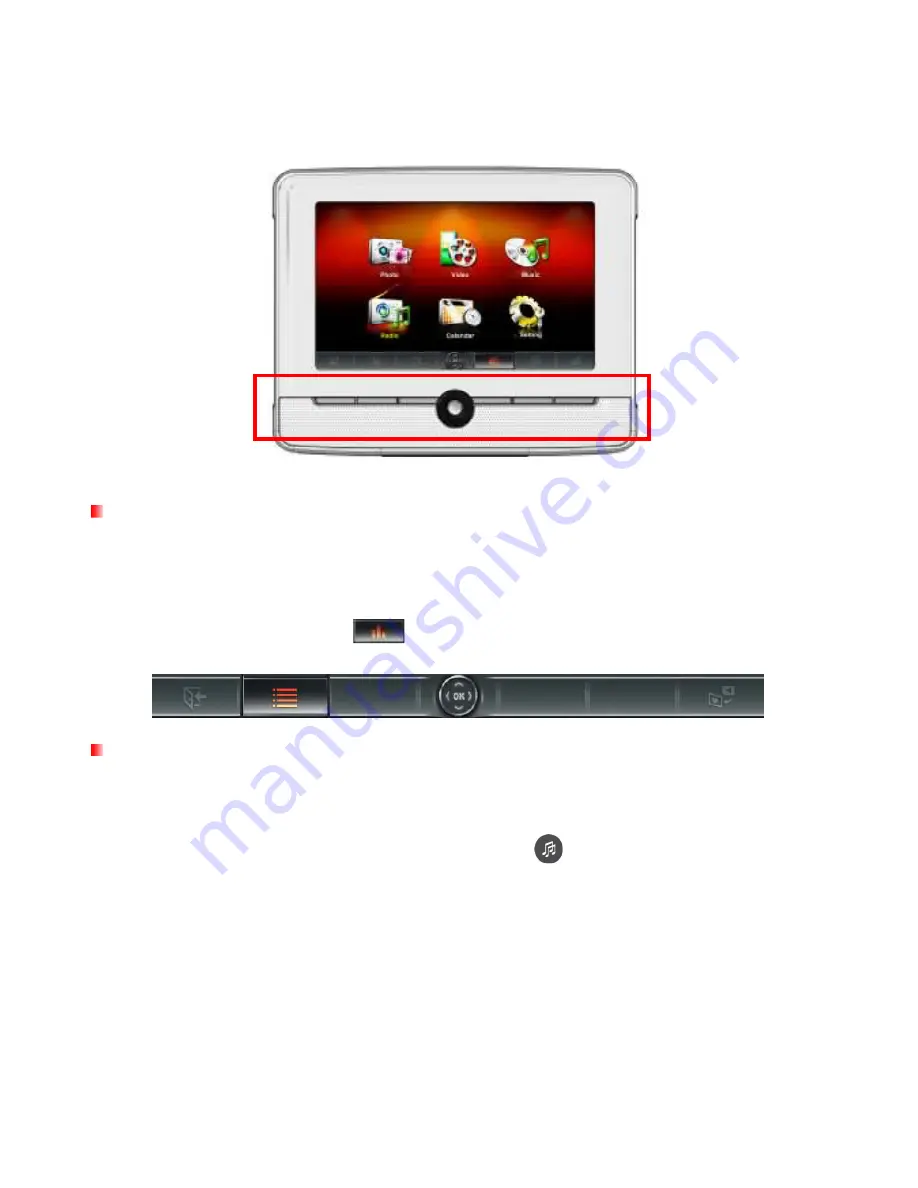
frame.) The central 5-way navigation button can be used for browsing through menus and selecting files, and 

the six menu buttons offer convenient shortcuts to certain Photo frame functions. The function of each menu 

button varies depending on the icon displayed directly above it in the OSD


  On Screen Display (OSD)   

The  On-Screen  Display  menu  will  appear  on  the  bottom  of  the  screen  whenever  any  of  the  menu  or 

navigation buttons on the front of the Photo frame is pressed. The OSD menu buttons offer quick and easy 

shortcuts to some of the functions in the Options menu of each mode. Most of these shortcuts can also be 

accessed with the remote control (see below). Each option is mapped to a rectangular menu button located 

directly  underneath  it.  All  icons  like 

  shown  in  this  User’s  Manual  and  the  Quick  Start  Guide 

represent OSD menu button functions. The OSD menu will disappear after 10 seconds without button input. 


  Remote Control   

Your Photo frame comes with a compact, easy-to-use remote control. You can operate your Photo frame 

with either the navigation and menu buttons on the front of the Photo frame or by using the remote control. 

Note that when using the remote control you should always aim it directly at the front of your Photo frame 

and make sure there are no obstacles in the way. All icons like 

  shown in this User’s Manual and the 

Quick  Start  Guide  represent  functions  that  you  can  access  directly  from  the  remote  control  for  easy, 

straightforward operation of your Photo frame. 

Summary of Contents for PF720

Page 1: ...PF720 Digital Photo Frame User s Manual...

Page 2: ...tion and Menu Buttons 8 On Screen Display OSD 9 Remote Control 9 Connecting to a Computer 11 Windows 2000 XP and Vista 11 Mac OS 10 0 or later 12 Linux Kernel 2 4 or later 13 The Home Menu 14 Photo 14...

Page 3: ...2 Calendar 30 Settings 32 Troubleshooting 38 Specifications 39 Ordering Information 39 Transcend Limited Warranty 40...

Page 4: ...give you step by step instructions and advice to help you get the best experience your new device Please read it in carefully before using the Photo frame Package Contents Upon purchasing your Transc...

Page 5: ...radio station or MP3 song System Requirements System requirements for connecting Photo frame to a computer 100 240V voltage power outlet for the DC adaptor Desktop or notebook computer with a working...

Page 6: ...tal damage or corrosion To protect your health and your hearing keep the Photo frame s music volume below 80 decibels and do not listen for an extended period of time Cleaning The screen is very delic...

Page 7: ...nd one click counter clockwise 3 For Horizontal orientation turn the stand five full clicks counter clockwise until it stops 4 Connect the DC adapter cable to the DC power input jack on your Photo fra...

Page 8: ...ption quality Plug the included FM Antenna into the small 2 5mm jack located on the left side of the Photo frame Using a memory card or USB flash drive 1 Insert a memory card into its appropriate card...

Page 9: ...e volume Press inward on click the volume control wheel to mute You can plug headphones into your Photo frame s headphone jack to enjoy your music more personally The built in speakers will be disable...

Page 10: ...ntrol see below Each option is mapped to a rectangular menu button located directly underneath it All icons like shown in this User s Manual and the Quick Start Guide represent OSD menu button functio...

Page 11: ...lay the next or previous page of available items Go back to the last page or menu Add or delete the current photo video or music file from the Photo frame s internal memory Browse the contents of the...

Page 12: ...ting Photo frame to your desktop or notebook computer Windows Operating Systems have built in drivers to support your Photo frame Upon successful connection to your computer a new Removable Disk drive...

Page 13: ...ve Hardware pop up window will appear Select it to continue 3 A window will appear stating The USB Mass Storage Device device can now be safely removed from the system Unplug your Photo frame from the...

Page 14: ...ecute umount mnt Photo frame to un mount the device Then unplug your Photo frame from the USB port 1 WARNING To prevent data loss always follow the proper removal procedures when disconnecting the Pho...

Page 15: ...ect the Video icon or press to open the Music Explorer Music By selecting the Music option you can playback music on your Photo frame and even choose your favorite song to wake you up in the morning a...

Page 16: ...nt source memory card USB flash drive etc 24 thumbnails per page will be displayed Use the UP DOWN LEFT and RIGHT buttons to navigate to the thumbnail you want to view then press to view the selected...

Page 17: ...ory 24 thumbnails with check boxes will be displayed per page Use the UP DOWN LEFT and RIGHT buttons to move between images and press to check uncheck individual photos Select All Select all items in...

Page 18: ...e Some of these options are available on the remote or by using the menu buttons on the front of the Photo frame 1 Press and use LEFT and RIGHT to highlight the desired menu option 2 Press to access t...

Page 19: ...display photos Playback settings repeat EQ etc applied in MUSIC mode will be used Use on the remote to skip through available songs If there are no music files on the current storage media no music w...

Page 20: ...menu Thumbnail Select this item or press on the remote to jump to Thumbnail mode Photo View Select this item to switch to Photo View mode for zoom in and other functions Background Music Enable or di...

Page 21: ...ess to confirm Slideshow Transition Effects Change the way the screen transitions between each photo In the Transition Effects submenu use the LEFT or RIGHT buttons to select the desired effect and pr...

Page 22: ...s internal memory when the viewing source is a memory card or USB flash drive To remove a photo from the internal memory select My Favorites as the viewing source navigate to the desired thumbnail to...

Page 23: ...djust the volume by using the Volume Control Wheel on the left side of Photo frame or by pressing or on the remote 3 Press to go back to the previous video and to play the next available file 4 Press...

Page 24: ...available on the current storage device Use the UP and DOWN buttons to move to the desired folder You can enter a folder by pressing RIGHT or and exit or move up a level by pressing LEFT or selecting...

Page 25: ...es Normal Repeat one Repeat all Random Normal in folder Repeat in folder and Random in folder Picture Display Mode Change the way pictures are displayed in the Music Player Background Image static pho...

Page 26: ...H Time Displays the current time To start playing music press or on a highlighted song in the Music Explorer The Music Player functions are familiar and easy just like any other player 1 Press to pla...

Page 27: ...stereo station D Frequency Displays the currently selected FM radio frequency E Saved Stations Displays all saved stations and highlights currently selected channel F G Station Frequency Lights up whe...

Page 28: ...and RIGHT to highlight the desired menu option 2 Press to access the highlighted function or open its sub menu 3 Press once to go back to the previous screen 4 Press again to revert to the Home menu A...

Page 29: ...ange the way pictures are displayed in Radio mode Background Image static photo or Slideshow which will consecutively display all pictures on the currently selected media source The background Image c...

Page 30: ...full length and point it in the direction that gives the strongest signal Signal strength may also depend on the location of your home We recommend performing an Auto Scan the first time you use the R...

Page 31: ...the menu buttons on the front of the Photo frame 1 Press and use LEFT and RIGHT to highlight the desired menu option 2 Press to access the highlighted function or open its sub menu 3 Press once to go...

Page 32: ...mage static photo or Slideshow which will consecutively display all pictures on the currently selected media source The background Image can be chosen in Home Photo View Options Set as Background Imag...

Page 33: ...T to highlight the desired menu option 3 Press to access the highlighted function or open its sub menu 4 Press once to go back to the previous screen 5 Press again to revert to the Home menu Language...

Page 34: ...e default alarm sounds or your own personalized Music Alarm or Radio Alarm can be any song or radio station you want The Music Alarm sound can be chosen in Home Music Options Set as Music Alarm and th...

Page 35: ...and press UP DOWN to adjust the value Current Time Press LEFT or RIGHT to select hour or minute and UP DOWN to adjust the value 12H 24H Press UP or DOWN to switch between 12 Hour AM PM and 24 Hour cl...

Page 36: ...rightness of the screen Contrast Press LEFT or RIGHT to make adjustments to the screen s contrast Fullscreen Press UP or DOWN to enable or disable If disabled Photo frame will preserve the original di...

Page 37: ...o Type EXIF Horizontal Vertical Fullscreen Mode Photo frame Orientation Disabled Enabled Disabled Enabled Landscape A Portrait B Restore Defaults This function is available if you want to reset your P...

Page 38: ...will be shown Use LEFT or RIGHT to select Yes and press to perform the system upgrade If you do not want to upgrade press No to return to the Settings menu Note NEVER remove the power cord or any stor...

Page 39: ...o frame to the computer but the Photo frame does not appear as a new drive in my operating system Verify the DC adapter is connected to your Photo frame and that the Photo frame power is turned on If...

Page 40: ...m Power Supply Input 100 240 V 0 3A Output 5V DC 2 0A Picture Formats DSC JPEG up to 8000 x 8000 BMP 800 x 600 Video Formats MPEG1 4 SP ASP Motion JPEG AVI MOV MPG MP4 3GP Up to 720x576 30FPS Music Fo...

Page 41: ...oduct serial or electronic numbers will also void the product warranty This warranty only applies to the product itself and excludes all product accessories including but not limited to card adapters...

Reviews: