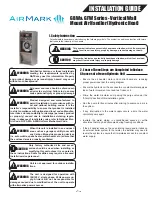
background image

15

10.WIRING DIAGRAM

1. To  avoid  the  electrical  shock,  please  connect  the  air  conditioner  with  the  ground  lug.  The  main  power  plug  in  the  air
conditioner has been joined with the ground wiring, please don't change it freely.
2. The power socket is used as the air conditioner specially.
3. Don't pull the power wiring hard.
4. When connecting the air conditioner with the ground, observe the local codes.
5. If necessary, use the power fuse or the circuit, breaker or the corresponding scale ampere.

Fig.13  AIR FILTER CLEAN

Fig.14  CONTROL WIRING  FOR AC SYSTEMS 

Fig.15 CONTROL WIRING  FOR HP SYSTEMS 

RED

GREEN

24RC

G Fan

Y1 Comp

          W1/B

THERMOSTAT

INDOOR UNIT

OUTDOOR UNIT

G

R

C

Y

C

BLACK

YELLOW

BLACK

W1

W2

24C

    W2

WHITE

BLACK/WHITE

RED

GREEN

          W2

G Fan

Y1 Comp

W1/B

THERMOSTAT

INDOOR UNIT

OUTDOOR UNIT

G

R

C

C

B

BLACK

YELLOW

BLACK

W1

R

Y

D

24C

24RC

RED

BLUE

PURPLE

WHITE

W2

BLACK/WHITE

Summary of Contents for Oxbox J4AC4018A1

Page 1: ...tion or operation Failure to follow these instruction may result in improper installation adjustment service or maintenance possibly resulting in fire electrical shock property damage personal injury...

Page 2: ...orizontal left or downflow Multiple electrical entry locations Field installed electric heater kits 5 7 5 10 15 20 kW available as an accessory Dual front panel design for ease of maintenance Blower a...

Page 3: ...e possibly resulting in fire electrical shock property damage personal injury or death The unit must be permanently grounded Failure to do so can result in electrical shock causing personal injury or...

Page 4: ...lications Top and side power and control wiring accessible screw terminals for control wiring all combine to make the installation easy and minimize installation cost See Fig 6 2 GENERAL CAUTION Make...

Page 5: ...as insulation so that the thickness is more than 2 in and fits inside the installation space opening Respectively condensation may form on the surface of the insulation Be sure to use insulation that...

Page 6: ...5 8 500 21 5 8 550 18 456 UPFLOW UNIT SHOWN UNIT MAY BE INSTALLED UPFLOW DOWNFLOW HORIZONTAL RIGHT OR LEFT AIR SUPPLY Fig 6 DIMENSIONS SUPPLY AIR FLANGES ARE PROVIDED FOR FIELD INSTALLATION ELECTRICA...

Page 7: ...ay from breaker while setting that side of breaker into opening When breaker is in place release tab locking circuit breaker into location in opening Repeat above operation for remaining breaker s if...

Page 8: ...ont service panel removed view AIRFLOW AIRFLOW Fig 9 INDOOR COIL AND DRAIN PAN SET UP HORIZONTAL ADAPTER KIT VAPOR LINE CONNECTION LIQUID LINE CONNECTION PRIMARY DRAIN CONNECTION VERTICAL DRAIN PAN AU...

Page 9: ...en installed in accordance with electrical codes to the unit cabinet Grounding may also be accomplished by attaching ground wire s to ground lug s provided in the unit wiring compartment Ground lug s...

Page 10: ...W Heat Strip 24 36 60 24 36 60 24 36 60 2 7 5kW Heat Strip 3 10kW Heat Strip 4 5 15kW Heat Strip double Breaker panel 20kW Heat Strip double Breaker panel 36 60 36 60 240 208 240 208 5 29 9 26 4 30 30...

Page 11: ...32 1 38 1 43 1 47 1 54 1 59 1 64 SCFM 1103 1073 1036 998 967 934 896 855 814 Power W 233 241 249 258 265 275 281 286 291 Current A 1 97 2 03 2 09 2 16 2 22 2 29 2 34 2 37 2 41 SCFM 898 752 603 511 405...

Page 12: ...1284 1226 1151 1076 946 904 893 869 Power W 143 151 159 168 177 191 197 195 194 Current A 1 23 1 26 1 33 1 41 1 50 1 61 1 63 1 61 1 62 SCFM 1531 1477 1418 1366 1299 1239 1138 1064 1001 Power W 200 211...

Page 13: ...return ductwork grills special filters accessories etc are accounted for in total resistance See airflow performance tables in this manual Design the duct system in accordance with ACCA Manual D Desig...

Page 14: ...recommended that a professional installation technician is contacted to ensure installation of these such filtration systems are installed correctly IMPORTANT Do not double filter the return air duct...

Page 15: ...R MANUAL BOLT 9 FILTER INSTALLATION DIMENSIONS AIR FILTER REMOVAL DIMENSIONAL DATA 1 Remove bolts manually remove air filter recover see in Fig 12 2 Hold the edge of the air filter and extract out 3 C...

Page 16: ...the air conditioner with the ground observe the local codes 5 If necessary use the power fuse or the circuit breaker or the corresponding scale ampere Fig 13 AIR FILTER CLEAN Fig 14 CONTROL WIRING FO...

Page 17: ...ings CAUTION NOT SUITABLE FOR USE ON SYSTEMS EXCEEDING 150V TO GROUND ATTENTION NE CONVIENT PAS AUXINSTALLATIONS DE PLUS DE 150V ALA TERRE FM NOTES 1 Use Copper Wire 75 Min Only Between Disconnect Swi...

Page 18: ...CK FL FL BLUE BLUE 4 1 3 2 CB1 60A W1 WHITE L1 L2 L1 L2 BLUE RED LS LS ELEMENTS ELEMENTS BROWN BLACK 1 2 3 4 5 6 0 15kW HEAT KIT 10kW 5kW HEATER KIT PLUG 4 8 2 6 C 1 0 1 BLACK YELLOW 4 8 2 6 RELAY2 YE...

Page 19: ...60A1C00A 090 factory installed This coil comes with a factory installed piston metering device See Table 1 for factory installed piston size Some system combinations will require a different sized pis...

Page 20: ...19 13 7 70 37 32 26 21 16 10 65 38 34 29 24 19 13 60 40 36 31 27 22 17 55 41 37 34 30 26 21 Superheat F Indoor Temperature F Dry Bulb wet Bulb Outdoor Temp F Charge the system by superheat when using...

Reviews: