background image

General Information

12

COM-SVN01D-EN

Reuse the compressors mounting isolators or mounting
spacers that are used with the existing compressor
assembly.

Braze the compressor into the system. Compressor
connections are copper-plated steel. Use BAg-28, 40%
silver, with paste flux to make the copper tube connections
to the compressor.

Proceed with the following as described in the following
sections:

“Leak Detection,” p. 17

“Vacuum Testing and Evacuation,” p. 18

“Verification Before Start-Up,” p. 19

Electrical Failure

Replace only the failed compressor in a tandem or trio set.

Drain and replace the oil in all the non-failed compressors.

Reuse the compressors mounting isolators or mounting
spacers that are used with the existing compressor
assembly.

Braze compressor into the system. Compressor
connections are copper-plated steel. Use BAg-28, 40%
silver, with paste flux to make the copper tube connections
to the compressor.

Important:

On tandem or trio assemblies, the suction
and discharge lines must not be modified,
except for the use of slip joint couplings.
Other modification may cause oil return
issues and lead to compressor failure. Cut
the lines in a convenient place, remove the
compressor then unbraze the lines from the
compressor. On reinstallation, reinstall
lines to compressor and reassemble the cut
lines with a slip coupling. See

Figure 7, p. 11

for suggested area to cut the discharge and
suction line.

Minimize system and compressor open times to avoid
excessive moisture absorption by the POE oil. Maximum
suggested open time is 15 minutes.

Test the acid condition of the oil in the compressors using
an acid test kit. Use Trane Part Numbers KIT06815,
CHM00414, and KIT06754.

Two Types of Motor Failures

Light.

If oil test kit is negative and oil is only slightly

discolored, treat in the same manner as a mechanical
failure.

Severe.

If oil test kit is positive with strong pungent odor

and dark oil, drain and replace oil in all of the non-failed
compressors.

Reuse the compressor mounting isolators or mounting
spacers that are used with the existing compressor
assembly.

This type of failure requires changing both the suction and
liquid line filter-driers. Use replaceable filter-drier cores to
facilitate changing filter-driers, if required.

Install the suction filters no closer than the distance listed
in the following table. The distance is measured from the
centerline of the suction inlet tee (see

Figure 7, p. 11

).

Braze compressor into the system. Compressor
connections are copper-plated steel. Use BAg-28, 40%
silver, with paste flux to make the copper tube connections
to the compressor.

Proceed with the following as described in previous
sections:

“Leak Detection,” p. 17

“Vacuum Testing and Evacuation,” p. 18

“Charging the System,” p. 19

“Verification Before Start-Up,” p. 19

Figure 8.

Minimum distance before installation of
suction line filter

X Minimum Distance

Compressor Model “X” Distance

CSHD

 10 inches

CSHN tandem

 16 inches

CSHN trio

 25 inches

1. Use acid removal type filter-drier cores in both the

suction filter and liquid line filter drier.

2. Change when the pressure drop exceeds 4 psig.

CSHN/CSHL models

Test oil after 24 hours of operation. Change filter-drier
again if required. If oil is still acid, drain and replace oil in
all the non-failed compressors.

After system is clean, test kit indicates okay, remove the
suction clean up filter-drier and replace the liquid line drier
with standard filter drier cores.

CSHD models

Since CSHD compressors do not have an oil drain valve
that allows complete oil charge removal, it is
recommended that after 24 hours of operation, the filter-
drier cores be replaced with acid removal filter-drier cores.
Operate the system for another 24 hours before changing
to remove the suction filter-drier and install a standard
filter-drier in the liquid line.

Summary of Contents for CSHD

Page 1: ...on starting up and servicing of heating ventilating and air conditioning equipment can be hazardous and requires specific knowledge and training Improperly installed adjusted or altered equipment by a...

Page 2: ...nt that is used in these service procedures In addition some states or municipalities may have additional requirements that must also be adhered to for responsible management of refrigerants Know the...

Page 3: ...gases and extremely corrosive acids WARNING Explosion Hazard Failure to follow these instructions could result in death or serious injury or equipment or property only damage Use only dry nitrogen wit...

Page 4: ...ed in this document are the trademarks of their respective owners Revision History Updated Model Number Descriptions chapter Updated Torque values table in General Information chapter Updated Oil chan...

Page 5: ...Inspections 10 Repair Recommendations 11 Mechanical Failure 11 Electrical Failure 12 Two Types of Motor Failures 12 Removal and Installation 13 Removal 13 Compressor Replacement Tandem and Trio Compr...

Page 6: ...tenance IOM manuals The following table lists these IOMs by unit type Unit Type IOM a a Installation Operation and Maintenance IOM manuals listed here are current as of Februaryl 2015 Check e Library...

Page 7: ...76 176 MBtu h CSHN 184 184 MBtu h CSHN1 240 240 MBtu h CSHN 250 250 MBtu h CSHN1 315 315 MBtu h CSHN 374 374 MBtu h CSHN CSHL Digit 8 Voltage J 200 230 60 3 K 460 60 3 380 415 50 3 D 575 60 3 X 380 60...

Page 8: ...it absorbs moistureveryreadily Therefore itisimportanttoproperly handle the oil POE Oil handling guidelines Always use the smallest container size required for the job requirements Always leave the o...

Page 9: ...transported in the upside position droppedortippedovercouldresultininternaldamageto the compressor and it is recommended that the compressor not be put into service Damage to compressor or packaging...

Page 10: ...part number Compressor is the correct voltage Compressor ship with items Restrictors for use with tandem and trio compressors Oil equalizer Teflon gaskets WARNING R 410A Refrigerant under Higher Press...

Page 11: ...em or trio assemblies the suction and discharge lines must NOT be modified except for the use of slip joint couplings Other modification may cause oil return issues and lead to compressor failure Cut...

Page 12: ...as a mechanical failure Severe If oil test kit is positive with strong pungent odor and dark oil drain and replace oil in all of the non failed compressors Reuse the compressor mounting isolators or...

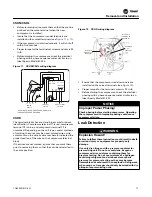
Page 13: ...service technician to perform a safe and successful compressor replacement Removal WARNING Pressurized Burning Fluid Failure to follow these instructions could result in death or serious injury Befor...

Page 14: ...ndem or trio set 1 Only replace the failed compressor 2 On tandem or trio assemblies the suction and discharge lines must not be modified except for the use of slip joint couplings Other modifications...

Page 15: ...m due to POE oil Remove the rubber plugs only when ready to install the compressor Plug other compressor on tandem or trio compressors Before removing the oil equalizer connection cap place a can pan...

Page 16: ...osive and could lead to long term problems and equipment damage if not properly removed Tandem two compressors and trio combinations three compressors with uneven compressor combinations requires the...

Page 17: ...g diagram Ensure that the compressor model terminals are installed on the correct terminals see Figure 12 Proper torque for the terminal screws is 25 in lb Before starting the compressor check the ele...

Page 18: ...pressurizing the system use an R 410A leak detection device to detect and locate leaks Vacuum Testing and Evacuation Use the procedure as described in the unit Installation Operation and Maintenance...

Page 19: ...tion and discharge service valves close them during the charging procedure Water chiller units Always operate the chilled water pumps while charging the unit to prevent freezing the evaporator Verific...

Page 20: ...operating Do not overcharge the unit Recommended system full load superheats unless specified differently in the unit Installation Operation andMaintenancemanual see LiteratureReferenced p 6 is 16 F 2...

Page 21: ...mpressor superheat subcooling oil sump superheat voltage and amperage Check all of the following on a regular basis System operating conditions System refrigerant charge level Oil levels and oil color...

Page 22: ...g valve may be stuck and not switched properly bypassing from the high side to the low side of the system this situation is indicated by an extremely warm suction inlet to the compressor Model CSHN374...

Page 23: ...lywiredintothesystem safety circuit If the motor is believed to be incorrectly phased change two of the three wires PTC Overheat motor over temperature over current Compressor motor drawing too much c...

Page 24: ...PTC open replace compressor Resistance 0 ohms PTC shorted replace compressor Resistance 2750 ohm Wait until the motor has cooled down and resistance is less than 2750 ohms reconnect and try to reset...

Page 25: ......

Page 26: ......

Page 27: ......

Page 28: ...are committed to using environmentally conscious print practices Trane by Trane Technologies NYSE TT a global climate innovator creates comfortable energy efficient indoor environments for commercial...

Reviews: