background image

8  

Manually Set up a Schedule

4

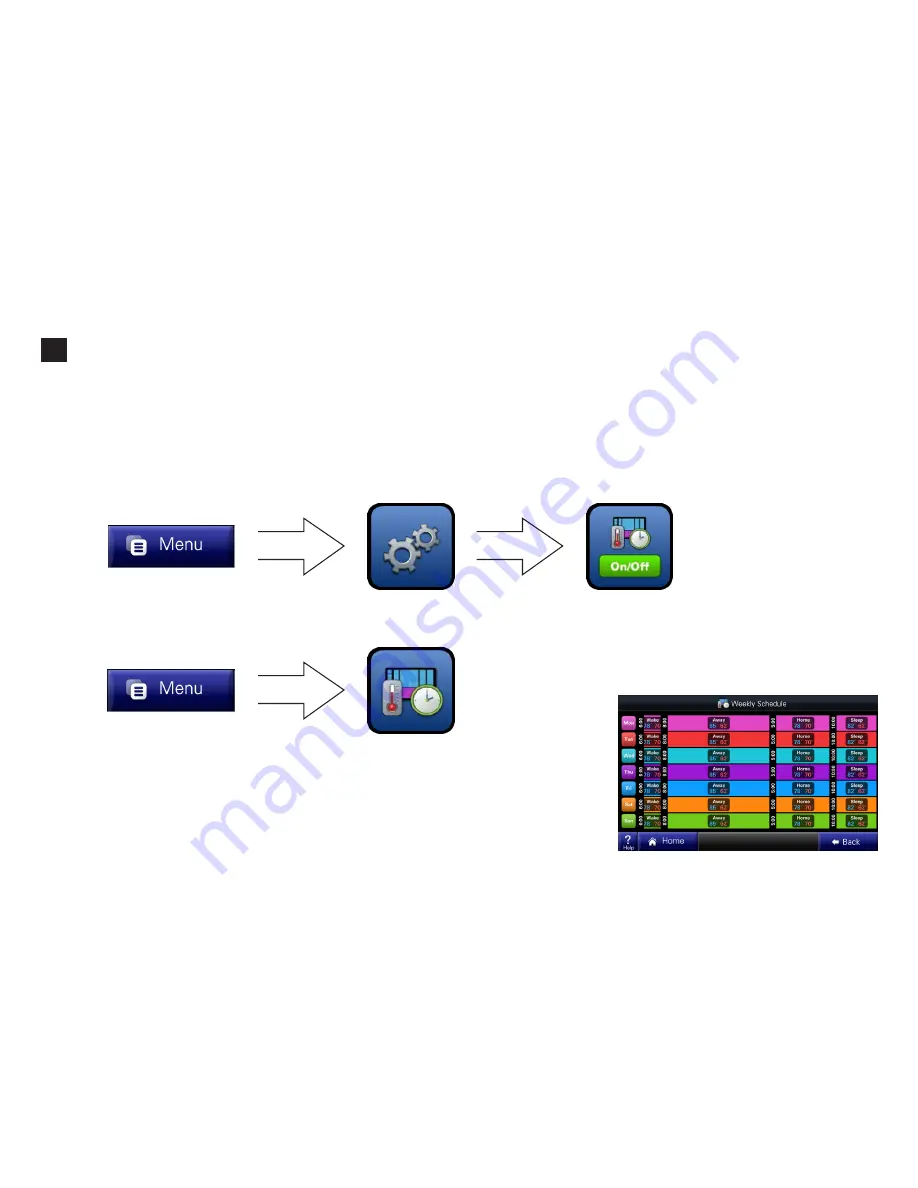
1) Turn Scheduling On (and select Manual Scheduling)

2) Enter the Schedule Menu
 

3) Select a day or time period
 

By default the schedule shows the periods Wake, Away, Home and Sleep. Each day 

can have its own schedule and each schedule will be a unique color.

Default
Schedule

The procedure below describes setting up a manual schedule. Scheduling can also be set up via Guided Scheduling which creates a schedule by 
asking you a series of questions. Guided Scheduling can also be selected in the screen below.

Summary of Contents for ComfortLink II XL950 Control

Page 1: ...User s Guide ComfortLink II XL950 Control ...

Page 2: ...Interactive Touchscreen 1 Touch Presets Built in Help Screens Operating Runtime Analysis System Alerts Lock Screen Security Custom Screen Options Screen Savers Ten Year Registered Warranty The ComfortLink II control integrates home comfort into your personal lifestyle like nothing you ve ever seen before Amazingly versatile incredibly advanced ...

Page 3: ...other implement can damage the screen CAUTION Use only a soft damp cloth to clean the screen CAUTION Customizable Customize the screen to suit your unique needs You can setup shortcuts and an easy access dashboard on the Home screen You can change the colors and enjoy a photo slideshow Table of Contents Introduction 1 4 Buttons and Navigations 5 System Fan Air Cleaner Modes 6 7 Scheduling Programm...

Page 4: ... with just a few button touches Manually change setpoints or use convenient Home Away and Sleep presets View big bold at a glance system status See current system status Use context sensitive help Choose the dashboard items that show in this section Easy to use Everything is just a touch away ...

Page 5: ...E You may access the Menu screen by pressing the Menu button on the home screen You may access the Settings Menu by pressing the Settings button from the Menu screen EXAMPLE In the following sections button sequenc es will be shown with icons For example the se quence on this page would be represented this way ...

Page 6: ...witch between heating and cooling automatically Heating and Cooling modes are dedicated modes For example you may wish to set your sys tem to Heating in winter months so your cooling unit does not run Likewise you may wish to set your system to Cooling in summer months so that your furnace does not run To completely turn off your system select Off 2 Fan Mode In Auto Fan Mode the sys tem s fan will...

Page 7: ...hen not actively heating or cooling to 100 for 24 hours to achieve maximum clean air delivery rate Selecting Ventilation allows the user to temporarily override the programmed run time Cooling Setpoint Panel Heating Setpoint Panel Raise Lower To adjust the Heating Setpoint select Heating and raise or lower the temperature to reach your desired setpoint To adjust the Cooling Setpoint select Cooling...

Page 8: ...ows the periods Wake Away Home and Sleep Each day can have its own schedule and each schedule will be a unique color Default Schedule The procedure below describes setting up a manual schedule Scheduling can also be set up via Guided Scheduling which creates a schedule by asking you a series of questions Guided Scheduling can also be selected in the screen below ...

Page 9: ...e during weekdays Example B Example B is for someone who is out of town Monday Thursday 5 Adjust the Time for each period Select a period one at a time and set its beginning time by pressing the Time button Press the Temperature button to adjust the setpoints for each period NOTE Notice that you can delete or add periods maximum 6 per day 6 Adjust the Temperature for each period Press the Temperat...

Page 10: ...d must remain inserted to view the photos and the SD card must remain unlocked You can set up a photo album and a screen saver using your own photos Photo Album View and set up your photo album Required Photo Formats Photos on your SD card must be in jpg jpeg bmp png or gif formats and each photo must be less than 3MB in file size Recommended SD Cards SD SDHD SD Adapter microSD miniSD ...

Page 11: ...d all the way you will see this message 2 Images will be loaded from your SD card into the viewer and sized to fit the screen 4 In thumbnail view you can view up to 15 photos at time You can also see or select which photos will be in cluded in a slideshow 5 After you have selected which photos to include in your slideshow press Settings to configure the Screen Saver Or navigate to the Screen Saver...

Page 12: ...en Saver shows the cur rent temperature as a floating icon over a darkened black screen Select Image Screen Saver if you have inserted an SD card and added photos to a slideshow 3 Set the number of seconds before the next photo will display Screen Saver A standard or a custom photo screen saver can be selected ...

Page 13: ... and Vacations Set up how your system will operate for special events or when you are away from home for extended periods Name Your System Give your system a name This is very important if you have more than one system in your home Dealer Information Contact your dealer by using contact information in the Service menu ...

Page 14: ...t time date and time zone If a wireless network is set up the time can be automatically synced via the internet System Runtime History System Runtime History monitors how much your system runs for both heating and cooling and also displays the average indoor temperature and outdoor high and low temperatures This data allows you to better manage your utility costs by seeing when and how much your s...

Page 15: ...eless network to enable weather and software update features See the following section for setup details 802 11 B G wireless router and internet required Humidity You may see and adjust the humidity level in your home and adjust the humidity setpoints for both Heating and Cooling modes for systems equipped with humidity control ...

Page 16: ...llation If your personal wireless network is a secure network you will need the password IMPORTANT After wireless networking is enabled you will need to register your system with a valid email address before the weather data will be displayed 1 Your control can access real time weather conditions fore casts and alerts 2 You can download software up dates for efficient operation and the ability to ...

Page 17: ... from a list of available wireless net works Enabling Wireless Networking 7 1 1 Enter the Wireless Network Setup Menu NOTE If the router is configured to not broadcast its SSID refer to Advanced Network Settings Once the wireless radio is turned On two pop up messages will appear prompting the user to name the system and change the System Password ...

Page 18: ...ormation Available broadcasting networks with an adequate signal strength will display their SSIDs Service Set IDentifiers in this screen A closed lock icon next to the SSID indicates a secure network An open lock indicates a non secure open network Select your network and press Connect If a Network Not Found message is displayed verify the wireless network is function ing and within range Consult...

Page 19: ...to provide the required informa tion 1B If the network is secured with a closed padlock the following mes sage will be dis played 3 The control will connect to the wireless network 4 When the control has successfully joined the wire less network the name of the network will be displayed with a green dot to the left and a signal strength indicator to the right Enter Network Key Password 7 3 ...

Page 20: ...mation 7 4 Enter the Advanced Network Setup Menu IMPORTANT The Advanced Network screens are intended for individuals with networking familiarity You or your network administrator will need to provide the required information If any of this information is unknown or for questions specific to the wireless router please consult the router documentation or your network administrator ...

Page 21: ...e Network Security button in this Ad vanced Network Settings menu will be highlighted by default 4 Select a network security type NOTE WEP Shared is not supported 3 Enter the SSID Name using the on screen keypad When the network s SSID is not broadcast hidden manual configuration in this screen is required Network Security 7 5 ...

Page 22: ...ion may be required in a non broadcast network where IP addresses are assigned by DHCP You may connect to the network without modifying the Host Settings 3 Enter the IP address as required for each 4 To manually select a DNS server enter IP address es 1 Select the Host Settings button to access the second screen of settings in this Ad vanced Network Settings menu 2 Select IP Address Gateway and Su...

Page 23: ... When joining a different network the current router must be discon nected in this menu before a new one may be selected In addition if settings are changed on the owner s router the network may need to be disconnected and reconnected in this menu Repeat previous steps to connect to a different network The Network Properties screen displays the control s current network informa tion Network Proper...

Page 24: ...rrent condition 3 In zoned environments the main screen display will change to indicate the presence of mul tiple zones Notice the new zone button la beled Upstairs at right Arrow buttons navigate between zone views 1 In a zoned environ ment the Zones but ton will appear in place of the System button see picture at right ...

Page 25: ...may be set in the Zone Names screen The Rename System and Rename Zone buttons al low entering custom names from a keypad Pre configured names are also available 6 A schedule for one zone can be copied to another 7 Each zone s schedule can be viewed by cy cling through the zones using the arrows in the top left corner ...

Page 26: ...il address 3 An email containing a verification code will automatically be sent to the email address you entered Registration is required for Weather Software Updates and Nexia Home Ingelligence integration Registration ensures that your control is using the most up to date software and will also let you take advantage of exciting new features in the future You will be notifed via email when there...

Page 27: ...tely via an internet connected computer and most smart cell phones via Nexia Home Intelligence Visit www nexiahome com to learn more 1 Visit www nexiahome com to sign on and add your new control to your account or click on Ready to setup a Nexia Home Intelligence system Get started here to set up a new Nexia account 2 Follow the online instructions to add your control to your account 3 When you ad...

Page 28: ... web browser and your computer download the latest sofware upgrade image from the trane com website and place this computer file on an SD card After transfer ring the SD card from your computer to the control select Check for upgrades on SD Card as shown in the screen at right Follow the instructions to upgrade your control Additional instructions are found on the trane com website Requirements Yo...

Page 29: ...sses Remove and re install the control as shown below The boot up process may take several minutes Re Install Control Re install control flat onto sub base being careful to align unit correctly with the sub base before applying force Control should fit snug and not rock when properly installed Remove Control Remove control from its sub base by grasping at edges and gently pulling the control strai...

Page 30: ...which will remain in the menu bar Dealer Information can also be accessed by this path System Alerts 1 When your system indicates an issue with communication or operation an alert will display on the screen Click the Dealer Contact Info to retrieve your dealer s phone numbers and website informa tion ...

Page 31: ...ver The 950 automatically performs these four test each time the Network Diagnostics screen is entered Optionally the user can manually perform these tests 1 Weather Service receive current weather conditions 2 Registration Service send Registration Information and Data Logs to the 950 server and 3 Nexia Service send and receive information from the Nexia server If a Service is unavailable or if a...

Page 32: ...t any and all proof of Product purchase or installation and or closing date of the residence WHAT COMPANY WILL DO Company may request proof of Product purchase and or installation in order to provide Product parts under this limited warranty As Company s only responsibility and Purchaser s only remedy under this limited warranty Company will furnish a replacement part to the licensed HVAC service ...

Page 33: ...t only manufacturer approved and genuine alternate refrigerants shall be used The use of contaminated counterfeit non genuine or non manufacturer approved alternate refrigerant will void this limited warranty 3 All Products Products include a liquid line filter drier which must be replaced when a compressor replacement is necessary A suction line filter drier must be added for compressors defined ...

Page 34: ...P ZDAMPRD ZDAMPSM ZDAMPBM ZDAMPRR Base Limited Warranty Period five 5 years Registered Limited Warranty Period ten 10 years HUMIDIFIERS HUMD200 HUMD300 HUMD500 Base Limited Warranty Period five 5 years Registered Limited Warranty Period ten 10 years ENERGY RECOVERY VENTILATOR ERV ERVR100 ERVR200 ERVR300 Base Limited Warranty Period five 5 years Registered Limited Warranty Period ten 10 years AIR C...

Page 35: ...t the dealer or an experienced radio TV technician for help This device complies with Part 15 of the FCC Rules and Industry Canada Operation is subject to the following two conditions 1 This device may not cause harmful inter ference and 2 This device must accept any interference received including interference that may cause undesired operation FCC IC Caution Any changes or modifications not expr...

Page 36: ...5070 05 The manufacturer has a policy of continuous product and product data improve ment and it reserves the right to change design and specifications without notice 6200 Troup Highway Tyler TX 75707 2013 Trane ...

Reviews: