background image

28

A801X-SVX001-1A-EN

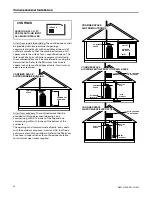
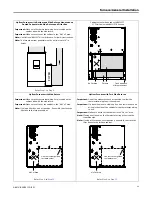
FURNACE

CONFINED

LESS THAN 50 CU. FT. 
PER 1000 BTU/HR INPUT
ALL EQUIP. INSTALLED

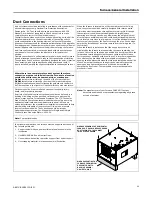
All air from inside the building The confined space shall
be provided with two permanent openings
communicating directly with an additional room(s) of
sufficient volume so that the combined volume of all
spaces meets the criteria for an unconfined space. The
total input of all gas utilization equipment installed in
the combined space shall be considered in making this
determination. Refer to the Minimum Free Area in
square inches for confined spaces table, for minimum
open areas required.

CONFINED SPACE

AIR FROM INSIDE BUILDING

CONFINED 

SPACE

PERMANENT

OPENINGS

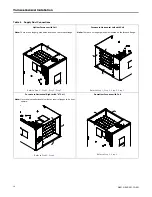
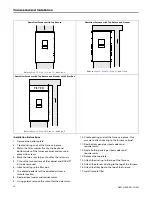
All air from outdoors The confined space shall be
provided with two permanent openings, one
commencing within 12 inches of the top and one
commencing within 12 inches of the bottom of the
enclosure.

The openings shall communicate directly, or by ducts,
with the outdoors or spaces (crawl or attic) that freely
communicate with the outdoors. Refer to the Minimum
Free Area in square inches for confined spaces table,
for minimum open areas required.

CONFINED SPACE

AIR FROM OUTDOORS

CONFINED 

SPACE

OUTLET

OUTDOOR 

AIR DUCTS

INLET

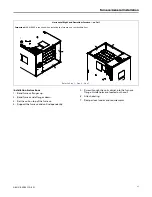
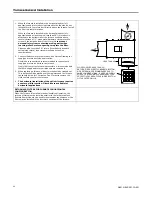
CONFINED SPACE

AIR FROM VENTILATED ATTIC/CRAWL SPACE

CONFINED 

SPACE

ALTERNATE

INLET AIR

INLET

AIR DUCT

OUTLET

AIR

ATTIC LOUVERS

TO OUTDOORS

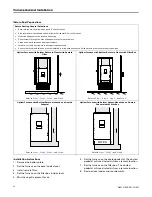
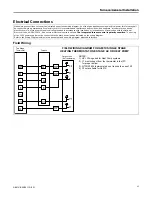
CONFINED SPACE

AIR FROM VENTILATED ATTIC

CONFINED 

SPACE

INLET

AIR DUCT

OUTLET

AIR

ATTIC LOUVERS

TO OUTDOORS

F

Fu

urrn

na

acce

e G

Ge

en

ne

erra

all IIn

nsstta

alllla

attiio

on

n

Summary of Contents for A801X026AM2SC

Page 1: ...X S SV VX X0 00 01 1 1 1A A E EN N Upflow Downflow Horizontal Left Right Gas Fired Single Stage Induced Draft Furnaces with High Efficiency Motor U Up pf fl lo ow w D Do ow wn nf fl lo ow w H Ho or ri...

Page 2: ...E EC CT TR RI IC CA AL L S SH HO OC CK K F FI IR RE E O OR R E EX XP PL LO OS SI IO ON N H HA AZ ZA AR RD D F Fa ai il lu ur re e t to o f fo ol ll lo ow w t th hi is s W Wa ar rn ni in ng g c co ou u...

Page 3: ...p pe er rs so on na al l i in nj ju ur ry y o or r d de ea at th h D Do o N NO OT T a at tt te em mp pt t t to o m ma an nu ua al ll ly y l li ig gh ht t t th he e f fu ur rn na ac ce e W WA AR RN NI...

Page 4: ...f f b be ef fo or re e s se er rv vi ic ci in ng g f fi il lt te er rs s t to o a av vo oi id d c co on nt ta ac ct t w wi it th h m mo ov vi in ng g p pa ar rt ts s W WA AR RN NI IN NG G C CA AR RB B...

Page 5: ...de ed d t th ha at t a an n e ex xt te er rn na al l o ov ve er rf fl lo ow w d dr ra ai in n p pa an n b be e i in ns st ta al ll le ed d i in n a al ll l a ap pp pl li ic ca at ti io on ns s o ov v...

Page 6: ...do ow ws s b be et tw we ee en n t th he e s sp pa ac ce e i in n w wh hi ic ch h t th he e a ap pp pl li ia an nc ce e s s c co on nn ne ec ct te ed d t to o t th he e v ve en nt ti in ng g s sy ys s...

Page 7: ...Check 22 Gas Valve Adjustment 23 High Altitude Derate 24 General Venting 25 Air for Combustion and Ventilation 27 Duct Connections 29 Return Air Filters 35 Electrical Connections 37 Field Wiring 37 T...

Page 8: ...NG G Only qualified personnel should install and service the equipment The installation starting up and servicing of heating ventilating and air conditioning equipment can be hazardous and requires sp...

Page 9: ...SP PSC PSC PSC Drive No Speeds Direct 1 Direct 1 Direct 1 Direct 1 Motor RPM 3300 3300 3300 3300 Volts Ph Hz 120 1 60 120 1 60 120 1 60 120 1 60 FLA 1 39 0 30 0 30 0 30 Inducer Orifice 0 90 1 20 1 15...

Page 10: ...city High Velocity High Velocity High Velocity Hi Vel No Size Thk 1 16 X 25 1 in 1 20 X 25 1 in 1 20 X 25 1 in 1 24 X 25 1 in VENT PIPE DIAMETER Min in 4 Round 4 Round 4 Round 4 Round HEAT EXCHANGER T...

Page 11: ...ent must come from outside the structure g The Furnace return air temperature range is between 55 and 80 Fahrenheit 80 models 55 F 90 models 45 F h Clean the Furnace duct work and components upon subs...

Page 12: ...ums stated in Clearance Table below Minimum clearance to combustible materials 3 Is there sufficient space for servicing the Furnace and other equipment A minimum of 24 inches front accessibility to t...

Page 13: ...anent wave solutions b Chlorinated waxes and cleaners c Chlorine based swimming pool chemicals d Water softening chemicals e De icing salts or chemicals f Carbon tetrachloride g Halogen type refrigera...

Page 14: ...14 A801X SVX001 1A EN Outline Drawing...

Page 15: ...1 Blower Tap for Heating Mode rUn Orn Orientation Err Active Alarm Menu E01 L6F Last 6 Faults To Clear Hold Option Button 5 sec E08 Flame current is low but still strong enough to allow operation Cr C...

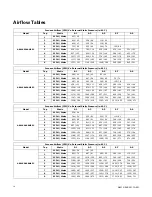
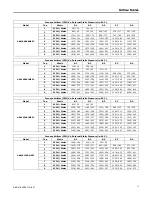
Page 16: ...9 1029 244 960 269 891 294 9 SCFM Watts 1556 398 1474 416 1392 435 1310 453 1228 471 Furnace Airflow CFM Vs External Static Pressure in W C Model Tap Static 0 1 0 3 0 5 0 7 0 9 A801X040BM2SC 1 SCFM Wa...

Page 17: ...2 1656 609 9 SCFM Watts 2533 931 2414 932 2295 933 2176 933 2058 934 Furnace Airflow CFM Vs External Static Pressure in W C Model Tap Static 0 1 0 3 0 5 0 7 0 9 A801X100CM5SC 1 SCFM Watts 821 55 442 5...

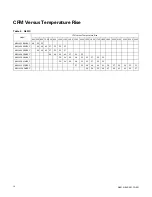
Page 18: ...0 1600 1700 1800 1900 2000 2100 2200 2300 2400 A801X026AM2SC 48 39 32 A801X040AM3SC 59 49 42 37 33 30 27 A801X040BM2SC 59 49 42 37 33 30 27 A801X060BM4SC 56 49 44 40 37 34 32 A801X080BM4SC 59 54 49 46...

Page 19: ...position The horizontal furnace installation in an attic should be on a service platform large enough to allow for proper clearances on all sides and service access to the front of the furnace See the...

Page 20: ...ght side of the furnace in the upflow orientation Automatic Gas Valve with Manual Shut off Main Manual Shut off Valve Ground Union Joint Drip Leg 1 8 NPT Test Fitting Furnace in downflow orientation w...

Page 21: ...iping out bottom Automatic Gas Valve with Manual Shut off Main Manual Shut off Valve Ground Union Joint Drip Leg 1 8 NPT Test Fitting Furnace in horizontal right orientation with gas piping out top Au...

Page 22: ...EET PER HOUR OF GAS FOR VARIOUS PIPE SIZES AND LENGTHS PIPE SIZE LENGTH OF PIPE 10 20 30 40 50 60 70 1 2 131 90 72 62 55 50 46 3 4 273 188 151 129 114 104 95 1 514 353 284 243 215 195 179 1 1 4 1060 7...

Page 23: ...hite Rodgers gas valve model 36J 4 Turn on system power and make a call for heating 5 Adjust gas heat by removing the low LO adjustment regulator cover screw a To increase outlet pressure turn the reg...

Page 24: ...ithin the unit to the OFF position Turn the external gas valve to ON Purge the air from the gas lines After purging check all gas connections for leaks with a soapy solution DO NOT CHECK WITH AN OPEN...

Page 25: ...aximum capacity Masonry Chimney Kit BAYVENT800B may be used with these furnaces Upflow model furnaces only to allow venting into a masonry chimney Refer to the BAYVENT800B Installer s Guide for applic...

Page 26: ...tion of the National Fuel Gas Code ANSI Z223 1 latest edition 10 Vent connectors serving appliance vented by natural draft or non positive pressure shall not be connected into any portion of a mechani...

Page 27: ...OORS FURNACE WATER HEATER CLOTHES DRYER UNCONFINED 50 CU FT OR MORE PER 1000 BTU HR INPUT ALL EQUIP INSTALLED C Co on nf fi in ne ed d spaces are installations with less than 50 cu ft of space per 100...

Page 28: ...PENINGS All air from outdoors The confined space shall be provided with two permanent openings one commencing within 12 inches of the top and one commencing within 12 inches of the bottom of the enclo...

Page 29: ...rnaces not equipped with a cooling coil it is recommended that the outlet duct be provided with a removable access panel The opening shall be accessible when the furnace is installed and shall be of s...

Page 30: ...no longer guide holes located on the furnace flange Refer to Step 1 Step 3 Step 5 Step 7 Refer to Step 1 Step 4 Step 5 Step 7 Furnace in Horizontal Right with A Coil Downflow Furnace with Coil Refer t...

Page 31: ...on n I In ns st tr ru uc ct ti io on ns s 1 Bend furnace flanges up 2 Bend furnace side flanges down 3 Set the coil on top of the furnace 4 Support the furnace and coil independently 5 Screw through t...

Page 32: ...with Bottom Return in Closet with Filter Box FILTER Refer to Step 1 Step 4 Step 5 and Step 8 Upflow Furnace with Bottom Return Mounted on a Ducted Pedestal Refer to Step 1 Step 6 Step 3 and Step 8 Up...

Page 33: ...net side with the side return Important Make sure not to cut the cabinet in the No Cut area Note If using a filter box use a transition if possible to attach the filter box to the furnace cabinet Impo...

Page 34: ...cut out for the return air 5 Cut out the two sections of the cabinet and BAYLIFT kit to be removed 6 Attach ducting to the filter box 7 The ducted pedestal will use ducted air from a remote location...

Page 35: ...r Installations All return air duct systems should provide for installation of return air filters 1 Determine the appropriate position to set the furnace in order to connect to existing supply and ret...

Page 36: ...ucts to the furnace If only the front of the furnace is accessible it is recommended that both supply and return air plenums are removable 3 When replacing a furnace old duct work should be cleaned ou...

Page 37: ...integrated furnace control is polarity sensitive The hot leg of the 120V power supply must be connected to the black power lead as indicated on the wiring diagram Refer to the Wiring Diagram section...

Page 38: ...FURNACES TWINNING CONNECTION DIAGRAM 1 STAGE HEAT 1 STAGE COOLING WITH TRANSFORMER THERMOSTAT 1 STAGE HEATING 1 STAGE COOLING THERMOSTAT FURNACE NO 1 FURNACE NO 2 ISOLATION RELAY FIELD SUPPLIED ISOLA...

Page 39: ...he e f fu ur rn na ac ce e To shut off For complete shutdown Turn the toggle or control switch located on the main gas valve inside the unit to the OFF position and the external main gas shutoff valve...

Page 40: ...5 Venting Options for Upflow Applications Refer to the illustrations below to find the approved venting options for upflow furnace Important The exhaust must be vented to the outdoors Upflow Orientat...

Page 41: ...Downflow Applications Refer to the illustrations below to find the approved venting options for downflow furnace models Important The combustion air exhaust must be vented to the outdoors Note 4 Type...

Page 42: ...crews are recommended for attaching the vent pipe to the inducer outlet applicable to all the instructions below Upflow orientation with top venting Refer to Step 1 Upflow orientation with left side v...

Page 43: ...n ns s 1 No changes need to be made to the inducer when installing the furnace in upflow position when vented through the top 2 Before proceeding lay unit on its back to make the conversion easier 3 R...

Page 44: ...ssing the MENU key and then depress the OPTION key to the desired setting Then momentarily depress the MENU key again to save the change 180 C1 7 C1 1 C1 2 C1 3 C1 4 HtP Heating Speed Tap H1 5 H1 1 01...

Page 45: ...enu key then push the op on key The LED will flash three mes then begin the test To exit the test mode momentarily push the Menu key cycle power to the furnace or make a valid thermostat call for capa...

Page 46: ...A Blower housing and wheel removed from view for clarity Furnace Model Dimension A inches A026 3 5 3 1 2 A040 3 75 3 3 4 B040 3 5 3 1 2 B060 4 ton 4 25 4 1 4 B080 4 25 4 1 4 2 375 A Blower housing and...

Page 47: ...eo Evaporator Coil Clean Filter Furnace Airflow CFM Vs External Static Pressure in W C Model Tap 0 1 0 3 0 5 0 7 0 9 A801X080BM4S 1 633 297 2 957 800 719 428 213 3 1220 1080 940 800 660 4 1403 1298 11...

Page 48: ...en lost one hour lockout after 10 times e2 3 1st Stage Gas Valve Not Energized When It Should Be exceeded after 10 times e3 Shorted Pressure Switch 1st Stage e3 2 Open Pressure Switch 2nd Stage e04 Op...

Page 49: ...Factory Defaults 1 Display must be in Idle Mode 2 Push the Menu and Option buttons at the same time for 15 seconds then release 3 The 7 segment will flash FD 3 times This confirms the unit has been r...

Page 50: ...erty damage including death Troubleshoo ng Flowchart Index IFC Component Layout Ge ng Started Error Codes E2 1 Retries Exceeded flame never sensed E2 2 Recycles Exceeded loss of flame a er being sense...

Page 51: ...NU and OPTION Select Buttons 5 Amp Fuse Flame Current FP HLI W R G B C Y Y1 Inducer Igniter Connector IGN N IND N IND H IGN H MV GND TH MVC HLO PS1 TR ILI 6 Pin CTM Motor Connector Tap 1 Low Speed Tap...

Page 52: ...0 VAC measured at transformer NO Is 120 VAC measured between Line and Neutral at the IFC NO Is 120 VAC measured between Line and Neutral at J box NO Verify Panel Loop is connected YES Repair high volt...

Page 53: ...gas pressure connector Is inlet gas pressure above 13 8 WC or less than nameplate minimum NO Correct inlet gas pressure Maximum pressure is 13 8 WC Check opera on YES There are two flame sense pads l...

Page 54: ...electrical power to furnace Connect manometer to manifold pressure connector NO YES NO Disconnect electrical power to furnace Connect manometer to inlet gas pressure connector Cycle power to furnace...

Page 55: ...the PS1 indica ng that the pressure switch is closed when it should be open In most cases the pressure switch is not the problem NOTE Verify pressure switch wiring and tube rou ng are correct 3 1 Fau...

Page 56: ...sure switch wiring and tube rou ng are correct Note 2 Measured pressure is nega ve greater than refers to magnitude only 3 2 Fault Code NO Cycle power to the furnace and call for 1st stage heat NO Pos...

Page 57: ...NO Increase blower off delay YES DEFINITION Limit switches are safety devices that will open when an abnormal high temperature has been sensed REMOVE ALL JUMPER WIRING TO SWITCHES Under no circumstanc...

Page 58: ...an comes on do flames stay consistent Replace heat exchanger Check opera on NO Replace Roll out switch Check opera on YES DEFINITION Limit switches are safety devices that will open when an abnormal h...

Page 59: ...Code and Installa on Instruc ons YES NO Disconnect power to unit Turn off gas supply Remove gas valve 05 Fault Code Is flame current measured across FS pads YES Is flame seen with no call for heat YES...

Page 60: ...al and ground problem Furnace must be on a dedicated circuit YES 6 1 Fault Code DEFINITION Ground Fault Incoming or chassis ground connec on is not sensed Connect volt meter to black incoming and chas...

Page 61: ...ors are ght Disconnect igniter and check resistance Is resistance reading between 37 70 ohms at 75F NO Replace igniter Check opera on YES 6 3 Fault Code Igniter is good Does igniter glow Make a call f...

Page 62: ...present when it should not be present Is 24 VAC nominal voltage present between Red lead at gas valve connec on to chassis ground Turn Comfort Control to OFF posi on Correct wiring Check opera on YES...

Page 63: ...correctly See figure YES YES Correct flame sensor loca on NO Flame sensor is good Check wiring and or connec ons NO 08 Fault Code Make a call for hea ng 442 REF 1 470 REF Flame Sensor 385 REF 585 REF...

Page 64: ...AC measured across the fuse terminals Replace fuse Is fuse fully seated into connector NO Properly seat the fuse NO Replace IFC YES Start unit and measure amp draw on transformer 24VAC red wire Is amp...

Page 65: ...his unit is limited to TAP 1 only No field adjustment can be made If troubleshoo ng other speed taps use the method as outlined below using the voltages listed for the tap number being used A801X CTM...

Page 66: ...current use a VOM set to DC volts 1VDC 1 micro amp Flame current will vary depending on the type of meter used Typical flame current ranges from 0 75 3 0 micro amps 0 75 3 VDC 8 Once the flame sense...

Page 67: ...er Turn off gas and electric power supply To clean burners remove burner bottom plate 2 screws and bottom burner bracket 2 screws Twist burner towards slot lift and push forward away from orifice Remo...

Page 68: ...ential applications For more information please visit www trane com or www americanstandardair com The manufacturer has a policy of continuous data improvement and it reserves the right to change desi...

Reviews: