background image


824 Programmable Comfort Control

18-HD72D1-1  

page 5

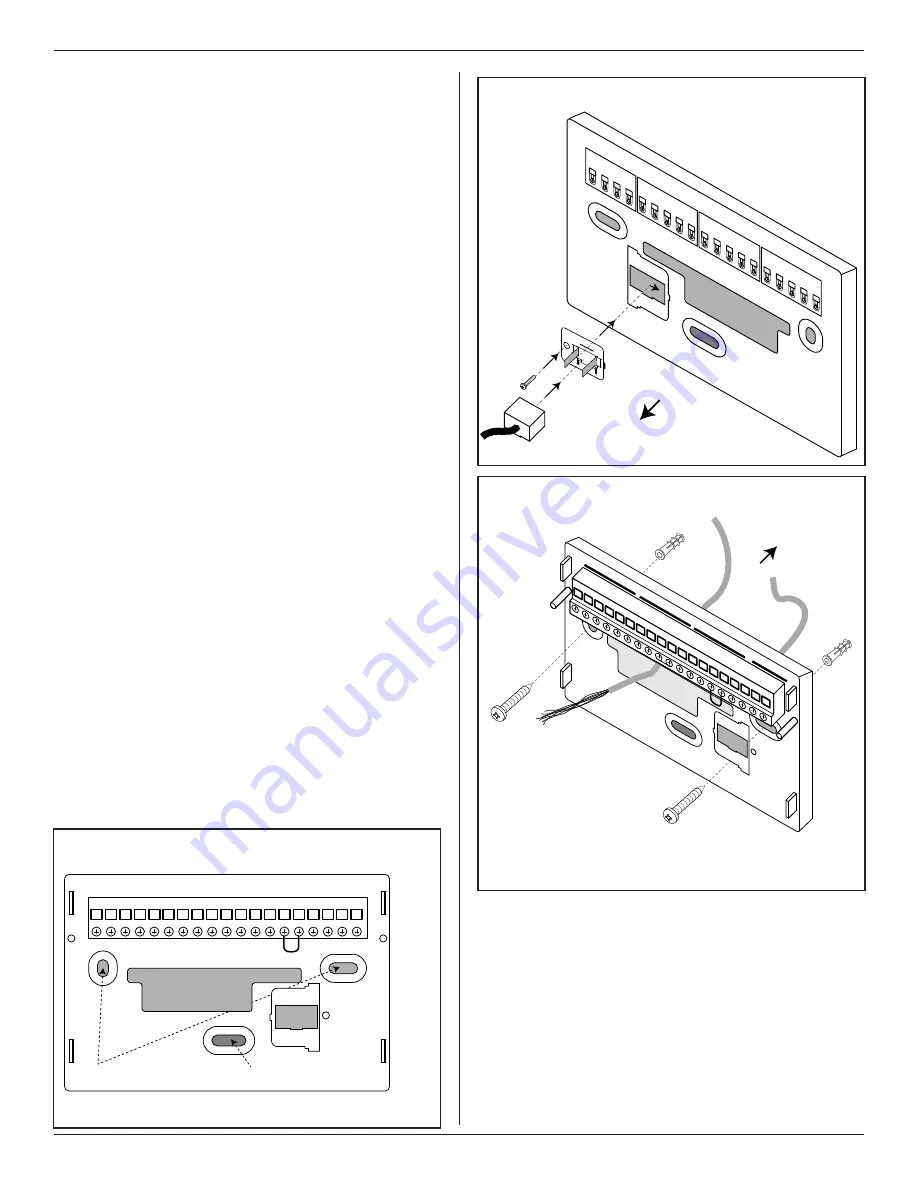
7.  Drill the holes in the wall where marked.

If you are using a wireless Internet connection, skip to 
step 9.

8.  If using a wired Ethernet connection, follow these 

step and refer to “Figure 3. Attach RJ-45 Holder to 
Sub-base”.
a.  With the Sub-base and RJ-45 Holder oriented as 

shown, press the holder into the Sub-base.

b.  Slide the holder to the right so it snaps in place.
c.  Secure the holder with the provided screw.
d.  Insert the RJ-45 Connector into the RJ-45 


Holder until it snaps into place.

9.  Mount the sub-base to the wall using included 

mounting screws and drywall anchors (if necessary). 
An optional mounting hole is available for more secure 
mounting, if needed. Make sure all wires extend 
through the hole in the sub-base see “Figure 4. Mount 
the Sub-base to the Wall”.

4.4  Wiring

1.  Adjust the length and position of each wire to reach 

the proper terminal on the connector block of the 
sub-base. Strip 1/4” of insulation from each wire. 
Do not allow adjacent wires to short together when 
connected. 

2.  Match and connect control wires to the proper 

terminals on the connector block. Refer to Field Wiring 
Diagrams included in this document.

3.  Push excess wire back into the wall and seal the 

hole to prevent air leaks. NOTE: Air Leaks in the wall 
behind the Control can cause improper operation.  

4.  Attach the Control to the sub-base.
5.  Turn ON power to the heating and cooling equipment.

RS1 RS1 ODT ODT W3 W2 W1 BK

G

Y2 Y1

O B/C RH RC

AUX2

AUX1

Mounting Holes

Optional Mounting Hole

Wall

Thermostat Wiring

Ethernet
Wiring

Thermostat

Wires

RJ-45

Plug

RS1 RS1 ODT ODT W3 W2 W1 BK

G

Y2 Y1

O B/C RH RC

AUX2

AUX1

Mounting Holes

Optional Mounting Hole

Wall

Thermostat Wiring

Ethernet
Wiring

Thermostat

Wires

RJ-45

Plug

FIGure 2. 

MARK THE MOUNTING HOLES

FIGure 3. 

ATTACH RJ-45 HOLDER TO SUB-BASE

This side mounts to wall

Wall

a

b

c

d

FIGure 4. 

MOUNT THE SUB-BASE TO THE WALL

Summary of Contents for 824 Comfort Control

Page 1: ...in with this unit These instructions do not cover all variations in systems or provide for every possible contingency to be met in connection with the installation Should further information be desire...

Page 2: ...omponents Failure to follow all electrical safety precautions when exposed to live electrical components could result in death or serious injury 1 Safety 2 2 Product Specifications 3 3 General Informa...

Page 3: ...be sure the indoor unit control power transformer is adequately sized 2 Product Specifications 3 General Information 3 1 Overview The 824 Programmable Control has a 4 1 2 inch color touch screen and o...

Page 4: ...ances entertainment centers or shelving units Do not mount the Control closer than 2 inches to any pipes duct work or other metal obstructions Do not have metal obstructions concrete or brick walls be...

Page 5: ...gth and position of each wire to reach the proper terminal on the connector block of the sub base Strip 1 4 of insulation from each wire Do not allow adjacent wires to short together when connected 2...

Page 6: ...NG W VARIABLE SPEED OIL FURNACE 13 DIAGRAM 13 PACKAGE SINGLE OR MULTI STAGE HEAT COOL W VARIABLE SPEED BLOWER 13 DIAGRAM 14 PACKAGE SINGLE STAGE HEAT COOL W VARIABLE SPEED BLOWER PAGE DIAGRAM DESCRIPT...

Page 7: ...eeze protection and internally mounted condensate overflow circuits to function properly 3 If a 3rd party overflow condensate switches are installed wire between Y1 of the 824 and YI of the airflow co...

Page 8: ...te Sensor 1 3 1 Stage Cooling w GAM5B Model Air Handler 824 COMFORT CONTROL INDOOR UNIT OUTDOOR UNIT NOTES 1 Y terminal must be connected at indoor unit for high stage air flow AUX 2 AUX 1 24VAC HOT C...

Page 9: ...el Air Handler INDOOR UNIT OUTDOOR UNIT AUX 2 AUX 1 24VAC HOT COMMON SOV COOLING FAN HEATING ODT RS AUX2 AUX2 AUX1 AUX1 RC RH B C O Y1 Y2 YI YO G BK W1 W2 W3 ODT ODT RS1 RS1 R B G W B Y Optional Outdo...

Page 10: ...W1 W2 W3 W2 W3 ODT ODT RS1 RS1 R B G W1 B Y Optional Outdoor Sensor Optional Remote Sensor 824 COMFORT CONTROL 7 1 Stage w GAT2 GAM2 Model Air Handler INDOOR UNIT OUTDOOR UNIT AUX 2 AUX 1 24VAC HOT CO...

Page 11: ...Variable Speed Gas Furnace INDOOR UNIT OUTDOOR UNIT AUX 2 AUX 1 24VAC HOT COMMON SOV COOLING FAN HEATING ODT RS AUX2 AUX2 AUX1 AUX1 RC RH B C O O Y1 Y2 Y2 Y1 Ylo Y Y2 G BK BK W1 W2 W3 ODT ODT RS1 RS1...

Page 12: ...RIMARY AIR CONDITIONER T T AUX 2 AUX 1 24VAC HOT COMMON SOV COOLING FAN HEATING ODT RS AUX2 AUX2 AUX1 AUX1 RC RH B C O O Y1 Y2 Y2 G BK W1 W2 W3 ODT ODT RS1 RS1 R R B BK G W1 B Y1 Y1 Ylo Y Y2 Optional...

Page 13: ...Sensor Optional Remote Sensor NOTES 1 Cut and remove the factory installted jumper at BK on the ECM fan control board 2 BK is not connected on non Trane American Standard units 824 COMFORT CONTROL 13...

Page 14: ...nections must be made as shown for freeze protection and internally mounted condensate overflow circuits to function properly 3 Wire 3rd party condensate overflow switches between Y1 of the 824 and YI...

Page 15: ...onal Remote Sensor 1 17 1 Stage Heat Pump w GAM5B Model Air Handler 824 COMFORT CONTROL INDOOR UNIT OUTDOOR UNIT NOTES 1 Y terminal must be connected at indoor unit for high stage air flow 1 AUX 2 AUX...

Page 16: ...COMFORT CONTROL INDOOR UNIT OUTDOOR UNIT AUX 2 AUX 1 24VAC HOT COMMON SOV COOLING FAN HEATING ODT RS AUX2 AUX2 AUX1 AUX1 RC RH B C O Y1 Y2 O YI YO Y G BK BK W1 W2 G W W3 ODT ODT RS1 RS1 O R B R B Opt...

Page 17: ...W2 G W1 W3 W2 W3 ODT ODT RS1 RS1 O R B R B Optional Outdoor Sensor Optional Remote Sensor 21 1 Stage Heat Pump w GAT2 GAM2 Model Air Handler 824 COMFORT CONTROL INDOOR UNIT OUTDOOR UNIT AUX 2 AUX 1 24...

Page 18: ...installed BK jumper at the indoor unit 2 BK is not connected on non Trane American Standard units 3 Y1 Y2 must be connected at the indoor unit on non Trane American Standard units 4 For restricted mod...

Page 19: ...at the indoor unit on non Trane American Standard units 5 For restricted mode operation a wired ODT sensor must be connected to the 824 6 Remove factory RC RH jumper for systems with seperate heating...

Page 20: ...ting the Control and selecting Screen Calibration option within the five seconds following power up Diagram 27 Package Single or Multi Stage Dual Fuel w Variable Speed Blower AUX 2 AUX 1 24VAC HOT COM...

Page 21: ...ode and frequency of Air Filter ERV Service and System Maintenance Reminders When a reminder is triggered an alert will appear on the 824 Home Screen notifying the homeowner to contact their dealer fo...

Page 22: ...2 6 5 Select the number of cycles per hour during 1st stage indoor heat operation 2nd Stage Indoor Heat Cycles Per Hour 2 6 5 Select the number of cycles per hour during 2nd stage indoor heat operati...

Page 23: ...s installed Dehumidifier Select Relay Panel Aux Contact Aux 1 Aux 2 Select which set of aux contacts is controlling the ventilation system Dehumidifier Control Options Stand Alone Operation With Activ...

Page 24: ...ted The displayed indoor temperature will remain the same but the adjusted indoor temperature will control cooling operation Control Response Rate Normal Fast Select how quickly the control builds loa...

Page 25: ...Seconds 30 Seconds Select the blower on delay for compressor heating operation Variable Speed Blower Off Delay Compressor Heating No Delay 1 5 Minutes 100 45 Seconds 100 30 Seconds 50 1 5 Minutes 50 3...

Page 26: ...Enable defrost heater balance point for W1 and W2 only applicable when indoor heat is electric or hydronic Defrost Heater Balance Point W2 10 F 50 F 55 F Select an outdoor temperature to disallow 2nd...

Page 27: ...824 Programmable Comfort Control 18 HD72D1 1 page 27...

Page 28: ...Installation Guide page 28 18 HD72D1 1...

Page 29: ...uipment 2 6 CPH Factory default for compressor operation is 3 CPH Factory default for indoor heat is 5 CPH Effects of changing the cycle rates Lower CPH results in longer run cycles with less cycling...

Page 30: ...hibits in heating and cooling mode anytime the set point is adjusted more than 2 F Heating Aggressive Recovery Disable stage inhibit in heating mode only when the outdoor temperature falls below the s...

Page 31: ...terrupted when indoor RH exceeds desired cooling RH target A humidity icon will be displayed along with the fan icon to indicate that continuous fan operation has been disabled due to high humidity co...

Page 32: ...USB plug on the 824 Control and select Save Logs from the Service Menu The amount of data logged will be dependent on the number of days logged and the storage capability of the USB Flash Drive HOW T...

Page 33: ...l Alert indicates the loss of heating or cooling operation Only critical alerts will be displayed on the home screen These alerts will flash red when closed and moved to the top right corner of the co...

Page 34: ...description and possible causes to assist with troubleshooting Up to the last 30 days are displayed Dual Fuel Options The change over from heat pump to furnace can be set based on three options Comfor...

Page 35: ...this set up Load Value Load Value is a numerical representation of the needed capacity to satisfy the setpoint Proportional distance from setpoint error plus integral time away from setpoint error is...

Page 36: ...e Speed Test Technician Access Screens The Technician Access icon has a 5 second hold delay to enter the technician service screens After this 5 second hold delay the technician will see a Caution scr...

Page 37: ...television reception which can be determined by turning the equipment off and on the user is encouraged to try to correct the interference by one or more of the following measures Reorient or relocate...

Page 38: ...ducts 3 modification alteration abuse misuse negligence or accident 4 improper storage installation maintenance or operation including but not limited to operation of electrical equipment at voltages...

Reviews: