tenance, the Grill will provide you with delicious
od and years of cooking enjoyment.
ES THROUGHOUT THIS MANUAL
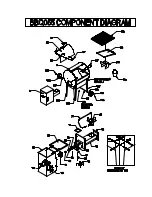
EFER TO THE COMPONENT DIAGRAM.
ou un-box the Grill, make sure you have, and can identify all of the following
arts:
egs (115, 119, 123, 127), Wheels (136) and Handles
ll (3).
nd Axle Rod (131)
3). Remove from grill for assembly
meter (31)
(2) Wheels (136)
ou will need to complete the assembly which includes:
heel Legs (123, 127)
4)
ht end of Grill (3).
Do not over
5)
Baffle (155) over the Firepot (65), and setting the Grease Drain
6)
k located below the Grease
Drain Tube opening on the right side of the Grill (3).
ollow these step by step instructions and you’ll be cookin’ in no time!
OOLS SUPPLIED FOR ASSEMBLY
ench
hillips screwdriver
INTRODUCTION
Congratulations on your purchase of this Traeger Wood Pellet Grill, Model BBQ055.
With proper set-up, operation and main
fo
NOTE: NUMBERS FOLLOWING PART NAM
R
When y
p
(1) Bag of Nuts, Washers, and Bolts. These are for mounting the Pellet
Hopper/Burner (37), L
(137) to the Gri
(1) Main Body (3)
(4) Legs (115, 119, 123, 127) a
(1) Pellet Hopper/Burner (37)
(1) Porcelain Grill (170) Remove for assembly
(1) Heat Baffle (155). Remove from grill for assembly
(1) Grease Drain Pan (16
(1) Grease Bucket (135)
(1) Dome Thermo
Y
1
) Mounting the Legs (115, 119, 123, 127) onto the Grill Body (3)
2) Mounting the Axle Rod (131) and Wheels (136) to the W
3) Mounting the Pellet Hopper (37) onto the Grill Body (3)
Mounting Handles (137) to Door (25) and to rig
tighten.
Damage to the handles could result.
Positioning the Heat
Pan (163) in place.
Hanging the Grease Bucket (135) on the Bucket Hoo
F
T
3/8” / 1/2” combo wrench
7/16” / 1/2” combo wr
P


