CAMON LS14 Lawn Scarifier
LS14 Lawn Scarifier
Page 17
Loosen the four M8 nuts that secure the engine to the chassis.
Gently push the engine to reduce the belt tension.
The drive belt has now become slack.
Grab the right hand side of the belt close to the bottom pulley and pull as if
you are trying to pull the belt off the bottom pulley.
With your other hand slowly and carefully rotate the pulley in an anticlockwise
direction and ease the belt off the pulley.
The belt is now free from the machine.
To fit the new belt, start by locating the new belt in the groove of the
centrifugal clutch.
Stretch the new belt tight by pulling it downwards to the bottom pulley.
Locate one side of the belt in position on the bottom pulley.
Slowly rotate the bottom pulley so that the belt is slowly eased into its place
sitting in the groove of the bottom pulley.
Gently pull the engine to tension the drive belt.
Re-attach the belt guard using the original cap screw bolts.
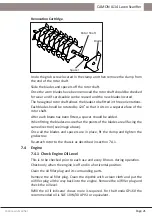
7.3.2 Removing Cartridge/Rotor Assembly
To access the underneath of the chassis you must use a lifting hoist to lift the
handlebars of the machine so that it tilts forward over its front axle.
Remove both the belt guard and rotor shaft guard by undoing the fastening
nuts and bolts.
Remove the belt as instructed above in section 7.3.1.
Remove the taper lock pulley from the rotor shaft by completely removing
the two grub screws in the middle of the pulley, then using one of the
removed grub screws insert it into the single hole between the 2 holes that
the grub screws were removed from, as you tighten the grub screw it should
push the pulley off the bush.
WARNING: Do not lose the woodruff key at this stage.
Remove the bolt holding the protection plate, rotate the protection plate
over on the front axle to gain access to the chassis rotor shaft removal slots.
Remove the bolts of the pillow block bearings.
Once the bearing bolts have been removed the blade rotor will be able to be
removed from the chassis by sliding it out of the chassis slots.


