Page 4
1. Introduction
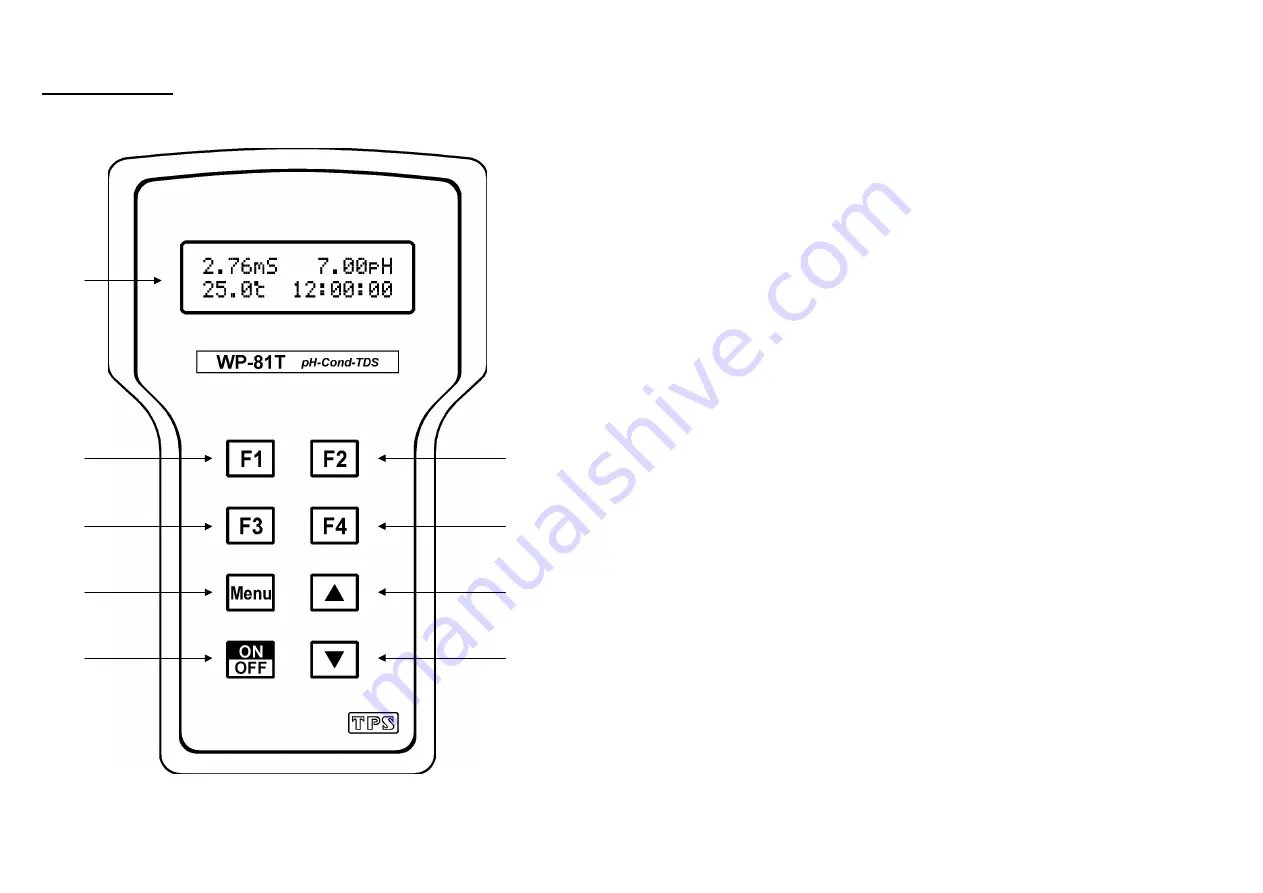
1.1 WP-81T Display and Controls
¬
-
´
°
®
¯
±
²
³
Page 1: ...introduction has a diagram and explanation of the display and controls of the WP 81T It also contains a full listing of all of the items that you should have received with your WP 81T Please take the time to read this section as it explains some of items that are mentioned in subsequent sections 3 Main Section The main section of the handbook provides complete details of the WP 81T including opera...
Page 2: ... 6 2 Calibration Notes 16 6 3 Calibration Messages 16 7 Temperature Calibration 17 7 1 Calibration Procedure 17 7 2 Calibration Notes 17 7 3 Calibration Messages 17 7 4 Manual Temperature Setting 18 8 Good Laboratory Practices GLP 19 8 1 To recall GLP information on the display 19 8 2 Failed Calibration 20 8 3 Printing GLP Information to the RS232 Port 20 8 4 Instrument Serial Number 21 8 5 Additi...
Page 3: ...nsors 30 15 Selecting pH6 88 or pH7 00 as the Primary Buffer 31 16 Initialising the WP 81T 32 17 Instrument firmware version number 32 18 Troubleshooting 33 18 1 General Errors 33 18 2 Conductivity and TDS Troubleshooting 34 18 3 pH Troubleshooting 36 18 4 Temperature Troubleshooting 37 19 Warranty 38 20 Appendices 40 20 1 Care Cleaning and Maintenance of Conductivity Electrodes 40 20 2 Replatinis...
Page 4: ...Page 4 1 Introduction 1 1 WP 81T Display and Controls ...
Page 5: ...d within the menu system on the WP 81T Press to access the user friendly menu system which makes the WP 81T a breeze to operate and The and keys are used for calibrating temperature readout section 7 1 setting the manual temperature compensation section 7 4 setting the clock section 13 1 setting the automatic logging period section 10 and displaying GLP information section 8 1 The key is also used...
Page 6: ...dard 200mL 122307 6 pH6 88 Buffer 200mL 121306 7 pH4 00 Buffer 200mL 121381 8 Battery charger 130037 9 WP 81T Handbook 130050 Options that may have been ordered with your WP 81T 1 k 10 ATC Temperature Sensor 5m cable 122220 2 k 0 1 ATC Temperature Sensor 1m cable 122229 3 RS232 Serial Interface Option includes cable 130039 4 Hard Carry Case 130059 5 Battery charger lead for 12V cigarette lighter s...
Page 7: ... 0 2 of full scale of selected range TDS Ranges 5 ranges with automatic range selection and linearising software k 0 1 Sensor 1 000 ppM to 10 00 ppK k 1 0 Sensor 10 00 ppM to 100 0 ppK k 10 Sensor 100 0 ppM to 1000 ppK Resolution 0 1 of selected range Accuracy 0 3 of full scale of selected range pH Range 0 to 14 00 pH Resolution 0 01 pH Accuracy 0 01 pH Temperature Range 10 0 to 120 0 o C Sensor l...
Page 8: ...tes RS232 Output optional 300 1200 9600 baud 8 bits no parity 1 stop bit XON XOFF Protocol Clock Calendar clock displays date month hours minutes seconds Year is recorded in memory and transmitted to optional RS232 port but is not displayed Battery Saver On Auto switch off after 5 minutes Off Continuous use Bar Graph display of battery charge level Readout of battery voltage available for troubles...
Page 9: ... Press to show or hide date and time F3 Press to start and stop automatic logging If logging period is set to zero press to transmit current reading plus date and time to the RS232 port Menu Press to access the user friendly menu system as detailed below F1 Cal F1 Cond TDS F2 pH F3 Temp F2 Notepad F1 Recall F2 Erase F3 Print if RS232 option fitted F4 Prog F1 Min F2 Sec Set Period F3 Mode F1 Conduc...
Page 10: ...anual temperature setting is displayed with 1o C resolution eg 2 76mS 7 00pH Man25o c 12 00 00 2 F2 TDS Displays TDS pH and Temperature readings simultaneously See section 13 2 for details on how to show or hide the date and time eg 36 0ppK 7 00pH 25 0o c 12 00 00 If the temperature probe is unplugged the manual temperature setting is displayed with 1o C resolution eg 36 0ppK 7 00pH Man25o c 12 00...
Page 11: ...e Conductivity standards are 150µS cm 1413µS cm 2 76mS cm 12 88mS cm and 58 0mS cm and should be selected according to your range of interest If the WP 81T does not recognise the standard it will display the message NOT STD during calibration Calibration will fail if this message is displayed Place the electrode into a sample of Conductivity standard so that it is immersed at least to the vent hol...
Page 12: ...d off even when the battery is removed This information can be recalled or printed later using the GLP function see section 8 5 The WP 81T displays the value of the standard to which it will attempt to calibrate Ensure that the standard value displayed corresponds to the standard that you are using 6 If the WP 81T does not recognise the standard it will display the message NOT STD during calibrati...
Page 13: ... Allowable TDS standards are 69 5ppM 2 00ppK 8 00ppK and 36 0ppK and should be selected according to your range of interest If the WP 81T does not recognise the standard it will display the message NOT STD during calibration Calibration will fail if this message is displayed Place the electrode into a sample of TDS standard so that it is immersed at least to the vent hole in the white plastic cove...
Page 14: ... even when the battery is removed This information can be recalled or printed later using the GLP function see section 8 5 The WP 81T displays the value of the standard to which it will attempt to calibrate Ensure that the standard value displayed corresponds to the standard that you are using 6 If the WP 81T does not recognise the standard it will display the message NOT STD during calibration Ca...
Page 15: ...t the bulb and reference junction are both covered DO NOT place the electrodes directly into the buffer bottle 7 Select pH Calibration F1 Cal F2 pH 8 When the reading has stabilised press the key to calibrate If a 1 point calibration has been performed the will not be removed until a full 2 point calibration has been performed 9 Rinse the pH and Conductivity electrodes in distilled water and blot ...
Page 16: ...e Ensure that the buffer value displayed corresponds to the buffer that you are using 6 3 Calibration Messages 1 If a 1 point calibration has been successfully performed the WP 81T will display the following message and the asymmetry of the electrode eg 1 Point Cal OK Asy 0 10pH 2 If a 1 point calibration has failed the WP 81T will display the following message and the failed asymmetry value of th...
Page 17: ...ury thermometer 7 Press the key to calibrate the temperature readout The will now be replaced by a decimal point if calibration was successful Alternatively press the key to abort temperature calibration 7 2 Calibration Notes 1 Temperature calibration information is retained in memory when the WP 81T is switched off even when the battery is removed This information can be recalled or printed later...
Page 18: ...he Conductivity sensor has a separate sensor built in for automatic temperature compensation for Conductivity and TDS 1 Switch the meter on 2 Measure the temperature of the sample 3 Select Temperature Calibration F1 Cal F3 Temp 4 The current temperature setting is now displayed eg 25 0 Man Temp Set F1 Save 5 Press the and keys until the display shows the temperature of the sample 6 Press the key t...
Page 19: ...on number and instrument serial number are displayed along with a prompt describing how to scroll through the GLP information eg WP81T V1 0 R1234 More Back 5 Press the key to sequentially scroll through the GLP information for all parameters Press the key to scroll back to previous data The sequence of information displayed is shown below Press to abort at any time WP81T V1 0 R1234 More Back Cond ...
Page 20: ... stored in the instrument s memory can be sent to a printer or PC via the RS232 port This function is available only when the optional RS232 port is fitted 1 Switch the meter on 2 Ensure that the WP 81T RS232 cable is connected to the instrument and to the printer or PC 3 Send the GLP information to the RS232 port F4 Setup F3 GLP F3 Print 4 The GLP information is sent to the RS232 port in formatte...
Page 21: ...ond TDS pH Temp where R1234 is the serial number The serial number is display when recalling the GLP information section 8 1 The serial number is included on the printout of GLP information section 8 3 8 5 Additional GLP Features Another GLP requirement is to record the date and time of every reading The WP 81T does this for you when readings are recorded either with the Notepad function section 9...
Page 22: ...tepad onto the WP 81T display 1 Select the Notepad menu F2 Notepad 2 Select Recall from the menu F1 Recall 3 Record number 1 is now displayed eg 2 76mS 7 00pH 25 0o c 1 F2 Clk 4 Press to alternatively display the date and time or the data for this record Press to move forward through the records Press to move backward through the records Press and hold the or keys to roll rapidly through the readi...
Page 23: ... cable for long term use if required 2 Connect the other end of the RS232 cable to an RS232 Printer or to COM1 or COM2 of a PC 3 Ensure that the baud rate for the printer or PC and the WP 81T are the same If necessary alter the baud rate of the WP 81T see section 11 1 The WP 81T uses XON XOFF protocol Ensure that the printer is set accordingly 4 Select the Notepad menu F2 Notepad 5 Select Print fr...
Page 24: ... 81T will ask if the records are to be logged into the Notepad or sent directly to the RS232 port Press to log records into the Notepad maximum of 150 readings Press to send records directly to the RS232 port 6 The automatic logging function is now programmed and can be started and stopped as required 7 To start automatic logging press in normal display mode If the WP 81T is logging into the Notep...
Page 25: ...he automatic logging period is set to greater than zero see section 10 Records can be sent directly to the RS232 port rather than stored in memory during automatic datalogging See section 10 for details 11 3 RS232 Configuration The WP 81T RS232 configuration is 8 bits No Parity 1 Stop Bit XON XOFF Protocol 11 4 Communication and Statistical Software Communication between the WP 81T and a PC can be...
Page 26: ... data ends with the message ENDS cr Erase logged data E cr Erases all logged records from the WP 81T memory Returns the message ERASED cr to confirm that the records have been erased Request status information S cr Returns the model name firmware version number instrument serial number and number of logged readings in memory eg WP81TsV1 0sR1234s9999 cr where s are spaces Note that the number of lo...
Page 27: ... The WP 81T sends a Zero for instant readings section 11 2 s s is one space DDDDDD is the Conductivity or TDS Data Maximum 6 characters right justified UUU is the unit description either uSs s mSs s ppM or ppK where s s is 1 space s s is one space PPPPPP is the pH Data Maximum 6 characters right justified uuu is the unit description sent as pHs s where s s is 1 space s s is one space TTTTTT is the...
Page 28: ...ts off This function can be switched off for continuous use To enable or disable the battery saver function 1 Switch the meter on 2 Select Battery Saver Set up F4 Setup F1 Batt 3 The battery saver menu is now displayed eg Batt Saver F1 OFF 100 F2 ON The arrow indicates the current selection The bar graph and percentage indicate the approximate level of charge in the battery 4 Press to disable the ...
Page 29: ...to the minutes Press the and keys until the minutes are correct 8 Check that the date and time are correct Press to save the settings If any changes are needed press the key to move left to the desired position Press to quit without resetting the clock Notes 1 The WP 81T does not test for a valid day of the month when setting the clock eg attempting to enter 31 02 96 is not corrected 2 The WP 81T ...
Page 30: ...only if the k 0 1 or k 10 sensor is connected eg Select F1 k 0 1 k Factor F2 k 10 The arrow indicates the current selection 5 Press to select a k 0 1 sensor Press to select a k 10 sensor Press to quit buffer selection and retain the current setting 6 Notes 1 The manual k factor selection is kept in memory when the meter is switched off even if the battery is removed 2 The manual k factor selection...
Page 31: ...arrow indicates the current selection 4 Press to select pH6 88 as the primary buffer Press to select pH7 00 as the primary buffer Press to quit buffer selection and retain the current setting 5 The setting is kept in memory when the meter is switched off even if the battery is removed The primary buffer is re set to pH6 88 during initialisation Note pH6 88 buffer is a DIN 19266 and NBS Primary sta...
Page 32: ...hown when the RS232 serial port option is fitted 4 The meter then displays Conductivity pH and Temperature Note that the decimal points have been replaced with a to indicate that the unit requires recalibration Note When the WP 81T is initialised the manual k factor selection is re set to k 10 See section 14 if you wish to select a k 0 1 sensor When the WP 81T is initialized the primary pH buffer ...
Page 33: ...r temperature section 7 1 Flashing symbol Battery is below 5 60 volts Recharge the battery Note that the unit will switch itself off when the battery falls below 5 00 volts Meter displays the word OFF and switches off Battery is below 5 00 volts Recharge the battery If this fails check the charger If charger OK replace the battery Meter will not turn on 1 Battery is exhausted 2 Faulty Instrument R...
Page 34: ...fails and k factor is greater than 0 133 1 33 or 13 3 depending on k factor of sensor 1 Electrode is not immersed deeply enough 2 Electrode may have a build up of dirt or oily material on electrode wires 3 Platinum black coating has worn off 4 Standard solution is inaccurate 5 Electrode is faulty 6 Faulty instrument 7 k factor incorrectly set if using k 0 1 or k 10 sensor Immerse electrode at leas...
Page 35: ...ngs even when calibration is successful 1 Electrode may have a build up of dirt or oily material on electrode wires 2 Platinum black coating has worn off Clean electrode as per the instructions detailed in section 20 1 Electrode requires replatinisation Return to the factory or see details in section 20 2 Readings drift 1 Electrode may have a build up of dirt or oily material on electrode wires Cl...
Page 36: ...has been set see section 15 Clean glass bulb as per instructions supplied with the electrode Attempt rejuvenation as per instructions supplied with the electrode If not successful replace electrode Dry in a warm place Replace buffers Unstable readings 1 Electrolyte chamber needs to be refilled 2 Reference junction blocked 3 Glass bulb not clean 4 Bubble in glass bulb 5 Faulty connection to meter 6...
Page 37: ...e Displays 4 5 pH for all solutions Glass bulb or internal stem cracked Replace electrode 18 4 Temperature Troubleshooting Symptom Possible Causes Remedy Displays OVR o C when electrode is plugged in 1 Faulty electrode 2 Faulty instrument Fit new electrode part number 122201 Return to factory for repair Temperature inaccurate and cannot be calibrated 1 Faulty connector 2 Faulty electrode 3 Faulty ...
Page 38: ...he registration section returned to TPS Pty Ltd within 7 days No claims will be recognised without the original guarantee card or other proof of purchase This warranty becomes invalid if modifications or repairs are attempted by unauthorised persons or the serial number is missing PROCEDURE FOR SERVICE If you feel that this equipment is in need of repair please re read the manual Sometimes instrum...
Page 39: ...ese amounts are not applicable to full account customers Your equipment will be repaired and returned to you by air express where possible For out of warranty units a repair cost will be calculated from parts and labor costs If payment is not received for the additional charges within 30 days or if you decline to have the equipment repaired the complete unit will be returned to you freight paid no...
Page 40: ...with distilled water Conductivity electrodes can be stored dry Ensure that the electrode is stored in a covered container to avoid dust and dirt build up 20 1 2 Cleaning of Conductivity of Electrodes Platinised platinum Conductivity electrodes can only be cleaned by rinsing in a suitable solvent DO NOT wipe the electrode wires as this will remove the platinum black layer 1 Rinsing in distilled wat...
Page 41: ...ctrode well in distilled water 3 Immerse the electrode in platinising solution at least to the vent hole in the white plastic cover Platinising solution is available from TPS part no 122300 Alternatively platinising solution can be prepared by dissolving 1g of Hydrogen Chloroplatinate H2PtCl16 in 30mL of distilled water and including about 0 01g of Lead Acetate CH3COO 2Pb and a drop or two of conc...
Page 42: ... junction A saturated solution of KCl is used to make contact with the sample It is vital that the KCl solution has an adequate flow rate in order to obtain stable accurate pH measurements 20 3 1 Asymmetry of a pH Electrode An ideal pH electrode produces 0 mV output at 7 00 pH In practice pH electrodes generally produce 0 mV output at slightly above or below 7 00 pH The amount of variance from 7 0...
Page 43: ...actice pH electrodes usually produce slightly less than this The output of a pH electrode is expressed as a percentage of an ideal electrode For example an ideal electrode that produces 59mV pH unit has 100 Slope An electrode that produces 50 15mV pH unit has 85 Slope see Figure 20 2 600 400 200 0 200 400 600 0 7 14 85 Slope at 25 oC 50 15mV pH 100 Slope at 25 oC 59mV pH Response of pH Electrode a...
Page 44: ... Checking the reference junction of a pH electrode If pH readings are inaccurate or unstable the reference junction of the electrode may be blocked The following test can be performed to determine if the reference junction of a pH electrode is making adequate contact with the sample solution 1 Calibrate the pH section of the WP 81T as per section 4 1 2 Dilute 1 part of pH6 88 buffer with 9 parts o...
Page 45: ... the key the WP 81T will calibrate to around 6 88 pH depending upon the temperature readout 5 If the WP 81T is operating correctly the reading should be totally stable with the wire firmly in place If not the meter requires servicing 6 Now carefully disconnect the wire from the centre pin only make sure the other end of the wire remains connected to the outside frame of the connector 7 The reading...