background image


Section 7 – Troubleshooting


43

7.7 

Output Fuse Replacement 

The 

easyCHEM 770

 has a 10 Amp fuse to protect the instrument from excessive power drain from 

the main Pool Pump. This can occur due to any of the following reasons… 


The Pool Pump has a power rating higher than 10 Amps. 


The Pool Pump has a larger than normal start-up current, which exceeds 10 Amps long 
enough for the fuse to blow. 


The Pool Pump is faulty. 

Other factors can also cause the fuse to blow, but these are the most common.  

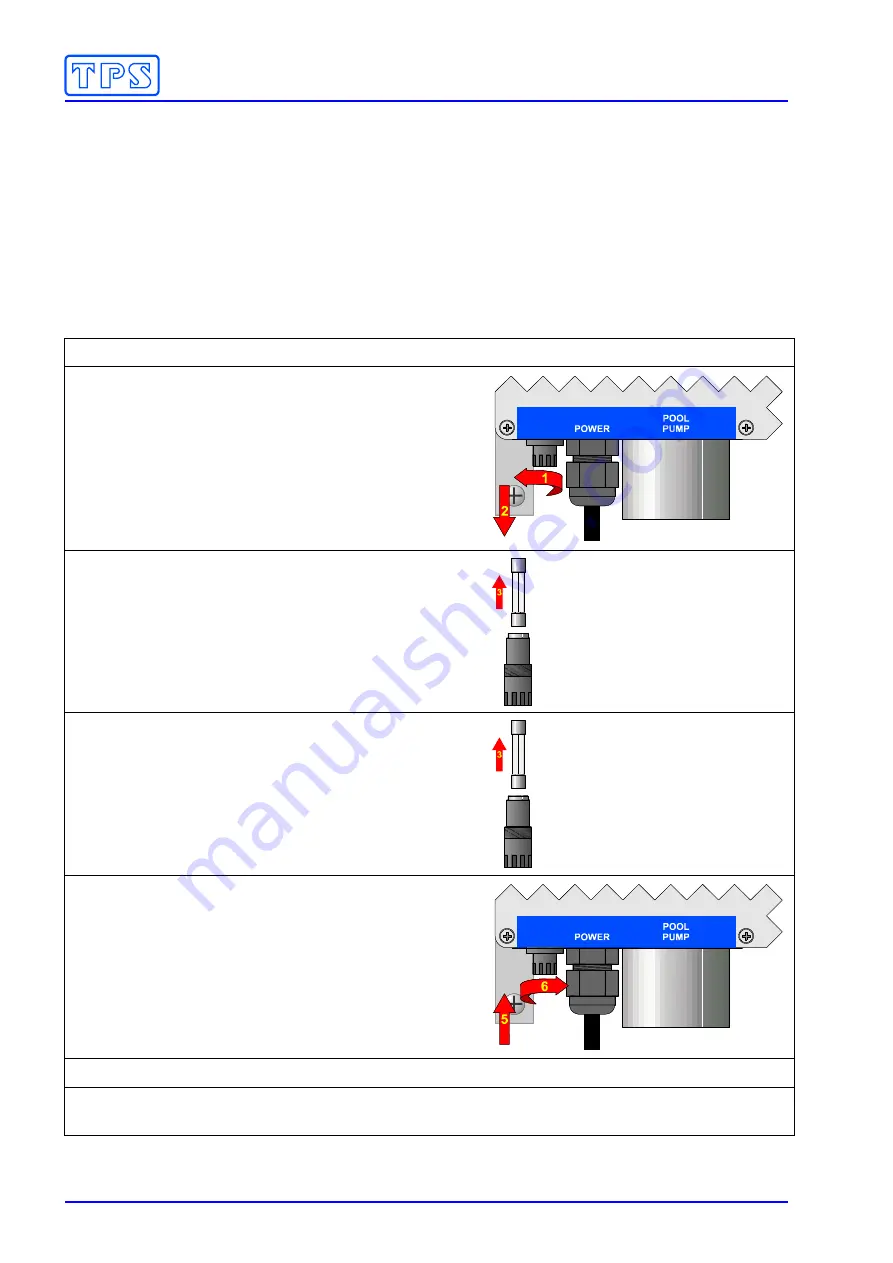
To replace the fuse… 

1.  Switch off the 

easyCHEM 770

 at the mains power outlet and unplug the power lead. 

2. Locate the fuse holder on the left hand 

underneath side of the unit. Un-screw it anti-
clockwise until it can be removed. 

3.  Fully remove the glass fuse from the fuse holder. 


4.  Replace the fuse with a 3AG type 250V 10A fuse. 

This should be the standard “fast blow” type.  

A “slow blow” type fuse may be used if the unit 
blows fuses consistently when the pool pump 
starts.  


5.  Insert the fuse holder into the 

easyCHEM 770

Push it into place then screw clockwise until it is 
firmly fastened in place.  

DO NOT OVERTIGHTEN. 

6. The 

easyCHEM 770

 can now be connected to the mains power outlet and switched on. 

7.  If fuses continue to blow, the problem causing this situation must be rectified. Please consult 

the pump supplier or TPS directly. 


Summary of Contents for easyCHEM 770

Page 1: ...easyCHEM 770 Pool Management System Chlorine Acid controller with dosing pumps and timer for pool pump easyCHEM 770 User Manual Date 06 Sep 2007 Author AB Version 1 31...

Page 2: ...td ABN 30 009 773 371 4 Jamberoo Street Springwood Brisbane Australia 4127 Phone 07 32 900 400 International 61 7 32 900 400 Fax 07 3808 4871 International 61 7 3808 4871 Email tps tps com au Web www...

Page 3: ...h the Pool Pump OFF manually 19 3 7 Pumping to Waste 20 3 8 Backwashing the Pool Filter 21 3 9 easyCHEM 770 Display Messages 22 Section 4 Peristaltic Dosing Pumps 23 4 1 Lubricating the Pump Tubing 23...

Page 4: ...on installing the easyCHEM 770 It is a duplicate of the information found on the easyCHEM 770 Installation Guide card Section 3 Operating Instructions The Operating Instructions provide details on ad...

Page 5: ...Section 1 Introduction 5 1 1 easyCHEM 770 Display and Controls 1 2 easyCHEM 770 Connectors...

Page 6: ...menus and data entry screens without saving changes Press to activate Auto Control mode The easyCHEM 770 will automatically add Chlorine and Acid as required Press to place the easyCHEM 770 into Stan...

Page 7: ...Part No 121381 Probe Injection Tee 50mm Part No 117904 50 to 40mm reduction bushes x 2 Part No NPRB5040 Peristaltic Pump Input and Output Tube 4m x 2 Part No 116360 ZoBell ORP Solution Part A 200mL Pa...

Page 8: ...e bottom of the chemical drums to the dosing pumps is 2 metres 4 The mains power lead from the pool pump reaches the easyCHEM 770 without straining 5 The mains power lead from the easyCHEM 770 reaches...

Page 9: ...mm diameter vent hole to avoid suction build up IMPORTANT INFORMATION REGARDING ACID Always use dilute Hydrochloric Acid Add 5 Litres of Acid to 20 to 25 Litres of water NEVER ADD WATER TO ACID Using...

Page 10: ...CHEM 770 controller on a sturdy wall or post using minimum 3mm or 1 8 stainless steel bolts screws or masonary anchors The easyCHEM 770 controller MUST be installed in a sheltered location Connect the...

Page 11: ...unction has been included for those installers who wish to check the operation of the dosing pumps when installation is complete The pump priming function can also be used to prime the peristaltic pum...

Page 12: ...reaches 700mV The control band stops the pump being rapidly switched on and off when the reading is close to the Set Point thereby increasing the pump s life 2 The exact ORP Set Point to achieve the c...

Page 13: ...control band If the Set Point is 7 40pH the Acid pump will start when the rises above 7 60pH and stop again when the reading reaches 7 40pH The control band stops the pump being rapidly switched on a...

Page 14: ...lorine and Acid as required Auto mode should be selected for normal operation 2 Press to place the easyCHEM 770 into Standby mode In this mode the unit will measure the ORP and pH levels of the pool b...

Page 15: ...wer bill and for the environment by reducing the electricity being used 1 Press to display the Pump Timer menu Pool Pump Timed 2 Select Timed from the menu and press to select the default Timer progra...

Page 16: ...is selected and press 4 The easyCHEM 770 will now prompt you to enter the Winter Start date Winter Start 15 May Enter Use the and keys to set the date and press Use the and keys to set the month and...

Page 17: ...und if selected The Custom program is covered in section 3 4 4 To operate the pump 24 hours per day select Continuous This is covered in the next section 3 4 3 To select the Continuous program The Con...

Page 18: ...is now displayed AM OFF 10 00 Set Enter Press or to set the hours for when the pool pump will turn OFF and press Press or to set the minutes for when the pool pump will turn OFF and press 5 The PM ON...

Page 19: ...o be switched OFF by the Timer cycle 2 To stop the pump press select Timed or OFF and press 3 6 To Switch the Pool Pump OFF manually The pool pump can be switched OFF manually using the easyCHEM 770 a...

Page 20: ...screen is displayed Set filter to Waste Enter The pool pump is now switched OFF Set the control on your filter to its Pump to Waste setting then press 3 The pool pump is now pumping pool water to was...

Page 21: ...control on your filter to its Backwash setting then press 3 The pool pump will now backwash the filter to waste for 60 seconds A countdown is provided on the screen Backwashing 60 Filter 4 When the c...

Page 22: ...ction 3 3 sOFF Emergency ShutOFF timer has been tripped See section 6 2 OFF Dosing Pump is off line due to 0 secs of ON time being set See section 6 3 2 OFF OVR for reading Dosing Pump is off line due...

Page 23: ...acing the Pump Tubing Replace the Pump Tubing if it gets worn begins to leak or pumping volume is reduced The Pump Tubing may be replaced every year as a precautionary measure To remove the old Pump T...

Page 24: ...ng to the compression fittings See the procedure detailed in section 2 4 The power to the easyCHEM 770 can now be re connected and switched on 4 3 PUMP Error Message The easyCHEM 770 monitors the dosi...

Page 25: ...s select Calibrate then select Cal Temp The Temperature Calibration screen is now displayed For example 25 0o c Temp Cal 26 0o c Enter 6 Use the and keys to enter the same temperature as measured by t...

Page 26: ...sfully performed the easyCHEM 770 will display the following message and the offset of the sensor For example Calibrate OK 0 1o c Offset 2 If a temperature calibration has failed the easyCHEM 770 will...

Page 27: ...et and the ORP Temperature sensor into the ORP Probe socket if not already connected 4 Remove the wetting cap from the pH sensor Rinse both sensors in distilled water Shake off as much water as possib...

Page 28: ...ymmetry or the Slope being outside these limits please consult the Troubleshooting guide section 7 4 for possible remedies 2 All calibration information is retained in memory when the easyCHEM 770 is...

Page 29: ...d the ORP Temperature sensor into the ORP Probe socket if not already connected 4 Remove the wetting cap from the pH sensor Rinse both sensors in distilled water Shake off as much water as possible Bl...

Page 30: ...lue For example Cal Failed Offset 70mV 3 If the reading is below 100 mV or above 400 mV the easyCHEM 770 will not even attempt calibration as this indicates a user error such as incorrect calibration...

Page 31: ...the year then use the and keys to set the year Press the key to move to the hours then use the and keys to set the hours Press the key to move to the minutes then use the and keys to set the minutes 3...

Page 32: ...within the limit ORP ShutOFF 70mins Enter Use the and keys to set the required time from 1 to 240 minutes Press and hold the or key to scroll rapidly 3 Press to save the ShutOFF timer setting for the...

Page 33: ...one or more of the following Re fill the Chlorine or Acid drum if they were empty Check and re calibrate the ORP and or pH sensors to ensure the reading is actually correct Extend the ON time if the p...

Page 34: ...psed The ON and OFF cycles for ORP and pH run sequentially This allows time for mixing for each of the chemicals and avoids the problem of the Chlorine affecting the pH reading or the Acid affecting t...

Page 35: ...means that the easyCHEM 770 will add Chlorine when the reading gets too low Too High means that the easyCHEM 770 will reduce the ORP when it gets too high This is rare and not normally used in pool an...

Page 36: ...ding gets too low Press or until the desired setting is selected and press 5 The current Control On Time is now displayed for example pH ON Time 1 min Enter Press or until the desired On Time is set a...

Page 37: ...pped When the alarm function has been tripped the message Alrm flashes next to the ORP and or pH reading whichever has tripped the alarm and the easyCHEM 770 beeps Automatic control will continue even...

Page 38: ...Section 6 User Settings 38 6 4 2 Alarm Set up Examples The following diagram illustrates the ORP alarm function of the easyCHEM 770 The Set Point is at 700 mV...

Page 39: ...to enter the number of Litres of Chlorine that you wish to add to the pool and press The maximum dose that can be added is 25 Litres 5 The easyCHEM 770 now proceeds to add the Chlorine The display sho...

Page 40: ...and press 4 The Reset menu is now displayed for example Calibration Full System Select Calibration and press to reset only the calibration information to factory values It will be necessary to re cali...

Page 41: ...to reset error If error re occurs dosing pump will require service 7 3 ORP Troubleshooting Symptom Possible Causes Remedy ORP reading inaccurate 1 Platinum tip of ORP sensor dirty 2 Reference junctio...

Page 42: ...ce if necessary Ensure that the bulb AND the reference junction are fully immersed as per diagram in section 5 2 1 Inaccurate readings even when calibration is successful Reference junction blocked Cl...

Page 43: ...r outlet and unplug the power lead 2 Locate the fuse holder on the left hand underneath side of the unit Un screw it anti clockwise until it can be removed 3 Fully remove the glass fuse from the fuse...

Page 44: ...Asymmetry Range 1 00 to 1 00 pH pH Slope Range 85 0 to 105 pH Buffers pH7 00 and pH4 00 Temperature Offset Range 10 0 O C to 10 0 O C Calendar Clock 24 Hour Calendar Clock Tests for valid day of the m...

Page 45: ...ou feel that this equipment is in need of repair please re read the manual Sometimes instruments are received for repair in perfect working order This can occur where the sensor s simply requires clea...

Reviews: