background image

TL-WPA4220 

300Mbps AV500 WiFi Powerline Extender 


12


Wireless  - 

This field displays the current settings or information for wireless. They  can be 

configured on the 

Wireless


Wireless Settings

 page.   


Wireless Radio - 

Indicates whether the wireless radio feature of the powerline extender  is 

enabled or disabled. 


Name (SSID)


-

 The SSID of the powerline extender. 


Channel

 - The wireless channel in use.   


Mode

 - The current wireless mode the powerline extender works on.   


Channel Width

 - The bandwidth of the wireless channel.   


MAC Address

 - The physical address of the powerline extender, as seen from the WLAN.   


System Up Time - 

This field displays the length of the time since the powerline extender was last 

powered on or reset.


Click the 

Refresh

 button to get the latest status and settings of the powerline extender.   

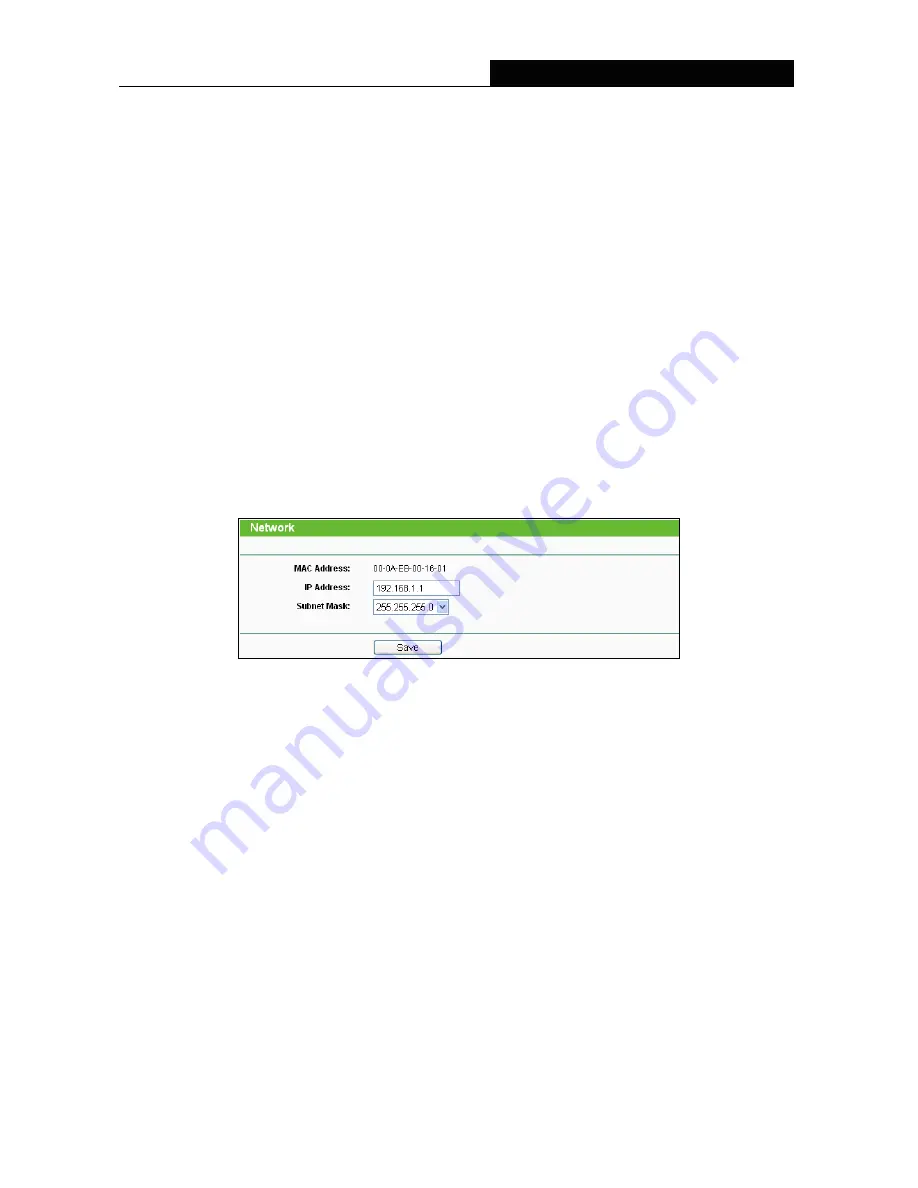
3.3 Network 

You can configure the IP parameters of the powerline extender on this page. 


Figure 3-6 Network 


MAC Address


-

 The physical address of the powerline extender's Ethernet port. The value can not 

be changed. 


IP Address -

 Enter the IP address of the powerline extender in dotted-decimal notation (factory 

default setting is 192.168.1.1).   


Subnet Mask -

  An address code that determines the size of the network. Usually it is 

255.255.255.0. 

Click the 

Save

 button to save your settings. 


Note: 

1.  If you change the IP address, you must use the new IP address to log in to the powerline extender. 
2.  If the IP address of the powerline extender conflicts with other device in the intranet, a temporary IP 

address will be generated at random. 

3.4 Wireless 

The

 Wireless 

option, improving functionality and performance for wireless network, can help you make 

Summary of Contents for TL-WPA4220 TKIT

Page 1: ...TL WPA4220 300Mbps AV500 WiFi Powerline Extender REV1 1 0 1910011553 ...

Page 2: ...s are trademarks or registered trademarks of their respective holders No part of the specifications may be reproduced in any form or by any means or used to make any derivative such as translation transformation or adaptation without permission from TP LINK TECHNOLOGIES CO LTD Copyright 2016 TP LINK TECHNOLOGIES CO LTD All rights reserved http www tp link com ...

Page 3: ...SRD with FHSS modulation 1 1 Maximum 2 5 mW e i r p 1 2 Maximum 100 mW e i r p Permitted for use SRD for outdoor applications without restriction on installation height only for purposes of gathering telemetry information for automated monitoring and resources accounting systems Permitted to use SRD for other purposes for outdoor applications only when the installation height is not exceeding 10 m...

Page 4: ...If you need service please contact us Avoid water and wet locations Explanation of the symbols on the product label Symbol Explanation Indoor use only RECYCLING This product bears the selective sorting symbol for Waste electrical and electronic equipment WEEE This means that this product must be handled pursuant to European directive 2012 19 EU in order to be recycled or dismantled to minimize its...

Page 5: ...cal regulations applicable to the product within the scope of Council Directives Directives 2004 108 EC Directives 2006 95 EC Directives 2011 65 EU Directives 1999 5 EC Directives 1999 519 EC The above product is in conformity with the following standards or other normative documents EN 55022 2010 AC 2011 EN 60950 1 2006 A11 2009 A1 2010 A12 2011 A2 2013 EN 50412 2 1 2005 EN 62311 2008 EN 300 328 ...

Page 6: ...lugging this product into a wall socket make sure that the electrical socket is not damaged and that there is no gas leakage 10 Place the connecting cables properly so that people won t stumble or walk on it 11 This product should be operated from the type of power indicated on the marking label If you are not sure of the type of power available consult the qualified technician 12 Unplug this prod...

Page 7: ...ce 8 3 1 Login 8 3 1 1 For Wired Connection 8 3 1 2 For Wireless Connection 9 3 2 Status 11 3 3 Network 12 3 4 Wireless 12 3 4 1 Wireless Settings 13 3 4 2 Wireless Security 14 3 4 3 Wireless MAC Filtering 17 3 4 4 Wireless Advanced 19 3 4 5 Wireless Statistics 20 3 5 Powerline 21 3 5 1 Network Settings 21 3 5 2 Station Settings 21 3 6 System Tools 23 3 6 1 Firmware Upgrade 23 3 6 2 Factory Defaul...

Page 8: ...Windows Vista 30 4 3 In Windows XP 32 4 4 In Windows 8 32 Chapter 5 Pair Button and Reset Button 35 5 1 Pair Secure with 128 bits AES 35 5 2 Setting Up a Powerline Network with the Pair Button 35 5 3 Reset 36 Appendix A Troubleshooting Guide 37 Appendix B Specifications 38 ...

Page 9: ...300Mbps With multiple protection measures including SSID broadcast control wireless LAN WEP encryption and Wi Fi Protected Access WPA2 PSK WPA PSK the device delivers complete data privacy It supports an easy Web based management utility Even though you may not be familiar with the device you can easily configure it with the help of this Guide The adapter adds three new functions which are found t...

Page 10: ... as a high shelf 3 Away from the potential sources of interference such as PCs microwaves and cordless phones 4 Away from large metal surfaces Failure to follow these guidelines can result in significant performance degradation or inability to wirelessly connect to the powerline extender Note Take notes that this 300Mbps AV500 WiFi Powerline Extender works in pairs or with another powerline adapte...

Page 11: ...a powerline network but there is no data being transferred Off The device isn t connected to any powerline network Blinking The device is transferring data Ethernet LED Solid The Ethernet port is connected Off The Ethernet port isn t connected Wi Fi Wi Fi Clone LED Off The wireless function is disabled Blinking slowly The extender is cloning Wi Fi settings from the other device Blinking quickly Th...

Page 12: ...han 10 seconds the extender will leave the network it is associated with and its network name assumes a random value 2 For detailed information about the Reset button and Pair button please refer to Chapter 5 Pair Button and Reset Button 2 4 Hardware Connection Please first make sure that your PC can successfully access the Internet via the router Then connect the powerline devices by following th...

Page 13: ...A4020P Wireless Router WAN LAN WAN Note Do not connect the powerline extender or powerline adapter to an extension lead power strip extension cord or surge protector as these may degrade the network performance Step 2 Connecting the Computer Following are the steps to properly connect the powerline extender to your computer 1 Connect one end of the provided Ethernet RJ45 cable to the powerline ext...

Page 14: ...er 6 5 Check and confirm that the Power LED and Ethernet LED on the powerline extender are ON The hardware connection mechanism is shown below As soon as the powerline devices are connected following the steps above a powerline network is available ...

Page 15: ... router for 2 seconds Here we take TP LINK router as an example 2 Press the Wi Fi Clone button on the extender for 2 seconds The extender will reboot later It s recommended that you plug the extender near the router to use Wi Fi Clone button After Wi Fi Clone A unified wireless network is established The SSID and wireless password of the powerline extender will be the same as the wireless router N...

Page 16: ...onnected to the extender via Ethernet cable you can log in the extender by following the steps below 1 Obtain the Management Utility setup file from the product support page at http www tp link com 2 Open the exe file and click Connect to log in to the Web based management utility Figure 3 1 Management Utility Note If another TL WPA4220 is displayed on the screen above and you cannot decide which ...

Page 17: ...the Using Proxy checkbox and click OK to finish it 3 1 2 For Wireless Connection If your device is connected to the extender via wireless you can log in the extender by following the steps below 1 Launch a web browser and type in the default domain name http tplinkplclogin net in the address field Figure 3 3 Log into the Powerline Extender 2 Enter admin for the User name and Password both in lower...

Page 18: ...ppears deselect the Using Proxy checkbox and click OK to finish it After a successful login you can configure and manage the device There are five main menus on the leftmost column of the Web based management page Status Network Wireless Powerline and System Tools Submenus will be available after clicking one of the main menus On the right of the Web based management page lays the detailed explana...

Page 19: ...ne including the MAC address Device Password and Network Name which can be configured on the Powerline Network Settings page MAC Address The physical address of the powerline extender as seen from powerline Device Password The security ID that restricts access to critical device functions Network Name The name that identifies a logical network Network The following parameters apply to the Ethernet...

Page 20: ...fresh button to get the latest status and settings of the powerline extender 3 3 Network You can configure the IP parameters of the powerline extender on this page Figure 3 6 Network MAC Address The physical address of the powerline extender s Ethernet port The value can not be changed IP Address Enter the IP address of the powerline extender in dotted decimal notation factory default setting is 1...

Page 21: ...less Settings Wireless Security Wireless MAC Filtering Wireless Advanced and Wireless Statistics Click any of them and you will be able to configure the corresponding function The detailed explanations for each submenu are provided below Figure 3 7 Wireless menu 3 4 1 Wireless Settings Selecting Wireless Wireless Settings will enable you to configure the basic settings for your wireless network on...

Page 22: ...ess devices connected with the powerline extender can connect in the same transmission mode e g 802 11b you can choose the Only mode e g 11b only If you have some devices that use different transmission modes choose the appropriate Mixed mode Channel Width Determines the channel width to be used It is unnecessary to change the default value unless required Enable Wireless Powerline Extender Radio ...

Page 23: ...ess security If disabled the wireless stations will be able to connect this device without encryption It is strongly recommended that you choose one of the security types to enable security WEP Select 802 11 WEP security Figure 3 10 WEP Type You can select one of following types Automatic Select Shared Key or Open System authentication type automatically based on the wireless station s capability ...

Page 24: ...racters For 128 bit encryption You can enter 26 hexadecimal digits any combination of 0 9 a f A F zero key is not permitted or 13 ASCII characters Note If you do not set the key the wireless security function is still disabled even if you have selected Shared Key as Authentication Type WPA WPA2 Select WPA WPA2 based on Radius Server Figure 3 11 WPA WPA2 Version You can select one of the following ...

Page 25: ...or at least 30 Enter 0 to disable the update Be sure to click the Save button to save your settings on this page Note You will be reminded to reboot the device after clicking the Save button 3 4 3 Wireless MAC Filtering Selecting Wireless Wireless MAC Filtering will allow you to set up some filtering rules to control wireless stations accessing the device which depends on the station s MAC address...

Page 26: ...s To add a MAC Address Filtering entry follow these instructions 1 Enter the appropriate MAC Address into the MAC Address field The format of the MAC Address is XX XX XX XX XX XX X is any hexadecimal digit For example 00 0A EB B0 00 0B 2 Enter a simple description of the wireless station in the Description field For example wireless station A 3 Select Enabled or Disabled for this entry on the Stat...

Page 27: ...ules that configured should be similar to the following list Note If you enable the function and select Deny the stations not specified by any enabled entries in the list to access for Filtering Rules but there isn t any enabled entry in the list thus no wireless stations can access the device 3 4 4 Wireless Advanced Selecting Wireless Wireless Advanced will allow you to do some advanced settings ...

Page 28: ...ll connected wireless stations so that wireless stations cannot access each other through WLAN This function will be disabled if WDS Bridge is enabled Note If you are not familiar with the setting items on this page it s strongly recommended that you keep the provided default values otherwise it may result in low wireless network performance 3 4 5 Wireless Statistics Selecting Wireless Wireless St...

Page 29: ...MAC Address The physical address of the powerline extender as seen from the powerline The value can not be changed Device Password The password of the powerline extender The value can not be changed Network Name Enter the network name factory default HomePlugAV Click the Default button to enter the default network name Click the Set Local button to set the powerline extender Click the Set All butt...

Page 30: ...er the station password in Device Password field The format of the password is XXXX XXXX XXXX XXXX X is any character For example RLXL BYPI MZBO OPAB 2 Enter a name you want to give the station in the Device Name field or leave it empty For example Station A 3 Click the Save button to save this entry Figure 3 20 Add or Modify PLC Station entry To add or modify another entries repeat steps 1 3 Clic...

Page 31: ...er to the latest version of firmware as well as backup or restore the device s configuration files It s suggested that you change the default password to a more secure one because it controls access to the device s web based management page Besides you can find out what happened to the system in System Log There are six submenus under the System Tools menu shown as Figure 3 22 Firmware Upgrade Fac...

Page 32: ...ing important configuration settings of device To upgrade the device s firmware follow these instructions 1 Download a more recent firmware upgrade file from the TP LINK website http www tp link com 2 Click Choose File to select the downloaded file on the computer 3 Click Upgrade 4 The powerline extender will reboot while the upgrading has been finished Note The firmware version must correspond to...

Page 33: ...up to save all configuration settings to your local computer as a file To restore the device s configuration follow these instructions Click Choose File to find the configuration file which you want to restore Click Restore to update the configuration with the file whose path is the one you have input or selected in the blank Note 1 The current configuration will be covered with the uploading conf...

Page 34: ...em Tools Password allows you to change the factory default user name and password of the device on the screen shown in Figure 3 27 Figure 3 27 Password It is strongly recommended that you change the factory default user name and password of the device All users who try to access the device s web based management page or Quick Setup will be prompted for the device s user name and password Note The ...

Page 35: ...line Extender 27 Figure 3 28 System Log The device can keep logs of all traffic You can query the logs to find what happened to the device Click the Refresh button to show the latest log list Click the Clear All button to clear all logs ...

Page 36: ... Fi Clone button to clone Wi Fi settings from the front router the SSID and wireless password of the powerline extender will be the same as the wireless router If you have established a secure and separate wireless network from the wireless router the SSID and wireless password of the powerline extender will be what you have set 4 1 In Windows 7 Windows 7 users may use the built in wireless utilit...

Page 37: ...ne Extender 29 2 Input the network key and then click OK Figure 4 2 Note If your network is an unsecured network you will not be prompted to input the network key 3 You have joined the home network and can surf the Internet now Figure 4 3 ...

Page 38: ...In Windows Vista Windows Vista users may use the built in wireless utility Follow the steps below 1 Right click the icon at the bottom of your screen then click Connect to a network Figure 4 4 2 Select the SSID of TL WPA4220 and then click Connect Figure 4 5 ...

Page 39: ...t the network key and then click Connect Figure 4 6 Note If your network is an unsecured network you will not be prompted to input the network key 4 You have joined the home network and can surf the Internet now Click Close to finish the connection Figure 4 7 ...

Page 40: ...bottom of your desktop select the SSID of TL WPA4220 and then click Connect Figure 4 8 2 Input the network key and then click Connect Figure 4 9 Note If your network is an unsecured network you will not be prompted to input the network key 4 4 In Windows 8 If you are using Windows 8 please follow the steps below to connect to the wireless network of the powerline extender ...

Page 41: ...of your desktop select the SSID of TL WPA4220 and then click Connect 2 Input the network security key and then click Next Note If your network is an unsecured network you will not be prompted to input the network key 3 Click to select whether to turn on sharing and connect to devices ...

Page 42: ...TL WPA4220 300Mbps AV500 WiFi Powerline Extender 34 4 You have joined the home network and can surf the Internet now ...

Page 43: ...0P for device A TL WPA4220 for device B and C 5 2 Setting Up a Powerline Network with the Pair Button You can connect a number of devices on a powerline network but you can use the Pair button on only two devices at a time Create a Powerline network using the Pair button Step 1 Press and hold the Pair button of powerline device A TL PA4020P for one second the Power LED will start flashing Step 2 W...

Page 44: ...p 2 can be exchanged Leave an existing Powerline Network As the figure above shows powerline device A B and C have formed a powerline network The user wants to remove one device powerline adapter C from this network Step 1 Press and hold the Pair button on powerline device C for at least 10 seconds Powerline device C will reset and restart Step 2 Wait for the reset to complete 5 3 Reset To reset t...

Page 45: ...ther end of the Ethernet cable RJ45 is properly connected to the computer LAN card or to your Cable xDSL Ethernet port 2 Make sure your computer LAN card is properly installed and configured 3 Make sure your Cable xDSL broadband access is working and configured correctly Contact your local dealer for technical support if the Ethernet LED still fails to light up after the above procedures 3 Powerli...

Page 46: ... Consumption 6W Data Rate Powerline 500Mbps Wireless 300Mbps Range 300 Meters over electrical circuit SOFTWARE FEATURES Modulation Technology OFDM PLC Encryption Powerline Security 128 bit AES Wireless Security WEP WPA WPA2 WPA PSK WPA2 PSK Encryption OTHERS Certification CE FCC RoHS Package Contents Powerline Ethernet Adapter 6 5 ft 2 m Ethernet cable RJ45 Quick Installation Guide Environment Ope...

Reviews: