background image


27

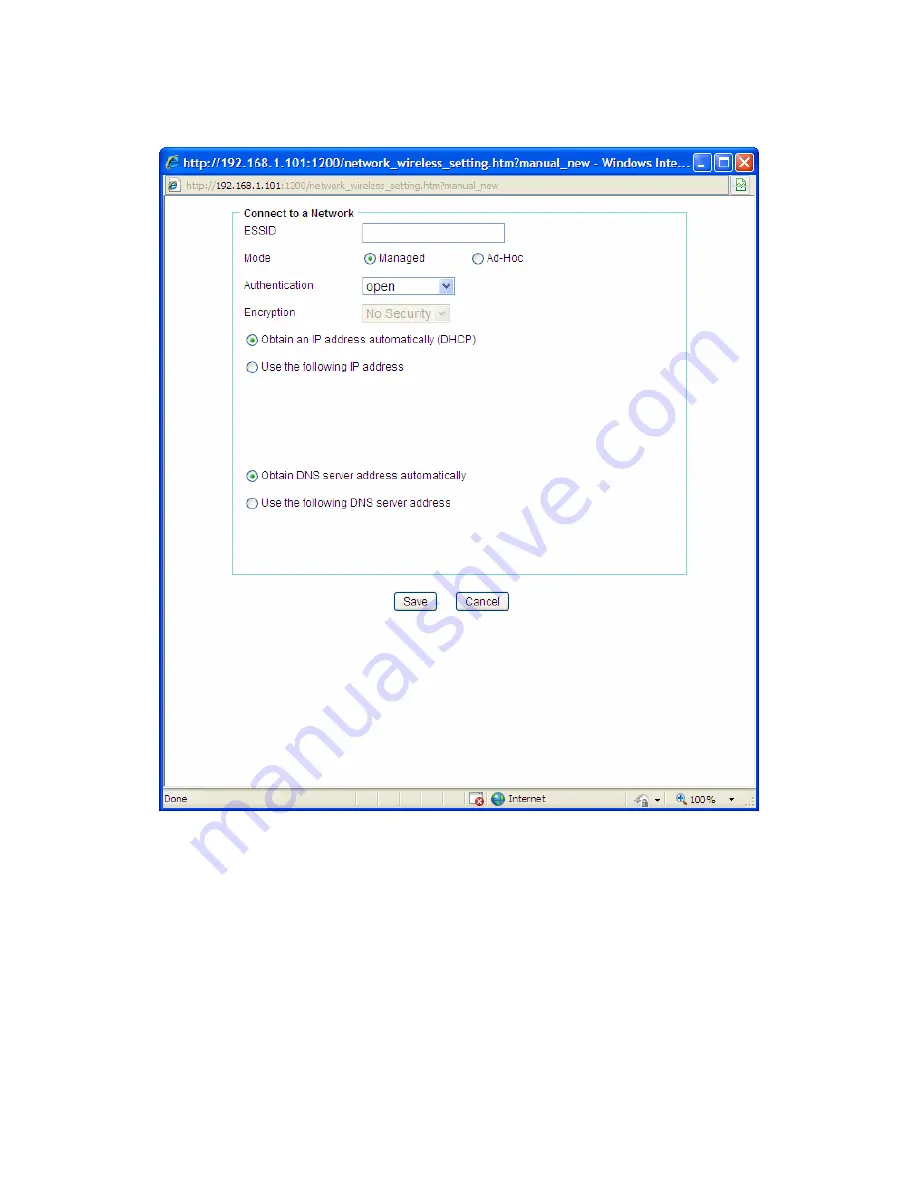
If you want manually fill in the ESSID of the wireless network, you can click

 Manual

 button. The network 

wireless setting page will display. Then enter the ESSID of the wireless network, select a mode, select 
the corresponding authentication and encryption, get an IP address for the Camera and click “

Save

”. 


ESSID

 – Enter the name of a wireless network (or ad-hoc device).   


Mode 

– The 

Managed

 option means the Camera will attempt to connect to an access point. 

The 

Ad-hoc

 option allows the Camera to connect to other wireless device clients.   


Authentication

 – The authentication of the wireless network. All the parameters for 

authentication must be the same as that of the desired AP or Router. 

Open

Open/Share

WPA-PSK

 and 

WPA2-PSK

 encryption security are supported by the Camera. Enter the 

ESSID of the desired wireless network, the corresponding option should be selected as same 
as that of the desired AP or Router.   

Here we take the wireless network with the ESSID of 

TP-LINK_Network1

 as an example. Its 

Authentication is 

WPA2-PSK

. The figure will display as shown below: 

Summary of Contents for TL-SC2020N

Page 1: ...TL SC2020N Wireless N Network Camera Rev 1 0 0 1910010671 ...

Page 2: ...s are trademarks or registered trademarks of their respective holders No part of the specifications may be reproduced in any form or by any means or used to make any derivative such as translation transformation or adaptation without permission from TP LINK TECHNOLOGIES CO LTD Copyright 2012 TP LINK TECHNOLOGIES CO LTD All rights reserved http www tp link com ...

Page 3: ...ed radio TV technician for help This device complies with part 15 of the FCC Rules Operation is subject to the following two conditions 1 This device may not cause harmful interference 2 This device must accept any interference received including interference that may cause undesired operation Any changes or modifications not expressly approved by the party responsible for compliance could void th...

Page 4: ...tdoor use and public service France Outdoor use limited to 10 mW e i r p within the band 2454 2483 5 MHz Military Radiolocation use Refarming of the 2 4 GHz band has been ongoing in recent years to allow current relaxed regulation Full implementation planned 2012 Italy None If used outside of own premises general authorization is required Luxembourg None General authorization required for network ...

Page 5: ...ons suivantes 1 Le dispositif ne doit pas produire de brouillage préjudiciable et 2 Ce dispositif doit accepter tout brouillage reçu y compris un brouillage susceptible de provoquer un fonctionnement indésirable NOTE IMPORTANTE Déclaration d exposition aux radiations Cet équipement est conforme aux limites d exposition aux rayonnements IC établies pour un environnement non contrôlé Cet équipement ...

Page 6: ...es 2011 65 EU The above product is in conformity with the following standards or other normative documents ETSI EN 300 328 V1 7 1 2006 ETSI EN 301 489 1 V1 8 1 2008 ETSI EN 301 489 17 V2 1 1 2009 EN 55022 2010 EN 55024 2010 EN 61000 3 2 2006 A1 2009 A2 2009 EN 61000 3 3 2008 EN60950 1 2006 A11 2009 A1 2010 A12 2011 EN62311 2008 The product carries the CE Mark Person is responsible for marking this...

Page 7: ...dows Web Browser 10 Chapter 4 Operating Camera via Mobile Phone 12 4 1 Mobile Phone Viewing 12 4 1 1 3G Mobile Phone Streaming Viewing 12 4 1 2 2 5G Mobile Phone WAP Viewing 12 4 1 3 2 5G Mobile Phone Browser Viewing 12 4 2 Using Camera via iPhone 12 Chapter 5 Configuration of Main Menu 14 5 1 Home 14 5 1 1 Video play buttons 14 5 1 2 Snapshot 15 5 1 3 Digital zoom in out the image via the monitor...

Page 8: ...a with your network environment to access Internet 40 B Storage Requirement Table Help to set Recording Storage System 40 C System Requirement Help to setup System 40 Europe EU Declaration of Conformity 42 Federal Communication Commission Interference Statement 45 ...

Page 9: ...unting Bracket with three screws a Lock Ring a Brace and a Base Plate RJ45 Cable Quick Installation Guide Resource CD including This User Guide Application Guide Other helpful information Note Make sure that the package contains the above items If any of the listed items is damaged or missing please contact your distributor ...

Page 10: ... for a long time or close to heating equipment e g near heaters Close to water e g near a bathtub kitchen sink laundry tub Close to sources of strong magnetism Close to sources of powerful electromagnetic radiation such as radios or TV transmitters Locations subject to strong vibration or shock In case of a breakdown In case of system breakdown discontinue use and contact your authorized dealer In...

Page 11: ...service package E g Net Framework Windows Media Player Enhance ActiveX Security 2 2 Product Features These easy to follow instructions make it quick and simple for setup and operation so you ll also soon be enjoying the benefits of these product features SYSTEM Resolutions Up to 640 x 480 Compressing format Motion JPEG Frame Rate Up to 30 fps at 640 x 480 Brightness Contrast Saturation Sharpness E...

Page 12: ... Wireless IEEE 802 11b g n with WEP WPA WPA2 Up to 150 Mbps WPS 1 Wi Fi Protected Setup 2 3 Physical Overview 2 3 1 Front View Built in Microphone Power LED Indicator Network LED Indicator It lights up when the Camera is well connected to the network It flashes when there are data being transmitted Power LED Indicator Solid Red The Camera boots up Flash Red The Camera has finished booting up but i...

Page 13: ... be restored to factory defaults LAN Port Through this port you can connect the Camera to your computer or the other Ethernet network devices WPS Wi Fi Protected Setup This button is used to easily set up a wireless connection with the Router supporting WPS Step 1 Press the WPS button on the router supporting WPS for 2 seconds Step 2 Within 2 minutes press the WPS button on the Camera for 2 second...

Page 14: ...e 2 Loosen the lock ring to adjust the desired angle of the Camera 3 Tighten the lock ring 2 5 Hardware Connection Before proceeding confirm that your PC is connected to your router and can access the Internet Make sure that your router s DHCP feature is enabled If not please refer to your router s instruction to enable it For TL SC2020N you can set up either a Wired Connection or a Wireless Conne...

Page 15: ...he power adapter into the power outlet 2 5 2 Wireless Connection by WPS Power on the Camera and make sure that the Power LED is flash red Then take the following steps A Press the WPS button on the Router supporting WPS for 2 seconds B Within 2 minutes press the WPS button on the Camera for 2 seconds After you press the WPS button on the Camera the WPS LED will turn flash blue Once the WPS Connect...

Page 16: ...ovided CD into your CD ROM driver The Setup Wizard will automatically pop up on your computer s screen as shown in the figure below Figure 3 1 2 Choose the Intelligent IP Installer and then the next screen appears Click on Intelligent IP Installer to begin the installation Figure 3 2 ...

Page 17: ...Programs TP LINK Intelligent IP Installer to start using the program Figure 3 3 4 The following screen will then display Click the Search button to search Network Cameras in the network it displays Network Cameras information including IP Address Figure 3 4 ...

Page 18: ...your web browser and then enter the IP address or host name of the Camera in the Location Address field of your browser 1 Click Link to IE button in Figure 3 4 directly You can also launch your web browser and then enter the IP address or host name of the Camera in the Location Address field of your browser 2 Use the default User name admin and default Password admin Note The default User name adm...

Page 19: ...11 3 The monitor image will be displayed in your browser In the far left side of main configuration are Home Information Basic setup System and Language ...

Page 20: ... RTSP streaming just type in rtsp IP PORT video 3gp as the Player URL 4 1 2 2 5G Mobile Phone WAP Viewing For 2 5G mobile phone viewing type http IP mobile wml into your 2 5G WAP Browser IP is the Public IP address of your Camera 4 1 3 2 5G Mobile Phone Browser Viewing For 2 5G mobile phone viewing type http IP mobile htm into your 2 5G Web Browser IP is the Public IP address of your Camera 4 2 Us...

Page 21: ...values are both admin Then click Log in 4 The TP LINK User Interface and live image will show up in the middle of the screen Note It will show continuous snapshots not a real time video streaming Therefore the recording feature is disabled ...

Page 22: ... main Browser The functions include Snapshot Open digital zoom Audio and Video Play Zoom FullScreen Pause Stop Snapshot Record Audio Button Zoom 5 1 1 Video play buttons Symbols Meaning Pause the current video Stop the current video Record the current video Full Screen Note Concerning the recording storage requirement of your hard disk please refer to the APPENDIX B Storage Requirement Table ...

Page 23: ...he monitor window Click to display the digital zoom in window Pull the to adjust the digital zoom range and it will be showed on the above window Use the left click of your mouse to move to anywhere in the window area 5 1 4 Audio buttons Symbols Meaning Note Mute off mean you can broadcast to the connected Camera s via the Ethernet using your microphone Mute on mean you can t broadcast to the conn...

Page 24: ...is function is only for the Administrator Click Basic setup to display the submenus Account Network Image Setting Video Audio Camera setting and Events 5 3 1 Account The device fault account and password setting is admin admin That means everyone who knows IP address can access the device including all configuration It is necessary to assign a password if the device is intended to be accessed by o...

Page 25: ...wers cannot access the Camera Select Enable to and the anonymous users can access the Camera in Viewer mode To add a new account please follow the steps below 1 Click the Add button 2 On the account setting window as shown in the following figure enter a User name and Password for the account then select a Role from the drop down list Click Save to apply the settings User Name Set a user name for ...

Page 26: ...ot only view the Live View but also the Information page The Administrator mode has all authority of configuration 5 3 2 Network Click the Network to display the submenus including TCP IP PPPoE DDNS UPnP Wireless and WPS 5 3 2 1 TCP IP This page displays the MAC address of the Camera and it s also used for the TCP IP configuration Obtain an IP address automatically DHCP If a DHCP server is install...

Page 27: ...erver if necessary HTTP Port Number Select 80 in general situations If you want to use a port number other than 80 select the text box and enter a port number between 1124 and 65534 When you have set the HTTP port number to a number other than 80 on the Network setting page or in the Setup Program access the device by typing the IP address of the device on the web browser as follows for example wh...

Page 28: ...ct this to obtain the address of DNS server automatically Use the following DNS server address Select this when you set the fixed address as the IP address of DNS server Primary DNS server Enter the IP address of the primary DNS server Secondary DNS server Enter the IP address of the secondary DNS server Note 1 PPPoE Point to Point Protocol over Ethernet PPPoE is a network protocol for encapsulati...

Page 29: ...er sites on the Internet to establish connection to the machine without needing to track the IP Address themselves Server Name Choose the DDNS Server from the list User ID Enter the user ID for authentication necessary for DDNS connections Type it up to 64 characters Password Enter the password for authentication necessary for DDNS connections Type it up to 32 characters Re type Password Re type t...

Page 30: ...22 2 Input all information and follow step by step with DynDNS 3 Login with new account and click Account My Hosts Add Host Services ...

Page 31: ...23 4 Type domain in the Hostname field and select sub domain 5 After typing information check your DDNS service ...

Page 32: ...name in Setting Network DDNS After completing setting reboot the Camera 5 3 2 4 UPnP Universal Plug and Play If you have a Router to access to Internet and the Router supports UPnP IGD function you need to turn on the UPnP Port Forwarding function ...

Page 33: ... simplify the implementation of networks in the home and corporate environments 5 3 2 5 Wireless The wireless network has to be set up by using cable network connection After setting the Camera correctly the wireless function can work without cable network connection Wireless settings must be the same as the access point or ad hoc device When changing the settings they should always be made first ...

Page 34: ... Security Shows which type of security the network uses See below for the security types supported by the Camera Radio Type Displays the radio type of the wireless network Mode Shows if the network type is Managed access point or router or Ad Hoc another client Channel Shows the wireless channel currently in use Click the Connect button to connect the Camera to the selected wireless network The ES...

Page 35: ...ect to an access point The Ad hoc option allows the Camera to connect to other wireless device clients Authentication The authentication of the wireless network All the parameters for authentication must be the same as that of the desired AP or Router Open Open Share WPA PSK and WPA2 PSK encryption security are supported by the Camera Enter the ESSID of the desired wireless network the correspondi...

Page 36: ...ect this when the fixed IP address is set IP address Enter the IP address of the Camera which must be in the same subnet with that of the desired AP Router Subnet mask Enter the subnet mask Default gateway Enter the default gateway Obtain DNS server address automatically If you select Obtain an IP address automatically DHCP above this entry will display in the figure Select this to obtain the addr...

Page 37: ... Protected Setup WPS or Quick Setup Security QSS you can establish a wireless connection between wireless Camera and router using either Push Button Configuration PBC method or PIN method I PBC Push Button Configuration method 1 Press the WPS QSS button of the router 2 Press the WPS button on the Camera in two minutes II PIN method 1 Firstly check PIN in the following screen You can also click the...

Page 38: ...the image is Contrast The value range is 0 100 The contrast is a measure of a display system defined as the ratio of white to black that the system is capable of producing The higher value the contrast is the more delicate of color you can have Saturation The value range is 0 100 The saturation of a color is determined by a combination of light intensity and how much it is distributed across the s...

Page 39: ...g Auto Florescent Incandescent Sunny and Cloudy 5 3 4 Video On this page you can optimize the video by adjusting its Resolution Maximum Frame rate and Light Frequency Resolution Select the video resolution among 640 480 320 240 and 160 120 Maximum Frame rate Select the maximum frame rate among 30 20 15 10 7 5 and 1 Light Frequency Select the light frequency among Auto 60Hz and 50Hz 5 3 5 Audio Sel...

Page 40: ...On to enable the LEDs select Off to disable the LEDs 5 3 7 Events Click Events to display the submenus including Motion detection e Mail SMTP and FTP 5 3 7 7 Motion detection There are three Motion Detection functions as sensors to set for different detecting zones Each one has Threshold and Sensitivity inputs which you can adjust to specific zone sequentially ...

Page 41: ...ction Threshold It means the extent to which the alarm will be triggered The default value is 50 and the value range is 0 100 The larger the value the higher the threshold Sensitivity It means that how often the sensor will scan the image different The higher sensitivity it is and the more frequently it scans The default value is 50 and the value range is 0 100 The larger the value the higher the ...

Page 42: ...y when an e mail is sent select one of the authentication methods from the followings SMTP Select if SMTP authentication is necessary for sending e mail POP Before SMTP Select when POP before SMTP authentication is necessary for sending e mail Note When you set to On be sure to select either or both SMTP or and POP before SMTP POP server name It is necessary when the POP before SMTP is selected in...

Page 43: ...P CAM and the SMPT server work Effective Period Set the period when the periodical sending is effective Always The periodical sending is always effective Schedule You can specify the period when the periodical sending is effective in the schedule setting in the other section Select Schedule and click the Schedule button and the Schedule setting page will appear Schedule Selection Select the list b...

Page 44: ...confirm the password type the same characters as you typed in the Password box Passive Mode Set whether you use the passive mode of FTP server or not when connecting to FTP server Select On to connect to FTP server using the passive mode Test After setting the FTP server information you can tick the test key to test if the connection between IP CAM and FTP server works Effective Period Set the per...

Page 45: ...and Date Time 5 4 1 Initialize Reboot Click this button to reboot this Camera It takes one minute to complete the reboot process Factory Default Click this button to recover this Camera to the factory default setting A confirmation dialogue will appear and then click OK to execute The network indicator on this Camera will start to blink This Camera will reboot automatically after completing adjust...

Page 46: ...te Time screen displays all options of time setting Current Date Time This displays the current date and time of this Camera PC Clock This displays the date and time of the monitoring PC clock Date Time Format You can click the drop down list to select different time display formats Keep current setting Select this mode to keep the current date and time of this Camera Synchronize with PC Select th...

Page 47: ...ylight Saving Time There are two modes to choose for setting up daylight saving time By Date Set the start and end time by select month day hour and minute By Week Number Set the start and end time by select month week hour and minute 5 5 Language Select a language from the drop down list the present display language of WEB User Interface will be changed ...

Page 48: ...20 6419 19 640 480 15 4970 14 640 480 10 3162 9 640 480 7 2427 7 640 480 5 1961 5 640 480 1 392 1 320 240 30 3416 29 320 240 20 2270 19 320 240 15 1770 14 320 240 10 1188 9 320 240 7 900 7 320 240 5 706 5 320 240 1 147 1 160 120 30 1493 29 160 120 20 989 19 160 120 15 756 14 160 120 10 499 9 160 120 7 346 7 160 120 5 302 5 160 120 1 62 1 B Storage Requirement Table Help to set Recording Storage Sy...

Page 49: ... 5 160 120 30 1493 15 4 160 120 20 989 10 2 160 120 15 756 7 8 160 120 10 499 5 1 160 120 7 346 3 6 160 120 5 302 3 1 160 120 1 62 0 6 C System Requirement Help to setup System Item Requirements CPU Pentium 4 2 8GHz or equivalent AMD Graphic Card 256 MB RAM graphic cards or equivalent on board graphic cards RAM 2 GB RAM Operating System Windows 2000 Windows 2003 Windows XP Windows Vista Windows 7 ...

Page 50: ...nd Italy where restrictive use applies In Italy the end user should apply for a license at the national spectrum authorities in order to obtain authorization to use the device for setting up outdoor radio links and or for supplying public access to telecommunications and or network services This device may not be used for setting up outdoor radio links in France and in some areas the RF output pow...

Page 51: ...erbij verklaart naam van de fabrikant dat het toestel type van toestel in overeenstemming is met de essentiële eisen en de andere relevante bepalingen van richtlijn 1999 5 EG Malti Maltese Hawnhekk isem tal manifattur jiddikjara li dan il mudel tal prodott jikkonforma mal ħtiġijiet essenzjali u ma provvedimenti oħrajn relevanti li hemm fid Dirrettiva 1999 5 EC Magyar Hungarian Alulírott gyártó nev...

Page 52: ...44 Svenska Swedish Härmed intygar företag att denna utrustningstyp står I överensstämmelse med de väsentliga egenskapskrav och övriga relevanta bestämmelser som framgår av direktiv 1999 5 EG ...

Page 53: ...ate the receiving antenna Increase the separation between the equipment and receiver Connect the equipment into an outlet on a circuit different from that to which the receiver is connected Consult the dealer or an experienced radio TV technician for help This device complies with Part 15 of the FCC Rules Operation is subject to the following two conditions 1 This device may not cause harmful inte...

Reviews: