background image

3

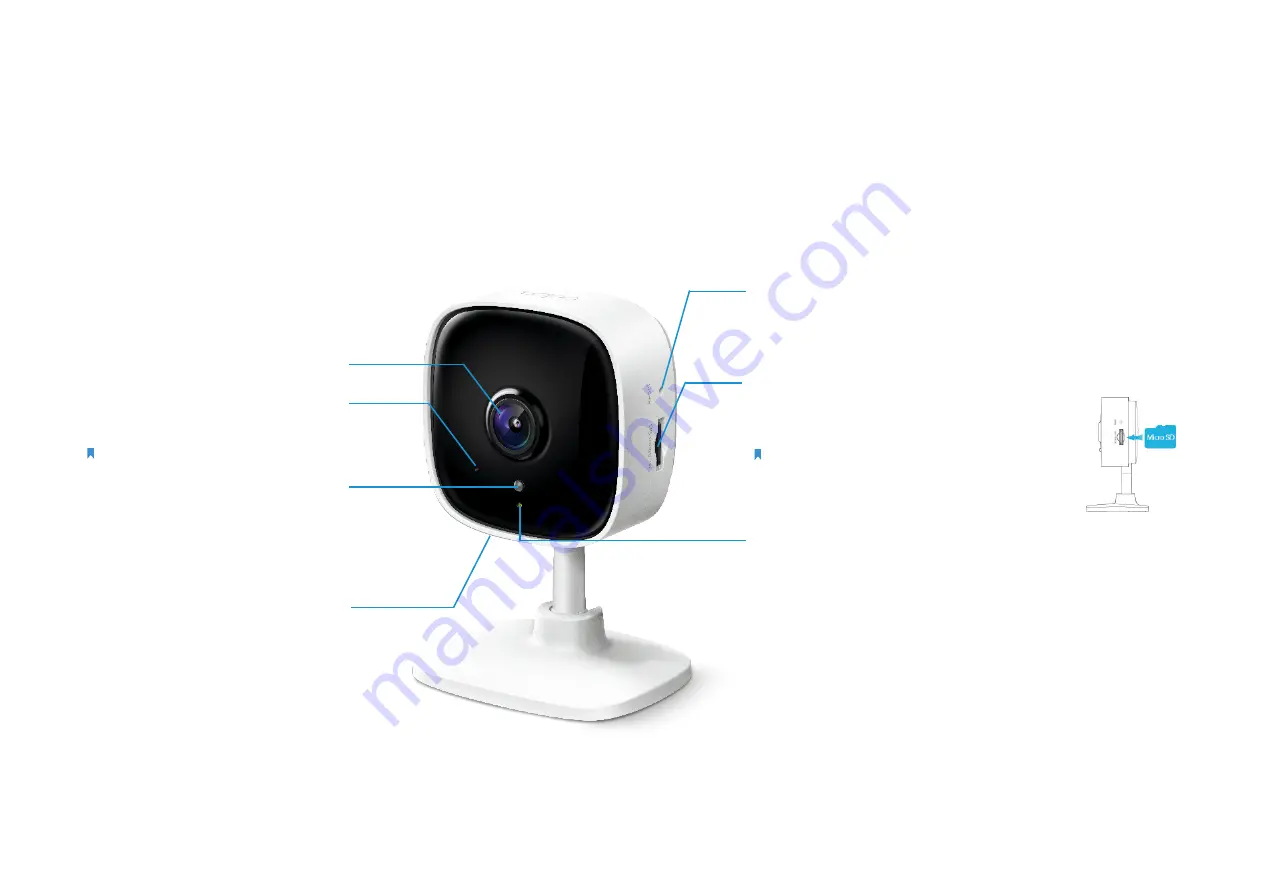
Appearance

The Home Security Wi-Fi Camera has a system LED that changes color according to its status, an alert light, lens, microphone, DC power port, RESET 

button and a microSD card slot. Refer below for details.


microSD Card Slot

Insert a microSD card and initialize it on the 

app for local recording.

Note:


Holding the card in the correct orientation, 

carefully insert the SD card into the slot. Push in the SD 

card until you hear a clicking sound. Do NOT insert at 

an angle or use force.

System LED

•  Solid red: 

Starting up

•  Blinking red and green: 

Ready for setup

•  Blinking red slowly: 

Connecting to Wi-Fi

•  Solid amber: 

Connected to Wi-Fi

•  Solid green: 

Connected to TP-Link Cloud server

•  Blinking red quickly: 

Camera resetting

•  Blinking green quickly: 

Camera updating

RESET Button

Press and hold for at least 5 seconds until 

the LED blinks red to reset your camera.

Alert Light

Blinks to alert you when the 

activity detected.

DC Power Port

Connect the power cord provided.

Lens

Microphone

Built-in internal microphone. 

Note:


Do NOT insert objects into the hole.

Summary of Contents for tapo TC60

Page 1: ...User Guide Home Security Wi Fi Camera TC60 2021 TP Link 1910013061 REV2 0 0 ...

Page 2: ...bout This Guide 1 Introduction 2 Appearance 3 Set Up Your Camera 4 Set Up Using Amazon Frustration Free Setup 6 Main Camera Controls 10 Motion Detection 12 24 hour Recordings 16 Privacy Mode 18 Authentication 19 ...

Page 3: ... this guide the following convention is used Convention Description Blue Key information appears in teal including management page text such as menus items buttons and so on Underline Hyperlinks are in teal and underlined You can click to redirect to a website Note Ignoring this type of note might result in a malfunction or damage to the device More Info Specifications can be found on the product ...

Page 4: ... up to 30 ft in total darkness Live View Always keep an eye on what matters most to you anytime anywhere Two Way Audio Communicate in real time through a built in microphone and speaker Alarm System Triggers lights and sounds as an alarm when motion is detected Privacy Mode Temporarily shut down surveillance with a tap in the app Sharing Share interesting and funny videos to everyone on social med...

Page 5: ...you hear a clicking sound Do NOT insert at an angle or use force System LED Solid red Starting up Blinking red and green Ready for setup Blinking red slowly Connecting to Wi Fi Solid amber Connected to Wi Fi Solid green Connected to TP Link Cloud server Blinking red quickly Camera resetting Blinking green quickly Camera updating RESET Button Press and hold for at least 5 seconds until the LED blin...

Page 6: ...Step 1 Download App Get the Tapo app from the App Store or Google Play or by scanning the QR code below OR Step 2 Log In Open the app and log in with your TP Link ID If you don t have an account create one first Step 3 Add Your Camera Tap the button in the app and select your model ...

Page 7: ...k Position Place the mounting template where you want the camera For wall mounting drill two holes through two circles 2 Mount Base Affix two mounting screws with the help of mounting template For wall mounting insert two anchors into holes and screw the screws into the anchors 3 Secure Camera Hang your camera on the screws Note Your camera might use one of the following two types of screws n 7 5 ...

Page 8: ...e or router You have saved your Wi Fi information to Amazon by using Alexa echo Your Tapo device and router are on the same network as your Alexa echo LED Indications during Amazon Frustration Free Setup LED Status Blinking amber and green Ready for setup Blinking amber FFS setup in progress Solid green Working properly If the LED does not turn solid green after a long time you can try to add the ...

Page 9: ...7 1 Open the Amazon Alexa app Then tap More and select Skills Games How to use Amazon Frustration Free Setup with Tapo devices 2 Enter Tapo in the search bar and choose Tapo ...

Page 10: ... 3 Tap the ENABLE TO USE button 4 Log in with your TP Link ID that has bound to your Tapo device and tap Authorize After authorized successfully the message Tapo has been successfully linked will come up ...

Page 11: ...device displays on the Home page in the Tapo app it indicates this device has been successfully associated with your Amazon account and joined your Wi Fi network automatically If this device does not display on the Home page in the Tapo app try setting it up manually Tap the button on the page select your device model and then follow the app instructions ...

Page 12: ...e home page You can view and manage your camera from anywhere at any time with the Tapo app Live View Tap Talk or Voice Call to communicate with loved ones turn on Alarm to get noticed when motion detected enable the Privacy Mode to temporarily shut down the surveillance for privacy or go to Playback Memory to check all recordings and saved moments Multi Screen View live videos from multiple camer...

Page 13: ...k the memorable moments you saved or find the FAQs of using smart camera and basic info related to the Tapo app Camera Memory Photos and videos you took will appear here Device Sharing Share your Tapo devices to your family members to manage devices together Camera Preferences You can choose to display the Live or Speed tag on the screen for all your Tapo cameras Voice Control Set up connections w...

Page 14: ...o enable the Notifications function to receive motion detection messages Motion Detection With motion detection the Tapo app alerts you of activity that matters and sends notifications straight to you when motion detected Insert a microSD card to record the clips when motion detected Otherwise you can only receive the notifications Note Initialize the SD card on the app before using it ...

Page 15: ...a Alarm settings Choose Alarm Type Sound Light and Alarm Sound Siren Tone and set Alarm Schedule as needed 4 Customize Activity Zones and the camera will only detect motion in custom zones Entire view is covered by default ...

Page 16: ... Sensitivity Low Normal High as needed Increased sensitivity results in more recordings and notifications 6 After editing the detection settings for the camera you can set the Recording Schedule for the motion detection ...

Page 17: ... 7 On the Live View page tap to find all recordings The orange sections are recordings for motion detection Note The microSD card is needed for recordings Initialize the SD card on the app before using it ...

Page 18: ...gle on to enable the microSD Recording function and set the Recording Schedule for Continuous Recording 24 hour Recording as needed 24 hour Recordings The microSD card is needed for 24 hour recording and it s suggested to initialize the SD card on the app before using it ...

Page 19: ...17 3 On the Live View page tap to find all recordings The blue sections mean continuous recording Note The microSD card is needed for recordings Initialize the SD card on the app before using it ...

Page 20: ...18 Privacy Mode On the Live View page tap to enable the Privacy Mode When enabled streaming and recording functions will be temporarily disabled to protect your privacy ...

Page 21: ...s in compliance with the essential requirements and other relevant provisions of directives 2014 53 EU 2009 125 EC 2011 65 EU and EU 2015 863 The original EU Declaration of Conformity may be found at https www tapo com en support ce RF Exposure Information This device meets the EU requirements 2014 53 EU Article 3 1a on the limitation of exposure of the general public to electromagnetic fields by ...

Page 22: ...o com support ukca Korea Warning Statements 당해 무선설비는 운용중 전파혼신 가능성이 있음 NCC Notice BSMI Notice 注意 取得審驗證明之低功率射頻器材 非經核准 公司 商號或使用者均不得擅自變更頻率 加大功率或變更原設計之特性及功能 低功率射頻器材之使用不得影響飛航安全及干擾合法通信 經發現有干擾現象時 應立即停用 並改善至無干擾時方得繼續使用 前述合法通信 指依電信管理法規定作業之無線電通信 低功率射頻器材須忍受合法通信或工業 科學及醫療用電波輻射性電機設備之干擾 安全諮詢及注意事項 請使用原裝電源供應器或只能按照本產品注明的電源類型使用本產品 清潔本產品之前請先拔掉電源線 請勿使用液體 噴霧清潔劑或濕布進行清潔 注意防潮 請勿將水或其他液體潑灑到本產品上 插槽與開口供通風使用 以確保本產品的操作可靠並防止過熱 請勿堵...

Page 23: ...ng 0 1 wt and exceeding 0 01 wt indicate that the percentage content of the restricted substance exceeds the reference percentage value of presence condition 備考 2 係指該項限用物質之百分比含量未超出百分比含量基準值 Note 2 indicates that the percentage content of the restricted substance does not exceed the percentage of reference value of presence 備考 3 係指該項限用物質為排除項目 Note 3 The indicates that the restricted substance corres...

Page 24: ...ure 0 ºC 40 ºC 32 F 104 F Storage Temperature 40ºC 70ºC 40 F 158 F Please read and follow the above safety information when operating the device We cannot guarantee that no accidents or damage will occur due to improper use of the device Please use this product with care and operate at your own risk Explanation of the symbols on the product label Symbol Explanation DC voltage Indoor use only RECYC...

Reviews: