background image

8

Chapter 2


Set Up Internet Connection

Wi-Fi: On
Turn Wi-Fi Off

TP-LINK_Extender_5GHz

Join Other Network...

Create Network...

Open Network Preferences...

TP-LINK_Extender_2.4GHz

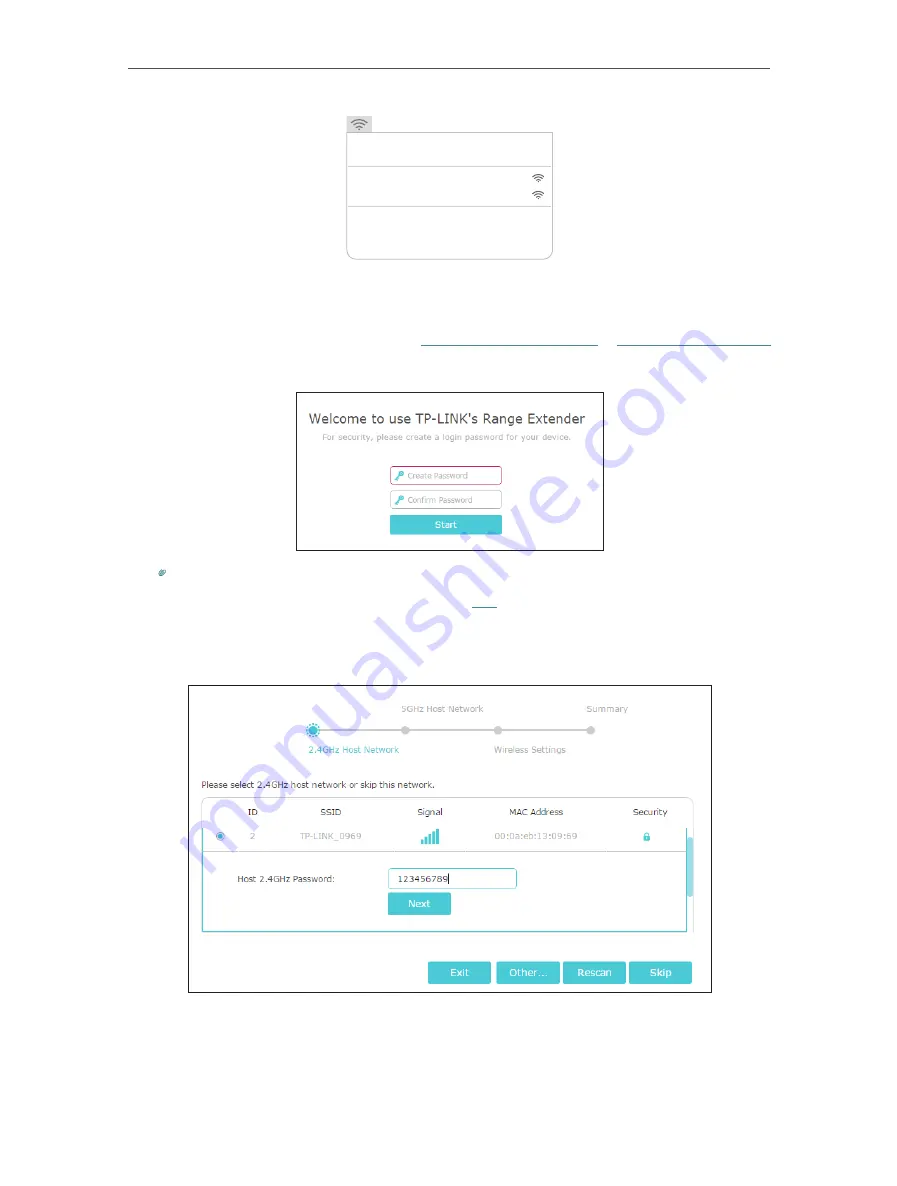
2. Follow the instructions of Quick Setup Wizard to connect the extender to your host   

router.

1 )  Launch a web browser and enter 

http://tplinkrepeater.net

 or 

http://192.168.0.254 

in the address field. Create a password for future login attempts, and click 

Start

.

Tips:


If the login window does not appear, please refer to 

FAQ

.

2 )  Select your host router’s 2.4GHz SSID (network name), enter its password (NOT 

the password you just created for management), and click 

Next

.

3 )  Select your host router’s 5GHz SSID (network name), enter its password (NOT 

the password you just created for management), and click 

Next

.

Summary of Contents for RE650

Page 1: ...User Guide AC2600 Wi Fi Range Extender RE650 REV1 0 0 1910011893...

Page 2: ...rk 13 3 3 Change LAN Settings 15 3 4 Specify DHCP Server Settings 16 3 5 Adjust Wi Fi Coverage 17 3 6 Set Access Control 17 Chapter 4 More Features of Your Extender 20 4 1 Use Your Extender as a Wirel...

Page 3: ...us items buttons and so on The menu structures to show the path to load the corresponding page For example Advanced Wireless MAC Filtering means the MAC Filtering function page is under the Wireless m...

Page 4: ...Chapter 1 Get to Know About Your Extender This chapter introduces what the extender can do and its appearance It contains the following sections Product Overview Appearance...

Page 5: ...on The extender works with any standard wireless router Instantly connect the extender to a router by pressing the router s WPS button if available followed by the extender s RE WPS button Alternative...

Page 6: ...er is connected to the 5GHz wireless network of your host router Off No 5GHz wireless connection Power On The extender is on Blinking The extender is initializing Off The extender is off 1 2 2 Port an...

Page 7: ...Connection This chapter informs you how to boost your host wireless coverage Please follow the step by step instructions to set up the Internet connection It contains the following sections Quick Set...

Page 8: ...connect to the host network via the WPS button or via a web browser Using the WPS button is an easier way to extend your host network We recommend you to use this way if your router has a WPS button...

Page 9: ...be affected by the distance between extender and host router we recommend that you relocate your extender by referring to Position Your Extender 2 1 2 Method Two Via a Web Browser 1 Connect your compu...

Page 10: ...bbrowserandenterhttp tplinkrepeater netorhttp 192 168 0 254 in the address field Create a password for future login attempts and click Start Tips If the login window does not appear please refer to FA...

Page 11: ...support 5GHz wireless network please click Skip to continue 4 Either keep the default SSIDs network names or customize them for the extended networks and then click Next 5 Verify your wireless settin...

Page 12: ...njoy Connect to the extended network and enjoy the Internet Both extended networks share the same wireless passwords as those of your host networks but may have different network names if you have cus...

Page 13: ...extender into an electrical outlet between your host router and the Wi Fi dead zone The location you choose must be within the range of your existing host network 2 Wait until the LED is lit and soli...

Page 14: ...you on how to configure network settings that are available for this extender It contains the following sections Check Internet Status Configure Wireless Network Change LAN Settings Specify DHCP Serv...

Page 15: ...to check the passwords of the host networks If the problem still exists please refer to the FAQ section The extender is connected to the host network but is not transmitting data Please check your ro...

Page 16: ...network you want to extend is on but not listed please try the following steps Move the extender closer to your router and click Rescan in the top right corner of the list You can manually enter the p...

Page 17: ...etworks Devices must join the network manually in order to connect 3 Click Save 3 3 Change LAN Settings The extender is preset with a default LAN IP 192 168 0 254 with which you can log in to the web...

Page 18: ...e settings of the DHCP Server if necessary 1 Visit http tplinkrepeater net and log in with the password you set for the extender 2 Go to Settings Network To specify the IP address that the extender as...

Page 19: ...Visit http tplinkrepeater net and log in with the password you set for the extender 2 Go to Settings Advanced Settings Wi Fi Coverage 3 Select Min Mid or Max to adjust your Wi Fi coverage of the exten...

Page 20: ...able cannot be blocked 1 Select Blacklist and click Save 2 Select the device to be blocked in the Online Devices table by ticking the corresponding checkbox 3 Click Block and the selected device s wil...

Page 21: ...k 5 Click OK To permit specific device s 1 Select Whitelist and click Save 2 Click Add in the Devices in Whitelist table Enter the Device Name and MAC Address And you can set the Effective Time for a...

Page 22: ...Extender This chapter explains how to use the extender as a wireless adapter and as an access point It contains the following sections Use Your Extender as a Wireless Adapter Transform Your Existing...

Page 23: ...rnet port of the extender is connected to the 5GHz wireless netwok To change the connected wireless frequency 1 Visit http tplinkrepeater net and log in with the password you set for the extender 2 Go...

Page 24: ...odem or wired router via an Ethernet cable 4 Visit http tplinkrepeater net and log in with the password you set for the extender 5 Go to Quick Setup to configure your extender 1 Configure your wireles...

Page 25: ...ork cards can be connected to your extender through this method not supported by iOS devices 1 Visit http tplinkrepeater net and log in with the password you set for the extender 2 Go to Settings Wire...

Page 26: ...24 Chapter 4 More Features of Your Extender PIN code Enter the client s PIN and click Connect...

Page 27: ...chapter presents how to manage and maintain your extender It includes the following sections Set Up System Time Control LEDs Power Schedule Upgrade the Firmware Backup and Restore Configuration Setti...

Page 28: ...nder 2 Go to Settings System Tools Time Settings To get system time 1 Select your local Time Zone from the drop down list 2 Click Save To set up Daylight Saving Time 1 Select Enable Daylight Saving Ti...

Page 29: ...wer Schedule The Power Schdule feature allows you to specify a time period during which the extender is off 1 Visit http tplinkrepeater net and log in with the password you set for the extender 2 Go t...

Page 30: ...the firmware 1 Download the latest firmware file for the extender from our website www tp link com 2 Visit http tplinkrepeater net and log in with the password you set for the extender 3 Go to Settin...

Page 31: ...s do not power off or reset the extender To reset the extender to factory default settings 1 Click Factory Restore to reset the extender 2 Wait a few minutes for the reset and reboot Note 1 During the...

Page 32: ...f the extender is not working properly you can save the system log and send it to our technical support team 1 Visit http tplinkrepeater net and log in with the password you set for the extender 2 Go...

Page 33: ...nder 2 Go to Settings Wireless Wireless Settings to retrieve or reset your wireless password Q4 What can I do if I cannot access the web management page This can happen for a variety of reasons Please...

Page 34: ...For more information about how to disable your router s MAC filter wireless access control or ACL please refer to your router s user guide 2 Power on your extender and run the Quick Setup to configure...

Page 35: ...roduct names are trademarks or registered trademarks of their respective holders No part of the specifications may be reproduced in any form or by any means or used to make any derivative such as tran...

Page 36: ...TV technician for help This device complies with part 15 of the FCC Rules Operation is subject to the following two conditions 1 This device may not cause harmful interference 2 This device must acce...

Page 37: ...ent appareil est conforme aux CNR d Industrie Canada applicables aux appareils radio exempts de licence L exploitation est autoris e aux deux conditions suivantes 1 l appareil ne doit pas produire de...

Page 38: ...ies with IC radiation exposure limits set forth for an uncontrolled environment This equipment should be installed and operated with minimum distance 20cm between the radiator your body D claration d...

Page 39: ...wer source Don t disassemble the product or make repairs yourself You run the risk of electric shock and voiding the limited warranty If you need service please contact us Avoid water and wet location...

Page 40: ...t WEEE This means that this product must be handled pursuant to European directive 2012 19 EU in order to be recycled or dismantled to minimize its impact on the environment User has the choice to giv...

Reviews: