background image

35

Chapter 7


Guest Network

7  1   Create a Network for Guests 

1. Visit 

http://tplinkwifi.net

, and log in with your TP-Link ID or the password you set for 

the router.

2. Go to 

Advanced 

Wireless 

Guest Network 

or


click

 Wireless 

on the top page. Locate 

the 

Guest Network 

section.

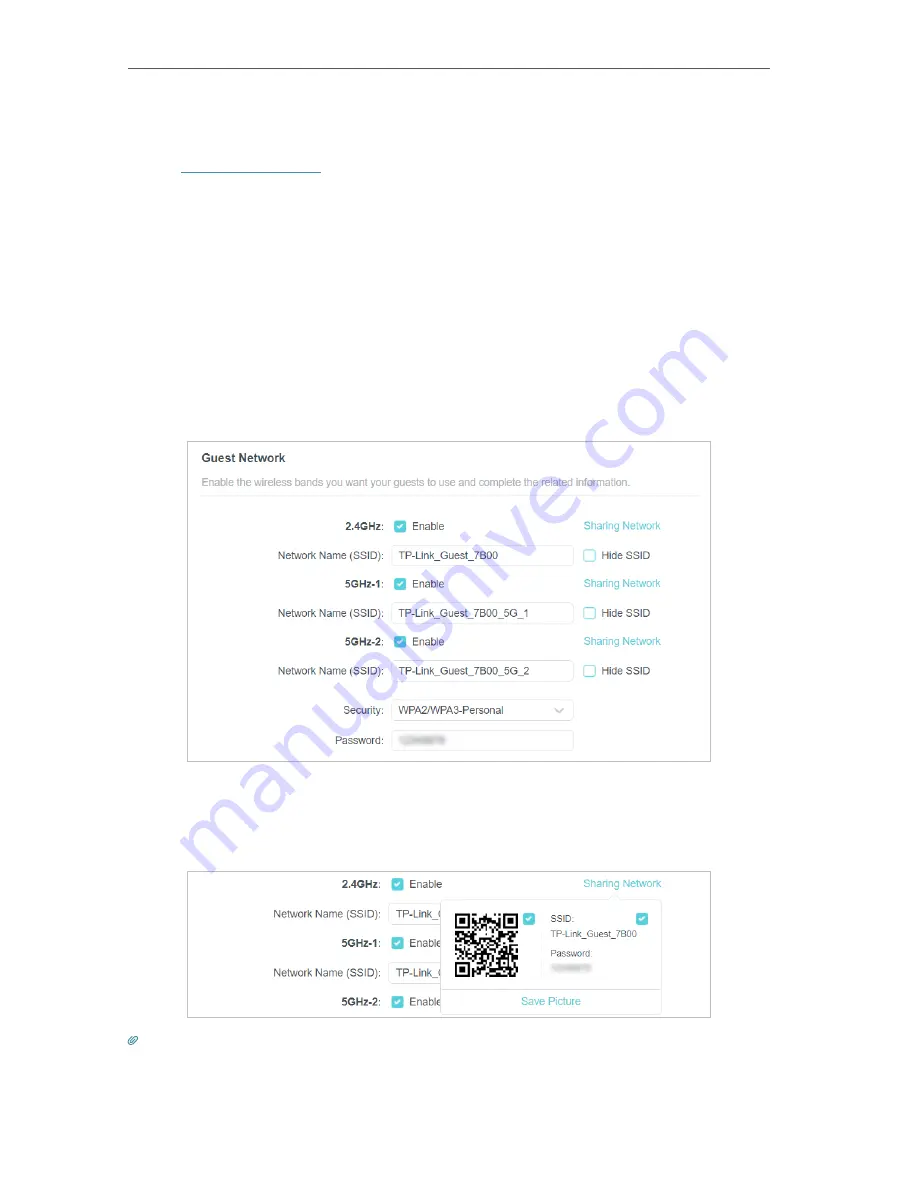
3. Create a guest network as needed.

1 )   Tick the Enable checkbox for the 2.4GHz, 5 GHz-1 or 5GHz-2 wireless network.
2 )  Customize the SSID. Don‘t select 

Hide SSID

 unless you want your guests to 

manually input the SSID for guest network access.

3 )  Select the 

Security

 type and customize your own password. If 

No security

 is 

selected, no password is needed to access your guest network.

4. Click 

SAVE

. Now your guests can access your guest network using the SSID and 

password you set! 

5. You can also click 

Sharing Network

 to share the SSID and password to your guests.

Tips:

To view guest network information, go to 

Network Map

 and locate the 

Guest Network

 section. You can turn on or off the 

guest network function conveniently.

Summary of Contents for Archer AX75

Page 1: ... 2021 TP Link 1910013054 REV1 0 0 User Guide AX5400 Tri Band Wi Fi 6 Router Archer AX75 ...

Page 2: ...3 Manually Set Up Your Internet Connection 15 4 4 Set Up the Router as an Access Point 18 4 5 Set Up an IPv6 Internet Connection 18 Chapter 5 TP Link Cloud Service 22 5 1 Register a TP Link ID 23 5 2 Change Your TP Link ID Information 23 5 3 Manage the User TP Link IDs 24 5 3 1 Add TP Link ID to Manage the Router 25 5 3 2 Remove TP Link ID s from Managing the Router 25 5 4 Manage the Router via th...

Page 3: ...Security 47 9 2 Parental Controls 47 9 3 Network Analysis Optimization 48 Chapter 10 OneMesh with Seamless Roaming 50 10 1 Set Up a OneMesh Network 51 10 2 Manage Devices in the OneMesh Network 53 Chapter 11 Network Security 55 11 1 Protect the Network from Cyber Attacks 56 11 2 Access Control 56 11 3 IP MAC Binding 58 11 4 ALG 60 Chapter 12 NAT Forwarding 61 12 1 Share Local Resources on the Inte...

Page 4: ...Routes 81 Chapter 15 Manage the Router 84 15 1 Update the Firmware 85 15 1 1 Auto Update 85 15 1 2 Online Update 85 15 1 3 Local Update 86 15 2 Backup and Restore Configuration Settings 87 15 3 Change the Login Password 88 15 4 Password Recovery 89 15 5 Local Management 90 15 6 Remote Management 91 15 7 System Log 93 15 8 Test the Network Connectivity 95 15 9 Set System Time and Language 97 15 10 ...

Page 5: ...sponding page For example Advanced System Firmware Update means the Firmware Update page is under the System menu that is located in the Advanced tab Note Ignoring this type of note might result in a malfunction or damage to the device Tips Indicates important information that helps you make better use of your device symbols on the web page Click to edit the corresponding entry Click to delete the...

Page 6: ...ing rated performance location connection quality and client condition Use of Wi Fi 6 802 11ax and features including OFDMA MU MIMO 1024 QAM and HT160 require clients to also support the corresponding features Saving clients battery power requires clients to also support the 802 11ax Wi Fi standard Actual power reduction may vary as a result of network conditions client limitations and environment...

Page 7: ...Chapter 1 Get to Know About Your Router This chapter introduces what the router can do and shows its appearance It chapter contains the following sections Product Overview Appearance ...

Page 8: ...le with 802 11a b g n ac Moreover it is simple and convenient to set up and use the TP Link router due to its intuitive web interface and the powerful Tether app 1 2 Appearance 1 2 1 Top Panel The router s LEDs view from left to right are located on the front You can check the router s working status by following the LED Explanation table LED Explanation Name Status Indication Power On The system ...

Page 9: ...d Internet Green On Internet service is available Orange On The router s Internet port is connected but the internet service is not available Off The router s Internet port is unplugged Ethernet On At least one powered on device is connected to the router s Ethernet port Off No powered on device is connected to the router s Ethernet port USB On The inserted USB device is ready to use Blinking A US...

Page 10: ...our router Reset Button Press and hold the button for about 6 seconds until the Power LED blinks to reset the router to its factory default settings LAN Port 1 4 For connecting your PC or other wired devices to the router WAN Port For connecting to a modem or an Ethernet outlet Power On Off Button Press this button to power on or off the router Power Port For connecting the router to a power socke...

Page 11: ...Chapter 2 Connect the Hardware This chapter contains the following sections Position Your Router Connect Your Router ...

Page 12: ... a horizontal surface such as on a shelf or desktop The device also can be mounted on the wall as shown in the following figure 143 9 14 10 3 2 ΦD H NOTE 5 207 D 8 179mm H 3mm Note The diameter of the screw head 5 207mm D 8 179mm and the distance of two screws is 143 9mm The screw that project from the wall need around 5mm based and the length of the screw need to be at least 20mm to withstand the...

Page 13: ...1 On Internet On 5 GHz 2 On Note If the 2 4 GHz LED and 5 GHz LEDs are off press and hold the Wi Fi button on the back for more than 2 seconds These LEDs should turn solid on 5 Connect your computer to the router Method 1 Wired Turn off the Wi Fi on your computer and connect the devices as shown below Ethernet cable Method 2 Wirelessly 1 Find the SSID Network Name and Wireless Password printed on ...

Page 14: ...ards can be connected to your router through this method Note WPS is not supported by iOS devices The WPS function cannot be configured if the wireless function of the router is disabled Also the WPS function will be disabled if your wireless encryption is WEP Please make sure the wireless function is enabled and is configured with the appropriate encryption before configuring the WPS 1 Tap the WP...

Page 15: ...Chapter 3 Log In to Your Router ...

Page 16: ...as Microsoft Internet Explorer Mozilla Firefox or Apple Safari Follow the steps below to log in to your router 1 Set up the TCP IP Protocol in Obtain an IP address automatically mode on your computer 2 Visit http tplinkwifi net and create a login password for secure management purposes Then click Let s Get Started to log in Note If the login window does not appear please refer to the FAQ Section ...

Page 17: ...ion built in automates many of the steps and verifies that those steps have been successfully completed Furthermore you can also set up an IPv6 connection if your ISP provides IPv6 service It contains the following sections Use Quick Setup Wizard Quick Setup Via TP Link Tether App Manually Set Up Your Internet Connection Set Up the Router as an Access Point Set Up an IPv6 Internet Connection ...

Page 18: ...omplete service from TP Link remote management TP Link DDNS and more log in with your TP Link ID or click Sign Up Now to get one Then follow the instructions to bind the cloud router to your TP Link ID Note To learn more about the TP Link Cloud service please refer to the TP Link Cloud Service section If you do not want to register a TP Link ID now you may click Skip to proceed If you have changed...

Page 19: ...rent internet connection settings You can also modify the settings according to the service information provided by your ISP Follow the steps below to check or modify your internet connection settings 1 Visit http tplinkwifi net and log in with your TP Link ID or the password you set for the router 2 Go to Internet 3 Select your internet connection type from the drop down list 4 Follow the instruc...

Page 20: ...et Connection 2 If you choose Static IP enter the information provided by your ISP in the corresponding fields 3 If you choose PPPoE enter the username and password provided by your ISP PPPoE users usually have DSL cable modems ...

Page 21: ...er the username and password and choose the Secondary Connection provided by your ISP Different parameters are needed according to the Secondary Connection you have chosen 5 Click SAVE Tips If you use Dynamic IP and PPPoE and you are provided with any other parameters that are not required on the page please go to Advanced Network Internet to complete the configuration If you still cannot access t...

Page 22: ...cable 4 Log in again to the web management page http tplinkwifi net and go to Advanced Quick Setup 5 Configure your wireless settings and click Next 6 Confirm the information and click SAVE Now you can enjoy Wi Fi Tips Functions such as Parental Controls QoS and NAT Forwarding are not supported in the Access Point mode Functions such as Guest Network are the same as those in the Router mode 4 5 Se...

Page 23: ...y known information provided by your ISP 4 Fill in information as required by different connection types 1 Static IP Fill in blanks and click SAVE 2 Dynamic IP SLAAC DHCPv6 Click Advanced to input further information if your ISP requires Click SAVE and then click Renew 3 PPPoE By default the router uses the IPv4 account to connect to the IPv6 server Click Advanced to input further information if y...

Page 24: ...ter the username and password for the IPv6 connection 4 6to4 Tunnel An IPv4 internet connection type is a prerequisite for this connection type Manually Set Up Your Internet Connection Click Advanced to input further information if your ISP requires Click SAVE and then click Connect 5 Pass Through Bridge Click SAVE and skip to Step 6 ...

Page 25: ...indows users are recommended to choose from the first two types Fill in Address Prefix provided by your ISP and click SAVE 6 Click Status to check whether you have successfully set up an IPv6 connection Tips Visit the FAQ section if there is no internet connection ...

Page 26: ...ill notify you when an important firmware upgrade is available Surely you can also manage multiple TP Link Cloud devices with a single TP Link ID This chapter introduces how to register a new TP Link ID bind or unbind TP Link IDs to manage your router and the Tether app with which you can manage your home network no matter where you may find yourself It contains the following sections Register a T...

Page 27: ...Link ID refer to Manage the User TP Link IDs Once you have registered a TP Link ID on the web management page you can only register another TP Link ID via the Tether APP Please refer to Manage the Router via the TP Link Tether App to install the app If you want to unbind the admin TP Link ID from your router please go to Advanced TP Link ID an click Unbind in the Device Information section 5 2 Cha...

Page 28: ...assword 2 Enter the current password then a new password twice And click SAVE 5 3 Manage the User TP Link IDs The TP Link ID used to log in to the router for the first time will be automatically bound as the Admin account An admin account can add or remove other TP Link IDs to or ...

Page 29: ... TP Link ID and focus on the Bound Accounts section 3 Click enter another TP Link ID as needed and click SAVE Note If you need another TP Link ID please register a new one via the Tether app Refer to Manage the Router via the TP Link Tether App to install the app and register a new TP Link ID 4 The new TP Link ID will be displayed in the Bound Accounts table as a User 5 3 2 Remove TP Link ID s fro...

Page 30: ...nd log in with your TP Link ID Note If you don t have a TP Link ID create one first 3 Connect your device to the router s wireless network 4 GobacktotheTetherapp selectthemodelofyourrouterandloginwiththepassword you set for the router 5 Manage your router as needed Note If you need to remotely access your router from your smart devices you need to Log in with your TP Link ID If you don t have one ...

Page 31: ...tings This chapter guides you on how to configure the wireless settings It contains the following sections Specify Wireless Settings Schedule Your Wireless Function Use WPS for Wireless Connection Advanced Wireless Settings ...

Page 32: ...es speed and efficiency Noted that only when your clients also support OFDMA can you fully enjoy the benefits It is disabled by default 1 Go to Advanced Wireless Wireless Settings 2 Enable OFDMA To enable or disable TWT TWT Target Wake Time allows 802 11ax routers and clients to negotiate their periods to transmit and receive data packets Clients only wake up at TWT sessions and remain in sleep mo...

Page 33: ...r the network in Password The value is case sensitive Note If you change the wireless settings with a wireless device you will be disconnected when the settings are effective Please write down the new SSID and password for future use To hide SSID 1 Go to Wireless or Advanced Wireless Wireless Settings 2 Select Hide SSID and your SSID won t display when you scan for local wireless networks on your ...

Page 34: ...less connection 1 Visit http tplinkwifi net and log in with your TP Link ID or the password you set for the router 2 Go to Advanced Wireless Wireless Schedule 3 Enable the Wireless Schedule feature 4 Click Add to specify a wireless off period during which you need the wireless off automatically and click SAVE Note The Effective Time Schedule is based on the time of the router You can go to Advance...

Page 35: ...n Method 1 to enable Router s PIN You can use the default PIN or generate a new one Note PIN Personal Identification Number is an eight character identification number preset to each router WPS supported devices can connect to your router with the PIN The default PIN is printed on the label of the router 6 3 3 Push the WPS Button Click Start on the screen or directly press the router s WPS button ...

Page 36: ... your device 1 Visit http tplinkwifi net and log in with your TP Link ID or the password you set for the router 2 Go to Advanced Wireless Additional Settings 3 Configure advanced wireless settings WMM WMM function can guarantee the packets with high priority messages being transmitted preferentially ...

Page 37: ... Threshold Enter a value between 1 and 2346 to determine the packet size of data transmission through the router By default the RTS Request to Send Threshold size is 2346 If the packet size is greater than the preset threshold the router will send RTS frames to a particular receiving station and negotiate the sending of a data frame DTIM Interval The value determines the interval of DTIM Delivery ...

Page 38: ...g your main network When you have guests in your house apartment or workplace you can create a guest network for them In addition you can customize guest network options to ensure network security and privacy It contains the following sections Create a Network for Guests Customize Guest Network Options ...

Page 39: ...ize the SSID Don t select Hide SSID unless you want your guests to manually input the SSID for guest network access 3 Select the Security type and customize your own password If No security is selected no password is needed to access your guest network 4 Click SAVE Now your guests can access your guest network using the SSID and password you set 5 You can also click Sharing Network to share the SS...

Page 40: ... guests to see each other Tick this checkbox if you want to allow the wireless clients on your guest network to communicate with each other via methods such as network neighbors and Ping Allow guests to access your local network Tick this checkbox if you want to allow the wireless clients on your guest network to communicate with the devices connected to your router s LAN ports or main network via...

Page 41: ... to share files and media from the USB storage devices over your home network locally or remotely through the internet The router supports USB external flash drives and hard drives It contains the following sections Access the USB Storage Device Media Sharing Time Machine ...

Page 42: ...ake sure its file system is FAT32 exFat NTFS or HFS Before you physically disconnect a USB device from the router safely remove it to avoid data damage Go to Advanced USB USB Storage Device and click Remove 8 1 1 Access the USB Device Locally Insert your USB storage device into the router s USB port and then refer to the following table to access files stored on your USB storage device Windows com...

Page 43: ... and a password to deny anonymous access to the USB disks you should select the Registered User radio box To learn how to set up an account for the access refer to To Set Up Authentication for Data Security Tablet Use a third party app for network files management Tips You can also access your USB storage device by using your Network Media Server Name as the server address Refer to To Customize th...

Page 44: ...urney Note If your ISP assigns a private WAN IP address such as 192 168 x x or 10 x x x you cannot use this feature because private addresses are not routed on the internet Follow the steps below to configure remote access settings 1 Visit http tplinkwifi net and log in with your TP Link ID or the password you set for the router 2 Go to Advanced USB USB Storage Device 3 Tick the Internet FTP check...

Page 45: ...third party app for network files management Tips Click Set Up a Dynamic DNS Service Account to learn how to set up a domain name for you router 8 1 3 Customize the Access Settings By default all the network clients can access all folders on your USB disk You can customize your sharing settings by setting a sharing account sharing specific contents and setting a new sharing address on the router s...

Page 46: ...Focus on the File Sharing section Specify sharing folders that you want to share and click SAVE To Set Up Authentication for Data Security You can set up authentication for your USB storage device so that network clients will be required to enter username and password when accessing the USB storage device 1 In the File Sharing section enable Secure Sharing ...

Page 47: ...required to enter the sharing password for USB access 2 Due to Windows credential mechanism you might be unable to access the USB disk after changing Authentication settings Please log out from the Windows and try to access again Or you can change the address of the USB disk by referring to To Customize the Address of the USB Storage Device 8 2 Media Sharing The feature of Media Sharing allows you...

Page 48: ...s section Note Here we take Windows 7 as an example Tablet Use a third party DLNA supported player 8 3 Time Machine Time Machine backs up all files on your Mac computer to a USB storage device connected to your router 1 Visit http tplinkwifi net and log in with your TP Link ID or the password you set for the router 2 Go to Advanced USB Time Machine ...

Page 49: ...apter 8 USB Settings 3 Tick the checkbox to enable Time Machine 4 Click Select to select a location for Time Machine backups 5 Set the Size Limit for Backups Note 0 means no limit for the space 6 Click SAVE ...

Page 50: ...ures built in TP Link HomeShield Whether protecting your sensitive data or limiting the access of kids and guests TP Link HomeShield provides you the tools you need to fully manage your network It contains the following sections Network Security Parental Controls Network Analysis Optimization ...

Page 51: ...m DDoS attacks To use this feature download Tether to enjoy the HomeShield service 1 Scan the QR code or get the Tether app from the Apple App Store or Google Play OR 2 Launch the Tether app and log in with your TP Link ID If you don t have an account create one first 3 Log in to your router and tap the HomeShield tab to use this feature 9 2 Parental Controls Parental Controls allows you to set up...

Page 52: ... ID If you don t have an account create one first 3 Log in to your router and tap the HomeShield tab to use this feature 9 3 Network Analysis Optimization TP Link HomeShield provides many tools for you to analyze and optimize your network Weekly and Monthly Reports Get weekly and monthly reports of your network usage Quality of Service QoS Prioritizes devices to give faster performance Scan Run a ...

Page 53: ...49 Chapter 9 HomeShield 2 Launch the Tether app and log in with your TP Link ID If you don t have an account create one first 3 Log in to your router and tap the HomeShield tab to use this feature ...

Page 54: ...Chapter 10 OneMesh with Seamless Roaming This chapter introduces the TP Link OneMeshTM feature It contains the following sections Set Up a OneMesh Network Manage Devices in the OneMesh Network ...

Page 55: ...he same wireless settings including network name password access control settings and more Seamless Roaming Devices automatically switch between your router and extenders as you move through your home for the fastest possible speeds Easy Setup and Management Set up a OneMesh network with a push of WPS buttons Manage all network devices on the Tether app or at your router s web management page 10 1...

Page 56: ...h page Note To check full list of TP Link OneMesh devices visit https www tp link com onemesh compatibility 5 If you have set up the extender to join the OneMesh network it will be listed on the router s OneMesh page Otherwise you need to find it in the Available OneMesh Devices list and click Add to add it to the OneMesh network Done Now your router and extender successfully form a OneMesh networ...

Page 57: ...s in the network 1 Visit http tplinkwifi net and log in with your TP Link ID or the password you set for the router 2 Go to Network Map 3 Click to view all mesh devices and click to view all connected clients To manage a OneMesh device in the network 1 Visit http tplinkwifi net and log in with your TP Link ID or the password you set for the router 2 Go to Advanced OneMesh 3 Click the OneMesh devic...

Page 58: ...Seamless Roaming 4 Manage the OneMesh device as needed You can Change device information Click Manage Device to redirect to the web management page of this device Click Leave OneMesh to delete this device from the OneMesh network ...

Page 59: ...an protect your home network from cyber attacks block or allow specific client devices to access your network using Access Control or you can prevent ARP spoofing and ARP attacks using IP MAC Binding It contains the following sections Protect the Network from Cyber Attacks Access Control IP MAC Binding For a more comprehensive home network protection system refer to the HomeShield chapter ...

Page 60: ...ettings 11 2 Access Control Access Control is used to block or allow specific client devices to access your network via wired or wireless based on a list of blocked devices Blacklist or a list of allowed devices Whitelist I want to Block or allow specific client devices to access my network via wired or wireless How can I do that 1 Visit http tplinkwifi net and log in with your TP Link ID or the p...

Page 61: ... means the selected devices have been successfully added to the blacklist To allow specific device s 1 Select Whitelist and click SAVE 2 Your own device is in the whitelist by default and cannot be deleted Click to add other devices to the whitelist Add connected devices 1 Click Select From Device List 2 Select the devices you want to be allowed and click ADD ...

Page 62: ...e will appear on the screen which means the device has been successfully added to the whitelist Done Now you can block or allow specific client devices to access your network via wired or wireless using the Blacklist or Whitelist 11 3 IP MAC Binding IP MAC Binding namely ARP Address Resolution Protocol Binding is used to bind network device s IP address to its MAC address This will prevent ARP Spo...

Page 63: ...e password you set for the router 2 Go to Advanced Security IP MAC Binding 3 Enable IP MAC Binding 4 Bind your device s according to your need To bind the connected device s 1 Click in the Binding List section 2 Click VIEW CONNECTED DEVICES and select the device you want to bind The MAC Address and IP Address fields will be automatically filled in 3 Click SAVE ...

Page 64: ...e gateway to support address and port translation for certain application layer control data protocols such as FTP TFTP H323 etc It is recommended to keep the default settings You may need to disable SIP ALG when you are using voice and video applications to create and accept a call through the router since some voice and video communication applications do not work well with SIP ALG 1 Visit http ...

Page 65: ...rwarding feature the router can penetrate the isolation of NAT and allows devices on the internet to initiatively communicate with devices on the local network thus realizing some special functions The TP Link router supports four forwarding rules If two or more rules are set the priority of implementation from high to low is Port Forwarding Port Triggering UPNP and DMZ It contains the following s...

Page 66: ...ed in HTTP service port 21 in FTP service port 25 in SMTP service and port 110 in POP3 service Please verify the service port number before the configuration I want to SharemypersonalwebsiteI vebuiltinlocalnetworkwithmyfriendsthroughtheinternet Forexample thepersonalwebsitehasbeenbuiltonmyhomePC 192 168 0 100 Ihope that my friends on the internet can visit my website in some way The PC is connecte...

Page 67: ...ommended to keep the default settings of Internal Port and Protocol if you are not clear about which port and protocol to use If the service you want to use is not in the common services list you can enter the corresponding parameters manually You should verify the port number that the service needs You can add multiple port forwarding rules if you want to provide several services in a router Plea...

Page 68: ...he triggering port all the external ports will be opened for subsequent connections The router can record the IP address of the host When the data from the internet return to the external ports the router can forward them to the corresponding host Port Triggering is mainly applied to online games VoIPs video players and common applications including MSN Gaming Zone Dialpad and Quick Time 4 players...

Page 69: ...the internet which can realize the unlimited bidirectional communication between internal hosts and external hosts The DMZ host becomes a virtual server with all ports opened When you are not clear about which ports to open in some special applications such as IP camera and database software you can set the PC to be a DMZ host Note When DMZ is enabled the DMZ host is totally exposed to the interne...

Page 70: ... devices to automatically find the front end NAT device and send request to it to open the corresponding ports With UPnP enabled the applications or host devices on the local network and the internet can freely communicate with each other thus realizing the seamless connection of the network You may need to enable the UPnP if you want to use applications for multiplayer gaming peer to peer connect...

Page 71: ...herefore you can play Xbox online games without a hitch INTERNET If necessary you can follow the steps to change the status of UPnP 1 Visit http tplinkwifi net and log in with your TP Link ID or the password you set for the router 2 Go to Advanced NAT Forwarding UPnP and toggle on or off according to your needs ...

Page 72: ...d more stable It is suitable for restricted environment such as campus network and company intranet PPTP VPN is more easily used and its speed is faster it s compatible with most operating systems and also supports mobile devices Its security is poor and your packets may be cracked easily and PPTP VPN connection may be prevented by some ISP It contains the following sections please choose the appr...

Page 73: ...in with your TP Link ID or the password you set for the router 2 Go to Advanced VPN Server OpenVPN and tick the Enable box of OpenVPN Note Before you enable VPN Server we recommend you configure Dynamic DNS Service recommended or assign a static IP address for router s WAN port and synchronize your System Time with internet The first time you configure the OpenVPN Server you may need to Generate a...

Page 74: ...tility Note You need to install the OpenVPN client utility on each device that you plan to apply the VPN function to access your router Mobile devices should download a third party app from Google Play or Apple App Store 2 After the installation copy the file exported from your router to the OpenVPN client utility s config folder for example C Program Files OpenVPN config on Windows The path depen...

Page 75: ...evices by the PPTP VPN server 4 Set the PPTP connection permission according to your needs Select Allow Samba Network Place access to allow your VPN device to access your local Samba server Select Allow NetBIOS passthrough to allow your VPN device to access your Samba server using NetBIOS name Select Allow Unencrypted connections to allow unencrypted connections to your VPN server 5 Click SAVE 6 C...

Page 76: ...e the Windows built in PPTP software or a third party PPTP software to connect to PPTP Server Here we use the Windows built in PPTP software as an example 1 Go to Start Control Panel Network and Internet Network and Sharing Center 2 Select Set up a new connection or network 3 Select Connect to a workplace and click Next ...

Page 77: ...73 Chapter 13 VPN Server 4 Select Use my Internet connection VPN 5 Enter the internet IP address of the router for example 218 18 1 73 in the Internet address field Click Next ...

Page 78: ...74 Chapter 13 VPN Server 6 Enter the User name and Password you have set for the PPTP VPN server on your router and click Connect 7 The PPTP VPN connection is created and ready to use ...

Page 79: ...75 Chapter 13 VPN Server ...

Page 80: ...is chapter guides you on how to configure advanced network features It contains the following sections Change the LAN Settings Configure to Support IPTV Service Specify DHCP Server Settings Set Up a Dynamic DNS Service Account Create Static Routes ...

Page 81: ...te to your needs And leave the Subnet Mask as the default settings 4 Click SAVE Note If you have set the Port Forwarding DMZ or DHCP address reservation and the new LAN IP address is not in the same subnet with the old one then you should reconfigure these features 14 2 Configure to Support IPTV Service I want to Configure IPTV setup to enable Internet IPTV Phone service provided by my internet se...

Page 82: ...f your ISP is not listed and no other parameters are required Select Custom if your ISP is not listed but provides necessary parameters 3 After you have selected a mode the necessary parameters including the LAN port for IPTV connection are predetermined If not select the LAN type to determine which port is used to support IPTV service 4 Click SAVE 5 Connect the set top box to the corresponding LA...

Page 83: ...ses for specified client devices 1 Visit http tplinkwifi net and log in with your TP Link ID or the password you set for the router 2 Go to Advanced Network DHCP Server To specify the IP address that the router assigns 1 Tick the Enable checkbox 2 Enter the starting and ending IP addresses in the IP Address Pool 3 Enter other parameters if the ISP offers The Default Gateway is automatically filled...

Page 84: ...iends to access your router and local servers FTP HTTP etc using a domain name without checking and remembering the IP address Note DDNS does not work if the ISP assigns a private WAN IP address such as 192 168 1 x to the router 1 Visit http tplinkwifi net and log in with your TP Link ID or the password you set for the router 2 Go to Advanced Network Dynamic DNS 3 Select the DDNS Service Provider ...

Page 85: ...ou want to use a new DDNS account please click Logout first and then log in with a new account 14 5 Create Static Routes Static routing is a form of routing that is configured manually by a network administrator or a user by adding entries into a routing table The manually configured routing information guides the router in forwarding data packets to the specific destination ...

Page 86: ... is established To surf the internet and visit my company s network at the same time I need to configure the static routing Company s server PC Router B Router A Switch LAN 192 168 0 1 192 168 0 100 LAN 192 168 0 2 WAN 172 30 30 100 172 30 30 1 How can I do that 1 Change the routers LAN IP addresses to two different IP addresses on the same subnet Disable Router B s DHCP function 2 Visit http tpli...

Page 87: ...r 255 255 255 255 Default Gateway The IP address of the gateway device to which the data packets will be sent This IP address must be on the same subnet with the router s IP which sends out data In the example the data packets will be sent to the LAN port of Router B and then to the Server so the default gateway should be 192 168 0 2 Interface Determined by the port WAN LAN that sends out data pac...

Page 88: ...ur router It contains the following sections Update the Firmware Backup and Restore Configuration Settings Change the Login Password Password Recovery Local Management Remote Management System Log Test the Network Connectivity Set System Time and Language Set the Router to Reboot Regularly Control the LED ...

Page 89: ...p tplinkwifi net and log in with your TP Link ID or the password you set for the router 2 Go to Advanced System Firmware Update 3 Enable Auto Update 4 Specify the Update Time and save the settings The router will update firmware automatically at the specified time when new version is available 15 1 2 Online Update 1 Visit http tplinkwifi net and log in with your TP Link ID or the password you set ...

Page 90: ...web browser is opened Click to update and log in to the web management page with the username and password you set for the router You will see the Firmware Update page 15 1 3 Local Update 1 Download the latest firmware file for the router from www tp link com 2 Visit http tplinkwifi net and log in with your TP Link ID or the password you set for the router 3 Go to Advanced System Firmware Update 4...

Page 91: ...outer to the default factory settings 1 Visit http tplinkwifi net and log in with your TP Link ID or the password you set for the router 2 Go to Advanced System Tools Backup Restore To backup configuration settings Click BACK UP to save a copy of the current settings to your local computer A bin file of the current settings will be stored to your computer To restore configuration settings 1 Click ...

Page 92: ... reset the router We strongly recommend you backup the current configuration settings before resetting the router 15 3 Change the Login Password The account management feature allows you to change your login password of the web management page Note If you are using a TP Link ID to log in to the web management page the account management feature will be disabled To manage the TP Link ID go to Advan...

Page 93: ...n 3 Tick the Enable box of Password Recovery 4 Specify a mailbox From for sending the recovery letter and enter its SMTP Server address Specify a mailbox To for receiving the recovery letter If the mailbox From to send the recovery letter requires encryption Tick the Enable box of Authentication and enter its username and password Tips SMTP server is available for users in most webmail systems For...

Page 94: ...r the router 2 Go to Advanced System Administration and complete the settings In Local Management section as needed Access the router via HTTPS and HTTP Tick the Enable box of Local Management via HTTPS to access the router via HTTPS and HTTP or keep it disabled to access the router only via HTTP Allow all LAN connected devices to manage the router Select All Devices for Local Managers Allow speci...

Page 95: ... this entry 5 Click SAVE 15 6 Remote Management This feature allows you to control remote devices authority to manage the router 1 Visit http tplinkwifi net and log in with your TP Link ID or the password you set for the router 2 Go to Advanced System Administration and complete the settings in Remote Management section as needed Forbid all devices to manage the router remotely Do not tick the Ena...

Page 96: ...s for Remote Managers 4 Click SAVE Devices on the internet can log in to http Router s WAN IP address port number such as http 113 116 60 229 1024 to manage the router Tips You can find the WAN IP address of the router on Network Map Internet The router s WAN IP is usually a dynamic IP Please refer to Set Up a Dynamic DNS Service Account if you want to log in to the router through a domain name Al...

Page 97: ...ogging in to http Router s WAN IP port number such as http 113 116 60 229 1024 Tips The router s WAN IP is usually a dynamic IP Please refer to Set Up a Dynamic DNS Service Account if you want to log in to the router through a domain name 15 7 System Log When the router does not work normally you can save the system log and send it to the technical support for troubleshooting To save the system lo...

Page 98: ...s at a fixed time every day however it s too troublesome to log in to the web management page every time I want to go checking It would be great if the system logs could be sent to my mailbox at 8 a m every day 1 Visit http tplinkwifi net and log in with your TP Link ID or the password you set for the router 2 Go to Advanced System Tools System Log 3 In the Save Log section click MAIL LOG 4 Enter ...

Page 99: ...ess Tips SMTP server is available for users in most webmail systems For example the SMTP server address of Hotmail is smtp mail outlook com 6 Email To Enter the recipient s email address which can be the same as or different from the sender s email address 7 Select Mail Log Automatically Tips The router will send the system log to the designated email address if this option is enabled 8 Frequency ...

Page 100: ... is used to display the route path your router has passed to reach the tested host and measure transit delays of packets across an Internet Protocol network 2 Enter the IP Address or Domain Name of the tested host 3 Modify the Ping Count number and the Ping Packet Size It s recommended to keep the default value 4 If you have chosen Traceroute you can modify the Traceroute Max TTL It s recommended ...

Page 101: ...like Parental Controls You can choose the way to obtain the system time as needed System language is the language displayed when you log into the router You can change the system language as needed 1 Visit http tplinkwifi net and log in with your TP Link ID or the password you set for the router 2 Go to Advanced System Time Language To get time from the internet 1 Enable 24 Hour Time if you want t...

Page 102: ...erver 6 Click SAVE To get time from your computer 1 In the Set Time field select Get from Managing Device 2 The time of your computer will then be displayed and click SAVE To manually set the date and time 1 In the Set Time field select Manually 2 Set the current Date In MM DD YYYY format 3 Set the current Time In HH MM SS format 4 Click SAVE To set Daylight Saving Time 1 Tick the Enable box of Da...

Page 103: ...l time zone 4 Click SAVE To set system language Select the language from the dropdown list then click SAVE 15 10 Set the Router to Reboot Regularly The Scheduled Reboot feature cleans the cache to enhance the running performance of the router 1 Visit http tplinkwifi net and log in with your TP Link ID or the password you set for the router 2 Go to Advanced System Reboot 3 Tick the Enable box of Re...

Page 104: ...uter indicates its activities and status You can enable the Night Mode feature to specify a time period during which the LED is off 1 Visit http tplinkwifi net and log in with your TP Link ID or the password you set for the router 2 Go to Advanced System LED Control 3 Enable Night Mode 4 Specify the LED off time and the LED will be off during this period every day 5 Click SAVE ...

Page 105: ...isit http tplinkwifi net to create a new login password Note Please refer to Password Recovery to learn how to configure Password Recovery You ll need to reconfigure the router to surf the internet once the router is reset and please mark down your new password for future use Q3 What should I do if I can t log in to the router s web management page This can happen for a variety of reasons Please t...

Page 106: ...102 4 Click LAN settings and deselect the following three options and click OK 5 Go to Advanced Restore advanced settings click OK to save the settings ...

Page 107: ... even though the configuration is finished 1 Visit http tplinkwifi net and log in with your TP Link ID or the password you set for the router 2 Go to Advanced Network Status to check internet status If IP Address is a valid one please try the methods below and try again Your computer might not recognize any DNS server addresses Please manually configure the DNS server 1 Go to Advanced Network DHCP...

Page 108: ...and check the internet access Reset the router to factory default settings and reconfigure the router Upgrade the firmware of the router Check the TCP IP settings on the particular device if all other devices can get internet from the router As the picture below shows if the IP Address is 0 0 0 0 please try the methods below and try again Make sure the physical connection between the router and th...

Page 109: ...s MAC address to the router The MAC addresses of a computer in wired connection and wireless connection are different Modify the LAN IP address of the router Note Most TP Link routers use 192 168 0 1 192 168 1 1 as their default LAN IP address which may conflict with the IP range of your existing ADSL modem router If so the router is not able to communicate with your modem and you can t access the...

Page 110: ...r 3 Go to Advanced Network Internet 4 Select your Internet Connection Type and fill in other parameters 5 Click SAVE 6 Restart the modem and the router again Please upgrade the firmware of the router If you ve tried every method above but still cannot access the internet please contact the technical support Q5 What should I do if I can t find my wireless network or I cannot connect the wireless ne...

Page 111: ...in the Services list on the right side 5 Right click Wireless Zero Configuration and then select Properties 6 Change Startup type to Automatic click on Start button and make sure the Service status is Started And then click OK If you can find other wireless network except your own please follow the steps below Check the WLAN LED indicator on your wireless router modem Make sure your computer devic...

Page 112: ...ur wireless router Note Wireless Password Network Security Key is case sensitive Windows unable to connect to XXXX Can not join this network Taking longer than usual to connect to this network Check the wireless signal strength of your network If it is weak 1 3 bars please move the router closer and try again Change the wireless Channel of the router to 1 6 or 11 to reduce interference from other ...

Page 113: ...no guarantee that interference will not occur in a particular installation If this equipment does cause harmful interference to radio or television reception which can be determined by turning the equipment off and on the user is encouraged to try to correct the interference by one or more of the following measures Reorient or relocate the receiving antenna Increase the separation between the equi...

Page 114: ... is no unauthorized change is made in the equipment and the equipment is properly maintained and operated FCC compliance information statement Product Name I T E Power Supply Model Number NBS30D120250VU Responsible party TP Link USA Corporation Address 10 Mauchly Irvine CA 92618 Website http www tp link com us Tel 1 626 333 0234 Fax 1 909 527 6804 E mail sales usa tp link com This equipment has be...

Page 115: ...s device may not cause harmful interference 2 This device must accept any interference received including interference that may cause undesired operation Any changes or modifications not expressly approved by the party responsible for compliance could void the user s authority to operate the equipment We TP Link USA Corporation has determined that the equipment shown as above has been shown to com...

Page 116: ...for indoor use to reduce the potential for harmful interference to co channel mobile satellite systems DFS Dynamic Frequency Selection products that operate in the bands 5250 5350 MHz 5470 5600MHz and 5650 5725MHz Avertissement 1 Le dispositif fonctionnant dans la bande 5150 5250 MHz est réservé uniquement pour une utilisation à l intérieur afin de réduire les risques de brouillagepréjudiciableaux...

Page 117: ...之特性及功能 低功率射頻器材之使用不得影響飛航安全及干擾合法通信 經發現有干擾現象 時 應立即停用 並改善至無干擾時方得繼續使用 前述合法通信 指依電信管理法規定作業之無線電通信 低功率射頻器材須忍受合法通信或工業 科學及醫療用電波輻射性電機設備之干 擾 應避免影響附近雷達系統之操作 高增益指向性天線只得應用於固定式點對點系統 安全諮詢及注意事項 請使用原裝電源供應器或只能按照本產品注明的電源類型使用本產品 清潔本產品之前請先拔掉電源線 請勿使用液體 噴霧清潔劑或濕布進行 清潔 注意防潮 請勿將水或其他液體潑灑到本產品上 插槽與開口供通風使用 以確保本產品的操作可靠並防止過熱 請勿堵塞 或覆蓋開口 請勿將本產品置放於靠近熱源的地方 除非有正常的通風 否則不可放在 密閉位置中 請不要私自打開機殼 不要嘗試自行維修本產品 請由授權的專業人士進 行此項工作 ...

Page 118: ...eference value of presence 備考3 係指該項限用物質為排除項目 Note 3 The indicates that the restricted substance corresponds to the exemption Продукт сертифіковано згідно с правилами системи УкрСЕПРО на відповідність вимогам нормативних документів та вимогам що передбачені чинними законодавчими актами України Safety Information Keep the device away from water fire humidity or hot environments Do not attempt to dis...

Page 119: ...tion DC voltage AC voltage Class II equipment Polarity of output terminals Energy efficiency Marking Indoor use only Caution Operator s manual RECYCLING This product bears the selective sorting symbol for Waste electrical and electronic equipment WEEE This means that this product must be handled pursuant to European directive 2012 19 EU in order to be recycled or dismantled to minimize its impact ...

Reviews: