background image

061107-12 TC54.LP02.C

The logs are fragile, and should be handled with care. Unpack and inspect log set. There 
should be a total of seven logs. Gas plumbing and vent connections should be completed 
before proceeding.

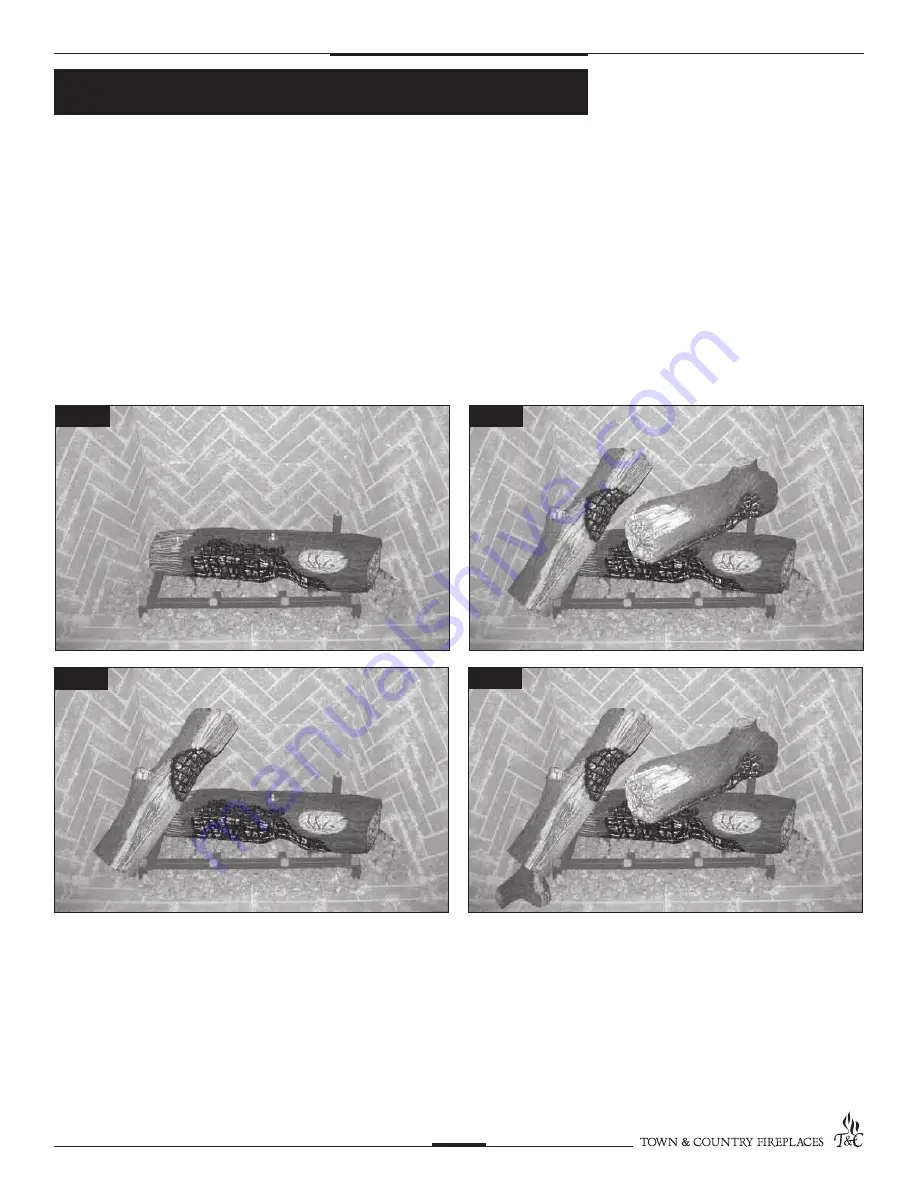
Position the logs exactly as indicated by the following pictures. The three main logs have 
holes and / or pins. Engage each pin in the corresponding holes. The four smaller logs do 
not have holes or pins. They rest in position. Locate as per the diagrams (Fig. # 14-20)

Note: Improper placement of logs will cause sooting on internal parts and glass. The 
logs may need to be repositioned slightly to avoid excessive fl ame impingement.

Fig. #14

Fig. #15

Fig. #16

Fig. #17

7

Log Set Assembly

Summary of Contents for TC54.LP02.C

Page 1: ...with the fireplace and should be kept together Refer to the Installation and Operating Instructions for proper gas supply safety requirements and operating instructions TC54 COUNTRY HOME BURNER KIT TC54 LP02 C PROPANE ONLY PART TC54 LP02 C INSTALLER LEAVE THIS MANUAL WITH APPLIANCE CONSUMER RETAIN THIS MANUAL FOR FUTURE REFERENCE ...

Page 2: ...t assembly LOG PACK EMBER MATERIAL two bags HARDWARE PACKAGE 1 Attach the lower burner assembly to the floor of the firebox with two screws Fig 1 2 Attach the manifold supply tube from the lower burner to the front bulk head fitting and tighten Fig 2 Ensure that there are no leaks Fig 1 Fig 2 2 Package Contents Burner Grate Installation ...

Page 3: ... sensor leads from lower burner pilot to the front electrical bulk head Fig 4 The spark electrode connection has a red dot above it 5 Positionthegrateandattachittothefloorwithtwoscrewslocated behind the front legs Fig 5 6 Attach the manifold supply tube from the upper burner to the rear bulk head fitting and tighten Fig 6 Ensure that there are no leaks ORANGE WIRE Fig 3 Fig 4 Fig 5 Fig 6 3 ...

Page 4: ...n Fig 7 Ensure there are no leaks 9 Attach spark electrode ORANGE and sensor leads from upper burner pilot to the rear electrical bulk head Fig 8 The spark electrode connection has a red dot above it A panel set must now be installed See Installation and Operating Instructions manual for details ORANGE WIRE Fig 7 Fig 8 4 ...

Page 5: ... Pressure Propane Minimum 12 5 wc Maximum 13 9 wc Manifold Pressure Maximum 11 0 wc Minimum 5 5 wc Note To test the gas pressure turn off the gas supply before removing the plug from the supply pressure test port or manifold pressure test port There are four ports on this fireplace the top two are connected to the rear burner and the bottom two are to the front burner Manifold pressures should be ...

Page 6: ...lower burner pan Do not compress leave it loose for best performance Fill the lower burner pan level with the top of the pan at rear and gradually slope forward to the firebox floor covering both lower burner tubes Place remaining ember material outside of the burner pan as desired to cover up gas lines and brackets Note Ember material placement and amount will affect flame appearance More ember m...

Page 7: ...as indicated by the following pictures The three main logs have holes and or pins Engage each pin in the corresponding holes The four smaller logs do not have holes or pins They rest in position Locate as per the diagrams Fig 14 20 Note Improper placement of logs will cause sooting on internal parts and glass The logs may need to be repositioned slightly to avoid excessive flame impingement Fig 14...

Page 8: ...061107 12 TC54 LP02 C 2 2 3 1 6 4 5 7 Fig 18 Fig 19 Fig 20 8 ...

Page 9: ... area may be hot Turn off the fireplace and allow the unit to cool before proceeding To Adjust See Fig 22 1 Open and remove window frame and set aside See Window Frame Removal section found in the Installation and Operating Instructions manual 2 Remove the logs and set aside 3 Loosen the screw in the Primary Air Shutter 4 Rotate the shutter to increase or decrease the amount of primary air PRIMARY...

Page 10: ...021 01 9 FLEX 1 2 LINE DORMONT 5019 223 10 FLEX 1 4 LINE DORMONT 16 5019 225 11 PILOT ASSEMBLY 5005 025 12 FLEX 1 4 LINE DORMONT 24 5019 227 LOG SET COMPLETE 5098 74615 REAR 1 shown in fig 20 5098 74615 1 RIGHT 2 shown in fig 20 5098 74615 2 LEFT 3 shown in fig 20 5098 74615 3 BOTTOM RIGHT 4 shown in fig 20 5098 74615 4 BOTTOM CENTRE 5 shown in fig 20 5098 74615 5 BOTTOM LEFT 6 shown in fig 20 509...

Page 11: ...061107 12 TC54 LP02 C 11 Notes ...

Page 12: ...TECHNICAL SUPPORT 1 877 715 2664 www townandcountryfireplaces net 2975 Allenby Rd Duncan BC V9L 6V8 Printed in Canada ...

Reviews: