background image

- 17 -

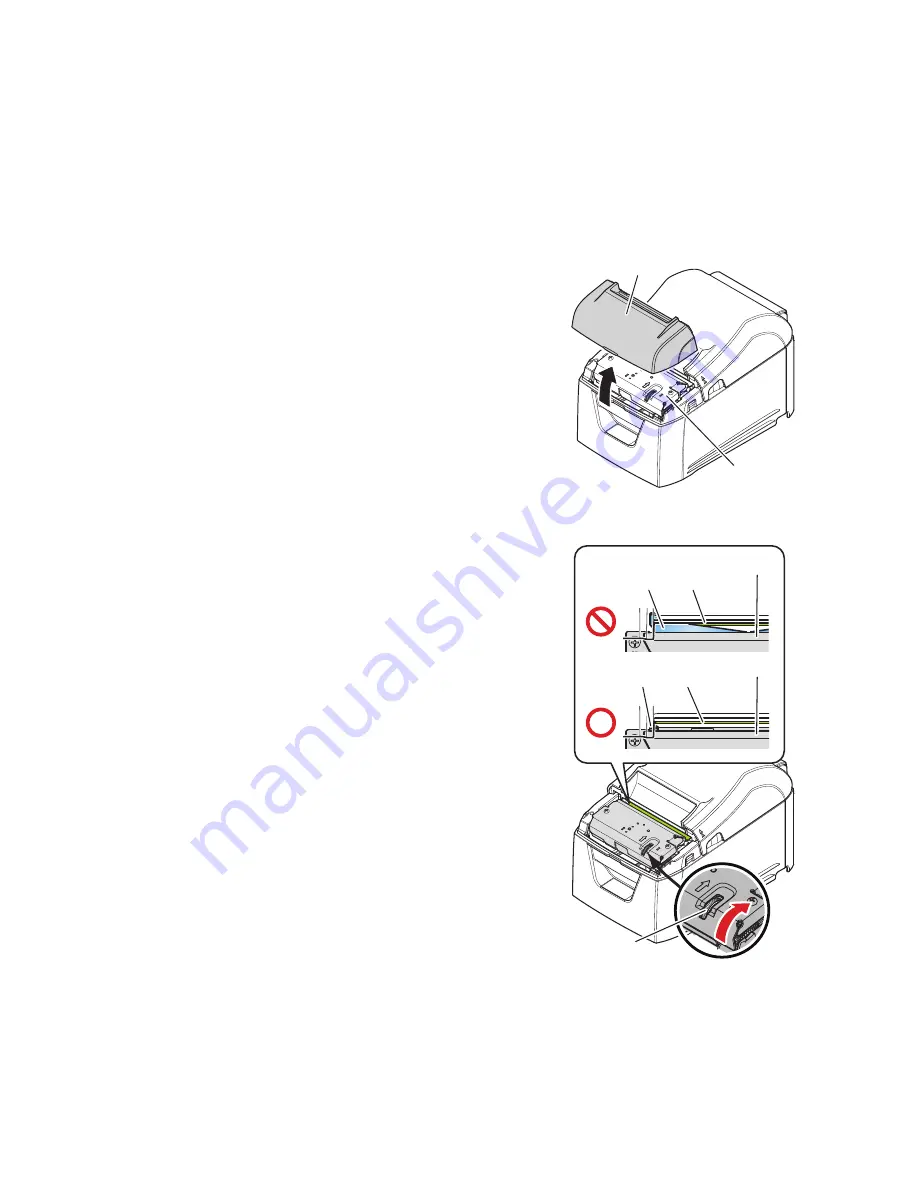
6-3.  Releasing the Cutter Lock

If the auto cutter locks up, restart the printer by turning the power switch off and then back on. A typical locked cutter will be 
restored when you restart the printer.

If restarting the printer does not release the locked cutter, follow the procedure below.

Note: Be sure to turn off the printer before performing maintenance on the cutter.

1)  Turn the power switch off.

2)  Remove the front cover.

3)  Remove the jammed paper.

Note: When removing jammed paper, be careful not to 

damage the printer.  

In particular, the thermal head is easily damaged, 

so do not touch it.

4)  Turn the knob in front of the cutter in the direction of the red arrow 

shown on the right until the rear cover can be opened.

Note: If you can not turn the knob in the direction of 

the red arrow, turn it in the opposite direction 

until the rear cover can be opened. 

5)  Open the rear cover, remove the jammed paper, and reset the 

paper.

6)  Attach the front cover, and turn the power switch on.

Knob

Drive knife

Drive knife

Cutter unit

Cutter unit

Stationary knife

Stationary knife

Front cover

Cutter unit

Summary of Contents for TP4000

Page 1: ...Hardware Manual THERMAL PRINTER TP4000...

Page 2: ...l environment This equipment generates uses and can radiate radio frequency energy and if not installed and used in accordance with the instruction manual may cause harmful interference to radio commu...

Page 3: ...er On 7 3 5 Connecting to a Peripheral Device 7 3 6 Loading a Paper Roll 8 3 7 Changing the Paper Width 10 3 8 Setup Precautions 11 4 Attaching the Accessories 13 4 1 Attaching the Holder Plate 13 5 T...

Page 4: ...extreme heat 6 Make sure that the surrounding area is clean dry and free of dust 7 Make sure that the printer is connected to a reliable power outlet It should not be on the same electric circuit as c...

Page 5: ...onnect this to a telephone line Peripheral drive connector Connects to an AC adapter Power inlet Connects to a host PC through a USB cable USB port Connects to a host PC through a cable Interface conn...

Page 6: ...ace Cable to the PC 3 1 1 USB Cable Connect the USB cable to a USB port on your PC 3 1 2 Parallel Cable Connect the parallel cable to a parallel port on your PC 3 1 3 RS 232C Cable Connect the RS 232C...

Page 7: ...ht the product from if you are unsure about what cable to use Before connecting or disconnecting an interface cable be sure to disconnect theAC adapter s power cord from the outlet 3 2 1 USB Cable To...

Page 8: ...le to the connector on the RS 232C interface board and tighten the left and right screws 3 2 2 Parallel Cable To connect a parallel cable follow the procedure given below 1 Make sure that the AC adapt...

Page 9: ...wer cord from the outlet 1 Connect the AC adapter to the power cord 2 Connect the AC adapter to the connector on the printer 3 Insert the power cable plug into an AC outlet CAUTION When disconnecting...

Page 10: ...lug Follow the procedure given below 1 Make sure that the AC adapter s power cord is not connected to the outlet 2 Connect the modular jack plug to the peripheral drive connector on the rear panel of...

Page 11: ...get your fingers caught when opening or closing the printer s rear cover 3 After the rear cover is closed the printer performs initial operations from paper feeding to paper cutting Do not open the re...

Page 12: ...outer diameters Inner diameter 12 1 mm external diameter 18 1 mm Printed surface Outer edge of roll You cannot use inner wrapped paper rolls Note 1 Do not glue or tape the paper roll and shaft core t...

Page 13: ...the paper width from 79 5 mm to 57 5 mm 1 Remove the paper roll guide 2 As shown in the figure insert the paper roll guide in the groove 3 Secure the paper roll guide in place by pushing the section...

Page 14: ...the tear bar There is a cutter or tear bar inside the paper outlet slot Never put your hand in the slot regardless of whether or not the printer is in operation You must open the printer cover to repl...

Page 15: ...sandpaper etc Do not touch the thermal print head heating element Doing so may make it dirty which will decrease the printing quality Static electricity can damage the driver IC and other components...

Page 16: ...age Be sure to have qualified personnel install the specified screws and printer to the wall Star is not responsible for any accidents or injuries that occur as a result of improper in stallation misu...

Page 17: ...over 5 Insert the roll paper as shown Note 1 The printer s weight is approximately 2 4 kg when the largest diameter roll paper is loaded Use screws on the wall that have both shear strength and pullin...

Page 18: ...ond intervals Paper cutting in progress error After you restart the printer the printer recovers when the mobile cutter returns to its home position Note 3 4 Flash memory error Off Flashes at 1 second...

Page 19: ...Do not pull on the paper with the rear cover closed Doing so may cause damage to or deformation of parts such as the thermal head and the rubber roller 4 Load the paper roll straight and gently close...

Page 20: ...ed paper Note When removing jammed paper be careful not to damage the printer In particular the thermal head is easily damaged so do not touch it 4 Turn the knob in front of the cutter in the directio...

Page 21: ...the dirt from the rubber roller Clean the entire rubber roller by rotating it 7 3 Paper Holder Clean the paper holder of debris dust paper particles etc that may have accumulated Note 1 The thermal h...

Page 22: ......

Reviews: