background image


11

4. Peripherals Installation 


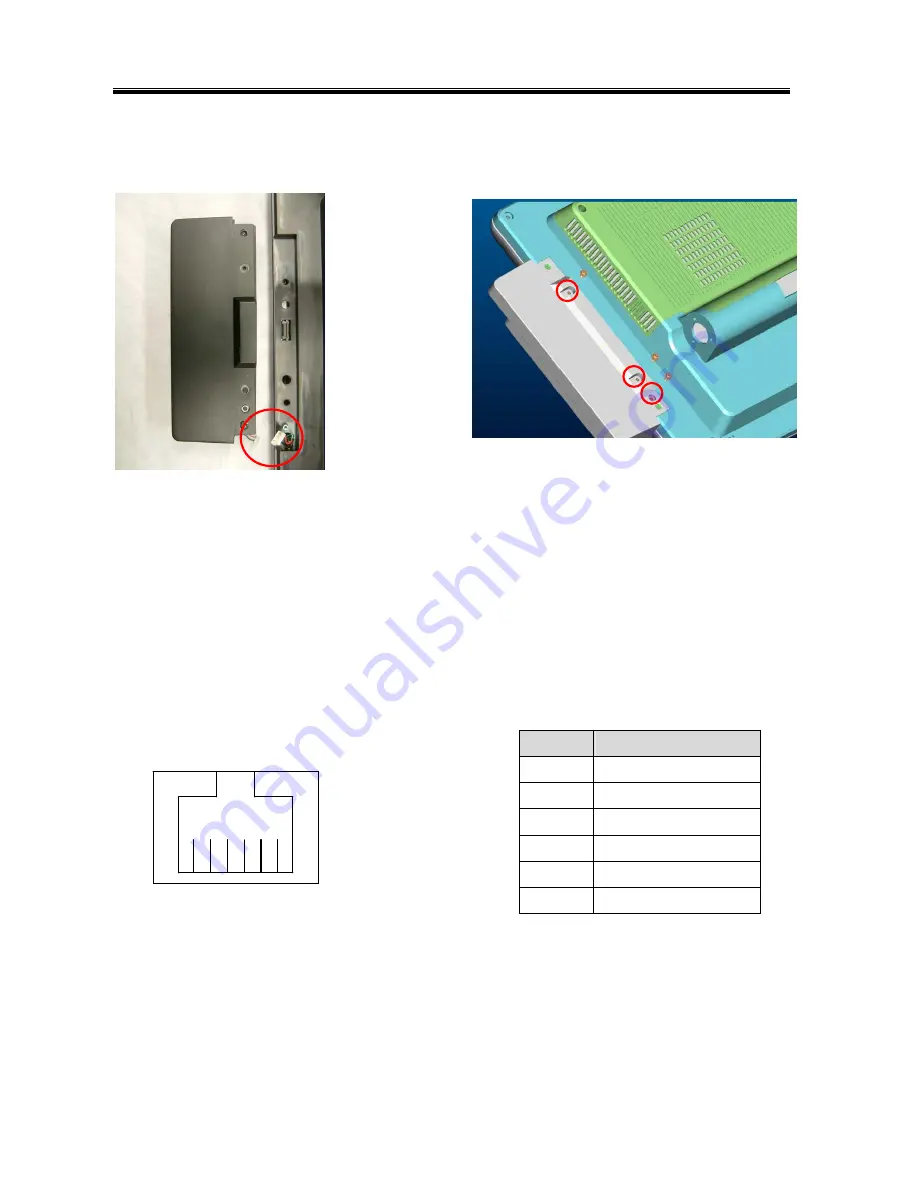
4.1 Biometric Magnetic Stripe Reader Installation 


a. Plug-in the cables (2) into the connectors on 

the terminal.


b. Secure the screws (3) to stabilize the 

module to the terminal. 


4.2 Cash Drawer Installation 

You can install a cash drawer through the cash drawer port. Please verify the pin 

assignment before installation. 


4.2.1 Cash Drawer Pin Assignment     


4.2.2 Cash Drawer Controller Register 

The Cash Drawer Controller use one I/O addresses to control the Cash Drawer.   

The Cash Drawer Control Register and the Cash Drawer Status Register. 


Register Location: 

4B8h 

Attribute: 

Read / Write 

Size: 

8bit 

6 1 

Pin 

Signal 

1 GND 

2 DOUT 

bit0 

3 DIN 

bit0 

12V / 24V 

5 DOUT 

bit1 

6 GND 

Summary of Contents for CS-200

Page 1: ...CS 200 Point of Sale Hardware System User Manual Revision v1 3 December 2009 ...

Page 2: ...incidental or consequential damages in connection with the furnishing performance or use of this material This document contains proprietary information that is protected by copyright All rights are reserved No part of this document may be photocopied reproduced or translated to another language without the prior written consent of the manufacturer TRADEMARK Intel Pentium and MMX are registered tr...

Page 3: ...t should never be placed near or over a radiator or heat register or in a built in installation unless proper ventilation is provided 7 This product should be operated from the type of power indicated on the marking label If you are not sure of the type of power available consult your dealer or local power company 8 Do not allow anything to rest on the power cord Do not locate this product where p...

Page 4: ... its working life Instead the device should be taken to the waste collection centers for activation of the treatment collection recycling and disposal procedure To prevent possible harm to the environment or human health from uncontrolled waste disposal please separate this from other types of wastes and recycle it responsibly to promote the sustainable reuse of material resources Household users ...

Page 5: ...d below Version Date Description 1 0 2007 December Initial release 1 1 2007 March System disassembly updated 1 2 2007 October Cover page update Wall mount bracket installation Connector Pin Definition update 1 3 2009 December Drivers installation removed from manual ...

Page 6: ...ion 11 4 2 Cash Drawer Installation 11 4 3 Customer Display Installation 13 4 4 Second Display Installation 14 4 5 Wall Mount Bracket Installation 15 5 System Disassembly 16 5 1 Removing the Base Cover 16 5 2 Replacing the HDD 17 5 4 Replacing the Power Supply 17 5 5 Replacing the RAM 18 Appendix A Specification 19 Appendix B Jumper Settings 21 Appendix C BIOS Setting 27 Appendix D Drivers Install...

Page 7: ...the carton Remove the unit from the carton by holding it by the foam inserts The following contents should be found in the carton 1 1 Standard Items a Driver CD b Power Cable Note The power cord type various according to different country and region ...

Page 8: ...t View 2 2 Rear View Note The maximum current that can be drawn from each COM port is 500 mA CD ROM option USB 1 2 Power Button VGA COM3 KB Mouse LAN Cash Drawer Power USB 24V Power USB 12V COM2 COM1 LPT COM4 Line In Line Out ...

Page 9: ...rawing Item Description 1 Front Bezel 2 Touch Panel 3 LCD Panel 4 LCD Chassis 5 Main Board 6 Inverter 7 MSR Function Board 8 Touch Bridge Board 9 Thermal Module 10 LCD Cover Assembly 11 MSR Dummy Door 12 CPU RAM Door ...

Page 10: ...10 Item Description 13 CD ROM 14 Base Front Cover 15 Front I O Board 16 CD ROM Guide Bracket 17 Side Cover 18 Power Supply 19 Rear I O Board 20 Base Cover Bracket 21 Base Cover ...

Page 11: ...tall a cash drawer through the cash drawer port Please verify the pin assignment before installation 4 2 1 Cash Drawer Pin Assignment 4 2 2 Cash Drawer Controller Register The Cash Drawer Controller use one I O addresses to control the Cash Drawer The Cash Drawer Control Register and the Cash Drawer Status Register Register Location 4B8h Attribute Read Write Size 8bit 6 1 Pin Signal 1 GND 2 DOUT b...

Page 12: ... 1 Opening the Cash Drawer 0 Allow closing the Cash Drawer Bit 0 Cash Drawer DOUT bit0 pin output control 1 Opening the Cash Drawer 0 Allow closing the Cash Drawer Note Please follow the Cash Drawer control signal design to control the Cash Drawer 4 2 3 Cash Drawer Control Command Example Use Debug EXE program under DOS or Windows98 Command Cash Drawer O 4B8 01 Opening O 4B8 00 Allow to closing Se...

Page 13: ...gh the hole b Pass the cable through the pole Place the short or long pole into the hole c Tighten the screws 2 under the pole d Connect the cable Please setup the COM port power e Connect the cable into the display f Tighten the screws as shown in the picture ...

Page 14: ...cting the second display a Connect the VGA cable male into the second display b Mount the second display on the rear of the system and tighten the screws 3 on the supporter All these screws are behind the supporting pole c Connect the other end of the VGA cable female into the system ...

Page 15: ...n a Place the wall mount bracket into the hooks and slide the bracket to the direction as shown by the arrows b The bracket should be located properly as shown by the photo c Tighten the screws 2 one on each side to finish the installation ...

Page 16: ...ver a Release the thumbscrews 2 b Slide the top cover towards the back and remove it c Release the thumbscrews 2 d Pull the base cover bracket towards you by the handle and lift it up e Fix the base cover in the open position as shown in the picture ...

Page 17: ...teps in chapter 5 1 a Disconnect the IDE cable 1 and power cable 1 b Remove the screws 4 to replace the HDD 5 4 Replacing the Power Supply a Remove the screws 2 b Disconnect the 20pin cable 1 c Remove the screw 1 d Remove the screws 2 You can now remove the power supply ...

Page 18: ...he screws 2 b Lift the cover up and remove it c The memory slots are located on the mainboard To remove the memory module use your finger to push the DIMM slot ejector clips into the down position d Remove the memory module from the slot ...

Page 19: ...sistive Tilt Angle Degree 0 70 Storage HDD 1 x 3 5 Drive Bay ODD 1 x Slim CD ROM CD RW CD ROM optional Flash Memory Compact Flash Type I II Expansion Mini PCI Socket 1 External I O Ports Front I O Line in Line out optional USB 2 V2 0 Rear I O PS 2 Keyboard 1 PS 2 Mouse 1 USB 2 V2 0 Powered USB 2 12V 24V Serial COM 4 x powered COM ports pin 1 pin 9 support 5V 12V by Jumper Parallel 1 LAN 10 100 1 R...

Page 20: ... 4 140 Operating Humidity 20 80 RH non condensing Storage Humidity 20 85 RH non condensing Peripherals Input Device Magnetic Card Reader 3 Tracks PS2 Interface Magnetic Card Reader Finger print module 3 Tracks PS2 Interface USB interface Mini PCI Wireless Lan card Antenna optional IEEE802 11a b g Output Device Second Display 12 1 TFT LCD Customer Display VFD LCD Dimension W x D x H CP200 378 x 364...

Page 21: ...21 Appendix B Jumper Settings B 1 M B ...

Page 22: ... 533 3 4 CPU Voltage Setting CPU Type JP7 SHORT JP8 SHORT Mobile Celeron 1 2 G 1 3V NC 3 4 1 2 NC 9 10 5 6 NC 7 8 NC 11 12 NC P4 Celeron 1 2 3 4 5 6 7 8 9 10 11 12 NC LCD ID Setting LVDS JP6 SHORT Panel Number Resolution Bits Channel 1 2 3 4 5 6 7 8 0 640 x 480 18 Single SHORT SHORT SHORT SHORT 1 800 x 600 18 Single SHORT SHORT SHORT OPEN 2 1024 x 768 18 Single SHORT SHORT OPEN SHORT 3 1280 x 1024...

Page 23: ...6 GND Pin 7 GND Pin 8 GND CN11 Power Switch Pin 1 SW_PWRBT Pin 2 GND Pin 1 GND Pin 2 LVDS_A3 Pin 3 BKLEN Pin 4 LVDS_A3 Pin 5 GND Pin 6 GND Pin 7 5V Pin 8 LVDS_CLKA Pin9 3 3V Pin 10 LVDS_CLKA Pin 11 GND Pin 12 GND Pin 13 3 3V_LCDVDD Pin 14 LVDS_A2 Pin 15 3 3V_LCDVDD Pin 16 LVDS_A2 Pin 17 NA Pin 18 GND Pin 19 NA Pin 20 LVDS_A1 Pin 21 NA Pin 22 LVDS_A1 Pin 23 NA Pin 24 GND Pin 25 NA Pin 26 LVDS_A0 Pi...

Page 24: ... USB3 USB4 port Pin 1 5V Pin 2 5V Pin 3 USB20_P3 Pin 4 USB20_P3 Pin 5 GND Pin 6 USB20_P2 Pin 7 USB20_P2 Pin 8 GND CN20 I BUTTON Pin 1 GND Pin 2 GND Pin 3 KCLK_IBT_TO_IO Pin 4 KDATA_IBT_TO_IO Pin 5 KCLK_MSR_TO_IBT Pin 6 KDATA_MSR_TO_IBT Pin 7 GND Pin 8 5V CN12 15 POS Card Reader Pin 1 5V_LCDVDD Pin 2 LVDS_B0 Pin 3 5V_LCDVDD Pin 4 LVDS_B0 Pin 5 5V_LCDVDD Pin 6 LVDS_B1 Pin 7 5V_LCDVDD Pin 8 LVDS_B1 P...

Page 25: ...21 22 23 24 25 26 27 28 29 30 31 32 33 34 NC 24V 24V 12V 12V 12V 5V RI 12V 5V DCD 12V 5V RI 12V 5V DCD PIN9 PIN1 PIN9 PIN1 Factory Default Setting COM3 COM4 DC Power Jumper Setting JP2 SHORT COM4 COM3 1 2 3 4 5 6 7 8 9 10 11 12 13 14 15 16 17 18 19 20 21 22 23 24 12V 5V RI 12V 5V DCD 12V 5V RI 12V 5V DCD PIN9 PIN1 PIN9 PIN1 Factory Default Setting USB DC Power Jumper Setting JP3 JP4 SHORT JP3 SHOR...

Page 26: ...M6_RXD2 Pin 3 COM6_TXD2 Pin 4 COM6_DTR2 Pin 5 GND Pin 6 COM6_DSR2 Pin 7 COM6_RTS2 Pin 8 COM6_CTS2 Pin 9 COM6_RI2 Pin 10 COM6_POWER CN12 CDIN Pin 1 CDIN_L Pin 2 CDIN_REF Pin 3 CDIN_R Pin 4 CDIN_REF CN20 I BUTTON Pin 1 24V Pin 2 24V Pin 3 GND Pin 4 GND Note OPEN SHORT ...

Page 27: ...is displayed during POST the Power on Self Test Press DEL to enter SETUP 3 The main menu of the BIOS setup is displayed 4 If the supervisor password is set you must enter it here 3 When a Problem Occurs If after making and saving system changes with the Setup utility you find that this product no longer boots start the BIOS setup and execute the following Load Optimized Defaults 4 BIOS Main Menu W...

Page 28: ...his category determines the system power consumption of the system PNP PCI Configurations This category specifies the value in units of PCI bus clocks of the latency timer for the PCI bus master and the IRQ level for PCI devices PC Health Status This page shows hardware monitor information Load Optimized Defaults BIOS defaults indicate the most appropriate value of the system parameters for a stan...

Page 29: ...disable the password It allows you to limit access to the system and to the setup or just to the setup Save Exit Setup Save CMOS value changes to CMOS and exit setup Exit Without Saving Discard all CMOS value changes and exit setup ...

Page 30: ...ou can find every individual driver and utility that enables you to install the drivers on the system Please insert the Driver CD into the drive and double click on the index htm to select the models You can refer to the drivers installation guide for each driver in the Driver Manual List ...

Reviews: