24
COMPUTER INPUT
SELECTING INPUT SOURCE
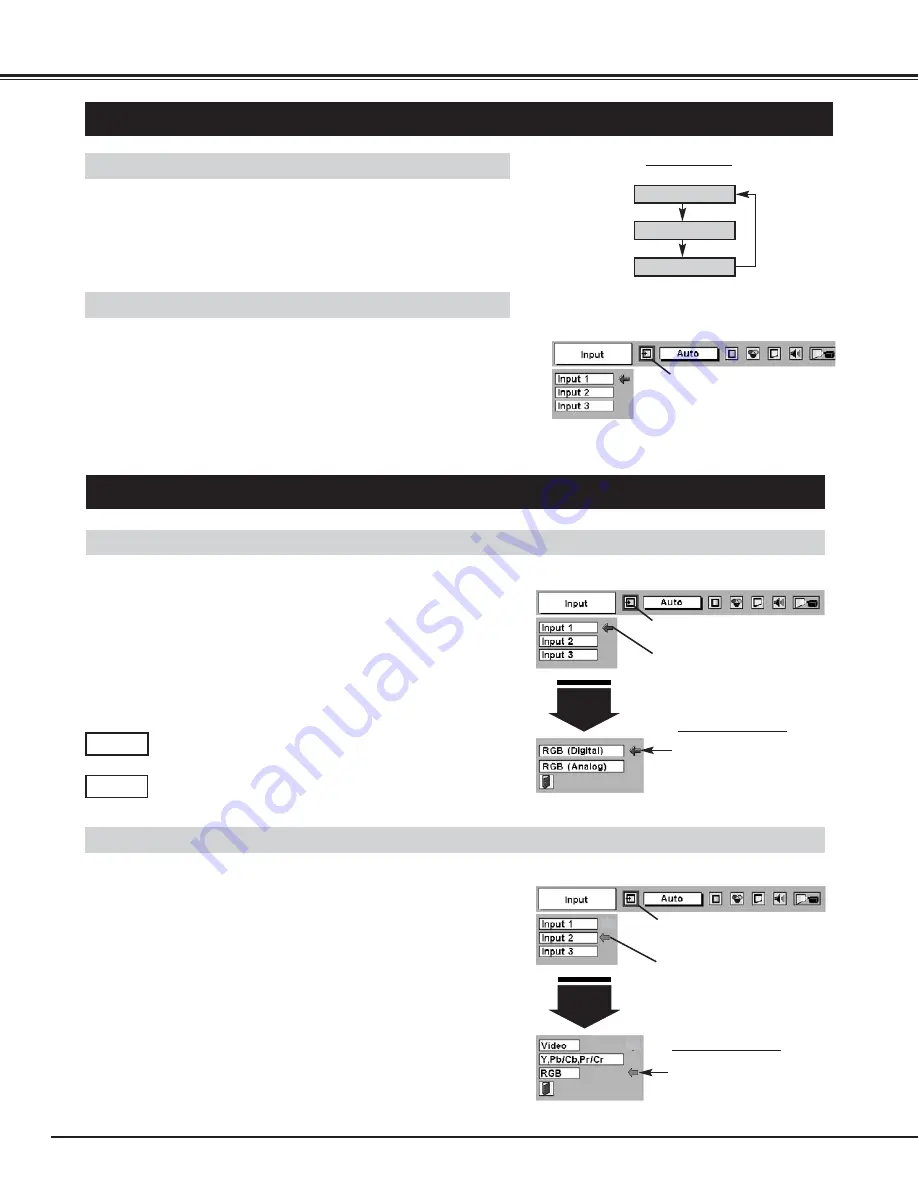
DIRECT OPERATION
Choose Computer by pressing INPUT button on Top Control or on
Remote Control Unit.
If projector cannot reproduce proper image, select correct input source
through MENU OPERATION (see below).
INPUT button
Input 1
Input 2
Input 3
Press MENU button and ON-SCREEN MENU will appear. Press
POINT LEFT/RIGHT button to move a red frame pointer to
INPUT Menu icon.
Press POINT DOWN button and a red-arrow icon will appear.
Move arrow to "RGB", and then press SELECT button.
1
3
When connect a computer output [5 BNC Type (Green, Blue, Red,
Horiz. Sync and Vert. Sync.)] from a computer to G, B, R, H/HV and V
jacks.
WHEN SELECT INPUT 2 (5 BNC INPUT JACKS )
SELECTING COMPUTER SYSTEM
WHEN SELECT INPUT 1 (COMPUTER INPUT TERMINALS )
Press MENU button and ON-SCREEN MENU will appear. Press
POINT LEFT/RIGHT button to move a red frame pointer to
INPUT Menu icon.
Press POINT DOWN button to move a red arrow pointer to Input
1 and then press SELECT button. Source Select Menu will
appear.
1
2
Input 1
INPUT MENU
Move a pointer to either Digital or Analog and then press
SELECT button.
3
When your computer is connected to COMPUTER
INPUT (DIGITAL) terminal, select RGB (Digital).
Digital
When your computer is connected to COMPUTER INPUT
(ANALOG) terminal, select RGB (Analog).
Analog
MENU OPERATION
Press MENU button and ON-SCREEN MENU will appear. Press
POINT LEFT/RIGHT buttons to select Input and press SELECT
button. Another dialog box INPUT SELECT Menu will appear.
Press POINT DOWN button and a red-arrow icon will appear.
Move arrow to INPUT source that you want to select, and then
press SELECT button.
1
2
Move a pointer to Digital or
Analog and press SELECT
button.
Move a pointer (red arrow) to
Input 1 and press SELECT
button.
INPUT Menu icon
Source Select Menu
Input 2
INPUT MENU
Move a pointer to RGB and
press SELECT button.
INPUT Menu icon
Move a pointer (red arrow) to
Input 2 and press SELECT
button.
Source Select Menu
INPUT Menu icon
Press POINT DOWN button to move a red arrow pointer to Input
2 and then press SELECT button. Source Select Menu will
appear.
2
Summary of Contents for TLP-X4100E
Page 1: ...OWNER S MANUAL 3LCD DATA PROJECTOR TLP X4100E ...
Page 46: ...46 ...
Page 47: ...47 ...
Page 48: ...Part No 610 302 1805 1AA6P1P3613 PA8SA Printed in Japan ...


