Toshiba TLP S70 Owner'S Manual Download Page 22

43

Others

42

If you think something is wrong, check the followings before contacting customer service.
Please see “

Trouble indications

” 

p.42

 as well.

If  This Happens

Check

No power

Power goes out
during use

No picture

No audio

Picture not
displayed
correctly

Picture blurred
Part of picture
out of focus

Image is dark

Colors too light
Bad shading

Remote control
doesn’t work

Before calling service personnel

• Is the power cord plugged in? Is it connected to the projector?
• Is the lamp cover loose? 

p.42

• Is the ambient temperature high? 

p.42

• Is the air filter clogged? 

p.42

• Is the air intake or air exhaust blocked? 

p.42

• Is the projector turned on? 

p.24

• Is the mute function on? 

p.28

• Is the brightness setting minimized? 

p.32

• Are the connections set up correctly? 

p.21

• Are all the connected devices functioning properly?

• Is the projector turned on? 

p.24

• Is the mute function on? 

p.28

• Is the volume setting minimized? 

p.25

• Are the connections set up correctly? 

p.21

• Are all the connected devices functioning properly?

• Is the input signal supported by the projector? 

p.46

p.47

• Is the correct video mode selected? 

p.26

• Is the correct signal format selected?  

p.26

• Is the selecting of computer or Y/P

B

/P

R

 input correct? 

p.24

• Is there something generating an abnormal video signal, for

instance the video tape?

• Is the lens dirty? 

p.40

• Is the lens focus adjusted optimally? 

p.25

• Is the projection distance within the projector’s supported range?

p.20

• Is the projector’s screen placement angle tilted too far?  

p.19

• Are the sharpness or sampling phase adjustments off? 

p.26


p.32

• Are the brightness or contrast adjustments off? 

p.32

• Is the lamp nearing the end of its service life? 

p.30

• Are the color, tint, R-level, G-level, or B-level adjustments off? 

p.32

• Is the screen dirty?
• Is the lamp nearing the end of its service life? 

p.30

• Are the remote control’s batteries drained?
• Are the batteries inserted into the remote control correctly? 

p.18

• Is the remote control being used within the effective range? 

p.18

• Are there any obstructions between the remote control and

projector?

• Are there any fluorescent or other bright lights shining at the

projector’s infrared remote sensor?

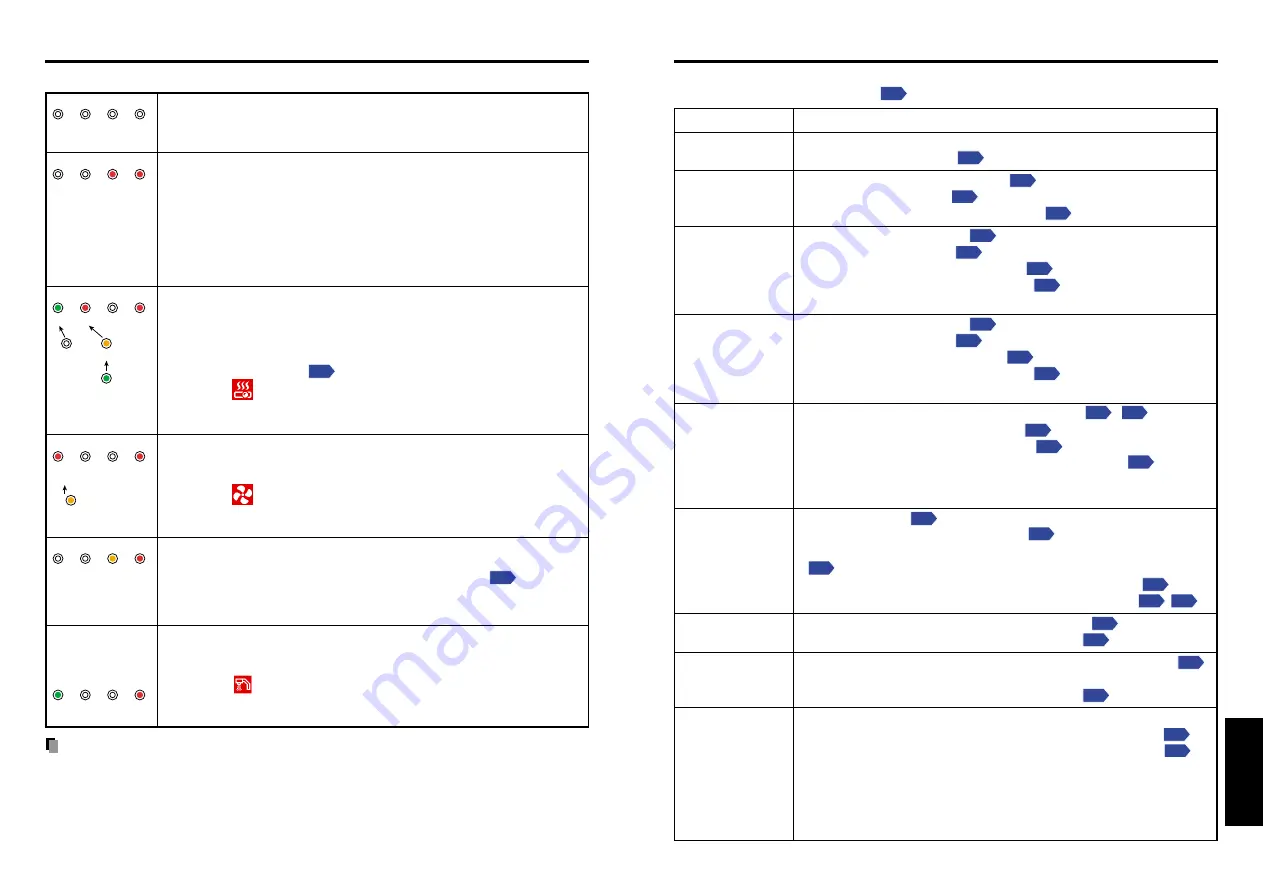
The indicator lights inform you of internal abnormalities.

No power

Problem with projector
• Unplug the power cord, and contact your dealer.

Lamp went out during use, or won’t come on

Lamp temperature is high so that it is difficult to turn on, the lifetime of
the lamp has ended or the projector is malfunctioning.
• Unplug the power cord and wait for a short while, then turn the power

back on.

• If a lamp burns out, replace it with a new one.

After approx. one minute of abnormal display, the projector returns to
the standby state waiting for internal cool down.

Power went out during use

Internal overheating, or the outside temperature is too high.
• Place the projector so that the air intake and exhaust are not blocked.
• Unplug the power cord and wait for a short while, then turn the power

back on.

• Clean the air filter. 

p.39

The 

 icon will appear before the power goes out.

After approx. one minute of abnormal display, the projector returns to
the standby state waiting for internal cool down.

Power went out during use

Problem with internal cooling fan.
• Unplug the power cord, and contact your dealer.

The 

 icon will appear before the power goes out.

After approx. one minute of abnormal display, the projector returns to
the standby state waiting for internal cool down.

Power went out during use, or power won’t come on

The lamp cover is not properly attached.
• Unplug the power cord, and reattach the lamp cover. 

p.41

After approx. one minute of abnormal display, the projector returns to
the standby state waiting for internal cool down.

Power went out during use

Camera is not correctly connected.
• Disconnect the power plug and check the connection with the camera.

The 

 icon will appear before the power goes out.

After approx. one minute of abnormal display, the projector returns to
the standby state waiting for internal cool down.

PRECAUTIONS

• Make sure to unplug the power cord if something goes wrong.
• If the power cord is unplugged before cooling is complete, give the lamp enough time to

cool before plugging it back in. If the lamp overheats, it may fail to light. Unplugging the
power cord repeatedly when the temperature is high will shorten the life of the lamp.
(Even if you are not concerned about lamp lifetime, the light may not come on if you do
not wait at least 3 minutes.)

(Off)

(Red lit) (Red lit)

Or
(Green lit)

(Green lit) (Red lit)

(Red lit)

Or

(Off)

Or
(Orange lit)

Or
(Orange lit or flashing)

(Red lit or flashing)

(Red lit)

(Orange
flashing)

(Red lit)

ON

LAMP

TEMP

FAN

ON

LAMP

TEMP

FAN

ON

LAMP

TEMP

FAN

ON

LAMP

TEMP

FAN

ON

LAMP

TEMP

FAN

Trouble indications

Others

Model with a
document
camera

(Green lit)

(Red lit)

ON

LAMP

TEMP

FAN

Summary of Contents for TLP S70

Page 1: ...ng TLP T70M T60M TLP S70 TLP S40 OWNER S MANUAL 3LCD DATA PROJECTOR TLP T70M XGA TLP T71M XGA With Document Camera TLP T60M XGA TLP T61M XGA With Document Camera TLP S70 SVGA TLP S71 SVGA With Document Camera TLP S40 SVGA TLP S41 SVGA With Document Camera ...

Page 2: ...s is a Class A product In a domestic environment this product may cause radio interference in which case the user may be required to take adequate measures CAUTION Laser beam is emitted when the laser button of the remote control is pressed Do not look at the laser beam directly from the front of the remote control Do not turn the laser beam toward a person or to a mirror USA only USA only CANADA ...

Page 3: ...RUCTIONS Continued 11 Object and Liquid Entry Never push objects of any kind into this product through openings as they may touch dangerous voltage points or short out parts that could result in a fire or electric shock Never spill liquid of any kind on the product 12 Do not place the product vertically Do not use the product in the upright position to project the pictures at the ceiling or any ot...

Page 4: ...yourself as opening or removing covers may expose you to dangerous voltage or other hazards Refer all servicing to qualified service personnel 19 Replacement Parts When replacement parts are required be sure the service technician has used replacement parts specified by the manufacturer or have the same characteristics as the original part Unauthorized substitutions may result in fire electric sho...

Page 5: ... unit is exposed to such a change in temperature moisture may condense on the crucial internal parts To prevent the unit from possible damage do not use the unit for at least 2 hours when there is an extreme or sudden change in temperature Place and Manner of Installation Do not place in hot locations such as near heating equipment Doing so could cause malfunction and shorten the life of the LCD p...

Page 6: ...ruption corruption or loss of the memory contents etc arising from the use of or the inability to use this unit Toshiba Corporation accepts no liability whatsoever for any damages arising from not having followed the descriptions in this Instruction Manual Toshiba Corporation accepts no liability whatsoever for any damages arising from malfunctions arising from combination with equipment or softwa...

Page 7: ... picture size Resize 29 Displaying Information Status display 30 Using the menus 31 How to use the menus 31 The image adjustment menu 32 The default setting menu 32 The display setting menu 33 Reset menu Special menu 33 Using the document camera 34 Uninstalling the camera 34 Installing the camera 34 Preparation of the document camera when loading the camera 35 Preparing the document camera for use...

Page 8: ...number of supplied power cords vary depending on the product destination The Supplied CD ROM The supplied CD ROM contains an owner s manual including information omitted in this Owner s manual Getting started and Acrobat Reader to view the manual Installing Acrobat Reader Windows Run the CD ROM select the Reader English folder and run ar500enu exe Follow the on screen instructions Macintosh Run th...

Page 9: ...O KEYSTONE INPUT ON STANDBY CANCEL CALL AUTO MUTE RESIZE FREEZE SET KEYSTONE MENU VOL VOL ZOOM ZOOM 1 2 3 4 5 6 12 13 14 11 15 Remote control transmitter Remote Control Notes For the remainder of this manual buttons are referred to as follows Selection buttons MENU button For further information of the mouse remote control supplied with the TLP T60M TLP T61M TLP T70M TLP T71M see the Owner s Manua...

Page 10: ...s with new ones The remote control The remote control may fail to operate if the infrared remote sensor is exposed to bright sunlight or fluorescent lighting Do not drop or bang Do not leave in hot or humid locations Do not get wet or place on top of wet objects Do not take apart In rare cases ambient conditions could impede the operation of the remote control If this happens point the remote cont...

Page 11: ...rojection size inches 1 547 26 44 a max length projection size inches 1 2907 22 06 90 a 90 Projection Distance and Screen Size with optical zooming Use the figures tables and formulas below to determine the screen size and projection distance Screen sizes are approximate values for full size picture with no keystone adjust ment a is the distance m between the lens and the screen and corresponds to...

Page 12: ...t in use and make sure that the lamp is off Keeping the lamp off is also very effective at saving electricity If the air filter becomes dirty and clogged the projector s internal temperature will rise shortening the lifetime of the LCD panel and causing malfunctions Clean the air filter from time to time p 39 and replace it periodically Contact the store where you purchased your projector or your ...

Page 13: ... the computer s LCD display For information on how to turn off the LCD display see the owner s manual of your computer If a signal not supported by the projector is input the icon will appear If a no signal is being input from the connected device the icon will appear If an unavailable operation button is pressed the icon will appear 1 3 2 1 2 1 Turn on the power Turn on the power by following the...

Page 14: ...OM ZOOM ZOOM Using auto setting Auto setting This function sets up the projector to the optimum state for each type of the input signal by using simple operations 1 Press the AUTO SET button The Auto setting menu appears 2 Press the AUTO SET button again The menu item is automatically adjusted set For computer input the icon will appear during processing Note Auto adjustment setting may not be per...

Page 15: ...ze increases You cannot make it larger than the original size Notes Pressing either the ZOOM or ZOOM button would display the icon The adjustment value will automatically be saved Cutting off the picture and sound temporarily Mute When you want to project the images of another projector overhead projector etc temporarily this projector s images and sound can be turned off Press the remote control ...

Page 16: ...rol once When the button is pressed once the Setting display menu appears Pressing it again displays information p 31 The table below shows what kind of information is displayed Press the button or press the CALL or CANCEL button on the remote control to serve the same purpose again to dismiss the display Yes displayed No not displayed Item Description Computer Y PB PR Video Camera S video Input I...

Page 17: ...t menu Use this menu to adjust image related items Items that can be adjusted are marked with Yes and those that cannot are marked with No Item Description Computer Y PB PR Video S video Camera Contrast Lower Higher Yes Yes Yes Yes Yes Brightness Darker Brighter Yes Yes Yes Yes Yes Color Lighter Deeper No Yes Yes Yes No Tint Note 1 Reddish Greenish No No Yes Yes No Sharpness Softer Sharper No Yes ...

Page 18: ...arm 4 Raise camera head 1 Connect the supplied camera cable to the camera input terminal 2 Connect the other end of the camera cable to the camera terminal on the document camera 3 Pull out the tip resistant bar and set up the document camera Using the document camera Please read this chapter if the model you purchased includes a document camera Uninstalling the camera Installing the camera PRECAU...

Page 19: ...r speed setting may not eliminate the flicker depending on the lighting state of the document or image adjustment Note No audio is output when camera input is selected Turn the focusing ring to adjust the focus Near 100 mm to 300 mm Far 300 mm to 5 m Using the document camera Continued Image projection with the document camera 1 Place the document Set the document at the top of or the side of the ...

Page 20: ... air filter is cleaned regularly The icon message Check the air filter for dirt is displayed every 100 hours If the usage time exceeds 100 hours this message is displayed for 30 seconds when the image is displayed for the first time after power is turned on This display will be dismissed with any operation Check out the filter and any debris is found use the following procedure for cleaning WARNIN...

Page 21: ...and dispose it in accordance with local regulations 2 1 2 1 1 2 3 4 5 Lamp replacement Continued WARNING Request cleaning and maintenance of a ceiling mounted unit from your projector dealership Lens cleaning Clean the lens with a commercially available blower and or lens cleaner The lens is easily scratched so do not rub it with hard objects or strike it Main unit cleaning Clean the main unit aft...

Page 22: ... dealer Lamp went out during use or won t come on Lamp temperature is high so that it is difficult to turn on the lifetime of the lamp has ended or the projector is malfunctioning Unplug the power cord and wait for a short while then turn the power back on If a lamp burns out replace it with a new one After approx one minute of abnormal display the projector returns to the standby state waiting fo...

Page 23: ... Mini D sub 15 pin RGB Y PB PR dual use MONITOR terminal Mini D sub 15 pin RGB Y PB PR dual use S VIDEO terminal Mini DIN 4 pin VIDEO terminal RCA Pin Jack 1 V p p 75 Ω AUDIO terminal 3 5mm dia stereo mini jack 1 5V rms 22 kΩ or more CONTROL terminal Mini DIN 8 pin RS 232C Each plastic part displays the materials it is made from in order to facilitate recycling after this product becomes no longer...

Page 24: ...B signals Note however that depending on the computer model the screen may show flicker or streaking Please adjust the projector if this happens Press the AUTO SET button and adjust automatically or manually p 26 Mode 720x400_85 VGA_60 VGA_72 VGA_75 VGA_85 SVGA_56 SVGA_60 SVGA_72 SVGA_75 SVGA_85 MAC16 XGA_43i XGA_60 XGA_70 XGA_75 XGA_85 MAC19 SXGA1_75 QuadVGA_60 QuadVGA_85 SXGA3_60 SXGA3_75 SXGA3_...

Page 25: ...ers supported 4 Replies Acknowledge ACK 06h CR 0Dh Data Normally ended ACK 06h ESC 1Bh Aborted No acknowledge NAK 15h If commands are to be sent consecutively wait for the response from the projector before sending the next command Main Commands Note Contact your dealer for control cable and other commands Separately Sold Product Replacement Lamp Model TLPLV2 Note Design specifications etc subject...

Page 26: ......

Reviews: