background image

75

62HM15

Copyright © 2005 TOSHIBA CORPORATION. All rights reserved.

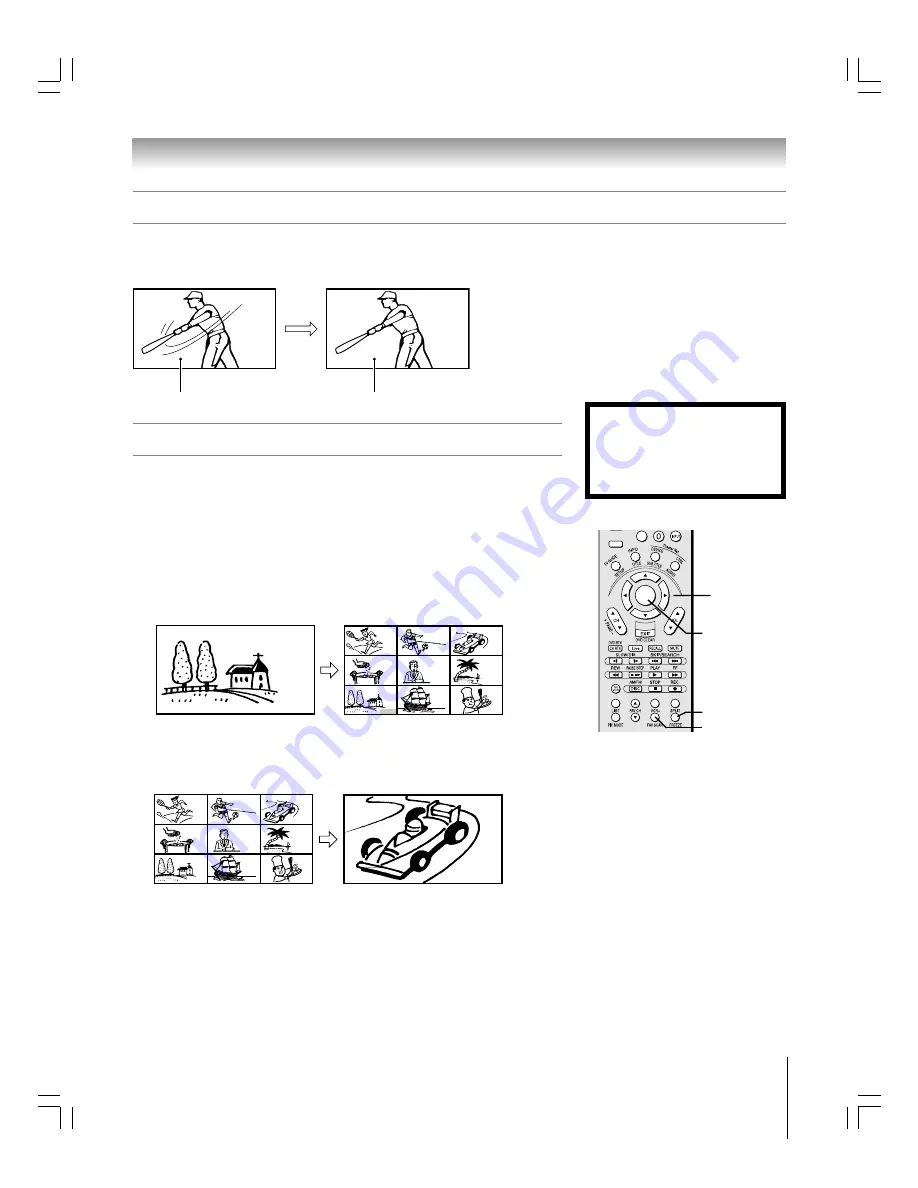
1. When viewing the TV, press FREEZE to make the picture a still picture.
2. To return to the moving picture, either press FREEZE again.

Chapter 8: Using the TV’s features

Using the FREEZE feature

Using the favorite channel scan feature

You can use this feature to quickly scan and tune the channels you programmed as
favorite channels from a nine-picture multi-window.

NOTE: 

To use the favorite channel scan feature, you must first program channels into the

favorite channel memory. See “Programming your favorite channels” on page 43.

To scan and tune your favorite channels:

1. Press FAV SCAN. The TV will display the channels you programmed as favorite

channels for the current ANT input in a nine-picture multi-window.
(To display the channels you programmed as favorite channels for the other antenna
input, you must change antenna input first (page 67), and then press FAV SCAN.)

CABLE

18

2

4–1

4–2

13

18

6

11

36

31

2. Press 

yzx


 to select one of the nine pictures, which becomes a moving picture

(the active window). (The main picture is always moving.)

3. Press ENTER to close the multi-window and tune the TV to the highlighted channel.

2

4–1

4–2

13

18

6

11

36

31

ACTION

ENTER

MENU

– 

100

+10

FAV SCAN

ENTER

y

x


z

Notes about recording:

• When the FAV SCAN multi-window is open and you try to start recording, the message “Not Available”

will appear on-screen. You will not be able to start recording until you close the FAV SCAN multi-window.

• If you use the TV’s remote control to start recording, you will not be able to open the FAV SCAN multi-

window. If you attempt to do so, the message “Not Available While Recording” will appear on-screen.

• It is recommended that you use the TV’s remote control to start recording. If you use a device other than

the TV’s remote control to start recording, you may be able to open the FAV SCAN multi-window during
the recording process. If this happens, the recorded audio and video will reflect the audio and video of the
active window, which may not be what you intended to record.

Still picture

moving picture

NOTE:

• The FREEZE feature is not available when

the POP double-window or FAV SCAN multi-
window is open. If you press FREEZE when
either window is open, the message “Not
available” will appear.

• If the TV is left in FREEZE mode, after 15

minutes it will automatically release the
FREEZE mode and return to the moving
picture.

Using the FREEZE function for any
purpose other than your private viewing
may be prohibited under the Copyright
Laws of the United States and other
countries, and may subject you to civil
and criminal liability.

FREEZE

#01E066-075_62HM15

5/24/05, 6:21 PM

75

Black

Summary of Contents for TheaterWide 62HM15

Page 1: ... about this TV Model number Serial number 62HM15 HIGH DEFINITION TELEVISION For an overview of steps for setting up and using your new TV see page 8 I S O 14001 FILE No A96 4 5 T O S H I B A A M E RICA CONSUMER PR O D U C T S L L C Compatible with the new Toshiba TM Audio Video Hard Drive Recorder See pages 23 and 49 for details Note A high definition tuner and programming are required to view Hig...

Page 2: ...ers and their families about television safety Tune Into Safety One size does NOT fit all Use appropriate furniture large enough to support the weight of your TV and other electronic components Use appropriate angle braces straps and anchors to secure your furniture to the wall but never screw anything directly into the TV Carefully read and understand the other enclosed instructions for proper us...

Page 3: ...r apparatus including amplifiers that produce heat 9 Do not defeat the safety purpose of the polarized or grounding type plug A polarized plug has two blades with one wider than the other A grounding type plug has two blades and a third grounding prong The wide blade or the third prong are provided for your safety If the provided plug does not fit into your outlet consult an electrician for replac...

Page 4: ...f you leave the TV unattended or unused for long periods of time 34 During normal use the TV may make occasional snapping or popping sounds This is normal especially when the unit is being turned on or off If these sounds become frequent or continuous unplug the power cord and contact a Toshiba Authorized Service Center 35 Special care for Texas Instruments Digital Light Processing DLP lamp units ...

Page 5: ...When the lamp wears out the picture may become dark or black or the lamp may fail at which time you must replace the lamp unit See Lamp unit replacement and care on pages 98 100 2 Each time you turn on the TV it may take several minutes to go from no picture to full picture brightness 3 The display on this TV is manufactured using a chip that may contain up to 1 3 million microscopic mirrors Each ...

Page 6: ...Using the auto aspect ratio feature 71 Selecting the cinema mode 480i signals only 72 Selecting the lamp mode 72 Using the POP features 73 Using the POP double window feature 73 Switching the speaker audio main or POP 74 POP double window aspect ratio 74 Using the FREEZE feature 75 Using the favorite channel scan feature 75 Adjusting the picture 76 Selecting the picture mode 76 Adjusting the pictu...

Page 7: ...ide International Inc and or one of its affiliates The TV Guide On Screen system is manufactured under license from Gemstar TV Guide International Inc and or one of its affiliates The TV Guide On Screen system is protected by one or more of the following issued United States patents 6 498 895 6 418 556 6 331 877 6 239 794 6 154 203 5 940 073 4 908 713 4 751 578 4 706 121 GEMSTAR TV GUIDE INTERNATI...

Page 8: ...e power cords for your TV and other devices 11 After you plug in the TV power cord the green LED on the TV front touchpad to the left of the POWER button will blink 3 times Wait about 30 seconds until the green LED lights continuously and then press POWER on the TV front touchpad or remote control See LED indications on page 94 12 See Menu layout and navigation for a quick overview of navigating t...

Page 9: ...tons function as left right menu navigation buttons 9 Green and Red LEDs When green lights solid not blinking it indicates that the TV power cord is plugged in and the power is OFF This is called standby mode Note When you first plug in the power cord the green LED will blink 3 times After approximately 30 seconds the green LED will light continuously at which point you can press POWER to turn ON ...

Page 10: ...o output in Dolby Digital or PCM pulse code modulation format for connecting an external Dolby Digital decoder amplifier A V receiver or home theater system with optical audio input See page 20 7 G LINK For use with one of the enclosed IR blaster G LINK cables to enable the TV Guide On Screen recording features See page 25 8 TheaterNet IR OUT For controlling infrared remote controlled devices thro...

Page 11: ...e provides better picture performance than a standard composite video or S video cable IEEE1394 cable is for use with video devices with compressed digital video output that meet CEA specifications for IEEE1394 This cable carries both video and audio information therefore no separate audio cables are required for a complete connection See pages 22 24 Note The transmission capability of IEEE1394 ca...

Page 12: ...s a trademark of Cable Television Laboratories Inc OUT IN AUDIO IN S VIDEO VIDEO 1 VIDEO 2 L R OUT 1 G LINK HDMI IN DIGITAL AUDIO OUT ANT 75 ANT1 CABLE ANT2 CableCARD COLOR STREAM HD 1 COLOR STREAM HD 2 VAR AUDIO R L TheaterNet OUT 2 1 2 S VIDEO IEEE1394 EJECT L MONO AUDIO VIDEO R L MONO AUDIO VIDEO R L MONO AUDIO VIDEO R PB PR Y L AUDIO R PB PR Y L AUDIO R TheaterNet OK CableCard Connected Acquir...

Page 13: ...d other materials is prohibited under the Copyright Laws of the United States and other countries and may subject you to civil and criminal liability To use the TV Guide On Screen recording features 1 Connect the G LINK cable according to the instructions on page 25 2 Make sure the VCR is connected to the A V OUT terminals on the TV see illustration 3 Set the VCR to the appropriate line input refe...

Page 14: ...V Tune the TV to channel 3 or 4 whichever channel is vacant in your area Use the Cable box controls to change channels To view the VCR Turn ON the VCR Select the VIDEO 1 video input source on the TV NOTE A VIDEO 1 connection with an S Video cable instead of a standard video cable will provide better picture performance as mentioned in the first bulleted item at the top of this page _____________ T...

Page 15: ...tereo VCR The unauthorized recording use distribution or revision of television programs videotapes DVDs and other materials is prohibited under the Copyright Laws of the United States and other countries and may subject you to civil and criminal liability To view satellite programs using the standard video connections or to record satellite programs Turn on all three devices Set the VCR to the ap...

Page 16: ...Turn off the VCR Select the ANT 2 video input source on the TV Tune the TV to channel 3 or 4 whichever channel is vacant in your area Use the Cable box controls to change channels Note When you use a Cable box you may not be able to use the remote control to program or access certain features on the TV To view the DVD player Turn ON the DVD player Select the VIDEO 2 video input source on the TV To...

Page 17: ...rlaced 480i 1080i scan systems A 1080i signal will provide the best picture performance If your DVD player does not have component video see page 16 If your DVD player has HDMI video see page 19 To view antenna or Cable channels Select the ANT 1 video input source on the TV To view the DVD player Turn ON the DVD player Select the ColorStream HD 1 video input source on the TV To view the VCR Turn O...

Page 18: ...put the POP picture When POP mode is active the AUDIO OUT terminals output the sound of the active window main or POP For additional information see Notes about recording on page 73 a VCR1 plays From antenna or Cable TV VCR2 records a The unauthorized recording use distribution or revision of television programs videotapes DVDs and other materials is prohibited under the Copyright Laws of the Unit...

Page 19: ... of uncompressed digital video with high bandwidth digital content protection which is being standardized for reception of high definition video signals Because this is an evolving technology it is possible that some devices may not operate properly with the TV NOTE To ensure that the HDMI or DVI device is reset properly it is recommended that you follow these procedures When turning on your elect...

Page 20: ...ched shape of the optical terminal To control the audio Turn on the TV and the digital audio device Press MENU on the TV s remote control and open the AUDIO menu Highlight AUDIO SETUP and press ENTER In the OPTICAL OUTPUT FORMAT field select either DOLBY DIGITAL or PCM depending on your device see Selecting the optical audio output format on page 81 Turn off the TV s built in speakers in the same ...

Page 21: ...he front of the TV and press the button for the desired function The signal passes from the remote control through the TV to the device via the IR blaster cable Note If you use the device s remote control to operate the device you also will need to use the TV s remote control to operate the TV For additional control options see TheaterNet on screen device control at right TheaterNet OUT IN AUDIO I...

Page 22: ... to connecting the IEEE1394 cable Note If you have an IEEE1394 device connected to both digital and analog inputs on the TV the TV automatically switches between analog and digital modes as needed when the initial device access is initiated using the TheaterNet button See page 44 for details on using the TheaterNet feature Supported signals The IEEE1394 ports support the signals listed below only ...

Page 23: ...nd control live TV pause rewind etc When you connect a D VHS or AVHD device to the TV The remote control keys LIVE REW PAUSE PLAY FF etc are automatically activated to allow control of live TV The TV Guide On Screen system is automatically configured to allow recording to the device See Chapters 5 and 7 for details Also see page 49 for details on setting the AVHD device skip time Some programs may...

Page 24: ... behind it in the chain The maximum length for an IEEE1394 cable between each device is 15 feet This TV is an IEEE1394A device The IEEE1394B protocol is faster and intended to allow for longer distances between devices and multi room systems IEEE1394A to IEEE1394B converters available at some electronics suppliers may allow compatibility of IEEE1394B devices with your existing IEEE1394A devices Th...

Page 25: ...75 ANT1 CABLE ANT2 CableCARD COLOR STREAM HD 1 COLOR STREAM HD 2 VAR AUDIO R L TheaterNet OUT 2 1 2 S VIDEO IEEE1394 EJECT L MONO AUDIO VIDEO R L MONO AUDIO VIDEO R L MONO AUDIO VIDEO R PB PR Y L AUDIO R PB PR Y L AUDIO R Back of TV Front of VCR Front of Cable box Infrared sensor G LINK IR blaster cable wand approx 1 inch from device TheaterNet If you cannot locate the device s infrared sensor 1 T...

Page 26: ... menu system pages 34 and 35 TV GUIDE opens the TV Guide On Screen system Chapter 7 INFO provides detailed information on highlighted items in the TV Guide On Screen system Chapter 7 ENTER activates highlighted items in the main menu system and the TV Guide On Screen system Arrow buttons yzx select or adjust programming menus CH yz cycles through programmed channels when no menu is on screen 41 fu...

Page 27: ...gramming 1 TV Toshiba TV 2 CBL SAT Toshiba Satellite receiver 3 VCR PVR Toshiba VCR 4 DVD Toshiba DVD 5 AUDIO 1 Pioneer Audio receiver 6 AUDIO 2 Pioneer LD Using the remote control MODE button to control your other devices To install the remote control batteries CAUTION Always dispose of batteries in a designated disposal location Never throw batteries into a fire 1 Slide the battery cover off the...

Page 28: ...9 Digit 9 0 Digit 0 Digit 0 Digit 0 Digit 0 Digit 0 Digit 0 10 Digit 0 100 digital sub 100 10 separator channel INPUT TV Video TV TV VCR input TV TV TV select PIC SIZE Selects the TV TV TV TV TV TV TV image shape MENU Menu Action Menu Menu ACTION Guide Menu Menu TV GUIDE SETUP TV Guide Guide DVD setup Guide INFO TITLE Guide Info INFO TITLE INFO Top menu TheaterNet TheaterNet Subtitle ADVANCE DEVIC...

Page 29: ...Stop Stop REC REC Menu Record Record Single Click Double Click Double Click LIST LIST FAV CH yz FAV channel up down VCR VCR SPLIT Split TV TV TV TV TV TV TV PIC MODE PIC MODE TV TV TV TV TV TV TV FAV SCAN FAV SCAN FREEZE Freeze TV TV TV TV TV TV TV Notes will send nothing TV will jump to TV VCR will jump to last active VCR or DVD Last active VCR DVD is the mode that remains for a minimum of 5 seco...

Page 30: ...e is listed try each one separately until you find the one that works 2 Press MODE until the Mode indicator for the device CBL SAT VCR PVR DVD AUDIO 1 AUDIO 2 lights up 3 While holding down the RECALL button press the Channel Number buttons to enter the four digit code for your brand of device If a valid code is entered the mode indicator will blink twice If an invalid code is entered the mode ind...

Page 31: ... and blink two more times Using the volume lock feature 8000 For the TV CABLE SAT VCR and DVD modes the volume controls VOL y z and MUTE can be locked to the selected device mode This feature does not apply to the AUDIO 1 and AUDIO 2 modes To lock the volume controls to always control the CABLE SAT device volume for example 1 Repeatedly press MODE to select CABLE SAT mode 2 While holding down the ...

Page 32: ... 0106 0105 0139 0110 0111 0144 0106 0169 0180 Multi brand remote control device codes ADMIRAL AIWA AKAI AUDIO DYNAMIC BELL HOWELL BROKSONIC CANON CCE CITIZEN CRAIG CURTIS MATHES DAEWOO DBX DIMENSIA EMERSON FISHER FUNAI GE GO VIDEO GOLDSTAR GRADIENTE HITACHI INSTANT REPLAY JENSEN JVC KENWOOD LG LXI MAGNAVOX MARANTZ MARTA MEMOREX MGA MINOLTA MITSUBISHI MULTITECH NEC OLYMPIC OPTIMUS ORION PANASONIC P...

Page 33: ...ceivers Brand Code PANASONIC PHILIPS PIONEER QUASAR RCA SANSUI SHARP SONY SOUNDE SIGH TEAC TECHNICS VICTOR YAMAHA 4119 4118 4121 4123 4105 4107 4150 4119 4118 4121 4103 4105 4127 4131 4130 4149 4103 4111 4139 4134 4137 4122 4138 4112 4113 4111 4110 4121 4118 4119 4132 4133 4101 4102 Receivers cont Brand Code DENON HITACHI KENWOOD MAGNAVOX MARANTZ MITSUBISHI NEC PANASONIC PHILIPS PIONEER PROSCAN QU...

Page 34: ... Settings window Audio Setup Audio Setup window Favorite Channels Favorite Channels window Preferences Closed Caption Mode Off CC1 CC2 CC3 CC4 T1 T2 T3 T4 Closed Caption Advanced Advanced Closed Captions window Input Labeling Input Labeling window Game Mode Off On Menu Language English Français Español Enable Rating Blocking Off On Locks Edit Rating Limits Edit Rating Limits window Channels Block ...

Page 35: ...ting the menu system All menus close automatically if you do not make a selection within 60 seconds except the signal meter menu which closes automatically after 5 minutes To close a menu instantly press EXIT Setup Installation menu layout continued To open the INSTALLATION menu illustrated below press MENU on the remote control or TV front panel open the SETUP menu select INSTALLATION and press E...

Page 36: ...ogram listings for your area The listings are automatically updated several times a day Note You must first set up your TV according to the applicable connection instructions in Chapter 2 If you connected a Toshiba TM AVHD Recorder you must perform the following TV Guide On Screen system setup in order to use the Symbio s full functionality See pages 23 and 49 for further details about AVHD digita...

Page 37: ... tune your Cable box to channel 02 leave the Cable box and TV ON and then press ENTER Screen 10 appears Screen 10 The TV Guide On Screen system will test the code for the brand of Cable box you selected Do not press any keys on the TV remote control or Cable box until the testing process is completed When testing is completed screen 11 appears Screen 11 If your Cable box tuned itself to channel 09...

Page 38: ...ress ENTER to display screen 15 Screen 15 Is a VCR connected If you select YES screen 16 appears If you select NO screen 21 appears Screen 16 The on screen diagram shows the correct way to connect your VCR to the G LINK terminal on the TV Make sure the G LINK cable is installed properly For additional details see page 25 Press ENTER to display screen 17 Screen 17 Select your VCR brand and then pre...

Page 39: ...he TV Guide On Screen system receives program listings data through your Cable or over the air video signal In order to receive regular program listings updates remember to do the following 1 Leave the TV in standby mode when it is not in use such as overnight or when you are not watching it by turning it OFF but leaving the power cord plugged in 2 If you have a Cable box connected leave it ON 3 I...

Page 40: ... accessible items will be grayed out in some instances for example if a cable box is connected to the ANT 1 input or if one of the VIDEO modes is the current input during TV Guide On Screen setup Terrestrial Input Configuration Channel program Channel Add Delete Navigate Select Back Exit DVD RTN CH RTN EXIT Signal Meter 4 Press to select the input source Cable or antenna for the ANT 1 input on the...

Page 41: ...antly If you have a CableCARD inserted page 12 channel programming for ANT 1 is disabled because the CableCARD automatically loads the Cable channel list in the TV s channel memory To program channels automatically 1 Make sure you have configured the antenna input sources See page 40 for details 2 Press MENU and open the SETUP menu 3 Highlight INSTALLATION and press ENTER A new set of INSTALLATION...

Page 42: ...ge Antenna Clear All Save Cancel Programming channels into the TV s channel memory continued To add a channel to the channel memory Highlight the unchecked box next to the channel number you want to add and then press ENTER to check the box To manually add digital subchannels on a physical channel Use the Channel Numbers and the Dash 100 on the remote control to enter the channel number for exampl...

Page 43: ...light SAVE and press ENTER 6 To program favorite channels for the other antenna input Either Highlight ANT 1 or ANT 2 which will change the favorite channel settings in the selected input This will not change the TV s current input Or Press INPUT to select ANT 1 or ANT2 and then repeat steps 1 6 To clear your favorite channel lists 1 Press MENU and open the PREFERENCES menu 2 Highlight FAVORITE CH...

Page 44: ...ee page 21 for details 2 Press MENU and open the SETUP menu 3 Highlight INSTALLATION and press ENTER A new set of INSTALLATION menu icons will appear on screen as shown in step 4 Setting up and using TheaterNet on screen device control 4 Open the DEVICES menu highlight THEATERNET DEVICES and then press ENTER Devices IEE 1394 Devices TheaterNet Devices Navigate Select Back Exit DVD RTN CH RTN EXIT ...

Page 45: ...e device you want to control and press ENTER TheaterNet Video 2 Video 1 Brandname ColorStream HD1 Toshiba Video 3 Brandname Toshiba ColorStream HD2 Brandname 1394 0 2 4 1 3 5 IEEE1394 DVHS 4 The input automatically changes to the input for the selected device and the device s control icons display Highlight the icon for the function you want to control and press ENTER To select the device s contro...

Page 46: ...97 DKK 0000 DMX Electronics 0157 Denon 0873 0003 Emerson 0305 Fisher 0174 0179 1325 GPX 1296 Garrard 0393 0420 Genexxa 0032 0305 Harman Kardon 0157 0173 Hitachi 0032 JVC 0072 1294 KLH 1318 1372 1373 Kenwood 0681 0826 0626 0028 0037 0190 Koss 1317 Krell 0157 LXI 0305 Linn 0157 MCS 0029 MTC 0420 Magnavox 0157 0305 Marantz 0626 0029 0157 0180 Miro 0000 Mission 0157 NSM 0157 Nikko 0174 Onkyo 0868 0101...

Page 47: ...8 Denon 0042 Dynatech 0000 Electrohome 0037 Electrophonic 0037 Emerex 0032 Emerson 0037 0184 0000 0121 0043 0209 0002 0278 0479 1278 1479 Fisher 0047 0104 Fuji 0035 0033 Funai 0000 GE 0060 0035 0240 0760 0807 1035 1060 Garrard 0000 Go Video 0432 GoldStar 0037 0038 1237 Gradiente 0000 HI Q 0047 Harley Davidson 0000 Harman Kardon 0081 0038 Harwood 0072 Headquarter 0046 Hitachi 0000 0042 0041 Hughes ...

Page 48: ...0000 0041 Technics 0035 0162 Teknika 0035 0037 0000 Thomas 0000 Tivo 0618 0636 Toshiba 0045 0043 0845 Totevision 0037 0240 Unitech 0240 Vector 0045 Vector Research 0038 Video Concepts 0045 Videomagic 0037 Videosonic 0240 Villain 0000 Wards 0060 0035 0048 0047 0081 0240 0000 0042 0072 0149 0760 White Westinghouse 0209 0072 1278 XR 1000 0035 0000 0072 Yamaha 0038 Zenith 0039 0000 0209 0033 0479 1479...

Page 49: ...open the SET UP menu 2 Highlight HDMI AUDIO SELECTION and press ENTER 3 Press z or y to select the HDMI audio mode Auto Digital or Analog and press ENTER Auto is the recommended mode See Connecting an HDMI or a DVI device to the HDMI input on page 19 Setting the time and date Note If you already set up the TV Guide On Screen system the time and date were set automatically and you can skip this ste...

Page 50: ... Low Power Shutdown mode for several minutes after the TV is turned off see Notes below If the TV is turned on from Low Power Shutdown mode the full picture appears immediately To set the Quick Restart feature 1 Press MENU and then press x or until the SETUP menu appears 2 Press y or z to highlight QUICK RESTART and then press ENTER 3 A side menu will display Highlight one of the side menu items a...

Page 51: ... Type in your PIN now or 0000 if no PIN has been set to restore settings to their factory default values OK System Information Factory Defaults This window provides the ability to reset the TV settings Type in your PIN now or 0000 if no PIN has been set to restore settings to their factory default values Press YES to confirm After the TV turns off unplug it and plug it back in to complete the rese...

Page 52: ...ing It is recommended that you connect your devices according to the instructions in Chapter 2 Search Search for shows by category keyword or alphabetically On screen help The TV Guide On Screen system contains on screen feature definitions and navigation instructions Setting up the TV Guide On Screen system Follow these instructions to set up the TV Guide On Screen system so it can receive curren...

Page 53: ... TT Jump forward and backward one day in the LISTINGS screen TV GUIDE INFO y x z digital separator REC PAGE UP DOWN Numbers SPLIT Navigating the TV Guide On Screen system ENTER MENU SS and TT While watching TV press the TV GUIDE button to enter the TV Guide On Screen system The LISTINGS screen will appear with the current show highlighted When in the TV Guide On Screen system if you press the TV G...

Page 54: ...ancel any changes and close the panel menu press MENU or highlight Cancel and press ENTER If a panel menu contains more options than can be displayed in one panel the word more appears at the bottom of the menu To access the additional options either scroll down using the z button or the PAGE UP DOWN CH yz button Info Box Video Window When you open the TV Guide On Screen system the current program...

Page 55: ...ce Show is set to Remind Once Other frequencies are Daily manual reminding only Regularly and Weekly Remind Off Show is set to Remind but is currently Off show remains in Schedule Remind Show is Suspended due to a schedule conflict show remains in Schedule Suspended Remind resumes when the conflict no longer exists Info Box An Info Box contains information about a show Service or Panel Ad or provi...

Page 56: ...w to Remind e g start time frequency automatic power ON auto tune TV Set a show to Record e g start end time frequency Lock and unlock the Video Window Access panel ads and channel ads Use the Number keys on the remote control to jump to a specific channel s listings To watch a show if on now highlight the show and press ENTER To display the Episode Options panel menu for a particular show highlig...

Page 57: ... and time 4 Highlight a show and press ENTER to watch if on now or press MENU to display the Episode Options panel menu See Episode Options panel menu on page 56 TV Guide On Screen Services continued SEARCH screen SEARCH allows you to find shows by keyword or category alphabetical HDTV movies sports children educational news variety series With SEARCH highlighted in the Service Bar press INFO to d...

Page 58: ...continued 6 A list of all matching shows for that keyword is displayed 7 Highlight a show and press ENTER to display all airings Then highlight a specific listing and press ENTER to watch if on now or press MENU to display the Episode Options panel menu From the Episode Options menu you can choose to set a recording or reminder or tune to the channel see Episode Options panel menu on page 56 The T...

Page 59: ... shows Press ENTER again to collapse the episode list Sort By Press x and to choose between the following Title Displays recorded shows in alphabetical order see example in Screen A at right Date Displays recorded shows by date and time with most recent first see example in Screen B at right 3 When finished press ENTER to highlight DONE and then press ENTER again to close the panel menu and displa...

Page 60: ...the remote control Press the REC key on the remote control to record the show Once with current default settings start and end recording on time Each time you press REC you change the Record frequency but not the default settings among Once default Regularly Weekly and Cancel Note The related Record icon appears on the show tile each time you press REC See Record icons on page 61 2 Set a show to R...

Page 61: ...is Change channel start recording If no change is made within 3 minutes the notification banner will close automatically the channel will change to the one set to record and the recording will occur as scheduled If you want to cancel the recording select Don t change cancel recording in the notification banner and press ENTER Record features continued Record conflict A conflict message appears for...

Page 62: ... TV must be on at the time or No default Note You can change the default values of the Remind Options panel menu fields See Change default options on page 65 for details 6 Highlight the WHEN field to set a time for displaying the reminder screen and press x or to choose in the range from 15 minutes early to 15 minutes late or On Time default 1 minute early 7 Press ENTER to highlight SCHEDULE REMIN...

Page 63: ...rt time as an existing auto tune Reminder A show set with an auto tune Reminder overlaps with a scheduled Recording Select one of these options Auto Tune Anyway This show will override an existing show set to auto tune Proceed No Auto Tune Set the show as a Reminder but do not auto tune Don t Set This Reminder Cancels the Reminder Remind features continued Remind icons Following is a description o...

Page 64: ... Settings screen 3 Highlight one of the options press ENTER and follow the on screen instructions Change channel display This option allows you to edit channel information that appears in LISTINGS including the following Reorder the position the channels appear in LISTINGS Change the tune channel number Note The tune channel is the channel on which you receive a station For example two viewers in ...

Page 65: ... turn on the TV 4 When finished press ENTER to highlight DONE and press ENTER again to close the menu and accept the changes or highlight CANCEL to close the menu with no changes SETUP screen continued Record defaults 1 From the SETUP screen highlight CHANGE DEFAULT OPTIONS and press ENTER 2 Highlight RECORD DEFAULTS and press MENU to display the Record Defaults panel menu 3 Enter the required inf...

Page 66: ...ICE button on the remote control see page 26 and 44 If an IEEE1394 device is the current input it will appear at the bottom of the Input Selection list however it will not display in the list if you change the input source You can label the video input sources according to the specific devices you have connected to the TV see Labeling the video input sources on the next page The source can be hidd...

Page 67: ...e control Note If you select HIDDEN for all of the input labels the POP feature will be disabled If you then attempt to access the POP feature the message Not available will appear on screen 5 To save the new input labels highlight SAVE and press ENTER To revert to the factory default labels highlight RESET and press ENTER Chapter 8 Using the TV s features Input labeling example The screen below l...

Page 68: ...F channel using the Channel Number and Dash buttons on the remote control Tuning channels Upper channels Current channel highlighted Lower channels Channel label Switching between two channels using Channel Return The Channel Return feature allows you to switch between two channels without entering an actual channel number each time 1 Select the first channel you want to view 2 Select a second cha...

Page 69: ... size SIZE to Select Natural Picture Size 0 0 Theater Wide 1 1 Theater Wide 2 2 Theater Wide 3 3 Full 4 4 Note You also can repeatedly press PIC SIZE to select the desired picture size or press the yz buttons on the remote control while the Picture Size screen is open Full may not be available for some program formats will be grayed out in the Picture Size screen Natural picture size The image is ...

Page 70: ...tched taller None of the picture is hidden Chapter 8 Using the TV s features To select the picture size press PIC SIZE on the remote control You also can select the picture size using the menu system Select PICTURE SIZE in the VIDEO THEATER SETTINGS menu Note If you select one of the TheaterWide picture sizes the top and bottom edges of the picture including subtitles or captions may be hidden To ...

Page 71: ...ngs permanently highlight SAVE and press ENTER To turn off the AUTO ASPECT feature Select OFF in step 3 above You can set separate scroll settings for TheaterWide 2 and TheaterWide 3 modes To set the scroll settings 1 Press MENU and open the VIDEO menu 2 Highlight THEATER SETTINGS and press ENTER Video Picture Settings Theater Settings Advanced Picture Settings Navigate Select Back Exit DVD RTN CH...

Page 72: ...ver you prefer 4 To save your settings temporarily highlight DONE and press ENTER To save your settings permanently highlight SAVE and press ENTER Selecting the cinema mode 480i signals only When you view a DVD 480i signal 3 2 pulldown processed from a DVD player connected to the ColorStream HD1 HD2 component video or HDMI inputs on the TV smoother motion can be obtained by setting the CINEMA MODE...

Page 73: ...u try to start recording the POP window will close and recording will start If you use the TV s remote control to start recording you will not be able to open the POP window and the message Not Available will appear on screen It is recommended that you use the TV s remote control to start recording If you use a device other than the TV s remote control to start recording you may be able to open th...

Page 74: ...s continued Example Press x Example Press CT 90216 ENTER x Switching the speaker audio main or POP While the POP window is open press x or to switch the sound main or POP that is output from the TV speakers and from the VARIABLE AUDIO OUT and AUDIO OUT terminals The window with the active sound is outlined with a green border NOTE The AUTO ASPECT RATIO feature page71 does not operate in POP double...

Page 75: ... 100 10 FAV SCAN ENTER y x z Notes about recording When the FAV SCAN multi window is open and you try to start recording the message Not Available will appear on screen You will not be able to start recording until you close the FAV SCAN multi window If you use the TV s remote control to start recording you will not be able to open the FAV SCAN multi window If you attempt to do so the message Not ...

Page 76: ...he Picture Settings menu Adjusting the picture quality You can adjust the picture quality contrast brightness color tint and sharpness to your personal preferences To adjust the picture quality 1 Press MENU and open the VIDEO menu 2 Highlight PICTURE SETTINGS and press ENTER 3 Press z or y to select the picture quality you want to adjust CONTRAST BRIGHTNESS COLOR TINT or SHARPNESS and then x and t...

Page 77: ...t is HDMI or IEEE1394 the menu will display the text DNR and will be grayed out to indicate that the feature does not function in this input To turn off CableClear DNR Select OFF in step 3 above Adjusting the picture continued Selecting the color temperature You can change the quality of the picture by selecting from three preset color temperatures cool medium and warm as described below To select...

Page 78: ...captions Highlight CC1 CC2 CC3 or CC4 CC1 displays translation of the primary language in your area Note If the program or video you selected is not closed captioned no captions will display on screen To view text Highlight T1 T2 T3 or T4 Note If text is not available in your area a black rectangle may appear on your screen If this happens turn the Closed Caption Mode OFF To turn off the Closed Ca...

Page 79: ...Note You can leave the TV in STEREO mode because it automatically outputs the type of sound being broadcast stereo or monaural If the stereo sound is noisy select MONO to reduce the noise To listen to an alternate language on an ATSC digital station if available Highlight the LANGUAGE field in step 3 above and then press to select the language you prefer To listen to a second audio program on an a...

Page 80: ... your audio adjustments 1 Press MENU and open the AUDIO menu 2 Highlight AUDIO SETTINGS and press ENTER 3 Press z to highlight RESET and press ENTER 4 To temporarily save the new settings highlight DONE and press ENTER To permanently save the new settings highlight SAVE and press ENTER Adjusting the audio quality You can adjust the audio quality by adjusting the bass treble and balance To adjust t...

Page 81: ...anced Audio Settings menu and press ENTER Reset Save SRS WOW 3D SRS WOW Focus SRS WOW TruBass Off Off Off Done Advanced Audio Settings Turning off the built in speakers Use this feature to turn off the TV speakers when you connect an audio system to your TV see Connecting a digital audio system and Connecting an analog audio system on page 20 To turn off the built in speakers 1 Press MENU and open...

Page 82: ...rmatted as FAT32 or NTFS for example are not supported Maximum memory card capacity 256 MB Maximum displayable JPEG image size 8 MB Note JPEG files larger than 8 MB will not display MP3 files have no size limit other than the maximum capacity of the memory card _____________ is a registered trademark of Toshiba Corporation i i l is a trademark MMC and MultiMediaCard are trademarks of Infineon Tech...

Page 83: ... To stop the slide show and return to the regular TV screen press EXIT SmartMedia memory card SD Secure Digital memory card TV right side panel Memory card slots Secure Digital SmartMedia or MMC MultiMediaCard Memory Stick or CompactFlash memory card CompactFlash ejector button Using the JPEG picture viewer Note If you stored both JPEG and MP3 files on the same memory card the JPEG picture viewer ...

Page 84: ...io player is playing the VOLUME and MUTE controls can be used however those on screen displays do not appear Also note that the MUTE function has three steps page 79 Surround bass treble and balance adjustments should be made before starting the MP3 audio player Permission is required in order to download MP3 files and music from the Internet Toshiba has no right to grant such permission Permissio...

Page 85: ...ICE on the remote control page 44 or pressing TV GUIDE on the remote control page chapter 7 Memory card care and handling Use index labels made exclusively for your specific brand of memory card Do not use commercially sold labels which can cause a malfunction when the card is inserted or ejected If the image does not appear correctly clean the metallic area of the memory card using a soft dry lin...

Page 86: ...L ACTION ENTER MENU 100 10 SLEEP Setting the ON OFF timer You can use the ON OFF timer to turn the TV on and off at a preset time on a recurring basis Note You must first set the time see page 49 To set the ON OFF timer 1 Press MENU and open the SETUP menu 2 Highlight ON OFF TIMER and press ENTER 3 Press z to highlight the DAY field and then press to select the recurrence weekends weekdays every d...

Page 87: ... Chip rating status Picture size Lamp mode Understanding the auto power off feature The TV will automatically turn itself off after approximately 15 minutes if it is tuned to a vacant channel or a station that completes its broadcast for the day This feature functions in ANT 1 and ANT 2 modes only Understanding the last mode memory feature If the power is cut off while you are viewing the TV the L...

Page 88: ...el Lock Game Timer New PIN Code Navigate Select Back Exit DVD RTN CH RTN EXIT Off Off Off Off Channels Block Input Lock Using the Locks menu 9 The LOCKS menu includes the RATING BLOCKING CHANNELS BLOCK INPUT LOCK FRONT PANEL LOCK GAME TIMER and NEW PIN CODE features You can use these features after entering the correct PIN code If you cannot remember your PIN code While the PIN code entering scree...

Page 89: ...fically designed to be viewed by adults and therefore may be unsuitable for children under 17 L Crude or indecent language S Explicit sexual activity V Graphic violence TV 14 Parents Strongly Cautioned This program contains some material that many parents would find unsuitable for children under 14 years of age D Intensely suggestive dialog L Strong coarse language S Intense sexual situations V In...

Page 90: ...K and then press ENTER Locks Edit Rating Limits New PIN Code Navigate Select Back Exit DVD RTN CH RTN EXIT Channels Block Front Panel Lock Off Off 30 Min 60 Min 90 Min 120 Min Enable Rating Blocking Off Off Input Lock Game Timer Off 5 Press yzx to highlight the channel you want to block then press ENTER which puts an X in the box next to that channel 6 Repeat step 5 for other channels you want to ...

Page 91: ...1 minute remain on the GameTimer If the TV loses power with time remaining on the GameTimer when power is restored the TV will enter VIDEO LOCK mode as if the GameTimer has expired and you will have to deactivate the video lock as described above Using the front panel lock feature You can lock the front panel touchpad buttons to prevent your settings from being changed accidentally by children for...

Page 92: ... next video input source and display the Input Selection window Cannot view external signals If you cannot view signals from external devices connected to VIDEO 1 VIDEO 2 or channel 3 or 4 VIDEO 3 or ColorStream or from channels 3 or 4 make sure the INPUT LOCK is set to OFF page 90 Black box on screen Set the CLOSED CAPTION feature to OFF page 78 Poor color or no color The station may have broadca...

Page 93: ...l may have been erased from the channel memory by the CHANNEL ADD DELETE feature Add the channel to the channel memory page 42 The channel may be blocked by the CHANNELS BLOCK feature Unblock the channel page 90 If you are unable to tune digital channels check the antenna configuration page 40 If you are still unable to tune digital channels clear all channels from the channel list page 42 and rep...

Page 94: ...hiba Authorized Service Center 5 Green and Red blink An abnormal temperature Turn OFF the TV Check to make sure all slots and openings in the 3 times only increase has occurred TV cabinet are not covered blocked or dusty Turn ON the TV again If the problem persists contact a Toshiba Authorized Service Center 6 Green is OFF The TV requires servicing Turn OFF the TV and unplug the power cord Plug th...

Page 95: ...en system again A No The information you entered is stored in the TV Guide On Screen system memory Note For Cable box users the TV must be OFF and the Cable box must be left ON for the TV Guide On Screen system to receive channel line up information 8 Q How do I connect the G LINK IR blaster cable to the G LINK input on the TV A See Chapter 2 Connecting your TV in this manual You also can refer to...

Page 96: ...wnload Show information is updated on a daily basis 19 Q I have seen the word download in reference to the TV Guide On Screen system What does that mean A Download refers to the times throughout the day when the TV Guide On Screen system is receiving channel and listings information from your Cable or over the air antenna transmission 20 Q After some show titles I have noticed from 1 to 4 stars Wh...

Page 97: ...your VCR owner s manual or contact your Cable TV company for proper wiring procedures 32 Q Is Help available in the TV Guide On Screen system If so how do I find it A Yes Highlight any of the five main Services Listings Schedule Recordings Setup Search and press the INFO key on the remote control An expanded Info Box displays additional help information Press INFO again to close the box Help is al...

Page 98: ... the lamp mode Because these are averages some lamps will require earlier replacement Note The lamp is warranted only for the periods and to the extent set forth in the Limited Warranty applicable to this set which is a substantially shorter period of time than the average useful service period See Limited United States Warranty on page 102 If you use the lamp beyond its service life you may notic...

Page 99: ... C Touching the lamp before it has cooled will result in severe burns ALLOW THE LAMP TO COOL FOR AT LEAST ONE 1 HOUR BEFORE REPLACING IT 2 STOP Allow the lamp to cool for at least one 1 hour before replacing it Required tools Manual Phillips screwdriver gloves Optional tool 5 32 or 4mm Allen wrench 1 Turn off the TV and unplug the power cord WARNING RISK OF ELECTRIC SHOCK TO REDUCE THE RISK OF ELE...

Page 100: ...continued 7 Using a manual Phillips screwdriver tighten the two lamp unit screws Note Hand tighten only Do not use an electric screwdriver How to replace the lamp unit continued 6 Carefully insert the new lamp unit straight into the TV until it is fully seated Note Never subject the lamp unit to excessive shock Never touch the lamp unit glass or otherwise get it dirty Doing so may affect the image...

Page 101: ...ies with the specifications listed below Designs and specifications are subject to change without notice This model may not be compatible with features and or specifications that may be added in the future Television System NTSC standard ATSC standard 8VSB Digital Cable 64 QAM 256 QAM in the clear unencrypted Encrypted channels can be viewed on this TV using a CableCARD See page 12 for details Cha...

Page 102: ...s DLP Television must be performed by an Authorized TACP Service Station 3 The warranties from TACP are effective only if this DLP Television is purchased and operated in the Continental U S A or Puerto Rico 4 Labor service charges for set installation setup adjustment of customer controls and installation or repair of antenna systems are not covered by this warranty Reception problems caused by i...

Page 103: ...S IS AND ANY EXPRESSED OR IMPLIED WARRANTIES INCLUDING BUT NOT LIMITED TO THE IMPLIED WARRANTIES OF MERCHANTABILITY AND FITNESS FOR A PARTICULAR PURPOSE ARE DISCLAIMED IN NO EVENT SHALL THE OpenSSL PROJECT OR CONTRIBUTORS BE LIABLE FOR ANY DIRECT INDIRECT INCIDENTAL SPECIAL EXEMPLARY OR CONSEQUENTIAL DAMAGES INCLUDING BUT NOT LIMITED TO PROCUREMENT OF SUBSTITUTE GOODS OR SERVICES LOSS OF USE DATA ...

Page 104: ...104 62HM15 Copyright 2005 TOSHIBA CORPORATION All rights reserved Chapter 11 Appendix Notes 01E098 105_62HM15 5 24 05 6 23 PM 104 Black ...

Page 105: ...105 62HM15 Copyright 2005 TOSHIBA CORPORATION All rights reserved Chapter 11 Appendix Notes 01E098 105_62HM15 5 24 05 6 23 PM 105 Black ...

Page 106: ...gital Noise Reduction 77 Double window POP feature 73 DVD player connection 16 17 D VHS 23 49 DVI connection 19 E F G H I J EIA 775 22 FAV SCAN button 75 Factory defaults restore TV 51 Favorite channels 43 75 Features TV 7 Flashing front panel lights 8 9 94 Focus SRS WOW 81 Front of the TV 9 Front panel lock 91 Front panel lights 8 9 94 Front panel touch pad 9 35 Game Mode 85 GameTimer 91 G LINK c...

Page 107: ...30 Volume lock feature 31 RESET button 9 Restart Quick 50 Restore TV factory defaults 51 Index continued S Safety care installation and service 2 5 SAP sound 79 Satellite receiver connection 15 Scrolling the TheaterWide picture 71 SD Secure Digital memory cards 82 Service 4 Setup TV 5 8 12 25 40 Setup TV Guide On Screen system 36 Sleep timer 86 SmartMedia memory cards 82 Sound quality adjustments ...

Page 108: ... is a registered trademark of Toshiba Corporation Digital Light Processing DLP and the DLP medallion are trademarks of Texas Instruments TOSHIBA AMERICA CONSUMER PRODUCTS L L C HEAD OFFICE 82 TOTOWA ROAD WAYNE NJ 07470 U S A NATIONAL SERVICE DIVISION 1420 B TOSHIBA DRIVE LEBANON TN 37087 U S A MANUFACTURED BY TOSHIBA AMERICA CONSUMER PRODUCTS L L C Copyright 2005 TOSHIBA CORPORATION All rights res...

Reviews: