background image

Intr

oduction

Connecting

y

our Monitor

Using the

remote contr

ol

Setting up

y

our Monitor

Oper

ating y

our

Monitor

Appendix

Index

29

(E) 51HC85, 57HC85, 65HC85

1

2

3

4

5

6

7

8

9

ENT

100

0

POWER

RECALL

INPUT

+10

PI

C SIZE

EXIT

INFO

TV
CBL/SAT
VCR
DVD

VOL

CH

ENTE

R

DVDMENU

MENU

TO

P

ME

NU

CL

EA

R

E

N

TE

R

yzx


PIC SIZE

ENTER

Note:

You can scroll the picture in TheaterWide 2
and TheaterWide 3 modes only. The scroll
amounts are as follows:

• 480i/480p/1080i signal source:

TheaterWide 1

:  Not adjustable

TheaterWide 2

:  -10 to +20

TheaterWide 3

:  -10 to +20

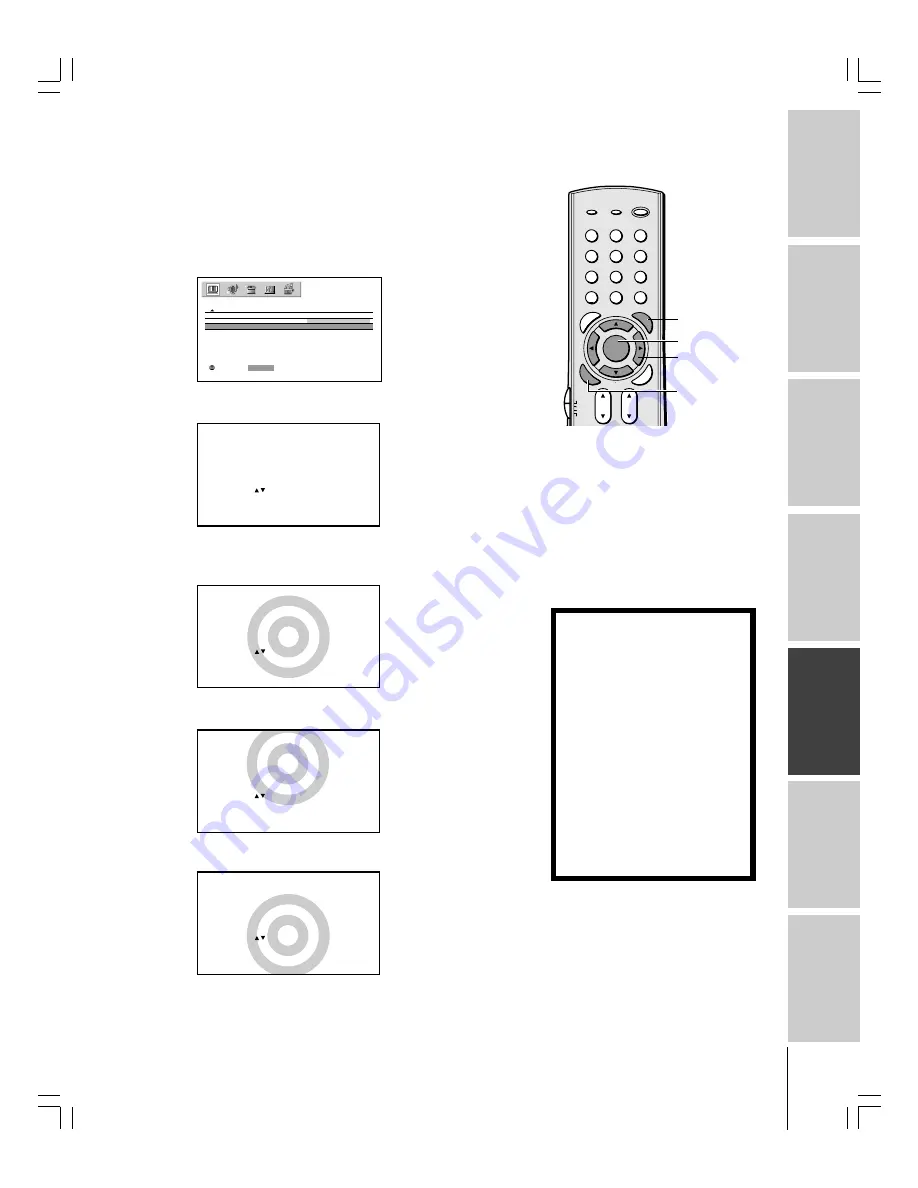
Scrolling the TheaterWide

®

 picture

(TheaterWide 2 and 3 only)

1. Press PIC SIZE to select the TheaterWide 2 or TheaterWide 3

mode.

2. Press MENU, and then press 

x

 or 

 until the PICTURE menu

appears.

3. Press 

y

 or 

z

 to highlight PICTURE SCROLL.

MOVE

:

: START

ENTER

P I CTURE  S I ZE

P I CTURE

AUTO  ASPECT

OFF

P I CTURE  SCROLL

RESET

SAVE

4. Press ENTER to display the Scroll Adjustment mode.

SCROL L  AD JUSTMENT

     0

TO  ADJUST

:

5. Press 

y

 or 

z

 to adjust the vertical position of the picture.

• Normal (center) position

SCROL L  AD JUSTMENT

     0

TO  ADJUST

:

• To raise the picture, press 

y

 .

SCROL L  AD JUSTMENT

     +20

TO  ADJUST

:

• To lower the picture, press 

z

.

SCROL L  AD JUSTMENT

     –10

TO  ADJUST

:

MENU

NOTICE OF POSSIBLE ADVERSE

EFFECTS ON MONITOR PICTURE

DISPLAY

Avoid displaying stationary images on
your monitor screen for extended periods
of time. Fixed (non-moving) patterns or
images (including but not limited to PIP/
POP windows, closed captions, video
game patterns, TV station logos (from
VCR, etc.), stock tickers, websites, and
special formats that do not use the entire
screen) can become permanently
ingrained in the cathode ray tube(s) of
the monitor and cause subtle but
permanent ghost images. 

This type of

damage is NOT COVERED BY YOUR
WARRANTY.

 See item 33 on page 4 for

details.

#01E_27-33_51HC85

05.4.28, 6:16 PM

29

Black

Summary of Contents for TheaterWide 51HC85

Page 1: ...hese numbers in the spaces below Refer to these numbers whenever you communicate with your Toshiba dealer about this monitor Model Serial No Projection Monitor OWNER S MANUAL Introduction Connecting your Monitor Using the remote control Setting up your Monitor Operating your Monitor Appendix Index 01E_01_51HC85 05 4 28 6 16 PM 1 Black ...

Page 2: ...n fact have more than one TV monitor The home theater entertainment experience is a growing trend and larger TVs monitors are popular purchases however they are not always supported on the proper TV monitor stands Sometimes TVs monitors are improperly secured or inappropriately situated on dressers bookcases shelves desks audio speakers chests or carts As a result TVs monitors may fall over causin...

Page 3: ...nings 4 Follow all instructions 5 Do not use this apparatus near water 6 Clean only with a dry cloth 7 Do not block any ventilation openings Install in accordance with the manufacturer s instructions 8 Do not install near any heat sources such as radiators heat registers stoves or other apparatus including amplifiers that produce heat 9 Do not defeat the safety purpose of the polarized or groundin...

Page 4: ...for 6 to 7 hours to allow the condensation to evaporate 31 For added protection of your monitor from lightning and power surges always unplug the power cord if you leave the monitor unattended or unused for long periods of time 32 During normal use the monitor may make occasional snapping or popping sounds This is normal especially when the unit is being turned on or off If these sounds become fre...

Page 5: ...in damage to the optic components of the monitor SUCH DAMAGE IS NOT COVERED UNDER THE TOSHIBA LIMITED WARRANTY 3 Always keep the top and bottom sections of the monitor cabinet in an upright position while disassembled Failure to follow this instruction may result in damage to the monitor including but not limited to the optic components cabinet bezel and glass mirror SUCH DAMAGE IS NOT COVERED UND...

Page 6: ...heaterWide picture TheaterWide 2 and 3 only 29 Using the AUTO ASPECT feature 30 Using the POP double window feature 31 Swapping the main and POP pictures 32 Switching the speaker sound main or POP program 32 Double Window aspect ratio 32 Using the LOCKS menu 33 Entering the PIN code 33 If you cannot remember your PIN code 33 Using the V CHIP menu 33 ENABLE BLOCKING 34 TV RATING Independent rating ...

Page 7: ...ack panel and front panel behind the door provide all the terminal connections you will need to connect other equipment to your monitor See Connecting your Monitor on page 8 Illustrations represent 57HC85 1 2 3 4 5 6 7 8 9 ENT 100 0 POWER RECALL INPUT 10 P I C S I Z E E X I T INFO STOP MUTE SLEEP TV VCR PAUSE FF REW SKIP SEARCH SPLIT SWAP LIGHT REC FREEZE SOURCE PLAY TV CBL SAT VCR DVD VOL CH ENTE...

Page 8: ...characteristics that allows them to work properly with this monitor s IR OUT ports Never use other aftermarket IR blaster cable with this monitor Other cables may not function properly and can cause damage THIS TYPE OF DAMAGE IS NOT COVERED BY YOUR TOSHIBA WARRANTY NOTE REGARDING PICTURE QUALITY When connecting video equipment to your Toshiba monitor For GOOD picture quality Use a standard yellow ...

Page 9: ...one audio cable If you have a VCR with S video use an S video cable in the S video terminals instead of the standard video cable Do not connect a standard video cable and an S video cable to Video 1 or Video 2 at the same time or the picture performance will be unacceptable The unauthorized recording use distribution or revision of television programs videotapes DVDs and other materials is prohibi...

Page 10: ...ANT OUT to TV CH 3 CH 4 VIDEO AUDIO L R IN OUT OUT 1 IR OUT 2 IN OUT Cable converter box Stereo VCR Note If you have a mono VCR connect L Mono to VCR Audio OUT using only one audio cable If you have a VCR with S video use an S video cable in the S video terminals instead of a standard video cable Do not connect a standard video cable and an S video cable to Video 1 or Video 2 at the same time or t...

Page 11: ...ture quality from a DVD player or satellite receiver without component video or HDMI use an S video cable If your DVD player has component video see page 12 If your DVD player or satellite receiver has HDMI or DVI see page 15 Do not connect both an S video cable and a standard video cable between the monitor and DVD player satellite receiver at the same time or the picture performance will be unac...

Page 12: ...UT L R L R PR PB Y OUT 1 IR OUT 2 DVD player with component video Stereo VCR From Antenna The unauthorized recording use distribution or revision of television programs videotapes DVDs and other materials is prohibited under Copyright Law of the United States and other countries and may subject you to civil and criminal liability Note For the highest possible picture quality use component video ca...

Page 13: ... for a DTV receiver without component video see notes at right IN from ANT OUT to TV CH 3 CH 4 VIDEO AUDIO L R IN OUT VIDEO OUT S VIDEO AUDIO COMPONENT VIDEO OUT L R L R PR PB Y Satellite IN OUT 1 IR OUT 2 Note For the highest possible picture quality use component video cables or an HDMI cable between the monitor and DTV receiver set top box You can connect component video cables to either set of...

Page 14: ...bles for better picture performance Do not connect both a standard video cable and an S video cable to Video 1 or Video 2 at the same time or the picture performance will be unacceptable Do not connect the same VCR to the output and input terminals is on the monitor at the same time To dub or edit VCR 2 must select Line IN and the monitor must select VIDEO 1 The Video OUT terminal does not output ...

Page 15: ...To connect an HDMI device you will need one HDMI cable type A connector For proper operation it is recommended that you use a short HDMI cable You should not encounter difficulty if you use an HDMI cable shorter than 16 4 ft 5m HDMI cable transfers both video and audio Separate analog audio cables are not required see illustration below Some CDVs video CDs may not output digital audio signals In t...

Page 16: ...or s IR OUT terminal OUT 1 IR OUT 2 1 2 3 4 5 6 7 8 9 ENT 100 0 POWER RECALL INPUT 10 PIC SIZE EXI T INFO STOP MUTE SLEEP TV VCR PAUSE FF REW SKIP SEARCH SPLIT SWAP LIGHT REC FREEZE SOURCE PLAY TV CBL SAT VCR DVD VOL CH ENT ER DVDMENU MENU T O P MENU CLEA R E N T E R To control the device s Point the monitor remote control programmed to operate the device see pages 22 23 or the device s remote con...

Page 17: ...on the monitor and the stereo amplifier and turn off the built in speakers see Turning off the built in speakers on page 45 You will need one pair of standard audio cables LINE IN L R OUT 1 IR OUT 2 Note To hear sound when using an external audio amplifier the volume of both the monitor and the amplifier must be set above 0 zero For example if the volume of the monitor is set to 0 you will not be ...

Page 18: ...verter boxes satellite receivers VCRs DVD players and HTIBs home theater in a box even if they are different brands If you have a Toshiba device Your monitor remote control is preprogrammed to operate most Toshiba devices See pages 20 21 If you have a non Toshiba device or a Toshiba device that the remote control is not preprogrammed to operate You can program the monitor remote control so it will...

Page 19: ...rs 0 9 100 enters the numbers directly VOL volume y z adjusts the volume level MENU accesses the on screen system page 24 ENTER activates the function settings in the menu page 24 y z x arrows select or adjust items in the menus page 24 PIC SIZE cycles through the five picture sizes Natural TheaterWide 1 2 3 and Full page 27 EXIT closes on screen menus page 24 SPLIT turns the POP feature on and of...

Page 20: ...our monitor remote control to operate a Cable converter box or satellite receiver set the Device Switch to CBL SAT VCR set the Device Switch to VCR DVD player or HTIB set the Device Switch to DVD Note Even after the monitor remote control is programmed it may not operate certain features on your other device If this happens and you wish to use those features you will need to use the device s origi...

Page 21: ...Digit 6 Digit 6 Digit 6 Digit 6 7 Digit 7 Digit 7 Digit 7 Digit 7 8 Digit 8 Digit 8 Digit 8 Digit 8 9 Digit 9 Digit 9 Digit 9 Digit 9 0 Digit 0 Digit 0 Digit 0 Digit 0 100 10 100 100 100 10 ENT TOP MENU Top Menu GUIDE Selects the Guide PIC SIZE image shape ENTER ENTER Enter Select Enter CLEAR EXIT Exit Exit Clear x yz Menu select Menu select Menu select VOLyz Volume up down CHyz Channel up down Ch...

Page 22: ...f this happens use the device s remote control Note In addition to POWER confirm that all necessary keys on the monitor remote control will operate your device If some keys are not operational repeat the device code setup using another code if other codes are listed for your device If after trying all listed codes the necessary keys do not operate your device use the device s original remote contr...

Page 23: ...2 048 056 Go Video 056 059 061 081 Goldstar 005 010 014 054 056 065 067 Gradiente 018 065 Harman Kardon 005 Hitachi 024 025 035 037 042 063 070 080 JBL 076 JC Penney 005 006 007 008 009 010 023 024 025 026 035 056 061 063 065 Jensen 024 025 037 050 JVC 005 006 007 014 037 043 062 063 068 082 Kenwood 005 006 007 012 014 037 043 053 068 071 Kodak 010 LG 010 Lloyds 053 073 079 Logik 061 LXI 010 Magna...

Page 24: ...ND SELECT EXT MODE P I CTURE P I CTURE SETT I NGS SPORTS 1 0 8 0 i V I DEO D I SPLAY FORMAT RESET SAVE C I NEMA MODE CONVERGENCE MOVE SELECT ENTER MODE P CTURE I I SETT NGS CONTRAST SPORTS BR I GHTNESS RESET SAVE COLOR T I NT SHARPNESS 5 0 5 0 0 5 0 1 0 0 SELECT END E X I T AUDIO AUDIO SETTINGS WOW SRS 3D ON OFF H I GH FOCUS T r u B a s s VIDEO MOVE ADJUST BASS AUD I O I SETT NGS TREBLE BALANCE RE...

Page 25: ...de only after the monitor has been on for at least 30 minutes 1 Press MENU and then press x or until the PICTURE menu appears 2 Press y or z to highlight CONVERGENCE and then press ENTER to display the pull down menu 3 Press y or z to highlight ADJUST and then press ENTER The monitor will enter 56 point convergence mode ADJUST RESET START MODE P I CTURE P I CTURE SETT I NGS D I SPLAY FORMAT RESET ...

Page 26: ...XIT to close the convergence screen To reset your adjustments 1 Select RESET in step 3 on page 25 and then press ENTER The message WARNING RESETS USER ADJUSTMENT TO FACTORY SETTINGS will appear 2 Press y or z to highlight START and then press ENTER Your convergence settings have been reset SELECT START ENTER RESET ADJUSTMENT W A R N I N G R E S E T S U S E R A D J U S T M E N T T O F A C T O R Y S...

Page 27: ...l picture size is not selectable for 1080i format programs The way the image displays in any of the picture sizes will vary depending on the format of the program you are viewing Select the picture size that displays the current program the way that looks best to you See Notice of possible adverse effects on monitor picture display below right Selecting the picture size 1 Press PIC SIZE on the rem...

Page 28: ... hidden Note Using these functions to change the picture size i e changing the height width ratio for any purpose other than your private viewing may be prohibited under Copyright Law of the United States and other countries and may subject you to civil and criminal liability TheaterWide 2 picture size example A B C D E F G Note To select the picture size press PIC SIZE on the remote control or se...

Page 29: ...ZE P I CTURE AUTO ASPECT OFF P I CTURE SCROLL RESET SAVE 4 Press ENTER to display the Scroll Adjustment mode SCROL L ADJUSTMENT 0 TO ADJUST 5 Press y or z to adjust the vertical position of the picture Normal center position SCROL L ADJUSTMENT 0 TO ADJUST To raise the picture press y SCROL L ADJUSTMENT 20 TO ADJUST To lower the picture press z SCROL L ADJUSTMENT 10 TO ADJUST MENU NOTICE OF POSSIBL...

Page 30: ...s x or until the PICTURE menu appears END SELECT EX I T MODE P I CTURE P I CTURE SETT I NGS SPORTS 1 0 8 0 i V I DEO D I SPLAY FORMAT RESET SAVE C I NEMA MODE CONVERGENCE 2 Press y or z to highlight AUTO ASPECT and then press ENTER SET ENTER P I CTURE S I ZE P I CTURE AUTO ASPECT ON OFF P I CTURE SCROLL RESET SAVE SELECT 3 Press y or z to select ON and then press ENTER ENTER Aspect ratio of signal...

Page 31: ... the V CHIP feature is active and you try to watch an input source that exceeds your set rating limits the program will be blocked see Using the V CHIP menu on page 33 BLOCKED POP 24 To close the POP window Press SPLIT again or EXIT SPLIT SOURCE Main window 480i only POP window EXIT Number Note You can display only 480i format programs in the Main window You can choose to output the sound of eithe...

Page 32: ...ple x Example Press x Example Press purple Note If the POP program is not 480i format it will not display in the main window when you press SWAP The VARIABLE AUDIO OUT terminals will switch with the speaker sound However the source of the regular AUDIO OUT terminals is determined by the AUDIO OUT menu setting page 46 The regular AUDIO OUT terminals do not switch with the speaker sound Note The AUT...

Page 33: ...ber buttons 0 9 to enter the 4 digit PIN code used for blocking channels SELECT SET ENTER 0 9 BLOCK I NG RESET LOCKS P I N CODE 1 1 1 0 BLOCK I NG ACT I VE LOCKS P I N CODE 1 2 3 4 SELECT SET ENTER 0 9 If the wrong PIN code is entered the message Incorrect appears Enter the code again and then press ENTER If you cannot remember your PIN code 1 While the PIN code entering screen is displayed press ...

Page 34: ...children under 17 L Crude or indecent language S Explicit sexual activity V Graphic violence 14 Parents Strongly Cautioned This program contains some material that many parents would find unsuitable for children under 14 years of age D Intensely suggestive dialog L Strong coarse language S Intense sexual situations V Intense violence PG Parental Guidance Suggested This program contains material th...

Page 35: ...and then press ENTER The BLOCKING OPTION menu appears 2 Press y or z to select an item as discribed below MPAA UNRATED 1 Highlight MPAA UNRATED and then press ENTER 2 Press y or z to select ON Lock or OFF Unlock for unrated programs in the MPAA rating system then press ENTER ENABLE BLOCK I NG ON V CH I P TV RAT I NG MPAA RAT I NG BLOCK I NG OPT I ON LOCKS MENU MOVE START ENTER MPAA UNRATED ON OFF ...

Page 36: ...ss ENTER 1 2 3 4 5 6 7 8 9 ENT 100 0 POWER RECALL INPUT 10 P I C S I Z E E X I T INFO POP DIRECT CH MUTE SLEEP TV CBL SAT VCR DVD VOL CH E N T E R DVDMENU MENU T O P MENU CLE A R E N T ER yzx ENTER Number Mode Picture Quality Sports Bright and dynamic picture factory setting Standard Standard picture setting factory setting Movie Movie like picture setting factory setting Preference Your personal ...

Page 37: ...o save your new preferences 1 Press MENU and then press x or until the PICTURE menu appears 2 Press y or z to highlight PICTURE SETTINGS and then press ENTER The PICTURE SETTINGS menu appears 3 Press yzx to highlight SAVE and then press ENTER When complete SAVE changes to DONE in the menu and the picture mode automatically changes to PREFERENCE see Selecting the picture mode on page 36 MOVE START ...

Page 38: ... a Cable channel or playing a video cassette or disc damaged by repeated use To turn on CableClear DNR 1 Press MENU and then press x or until the PICTURE menu appears 2 Press y or z to highlight PICTURE SETTINGS and then press ENTER The PICTURE SETTINGS menu appears 3 Press y or z to highlight CableClear DNR and then press ENTER MOVE SELECT ENTER MODE P CTURE I I SETT NGS COLOR TEMPERATURE RESET S...

Page 39: ... X I T INFO STOP POP DIRECT CH MUTE SLEEP TV VCR PAUSE FF REW SKIP SEARCH SPLIT SWAP POP CH LIGHT REC CH SCAN FREEZE SOURCE PLAY TV CBL SAT VCR DVD VOL CH ENTER DVDMENU MENU T O P MENU CLE A R E N T ER MENU yzx ENTER Selecting the cinema mode When you view a DVD movie 3 2 pulldown processed or interlaced mode from a DVD player connected to the ColorStream component video inputs on the monitor smoo...

Page 40: ...ee illustrations below You can select VIDEO 1 VIDEO 2 VIDEO 3 ColorStream HD1 ColorStream HD2 or HDMI depending on which input terminals are used for connecting the devices see Connecting your Monitor on page 8 SOURCE 1 2 3 4 HDM I V I DEO 1 V I DEO 2 V ColorStream 5 6 I DEO HD1 ColorStream HD2 3 SELECT I ON 1 6 TO SELECT SOURCE HDM I V I DEO 1 V I DEO 2 V ColorStream I DEO HD1 ColorStream HD2 3 S...

Page 41: ...t T1 T2 T3 or T4 Note If text is not available in your area a black rectangle may appear on your screen If this happens turn the Closed Caption feature OFF WORLD WEATHER Temps Current F C Weather LONDON 51 11 MOSCOW PARIS ROME TOKYO 57 14 53 12 66 19 65 18 Cloudy Clear Cloudy Rain Clear To turn off the Closed Caption feature Highlight OFF in step 4 1 2 3 4 5 6 7 8 9 ENT 100 0 POWER RECALL INPUT 10...

Page 42: ...on screen menus 1 Press MENU and then press x or until the CUSTOM menu appears 2 Press y or z to highlight SLEEP TIMER and then press ENTER 3 Press the Number buttons to enter the length of time until the monitor turns off automatically 4 Press ENTER to start the timer CUSTOM SLEEP T I MER CC V I DEO LABEL BACKGROUND 2 h 0 0 m SELECT SET ENTER 0 9 Setting the clock To set the clock 1 Press MENU an...

Page 43: ...ep rich bass from stereo sound sources Your monitor s audio will sound fuller richer and wider To adjust the WOW feature 1 Press MENU and then press x or until the AUDIO menu appears 2 Press y or z to highlight the desired WOW feature you want to adjust then press ENTER SRS 3D To turn on or off the surround sound effect FOCUS To turn on or off the vocal emphasis effect TruBass To select your desir...

Page 44: ...DJUST BASS AUD I O I SETT NGS TREBLE BALANCE RESET SAVE RESET AUD I O MENU 0 7 0 5 0 3 Press y or z to highlight the item you want to adjust 4 Press x or to adjust the level x makes the sound quality weaker or increases the balance in the left channel depending on the item selected makes the sound quality stronger or increases the balance in the right channel depending on the item selected Resetti...

Page 45: ... OFF AUD I O OUT To turn off the StableSound feature Select OFF in step 3 above Turning off the built in speakers Use this feature to turn off the monitor s built in speakers when you connect an audio system See Connecting an audio system on page 17 To turn off the built in speakers 1 Press MENU then press x or until the AUDIO menu appears 2 Press y or z to highlight SPEAKERS and then press ENTER ...

Page 46: ...g the POP sound with external equipment connected to the monitor s Audio OUT terminals while listening to the sound of the main picture through the monitor s built in speakers To select the Audio OUT sound 1 Press MENU and then press x or until the AUDIO menu appears 2 Press y or z to highlight AUDIO OUT and then press ENTER 3 Press y or z to select MAIN or POP and then press ENTER SET SELECT ENTE...

Page 47: ...D1 DVD THEATERWIDE 1 D L S V ColorStream 12 3 4 SLEEP T I MER 1h23m CLOCK Understanding the last mode memory feature If the power is cut off while you are viewing the monitor the Last Mode Memory feature turns on the monitor automatically when the power is resupplied If the power is going to be off for a long time and you are going to be away from your monitor unplug the power cord to prevent the ...

Page 48: ...or specifications that may be added in the future WARNING RISK OF ELECTRIC SHOCK Never attempt to service the monitor yourself Opening and removing the covers may expose you to dangerous voltage or other hazards Refer all servicing to a Toshiba Authorized Service Center Video Audio Terminals continued VARIABLE AUDIO OUTPUT 0 300 mV rms 30 modulation equivalent 2 2 k ohms or less HDMI INPUT HDMI co...

Page 49: ...No sound picture OK The sound may be muted Press VOLUME Make sure the SPEAKERS function in the AUDIO menu is set properly Poor picture sound OK If you connected an antenna via an external device such as a VCR check the antenna cable connections Adjust the PICTURE menu Black box appears on the screen The closed caption feature may be set to one of the Text modes T1 T2 T3 or T4 Turn closed captionin...

Page 50: ...sponsibility THE ABOVE WARRANTIES ARE SUBJECT TO THE FOLLOWING CONDITIONS 1 You must retain your original bill of sale or provide other proof of purchase 2 All warranty servicing of this monitor must be performed by an Authorized TACP Service Station 3 The warranties from TACP are effective only if this monitor is purchased and operated in the Continental U S A or Puerto Rico 4 Labor service charg...

Page 51: ...Language selection 25 Last mode memory 47 Locks menu 33 Menu system 24 MUTE button 43 Number buttons 19 P Picture adjustments COLOR TEMPERATURE 38 Picture mode 36 Picture quality 37 Picture out picture POP SOURCE button 31 SPLIT button 31 SWAP button 32 Picture scroll 29 Picture size selection 27 POP Window 31 Power button 24 Q R RECALL button 47 Remote control Battery installation 18 Effective ra...

Page 52: ... TheaterWide are registered trademarks of Toshiba America Consumer Products L L C HEAD OFFICE 82 TOTOWA ROAD WAYNE NEW JERSEY 07470 U S A NATIONAL SERVICE DIVISON 1420B TOSHIBA DRIVE LEBANON TN 37087 U S A YC N 23566643 05 05 PRINTED IN USA 01E_52_51HC85 05 4 28 6 17 PM 52 Black ...

Reviews: