background image

18

"Using the remote


co

ntr

o

l"

Using the remote control

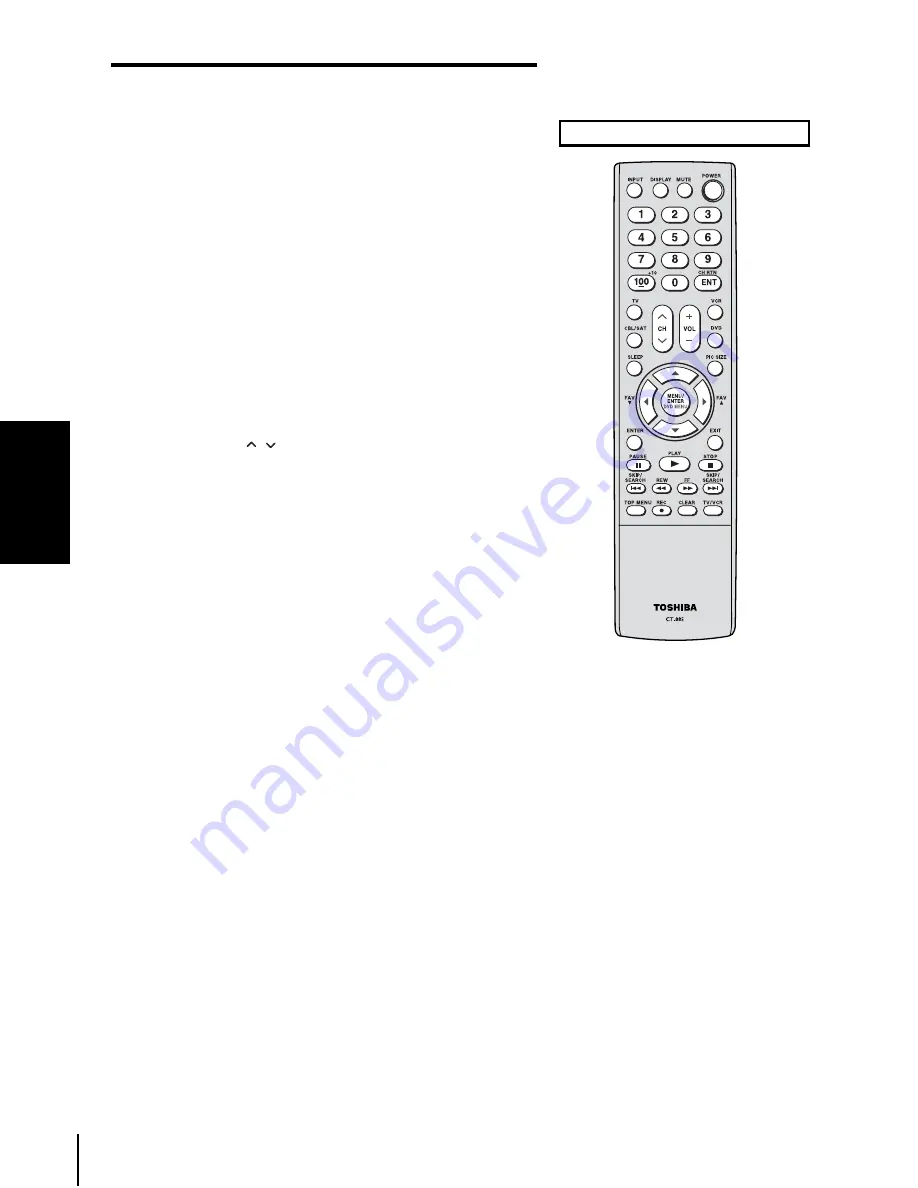
Learning about the remote control

1.

POWER

: Turns the TV on and off (standby mode*).

2.

MUTE:

 Turns off the sound (

page 36

).

3.

DISPLAY:

 Displays TV settings on-screen (

page 40

) or 

closes the on-screen menu.

4.

INPUT: 

Selects the video input source (

page 27

).

5.

Channel Numbers (0-9, 100)

: Allow direct access to 

channels (

page 26

).

6.

CH RTN/ENT:

 Enacts the selected channel/switches 

between the last two viewed channels (

page 27

).

7.

TV

: Selects TV mode (

page 21

).

8.

VCR

: Selects VCR mode (

page 20

).

9.

CBL/SAT

: Selects CBL/SAT mode (

page 20

).

10.

DVD

: Selects DVD mode (

page 21

).

11.

VOL (volume) + -:

 Adjust the volume level.

12.

CH (channel)


: Cycle through programmed 

channels (

page 25

).

13.

PIC SIZE

: Cycles through the five picture sizes: Natural, 

TheaterWide1/2/3, and Full (

page 28

).

14.

SLEEP

: Sets the TV to turn off at a specific time (

page 

34

).

15.

STWX


(arrow buttons):

 Select or adjust menu items 

(

page 24

).

16.

FAV


ST

: Cycle through channels you programmed as 

favorite channels (

page 26

).

17.

MENU/ENTER:

 Accesses the menu system (

page 24

).

18.

EXIT:

 Returns to the previous On-Screen Display (OSD) 

menu, or leaves and saves the menu settings (

page 24

).

*


The TV is in standby mode when the 

power is OFF but the power cord is still 
plugged into an outlet.

First press TV to control the TV.

Summary of Contents for TheaterWide 20HL86

Page 1: ...e TV s features Appendix Index Owner s Record The model number and serial number are on the back of your TV Record these numbers in the spaces below Refer to these numbers whenever you communicate with your Toshiba dealer about this TV Model number 2006 TOSHIBA CORPORATION All Rights Reserved Serial number 20HL86 20HL86 ...

Page 2: ...ference by one or more of the following measures Reorient or relocate the receiving antenna Increase the separation between the equipment and the receiver Connect the equipment into an outlet on a circuit different from that to which the receiver is connected Consult the dealer or an experienced radio TV technician for help CAUTION Changes or modifications to this equipment not expressly approved ...

Page 3: ... 13 Unplug this apparatus during lightning storms or when unused for long periods of time 14 Refer all servicing to qualified service personnel Servicing is required when the apparatus has been damaged in any way such as power supply cord or plug is damaged liquid has been spilled or objects have fallen into the apparatus the apparatus has been exposed to rain or moisture does not operate normally...

Page 4: ...e TV 23 Never allow anything to rest on or roll over the power cord and never place the TV where the power cord is subject to wear or abuse 24 Never overload wall outlets and extension cords 25 Always operate the TV with a 120 V AC 60Hz power source only 26 Always make sure the antenna system is properly grounded to provide adequate protection against voltage surges and built up static charges see...

Page 5: ...s voltage or other hazards Refer all servicing to a Toshiba Authorized Service Center 36 If you have the TV serviced Ask the service technician to use only replacement parts specified by the manufacturer Upon completion of service ask the service technician to perform routine safety checks to determine that the TV is in safe operating condition 37 The cold cathode fluorescent lamp in the LCD panel...

Page 6: ...lly 26 Changing channels 26 Programming your favorite channels 26 Using the TV s features 27 Switching between two channels using Channel Return 27 Using the Blue screen feature 27 Selecting the video input source 27 Viewing the wide screen picture formats 28 Selecting the picture size 28 Natural picture size 29 TheaterWide1 picture size For 4 3 format programs 29 TheaterWide2 picture size For Let...

Page 7: ...ly as possible The model and serial numbers are on the back of your TV Write these numbers in the space provided on the front cover of this manual for your records Instructions in this manual are based on using the remote control You also can use the controls on the TV if they have the same name as those referred to on the remote control Please read all the safety and operating instructions carefu...

Page 8: ...the back panel see illustrations below Also see Connecting your TV from page 10 to page 17 VOLUME CHANNEL POWER TV front Right side panel Headphone jack Power indicator Remote sensor Remote control Terminal cover removed see page 9 Back Power cord Cable clamper HDMI IN RGB PC IN PC AUDIO IN ANT IN INPUT MENU Audio output VIDEO 2 IN ColorStream HD VIDEO 1 IN S video Video Audio input Audio input ...

Page 9: ...ecessary 3 Reinstall the cover Align the holes on the TV back with the three tabs on the rear terminal cover as shown 4 Close the cover Cable clamper The cable clamper can be used to bundle the connection cables see page 10 Adjusting the TV viewing angle You can adjust the angle of the TV screen Cable clamper Tilt angle WARNING RISK OF SERIOUS PERSONAL INJURY OR EQUIPMENT DAMAGE Never grasp the ca...

Page 10: ...and blue ColorStream is Toshiba s brand of component video Separate audio cables are required for a complete connection Note Component video cables provide better picture performance than a standard composite video or S video cable HDMI cable is for use with devices with uncompressed HDMI high definition multimedia interface video and compressed audio output HDMI cable delivers digital audio and v...

Page 11: ...to watch basic and premium cable channels Tune the TV to channel 3 or 4 whichever channel is vacant in your area and use the converter box to change channels Note If you have a mono VCR connect L Mono to VCR Audio OUT using only one audio cable If you have a VCR with S video use an S video cable in the S video jacks instead of a standard video cable Note When you use a converter box with your TV t...

Page 12: ... box with your TV the remote control will not operate some features such as favorite channel programming or channel return If you have a mono VCR connect L Mono to VCR Audio OUT using only one audio cable If you have a VCR with S video use an S video cable in the S video jacks instead of a standard video cable Stereo VCR Back of TV The unauthorized recording use distribution or revision of televis...

Page 13: ...the channel to record and tune the TV to the channel to watch To record a TV program while watching a DVD tune the VCR to the channel to record and select VIDEO2 on the TV see Selecting the video input source on page 27 Note For the highest possible picture quality use component video cables between the TV and DVD player The ColorStream jacks can be used with 480i and 480p scan system Stereo VCR B...

Page 14: ...el to record and select VIDEO2 on the TV To record and watch the same TV program tune the VCR to the channel to record and select VIDEO1 on the TV To record one TV program while watching another TV program tune the VCR to the channel to record and tune the TV to the channel to watch Note For the highest possible picture quality use component video cables between the TV and DTV receiver set top box...

Page 15: ...inition video signals Because this is an evolving technology it is possible that some devices may not operate properly with the TV Note The HDMI jack is not intended for connection to and should not be used with a personal computer For PC connection see page 17 To connect an HDMI device you will need one HDMI cable type A connector per HDMI device For proper operation it is recommended that you us...

Page 16: ... TV or the TV s remote control To control the audio through the amplifier use the audio system s remote control Connecting a camcorder This connection allows you to watch video materials recorded on a camcorder Note Set the TV s volume to the minimum level if necessary Note If you have a camcorder with S video use an S video cable instead of a standard video cable for better picture performance Am...

Page 17: ... signals can be displayed XGA VESA 1024 X 768 60Hz Other formats or non standard signals may not be displayed correctly To display the optimum picture use the PC setting feature see Using the PC setting feature on page 39 Note Some PC models cannot be connected to this TV An adapter is not needed for computers with a DOS V compatible mini D sub 15 pin terminal Depending on the DVD s title and the ...

Page 18: ...Selects CBL SAT mode page 20 10 DVD Selects DVD mode page 21 11 VOL volume Adjust the volume level 12 CH channel Cycle through programmed channels page 25 13 PIC SIZE Cycles through the five picture sizes Natural TheaterWide1 2 3 and Full page 28 14 SLEEP Sets the TV to turn off at a specific time page 34 15 STWX arrow buttons Select or adjust menu items page 24 16 FAV ST Cycle through channels yo...

Page 19: ...mote control effective range Caution Never throw batteries into a fire Note Be sure to use AAA batteries Dispose of batteries in a designated disposal area The batteries should always be disposed of with the environment in mind Always dispose of the batteries in accordance with applicable laws and regulations If the remote control does not operate correctly or if the operating range becomes reduce...

Page 20: ...evices on page 21 The buttons shown at right will control the cable TV converter satellite receiver Press CBL SAT first To control a VCR Program the remote control to recognize the brand of your VCR see Programming the remote control to operate your other devices on page 21 The buttons shown at right will then control the VCR Press VCR first MUTE POWER INPUT Channel Numbers CH RTN ENT VOL CH CBL S...

Page 21: ...le holding down DISPLAY press the Channel Number buttons to enter the three digit code for your device within 10 seconds Note If you do not enter the code within 10 seconds from step 3 or if you enter the wrong code this operation is canceled 4 Point the remote control at the cable TV converter satellite receiver VCR or DVD player and press POWER to test the code If the device responds you entered...

Page 22: ...d 018 GE 001 002 009 040 042 048 056 Go Video 056 059 061 081 Goldstar 005 010 014 054 056 065 067 Gradiente 018 065 Harman Kardon 005 Hitachi 024 025 035 037 042 063 070 080 JBL 076 JC Penney 005 006 007 008 009 010 023 024 025 026 035 056 061 063 065 Jensen 024 025 037 JVC 005 006 007 014 037 043 062 063 068 082 Kenwood 005 006 007 012 014 037 043 053 068 071 Kodak 010 LG 010 Lloyds 053 073 079 ...

Page 23: ...Onkyo 044 Oritron 058 Panasonic 010 045 046 047 048 049 050 Philips 004 051 Pioneer 052 053 054 055 Proscan 001 056 Qwestar 057 058 RCA 001 002 059 089 Sampo 060 Samsung 061 062 086 090 Sansui 073 Sanyo 063 091 Sharp 064 067 Sherwood 074 Sony 011 012 065 066 068 069 070 Sylvania 027 Teac 071 Technics 072 Techwood 075 Toshiba 000 013 076 077 078 Yamaha 079 080 081 Zenith 014 082 092 Portable DVD pl...

Page 24: ...d save your menu settings press EXIT Note The PC mode is selectable only when the TV is in PC input mode and active picture is on screen see Selecting the video input source on page 27 Special Language English Natural Off Bright Picture Size Closed Caption Backlight Timer Setting Block Setting MENU ENTER EXIT Picture Contrast Brightness Color Sharpness Tint Picture Advanced Setting 56 32 32 0 0 Pi...

Page 25: ... Press T to highlight TV CATV Select the system CATV or TV that you want to program the channels 3 Press S or T to highlight CH PROGRAM 4 Press X or MENU ENTER to start auto programming The TV will automatically cycle through all the TV and Cable channels and store all active channels in the channel memory 5 Press EXIT to close the OSD menu and press CH or CH to view the programmed channels Note T...

Page 26: ...nly your favorite channels it allows you to skip other channels you do not normally watch To program your favorite channels 1 Press MENU ENTER and then press W or X until the CH Program menu appears 2 Press S or T to highlight Favorite Channel 3 Press X or MENU ENTER to display the Favorite Channel page 4 Press S or T to select the first favorite channel position 5 Press the Channel Number buttons...

Page 27: ...ill be muted when no signal is received To turn on the Blue screen feature 1 Press MENU ENTER and then press W or X until the CH Program menu appears 2 Press S or T to highlight Blue Screen 3 Press W or X to select On Note If the Blue screen appears repeatedly because of poor signal strength select Off in step 3 Selecting the video input source Press INPUT on the remote control or on the TV side p...

Page 28: ... picture size as described on the next page Using the OSD menu 1 Press MENU ENTER and press W or X to highlight the Special menu 2 Press S or T to highlight Picture Size then press W or X to select a desired picture size Note If the selected picture size is not supported with the input signal 720p or 1080i a message Not Available will display on screen Picture size Signal Natural Theater Wide1 The...

Page 29: ...t is stretched the same amount both wider and taller retains its original proportion Part of the picture at the top and bottom is hidden TheaterWide2 picture size example TheaterWide3 picture size For Letter box programs with subtitles The picture is stretched wider to fill the width of the screen but only slightly stretched taller A small part of the picture at the top and bottom is hidden Theate...

Page 30: ...G above parental guidance suggested PG 13 above 13 years and older R above restricted NC 17 above 18 years and older X adult If you select PG 13 above all G and PG rated movies will be available and all PG 13 R NC 17 and X rated movies will be blocked For Television programs including made for TV movies General TV Ratings Unblocked TV G above general audience individual categories do not apply TV ...

Page 31: ...press X to display the next page and select the rate to be set For Moive Ratings press W or X to select an item to be set Special Language English Natural Off Bright Picture Size Closed Caption Backlight Timer Setting Block Setting MENU ENTER EXIT Special Language English Off Bright Closed Caption Backlight Timer Setting MENU ENTER EXIT Natural Picture Size Block Setting Block Setting Enter Passwo...

Page 32: ...you adjusted can be saved in the TV s Memory mode Note If you select one of the factory set picture modes Dynamic Standard or Movie and then adjust a picture quality setting for example increase the contrast the picture mode automatically changes to Memory in the Picture menu Note When the selected input signal is PC the following functions will not be available Color Sharpness Tint NTSC Setup Bla...

Page 33: ... CC3 or CC4 CC1 displays captions in the primary language in your area Note If the program or video you selected is not closed captioned the captions will not display on the screen To view text select Text1 Text2 Text3 or Text4 Note If text is not available in your area a black rectangle may appear on your screen If this happens turn the Closed Cap tion feature Off To turn off the Closed Caption f...

Page 34: ...ke an alarm clock allowing you to set a specific length of time and making a beep sound when the time is up It helps remind you to start or stop something you want to do while watching the TV To set the Count Down Timer 1 Press MENU ENTER and then press W or X until the Special menu appears 2 Press S or T to highlight Timer Setting Press X to display the Timer Setting menu continue to next page No...

Page 35: ...to display the Special menu 2 Press S or T to highlight Backlight 3 Press W or X to select Bright Normal or Dark Note How to display the count down timer When the timer is set and counting press DISPLAY to show the timer information in the upper right corner of the TV To exit the information press EXIT once or DISPLAY repeatedly until the information disappears How to stop the beep sound of the co...

Page 36: ...MTS feature are L R L L R R Your selection decides from which speaker the audio is output To listen to different sound types 1 Press MENU ENTER and then press W or X until the Audio menu appears 2 Press S or T to highlight MTS 3 Press W or X to select Stereo SAP or Mono You can leave your TV in Stereo mode because it will automatically output the type of sound being broadcast stereo or monaural If...

Page 37: ...tory setting news dialogue factory setting your personal preference Adjusting the sound quality You can change the quality of your TV s sound by adjusting the bass treble and balance To adjust the sound balance 1 Press MENU ENTER and then press W or X until the Audio menu appears 2 Press S or T to highlight Balance 3 Press W or X to adjust the level W makes the sound quality weaker or increases th...

Page 38: ...light AVL 3 Press W or X to select On To turn off the AVL feature Select Off in step 3 above Using the Speaker Out feature Be sure you have correctly connected your TV to an external audio system if you want to activate the Speaker Out function For connection method refer to Connecting an audio system on page 16 To use the Speaker Out function 1 In the Audio menu press S or T to highlight Speaker ...

Page 39: ...ghlight Auto and then press MENU ENTER To manually make the appropriate adjustments to other items press T to highlight the item to be set and then press W or X Auto Automatically adjusts the screen position frequency and phase The displayed image will disappear for a few seconds while auto configuration is in progress Frequency Minimizes any vertical bars or stripes appearing on the screen backgr...

Page 40: ... TV the Last Mode Memory feature turns on the TV automatically when the power is resupplied If the power is going to be off for a long time and you are going to be away from your TV unplug the power cord to prevent the TV from turning on in your absence Note With the panel locked you can prevent your TV settings from being changed accidentally by children for example When the Panel Lock is on no c...

Page 41: ...mption 70 W 1 W in standby mode Audio Power 2 W 2 W Video Audio Terminals S VIDEO INPUT Y 1 V p p 75 ohms negative sync C 0 286 V p p burst signal 75 ohms VIDEO AUDIO INPUT VIDEO 1 V p p 75 ohms negative sync AUDIO 400 mV rms 30 modulation equivalent 22k ohms or greater ColorStream Component video INPUT Y 1V p p 75 ohms PR 0 7 V p p 75 ohms PB 0 7 V p p 75 ohms AUDIO 500 mV rms 47k ohms or greater...

Page 42: ...ulties Try another channel Check the antenna connections Black box appears on the screen The Closed Caption feature may be set to one of the Text modes Text1 Text2 Text3 or Text4 Turn closed captioning Off Unable to select a certain channel The channel may be erased with the manual programming feature Multiple images The station may have broadcast difficulties Try another channel Antenna reception...

Page 43: ...lite dishes cable television distribution VCRs DVD players recorders personal computer level IEEE 1394 devices and any other connected signal source device are your responsibility 5 Warranties extend only to defects in materials or workmanship as limited above and do not extend to any LCD Product or parts that have been lost or discarded by you or to damage to the LCD Product or parts caused by fi...

Page 44: ...by this warranty Reception problems caused by inadequate antenna systems misaligned satellite dishes cable television distribution VCRs DVD players recorders personal computer level IEEE 1394 devices and any other connected signal source device are your responsibility 5 Warranties extend only to defects in materials or workmanship as limited above and do not extend to any LCD Product or parts that...

Page 45: ...26 Favorite channels 26 FF button 20 Front of the TV 8 H HDMI connection 15 I INPUT button 27 L Language selection 25 Last mode memory 40 M Menu system 24 MTS 36 MUTE button 36 P Panel Lock 40 PAUSE button 20 PC connection 17 PC settings 39 PIC SIZE button 28 Picture adjustments Picture mode 32 Picture quality 32 Picture size selection 28 PLAY X button 20 POWER button 18 R REC button 20 Remote con...

Page 46: ...ONTARIO L3R 8H2 CANADA TEL 905 470 5400 SERVICE CENTERS TORONTO 191 McNABB STREET MARKHAM ONTARIO L3R 8H2 CANADA TEL 905 470 5400 MONTREAL 18050 TRANS CANADA KIRKLAND QUEBEC H9J 4A1 CANADA TEL 514 390 7766 VANCOUVER 22171 FRASERWOOD WAY RICHMOND B C V6W 1J5 CANADA TEL 604 303 2500 ColorStream is the registered trademark of Toshiba America Consumer Products L L C ...

Reviews: