background image

2. PRINTER SETUP 

ENGLISH VERSION EO1-33034 

2.7 Loading the Media


E2- 9 

2.7  Loading the Media 

(Cont.) 


12.

  There are four issue modes available on this printer.  How to set the  


media for each mode is provided below.  

 
Batch mode 

In the batch mode, the media is continuously printed and fed until the 
number of labels/tags specified in the issue command have been printed.  


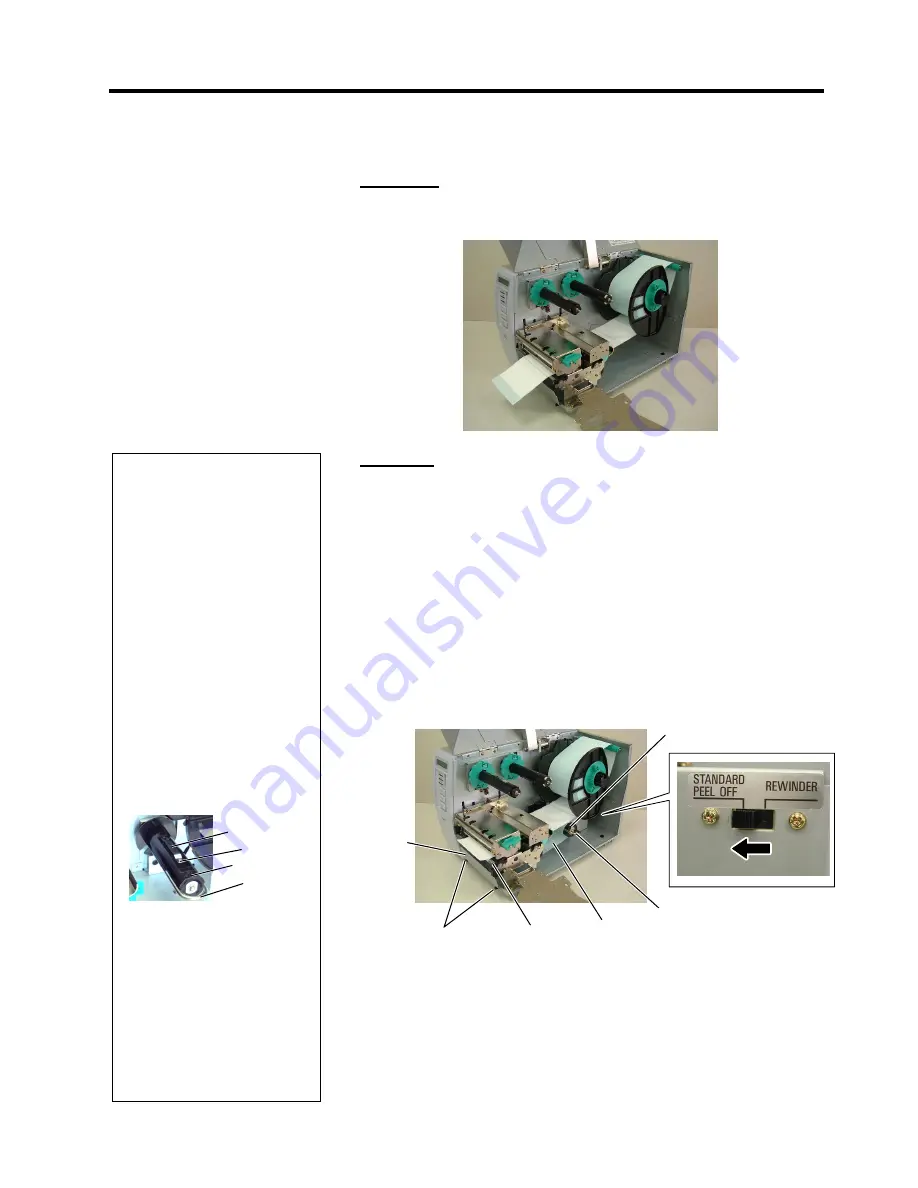
Strip mode 

When the optional Strip Module is fitted, the backing paper is 
automatically removed from the label at the Strip Plate as each label is 
printed.  
 
(1)  Remove enough labels from the leading edge of the media to leave 

500mm of backing paper free.  

(2)  Insert the backing paper under the Strip Plate. 
(3)  Wind the backing paper onto the Take-up Spool and fix it in position 

with the Take-up Clip.  (Wind the paper counterclockwise around 
the spool as this is the direction it rotates.) 

(4)  Rotate the Take-up Spool anti-clockwise a few times to remove any 

slack in the backing paper.  

(5)  Set the Selection Switch mounted on the Rewinder Assembly to 

STANDARD/PEEL OFF

 position. 


Take-up Clip  

Take-up Spool 

Front Plate 

Black Screw 

Backing Paper 

NOTES: 

1.  Be sure to set the Selection 

Switch to 

STANDARD/ 

PEEL OFF

 position. 

2.  The backing paper is easier 

to feed back to the Take-Up 
Spool if the Front Plate is 
removed.  

3.  Fit the Take-Up Clip so that 

the longer side of the clip is 
fitted into the shallow groove 
in the Take-Up Spool.   

4.  The backing paper can be 

wound directly onto the Take-
up Spool or a paper core. 


When using the Take-up 
Spool, detach the Holder 
Stopper by removing the B-
3x4 screw.  Otherwise, it may 
be difficult to pull out the 
wound backing paper roll.  


Holder Stopper 

B-3x4 Screw 

Take-up Spool


Take-up Clip 


When using a paper core, put 
the core on the Take-up Spool 
with the Holder Stopper on it, 
and attach the top edge of the 
backing paper to the core 
with adhesive tape.  The 
Take-up Clip is not 
necessary.  


This winding method is 
applicable to the Built-in 
Rewinder mode.  

Strip Plate 


Summary of Contents for TEC B-SX4T-QP

Page 1: ...TEC Thermal Printer B SX4T QQ QP Owner s Manual ...

Page 2: ...ss proprietors can participate voluntarily The targeted products are office equipment such as computers monitors printers facsimiles copiers scanners and multifunction devices Their standards and logos are uniform among participating nations ENERGY STAR is a U S registered mark This equipment has been tested and found to comply with the limits for a Class A digital device pursuant to Part 15 of th...

Page 3: ...r cord plug with wet hands as this may cause electric shock If the machines share the same outlet with any other electrical appliances that consume large amounts of power the voltage will fluctuate widely each time these appliances operate Be sure to provide an exclusive outlet for the machine as this may cause fire or electric shock Do not place metal objects or water filled containers such as fl...

Page 4: ...ures high humidity dust or gas Ensure the printer is operated on a level surface Any data stored in the memory of the printer could be lost during a printer fault Try to avoid using this equipment on the same power supply as high voltage equipment or equipment likely to cause mains interference Unplug the machine whenever you are working inside it or cleaning it Keep your work environment static f...

Page 5: ...e Power Cord E2 4 2 6 Turning the Printer ON OFF E2 5 2 6 1 Turning ON the Printer E2 5 2 6 2 Turning OFF the Printer E2 5 2 7 Loading the Media E2 6 2 8 Loading the Ribbon E2 11 2 9 Inserting the Optional PCMCIA Cards E2 12 2 10 Test Print E2 13 3 ON LINE MODE E3 1 3 1 Operation Panel E3 1 3 2 Operation E3 2 3 3 Reset E3 2 3 4 Dump Mode E3 3 4 MAINTENANCE E4 1 4 1 Cleaning E4 1 4 1 1 Print Head P...

Page 6: ...APPENDIX 3 INTERFACE EA3 1 APPENDIX 4 PRINT SAMPLES EA4 1 GLOSSARIES INDEX CAUTION 1 This manual may not be copied in whole or in part without prior written permission of TOSHIBA TEC 2 The contents of this manual may be changed without notification 3 Please refer to your local Authorised Service representative with regard to any queries you may have in this manual This is a Class A product In a do...

Page 7: ...moved from the centre to the left edge of the media When the optional interface board is installed Web functions such as remote maintenance and other advanced network features are available Superior hardware including the specially developed 8 dots mm 203 dots inch thermal print head which will allow very clear print at a printing speed of 76 2 mm sec 3 inches sec 152 4 mm sec 6 inches sec or 254 ...

Page 8: ...en unpacking the printer please make sure all the following accessories are supplied with the printer US Power Cord 1 pc P No FBCB0030203 QQ model only CD ROM 1 pc QQ P No 7FM00331000 QP P No 7FM00254000 EU Power Cord 1 pc P No EKA 0030001 QP model only Fan Filter 1 pc P No FMBB0036801 ...

Page 9: ...ing chapters Dimensions in mm inches LCD Message Display Operation Panel Power Switch OFF ON Media Outlet Top Cover Expansion I O Interface Connector Option Serial Interface Connector RS 232C Parallel Interface Connector Centronics Supply Window PCMCIA Card Slot Option USB Connector Option or LAN Connector Option AC Power Inlet 291 460 308 308 12 1 291 11 5 460 18 1 USB Connector Option or LAN Con...

Page 10: ...Interior Please see Section 3 1 for further information about the Operation Panel LCD Message Display ON LINE LED Green ERROR LED Red PAUSE key POWER LED Green FEED key RESTART key Ribbon Stopper Print Head Block Head Lever Ribbon Shaft Supply Holder Locking Ring Supply Shaft Print Head Platen ...

Page 11: ...ver open Be careful not to allow fingers or articles of clothing to get caught into any of the moving parts of the printer especially the optional cutter mechanism Make sure to turn off the printer power and to remove the power cord from the printer whenever working on the inside of the printer such as changing the ribbon or loading the media or when cleaning the printer For best results and longe...

Page 12: ...ark Sensor depending on the media being used Refer to Section 2 7 8 Load the ribbon Refer to Section 2 8 9 Turn the power ON Refer to Section 2 6 10 Perform a test print Refer to Section 2 10 11 Install the Printer Drivers Refer to the Printer Driver Manual When installing the printer it is important to ensure that the Fan Filter is attached before using the printer The Fan Filter consists of 2 pa...

Page 13: ...ard parallel connector and your host computer s parallel port LPT An Ethernet connection using the optional LAN board A USB cable connection between the printer s optional USB connector and your host computer s USB port Conforming to USB 1 1 The diagram below shows all the possible cable connections to the current version of the printer c Parallel Interface Connector Centronics d Serial Interface ...

Page 14: ...into a grounded outlet as shown in the figure below QQ Type QP Type CAUTION 1 Make sure that the printer Power Switch is turned to the OFF position before connecting the Power Cord to prevent possible electric shock or damage to the printer 2 Use only the Power Cord supplied with the printer Use of any other cord may cause electric shock or fire 3 Connect the Power Cord to a supply outlet with a p...

Page 15: ...er Power Switch verify that the ON LINE message appears in the LCD Message Display and that the ON LINE LED light is on and is not flashing 2 To turn OFF the printer power press the Power Switch as shown in the diagram below Note that is the power OFF side of the switch CAUTION Use the power switch to turn the printer On Off Plugging or unplugging the Power Cord to turn the printer On Off may caus...

Page 16: ...low it to cool before loading the media 3 To avoid injury be careful not to trap your fingers while opening or closing the cover WARNING NOTES 1 When the Head Lever is turned to Free position the Print Head is raised 2 To allow printing the Head Lever must be set to Lock position This ensures that the Print Head is closed There are two head pressure levels in the Lock position Set the Head Lever d...

Page 17: ...Then turn the Locking Ring clockwise to secure the Supply Holder 8 Place the media between the Media Guides adjust the Media Guides to the media width and tighten the Locking Screw 9 Check that the media path through the printer is straight The media should be centered under the Print Head NOTE Do not over tighten the Locking Ring of the Supply Holder Supply Shaft Supply Holder Groove Damper Locki...

Page 18: ...he Locking Screw Setting the Black Mark Sensor position 1 Remove the Locking Screw that secures the Media Sensor 2 Pull about 500 mm of media out of the front of the printer turn the media back on itself and feed it under the Print Head past the sensor so that the black mark can be seen from above 3 Manually move the Media Sensor so that the Black Mark Sensor is in line with the center of the blac...

Page 19: ...i clockwise a few times to remove any slack in the backing paper 5 Set the Selection Switch mounted on the Rewinder Assembly to STANDARD PEEL OFF position Take up Clip Take up Spool Front Plate Black Screw Backing Paper NOTES 1 Be sure to set the Selection Switch to STANDARD PEEL OFF position 2 The backing paper is easier to feed back to the Take Up Spool if the Front Plate is removed 3 Fit the Ta...

Page 20: ...e Top Cover If the media is thermal transfer media it is also necessary to load a ribbon Refer to Section 2 8 Loading the Ribbon CAUTION 1 Be sure to cut the backing paper of the label Cutting labels will cause the glue to stick to the cutter which may affect the cutter quality and shorten the cutter life 2 Use of tag paper when the thickness exceeds the specified value may affect the cutter life ...

Page 21: ...his function please ask a TOSHIBA TEC authorised service representative CAUTION Be careful not touch the Print Head Element when raising the Print Head Block Failure to do this may cause missing dots by static electricity or other print quality problems 1 Do not touch any moving parts To reduce the risk of fingers jewellery clothing etc being drawn into the moving parts be sure to load the ribbon ...

Page 22: ...11119 03 Read Write INTEL IMC004FLSA Simple TECNOLOGY STI FL 4A Mitsubishi MF84M1 G7DAT01 PC Card KING MAX FJN 004M6C Centennial Technologies Inc FL04M 20 11138 67 PC Card FJP 004M6R Flash Memory Card 4 MB Mitsubishi MF84M1 GMCAV01 Maxell EF 1M TB Flash Memory Card 1 MB Mitsubishi MF81M1 GBDAT01 Read See NOTE CAUTION 1 To protect PC cards discharge static electricity from your body by touching the...

Page 23: ...ill appear 5 Press the PAUSE key and the issue count setting display will appear Set the issue count with the FEED or RESTART key 6 Press the PAUSE key and the print speed setting display will appear Set the print speed with the FEED or RESTART key 7 Press the PAUSE key and the sensor type setting display will appear Select the sensor type with the FEED or RESTART key 8 Press the PAUSE key and the...

Page 24: ...rint the specified issue counts of the slant lines 3 dots 15 Press the FEED key and PAUSE key and the printer will print the specified issue counts of the characters of various sizes 16 Press the FEED key and PAUSE key and the printer will print the specified issue counts of the bar codes 17 Press the FEED key and PAUSE key and the printer will print the specified issue counts of blank labels 18 P...

Page 25: ...ng the test print operation turn the printer s power OFF then back to ON and check that the LCD Message Display shows ON LINE and that the ON LINE and POWER LED lights are illuminated Sample of the slant line 1 dot test print label Sample of the slant line 3 dots test print label Sample of the character test print label ...

Page 26: ...2 PRINTER SETUP ENGLISH VERSION EO1 33034 2 10 Test Print E2 16 2 10 Test Print Cont Sample of the bar code test print label Sample of the factory test label ...

Page 27: ...32 characters can be displayed on two lines There are three LED lights on the operation panel LED Illuminates when Flashes when POWER The printer is turned on ON LINE The printer is ready to print The printer is communicating with your computer ERROR Any error occurs with the printer The ribbon is nearly over See NOTE There are three keys on the operation panel PAUSE Used to stop printing temporar...

Page 28: ...media to be printed 5 When the RESTART key is pressed the printer resumes printing A reset operation clears the print data sent from the computer to the printer and returns the printer to an idle condition 1 The printer is turned on standing by or printing 2 To stop printing or clear the data sent from the computer press the PAUSE key The printer stops printing 3 Press and hold the RESTART key for...

Page 29: ...n Dump mode any characters sent from the host computer will be printed Received characters are expressed in hexadecimal values This allows the user to verify programming commands and debug the program For details please refer to your nearest TOSHIBA TEC service representative ...

Page 30: ...ances from the internal part of the printer 8 Wipe the Feed Gap Sensor and Black Mark Sensor with a dry soft cloth WARNING 1 Be sure to disconnect the power cord before performing maintenance Failure to do this may cause an electric shock 2 To avoid injury be careful not to pinch your fingers while opening or closing the cover and print head block 3 The print head becomes hot immediately after pri...

Page 31: ...e the jammed paper 4 Clean the Cutter with a soft cloth slightly moistened with alcohol 5 Reassemble the Cutter Module in the reverse order of removal CAUTION 1 DO NOT POUR WATER directly onto the printer 2 DO NOT APPLY cleaner or detergent directly onto any cover or panel 3 NEVER USE THINNER OR OTHER VOLATILE SOLVENT on the plastic covers 4 DO NOT clean the panel covers or the supply window with ...

Page 32: ... humidity dust or gas The thermal paper used for direct thermal printing must not have specifications which exceed Na 800 ppm K 250 ppm and Cl 500 ppm Some ink used on pre printed media may contain ingredients which shorten the print head s product life Do not use labels pre printed with ink which contain hard substances such as carbonic calcium CaCO3 and kaolin Al2O3 2SiO2 2H2O For further inform...

Page 33: ...n the printer off and then on Then select the Media Sensor for the media being used Finally resend the print job 3 Adjust the sensor position Then press the RESTART key 4 Replace the loaded media with one that matches the programmed size then press the RESTART key or turn the printer off and then on select a programmed size that matches the loaded media Finally resend the print job 5 Refer to Sect...

Page 34: ...epresentative 5 2 Possible Problems This section describes problems that may occur when using the printer and their causes and solutions Possible Problems Causes Solutions The printer will not turn on 1 The Power Cord is disconnected 2 The AC outlet is not functioning correctly 3 The fuse has blown or the circuit breaker has tripped 1 Plug in the Power Cord 2 Test with a power cord from another el...

Page 35: ...and media 6 Remove the jammed media from the printer DO NOT USE any sharp implements or tools as these could damage the printer 7 Clean the Print Head and Platen then remove any further dust or foreign substances 8 Paper jams in the Cutter Unit can be caused by wear or residual glue from label stock on the cutter Do not use non specified media in the cutter CAUTION Do not use any tool that may dam...

Page 36: ... tags have been issued The media will continue to be fed until the PAUSE key is released Threshold setting for the selected sensor is completed by this operation 9 Press the RESTART key 10 The printer is in stand by 11 Send an issue command from the PC to the printer 21 1 6 7 9 3 86 6 7 9 75 160 66 9 6 7 9 5 7 9 6 7 9 75 160 66 9 6 7 9 3 86 6 7 9 21 1 6 7 9 21 1 6 7 9 NOTES 1 If the PAUSE key is r...

Page 37: ...0 mm 4 1 inches Batch Cut Cut mode is enabled only when the optional Cutter Module is installed Strip Strip mode is enabled only when the optional Strip Module is installed 16 characters 2 lines 291 mm 460 mm 308 mm 11 5 18 1 12 1 39 7 lb 18 kg Media and ribbon are not included JAN8 JAN13 EAN8 EAN8 2 digits EAN8 5 digits EAN13 EAN13 2 digits EAN13 5 digits UPC E UPC E 2 digits UPC E 5 digits UPC A...

Page 38: ...rd ATA standard Flash memory card 1MB and 4MB cards See Section 2 9 Built in LAN interface board B 9700 LAN QM This board enables the printer to be used in a LAN network USB interface board B 9700 USB QM Installing this board enables a connection to a PC which has a USB interface A1 3 Media Please make sure that the media being used is approved by TOSHIBA TEC The warranty does not apply when a pro...

Page 39: ...re diameter Ø76 2 0 3 A1 3 2 Detection Area of the Transmissive Sensor The Transmissive Sensor is movable from the centre to the left edge of media The Transmissive Sensor detects a gap between labels as illustrated below Label NOTES 1 To ensure print quality and print head life use only TOSHIBA TEC specified media 2 The media length specifications for use of the cutter are 1 When issuing a label ...

Page 40: ...ck Mark A1 3 4 Effective Print Area The figure below illustrates the relation between the head effective print width and media width Sensor should be positioned at the centre of the black mark Centre of media Min 12 mm Media feed direction Min 2 0 mm Sensor is movable within this range 4 mm 112 mm Max media width 104 mm 0 2 Head Effective Print Range Out of print range Out of print range 4 mm Dete...

Page 41: ...int on the 1 5 mm wide area from the media edges shaded area in the above figure Printing this area may cause ribbon wrinkles resulting in a poor print quality of the guaranteed print area 2 The centre of media is positioned at the centre of the Print Head 3 Print quality in the 3 mm area from the print head stop position including 1 mm non printable area for print speed slow down is not guarantee...

Page 42: ...es 6 CUTTER ERROR z A problem has occurred with the cutter module Yes Yes 7 NO PAPER z The media has run out or the media is not loaded properly Yes Yes 8 NO RIBBON z The ribbon has run out Yes Yes 9 HEAD OPEN z Feed or printing was attempted with the print head block open Yes Yes 10 HEAD ERROR z There is a problem with the print head Yes Yes 11 EXCESS HEAD TEMP z The print head is overheated No Y...

Page 43: ...layed However LF and NUL will not be displayed Example 1 ESC T20 G30 LF NUL Command error The following message appears Example 2 ESC XR 0200 0300 0450 1200 1 LF NUL Command error The following message appears Example 3 ESC PC001 0A00 0300 2 2 A 00 B LF NUL Command error The following message appears When the error command is shown 3FH appears for codes other than codes 20H to 7FH and A0H to DFH 7...

Page 44: ...ion The serial data cable used to connect the printer to the host compute should be one of the following two types NOTE Use an RS 232C cable with the connector including inch type securing screws for the QQ model or metric type securing screws for the QP model DB 9S Connector to PC Pin No Signal 1 N C 2 RXD 3 TXD 4 DTR 5 GND 6 DSR 7 RTS 8 CTS 9 N C Housing Shield DB 25P Connector to Printer Pin No...

Page 45: ...APPENDIX 4 PRINT SAMPLES ENGLISH VERSION EO1 33034 APPENDIX 4 PRINT SAMPLES EA4 1 APPENDIX 4 PRINT SAMPLES Font ...

Page 46: ...T SAMPLES EA4 2 APPENDIX 4 PRINT SAMPLES Cont Bar codes JAN8 EAN8 MSI Interleaved 2 of 5 CODE39 Standard NW7 JAN13 EAN13 UPC E EAN13 2 digits EAN13 5 digits CODE128 CODE39 Full ASCII CODE93 UPC E 2 digits UPC E 5 digits EAN8 2 digits EAN8 5 digits UPC A UPC A 2 digits ...

Page 47: ...PPENDIX 4 PRINT SAMPLES Cont UPC A 5 digits UCC EAN128 Industrial 2 of 5 POSTNET Customer bar code Customer bar code of high priority KIX Code RM4SCC RSS 14 RSS 14 Stacked RSS 14 Stacked Omnidirectional RSS Limited RSS Expanded Data Matrix PDF417 QR code Micro PDF417 MaxiCode CP Code ...

Page 48: ...t after a set number of media have been printed Cutter module A device used to cut the media DPI Dot Per Inch The unit used to express print density Expansion I O interface An optional interface circuit that may be installed into printer to allow the printer to be connected to an external device such as a wrapping machine and to receive feed print start and pause signals from the external device a...

Page 49: ...rinting it is heated by the thermal print head causing an image to be transferred onto the media Strip mode A device used to remove labels from the backing paper Supply Media and ribbon Tag A type of media with no adhesive Usually tags are made of cardboard or other durable material Thermal direct printing A printing method using no ribbon but thermal media which reacts to heat The thermal print h...

Page 50: ...print area A1 5 H Head lever 1 4 2 6 I Interface 2 3 A1 1 A3 1 Issue mode 2 9 A1 1 J Jammed media 5 3 L Label 2 6 A1 2 A1 3 LCD message display 1 3 1 4 3 1 M Media 2 6 4 3 A1 2 Media length A1 3 Media pitch A1 3 Media sensor 2 8 O ON LINE LED 1 4 3 1 Operation Panel 1 3 1 4 3 1 P Parallel interface 1 3 Parallel port 2 3 PAUSE key 1 4 3 1 PCMCIA card 2 12 PCMCIA interface board 2 12 A1 2 Platen 1 4...

Page 51: ... 3 Strip mode 2 9 Strip module 2 9 A1 2 Supply voltage A1 1 T Tag A1 2 Test print 2 13 Thermal direct 2 13 A1 1 Thermal transfer 2 13 A1 1 Threshold setting 5 4 Transmissive sensor 2 13 A1 3 Two dimensional code A1 1 U USB interface 1 3 2 3 A1 2 W Weight A1 1 ...

Page 52: ......

Page 53: ......

Page 54: ...M EO1 33034 ...

Reviews: