background image

177

Toshiba Utilities

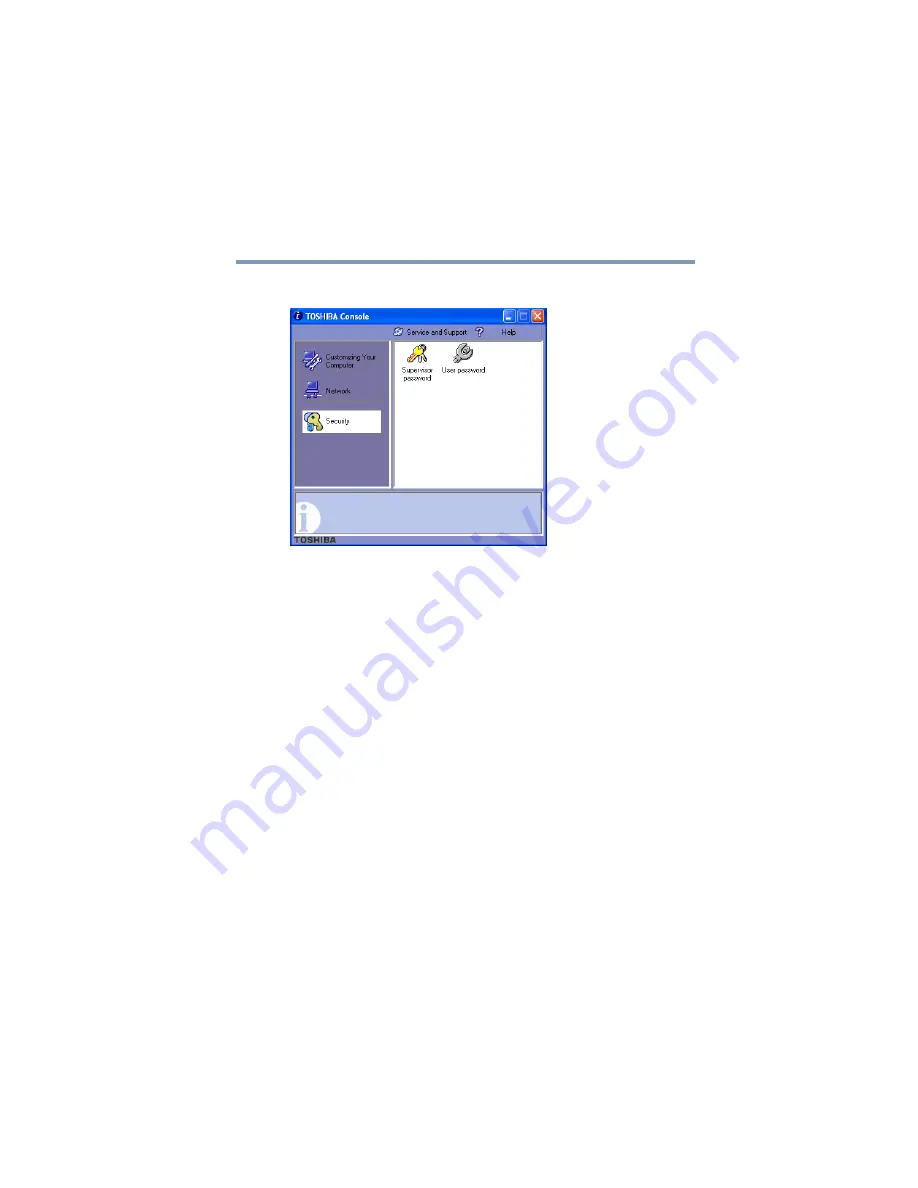
Using a supervisor password

5.375 x 8.375 ver 2.3

3

Select 

Security

.

Sample TOSHIBA Console Security window

4

Click the 

Supervisor password

 icon.

5

Select 

Not Registered

.

6

Enter the correct password.

7

Click 

OK

, then click 

OK 

again to exit.

Summary of Contents for TE2300 Series

Page 1: ...7 Calling from outside the United States 949 859 4273 For more information see If Something Goes Wrong on page 178 in this guide Handling the cord on this product will expose you to lead a chemical known to the State of California to cause birth defects or other reproductive harm Wash hands after handling C6668 0304M2 03 04 ...

Page 2: ...n the hard disk or other storage devices as a precaution against possible failures alteration or loss of the data IF YOUR DATA IS ALTERED OR LOST DUE TO ANY TROUBLE FAILURE OR MALFUNCTION OF THE HARD DISKDRIVE OR OTHER STORAGE DEVICES ANDTHE DATA CANNOT BE RECOVERED TOSHIBA SHALL NOT BE LIABLE FOR ANY DAMAGE OR LOSS OF DATA OR ANY OTHER DAMAGE RESULTING THEREFROM WHEN COPYING OR TRANSFERRING YOUR ...

Page 3: ...measures Reorient or relocate the receiving antenna Increase the separation between the equipment and receiver Connect the equipment to an outlet on a circuit different from that to which the receiver is connected Consult the dealer or an experienced radio TV technician for help Only Peripherals complying with the FCC Class B limits may be attached to this equipment Operation with noncompliant per...

Page 4: ...he applicable FCC part 68 rules and requirements adopted by the ACTA A compliant telephone cord and modular plug is provided with this product It is designed to be connected to a compatible modular jack that is also compliant The REN is used to determine the number of devices that may be connected to a telephone line Excessive RENs on a telephone line may result in the devices not ringing in respo...

Page 5: ...of Toshiba or the Toshiba Support Centre within the United States at 800 457 7777 or Outside the United States at 949 859 4273 If the equipment is causing harm to the telephone network the telephone company may request that you disconnect the equipment until the problem is resolved Disconnection If you should ever decide to permanently disconnect your modem from its present line please call the te...

Page 6: ...ertified equipment should be coordinated by a representative designated by the supplier Any repairs or alterations made by the user to this equipment or equipment malfunctions may give the telecommunications company cause to request the user to disconnect the equipment Users should ensure for their own protection that the electrical ground connections of the power utility telephone lines and inter...

Page 7: ... experience any such problem immediately turn off either one of your Bluetooth or Wireless LAN Please contact Toshiba PC product support on Web site http www toshiba europe com computers tnt bluetooth htm in Europe or http www pcsupport global toshiba com in the United States for more information This device is restricted to indoor use due to its operation in the 5 15 GHz to 5 85 GHz frequency ran...

Page 8: ...that it does not emit RF field in excess of Health Canada limits for the general population consult Safety Code 6 obtainable from Health Canada s Web site www hc sc gc ca rpb The RF device shall not be co located with any other transmitter that has not been tested with this device Operation is subject to the following two conditions 1 this device may not cause interference and 2 this device must a...

Page 9: ... for public usage outside building For registration and license please contact IBPT BIPT Gebruik buiten gebouw alleen op kanalen 10 2457 MHz en 11 2462 MHz Voor privé gebruik buiten gebouw over publieke groud over afstand kleiner dan 300m geen registratie bij BIPT IBPT nodig voor gebruik over afstand groter dan 300m is wel registratie bij BIPT IBPT nodig Voor publiek gebruik buiten gebouwen is lic...

Page 10: ...ie Vorgehensweise abstimmen France Restricted frequency band only channels 10 and 11 2457 MHz and 2462 MHz respectively may be used in France License required for every installation indoor and outdoor installations Please contact ART for procedure to follow Bande de fréquence restreinte seuls les canaux 10 à 11 2457 MHz et 2462 MHz respectivement doivent être utilisés en France Toute utili sation ...

Page 11: ...GHz frequency band must be integral antenna which provide no access to the end user Refer to the Regulatory Statements as identified in the documentation that comes with those products for additional information Caution Radio Frequency Interference Requirements This device is restricted to indoor use due to its operation in the 5 15 GHz to 5 25 GHz frequency range FCC requires this product to be u...

Page 12: ...ystems premises radio station and specified low power radio station 1 Sticker Please put the following sticker on devices incorporating this product 2 Indication The indication shown below appears on this equipment 1 2 4 This equipment uses a frequency of 2 4 GHz 2 DS This equipment uses DS SS modulation 3 The interference range of this equipment is less than 40m 4 This equipment uses a frequency ...

Page 13: ... or modify the device Do not install the embedded wireless module into other device Interference Statement This equipment has been tested and found to comply with the limits for a Class B digital device pursuant to Part 15 of the FCC Rules These limits are designed to provide reasonable protection against harmful interference in a residential installation This equipment generates uses and can radi...

Page 14: ...tion substitution or attachment will be the responsibility of the user The following information is dependent on what type of wireless device is in your computer Approved Countries Regions for use for the Atheros AR5001X Mini PCI Wireless network adapter This equipment is approved to the radio standard by the countries regions in the following table Do not use this equipment except in the countrie...

Page 15: ...countries regions in the following table Australia Austria Belgium Canada Denmark Finland France Germany Greece Ireland Italy Liechtenstein Luxembourg Netherlands New Zealand Norway Portugal Sweden Switzerland UK USA Canada USA Argentina Australia Austria Belgium Brazil Canada Chile Denmark Finland France Germany Greece Iceland Ireland Italy Japan Liechtenstein Luxembourg Mexico Netherlands New Ze...

Page 16: ...with any product with Bluetooth wireless technology that is based on Frequency Hopping Spread Spectrum FHSS radio technology and is compliant to Bluetooth Specification Ver 1 1 as defined and approved by The Bluetooth Special Interest Group Logo certification with Bluetooth wireless technology as defined by The Bluetooth Special interest Group Australia Austria Belgium Canada Denmark Finland Franc...

Page 17: ...for more information Bluetooth and Wireless LAN devices operate within the same radio frequency range and may interfere with one another If you use Bluetooth and Wireless LAN devices simultaneously you may occasionally experience a less than optimal network performance or even lose your network connection If you should experienceanysuchproblem immediatelyturnoffeitheroneofyourBluetooth or Wireless...

Page 18: ...mplies with the following European Union EU and EFTA This equipment complies with the R TTE directive 1999 5 EC and has been provided with the CE mark accordingly Canada Industry Canada IC This device complies with RSS 210 of Industry Canada Operation is subject to the following two conditions 1 this device may not cause interference and 2 this device must accept any interference including interfe...

Page 19: ...ents as identified in the documentation that comes with those products for additional information The Bluetooth Card from TOSHIBA is far below the FCC radio frequency exposure limits Nevertheless it is advised to use the Bluetooth Card from TOSHIBA in such a manner that human contact during normal operation is minimized Changes or modifications made to this equipment not expressly approved by TOSH...

Page 20: ...econd generation low power data communication systems such as this equipment overlaps that of mobile object identification systems premises radio station and specified low power radio station 1 Sticker Please put the following sticker on devices incorporating this product 2 Indication The indication shown below appears on this equipment 1 2 4 This equipment uses a frequency of 2 4 GHz 2 FH This eq...

Page 21: ... 01NYDA1305 The following restrictions apply Do not disassemble or modify the device Do not install the embedded wireless module into other device DVD ROM multi function drive safety instructions The DVD ROM and multi function drives employ a laser system To ensure proper use of this product please read this instruction manual carefully and retain for future reference Should the unit ever require ...

Page 22: ...wner s manual may result in hazardous radiation exposure Copyright This guide is copyrighted by Toshiba America Information Systems Inc with all rights reserved Under the copyright laws this guide cannot be reproduced in any form without the prior written permission of Toshiba No patent liability is assumed however with respect to the use of the information contained herein 2003 by Toshiba America...

Page 23: ...ORMATION CONTAINED HEREIN OR THE USE THEREOF Trademarks AccuPoint II Fn esse Noteworthy InTouch and SelectBay are registered trademarks SelectServ and Ask IRIS Online are trademarks of Toshiba America Information Systems Inc and or Toshiba Corporation IBM and Wake on LAN are registered trademarks and PS 2 is a trademark of IBM Corporation MS DOS Microsoft Windows Windows XP Media Player DirectX an...

Page 24: ...mation This product contains mercury Disposal of this material may be regulated due to environmental considerations For disposal reuse or recycling information please contact your local government or the Electronic Industries Alliance at www eiae org ...

Page 25: ...ing a place to work 37 Creating a computer friendly environment 37 Keeping yourself comfortable 38 Other precautions 41 Setting up your computer 42 Connecting to a power source 43 Turning on the computer 46 Opening the display panel 46 Turning on the power 46 Setting up your software 47 Registering your computer with Toshiba 48 Setting up other devices 48 ...

Page 26: ...e 56 Connecting a USB mouse 56 Connecting a PS 2 mouse 56 Using a PS 2 mouse simultaneously with AccuPoint II 57 Connecting a local printer 59 Setting up your printer 60 Connecting an external diskette drive 64 Connecting external speakers or headphones 64 Connecting a microphone 65 Adding memory 65 Installing a memory module 66 Removing a memory module 68 Using Slim SelectBay modules 69 Removing ...

Page 27: ...e 85 Starting a program 86 Starting a program from the Start menu 86 Starting a program from Windows Explorer 87 Starting a program from the Run dialog box 88 Saving your work 89 Printing your work 91 Using a compact disc drive 92 Inserting compact discs 94 Removing compact discs 96 Caring for CDs and DVDs 96 Using PC Cards 97 Hot swapping 97 Using your computer at the office 98 Using a computer l...

Page 28: ...f your battery 120 Safety precautions 120 Maximizing battery life 121 Disposing of used batteries safely 122 Conserving power 123 Power usage modes in Windows XP 124 Using a hot key to set the power usage mode 124 Additional options for power 125 Chapter 5 Exploring Your Options 126 Exploring the desktop 126 Finding your way around the desktop 126 Exchanging data with another computer 129 Transfer...

Page 29: ...Expansion Options 144 Devices for office computing 144 Connecting external optional devices 145 Using an external keyboard 145 Making your external keyboard emulate the Fn key 146 Using a mouse 146 Connecting a serial mouse 146 Connecting a USB mouse 147 Connecting a PS 2 mouse 147 Using a PS 2 mouse simultaneously with AccuPoint II 148 Using a printer 149 Connecting a parallel printer 150 Setting...

Page 30: ...Changing or removing existing key assignments 164 Hotkey utility 164 TOSHIBA Console 165 Customizing Your Computer 166 Network 166 Security 166 Power Management 166 Toshiba Mobile Extension 169 Mobile Extension Service 169 Toshiba Hardware Setup 170 TOSHIBA Power Saver utility 172 Enabling Hibernation 172 Setting user passwords 173 Using an instant password 174 Setting a user password 174 Disablin...

Page 31: ...n your own 185 Fixing a problem with Device Manager 186 Memory problems 188 Power and the batteries 189 Keyboard problems 190 Display problems 191 Disk drive problems 193 DVD ROM or multi function drive problems 195 Sound system problems 196 PC Card problems 197 Printer problems 200 Modem problems 201 Develop good computing habits 202 If you need further assistance 203 Before you call 203 Contacti...

Page 32: ...ix B Power Cable Connectors 214 Appendix C Using ConfigFree with your Toshiba Computer 215 Getting Started 216 ConfigFree Main Screen 216 Starting ConfigFree 217 Configuring ConfigFree 217 ConfigFree Utilities 218 Connectivity Doctor 218 Device Settings 219 Profile Settings 221 Quick Connect 222 Using Auto Switch 223 Auto Switch Cable Disconnect 224 Auto Switch SSID 224 Glossary 225 Index 240 ...

Page 33: ...essional already installed on your computer Your operating system offers exciting features and easy Internet access While Toshiba has made every effort at the time of publication to ensure the accuracy of the information provided herein product specifications configurations prices system component options availability are all subject to change without notice For the most up to date product informa...

Page 34: ...r interests you most Safety icons This guide contains safety instructions that must be observed in order to avoid potential hazards that could result in personal injuries damage to your equipment or loss of data These safety cautions have been classified according to the seriousness of the risk and the icons highlight these instructions as follows Indicates an imminently hazardous situation which ...

Page 35: ...tional information TECHNICAL NOTE This icon indicates technical information about the computer HINT This icon indicates helpful hints and tips DEFINITION This icon indicates the definition of a term used in the text Other documentation Your computer comes with the following documentation in addition to this user s guide An electronic version of the user s guide Look for the user s guide icon on yo...

Page 36: ...erating system documentation which explains the features of the operating system Service options Toshiba offers a full line of service options built around its SelectServTM limited warranty programs To stay current on the most recent software and hardware options for your computer and for other product information be sure to regularly check the Toshiba Web site at pcsupport toshiba com If you have...

Page 37: ... provides guidelines for setting up your computing environment Creating a computer friendly environment Place the computer on a flat surface that is large enough for the computer and any other items you need to use such as a printer Leave enough space around the computer and other equipment to give adequate ventilation otherwise they may overheat To keep your computer in prime operating condition ...

Page 38: ...change such as air conditioner vents or heaters Extreme heat cold or humidity Operate the computer within a temperature range of 41 degrees to 95 degrees Fahrenheit 5 degrees to 35 degrees Celsius and 20 percent to 80 percent non condensing humidity Keeping yourself comfortable Strain and stress injuries are becoming more common as people spend more time using their computers However with a little...

Page 39: ... no higher than eye level If you use a paper holder set it at the same height and distance as the screen Seating and posture When using your computer maintain good posture with your body relaxed and your weight distributed evenly Proper seating is a primary factor in reducing work strain Some people find a backless chair more comfortable than a conventional chair Whichever type you choose use the ...

Page 40: ...ly stores Sit with your back straight so that your knees hips and elbows form approximately 90 degree angles when you work Do not slump forward or lean back too far Lighting Proper lighting can improve the readability of the display and reduce eyestrain Position the display panel or external monitor so that sunlight or bright indoor lighting does not reflect off the screen Use tinted windows or sh...

Page 41: ...oid performing repetitive activities for long periods Intersperse such activities with other tasks Focusing your eyes on your computer screen for long periods can cause eyestrain Look away from the computer frequently and focus your eyes on a distant object for at least 30 seconds Other precautions Your computer is designed to optimize safety minimize strain and withstand the rigors of portability...

Page 42: ...rnal components to your computer These components include but are not limited to a mouse keyboard printer memory and PC cards Your computer comes with a rechargeable battery pack that must be charged before you can use it To use external power or to charge the battery you must attach the AC adapter See Connecting to a power source on page 43 To register your computer online or to sign up for an In...

Page 43: ...r from an external AC power source and to charge the computer s batteries Sample power cable and AC adapter Handling the cord on this product will expose you to lead a chemical known to the State of California to cause birth defects or other reproductive harm Wash hands after handling Hold the power cable by its plug when you connect disconnect it Do NOT pull the cable itself Doing so may damage t...

Page 44: ...puter always follow the steps in the exact order as described in the User s Manual Connecting the power cable to a live electrical outlet should be the last step otherwise the adapter DC output plug could hold an electrical charge and cause an electrical shock or minor bodily injury when touched As a general safety precaution avoid touching any metal parts To connect AC power to the computer 1 Con...

Page 45: ... amber during charging either the battery pack is malfunctioning or it is not receiving input from the AC power supply Disconnect the AC cable and remove the battery pack See If Something Goes Wrong on page 178 for troubleshooting information Damaged power cables can cause fire or electric shock Never modify forcibly bend place heavy objects on top of or apply heat to the power cable If the power ...

Page 46: ...y to power the computer Once the battery is charged for the first time avoid leaving the computer plugged in and turned off for more than a few hours at a time Continuing to charge a fully charged battery can damage the battery Turning on the computer The computer is now ready for you to turn it on and begin using it Opening the display panel 1 Slide the display latch to the right 2 Lift the displ...

Page 47: ... system indicator panel glows green about one second Turning on the power 4 The preinstalled operating system will load automatically When you turn on the computer for the first time do not turn off the power again until the operating system has loaded completely Setting up your software The first time you turn on your computer the Setup Wizard guides you through steps to set up your software 1 Fr...

Page 48: ...system Setting up other devices You may want to take this time to set up your printer For more information see Setting up your printer on page 150 Turning off the computer It is generally a good idea to turn off your computer when you are not using it If you are using the computer for the first time leave the computer plugged into a power source even though the computer is off to fully charge the ...

Page 49: ...hile any drive is in use Doing so may damage the media in use and result in loss of data Closing the display panel When you are finished shut the computer down and close the display panel to keep dust and dirt out of the computer If you close the computer while it is still on these actions will occur If you have the LCD power saver feature set the LCD panel will automatically turn off until you op...

Page 50: ...external display devices to one of two available video ports A television via the video out composite port A video display device such as a video projection unit via the video out composite port An external monitor or projector via the RGB monitor port Before connecting a television video projector monitor or other display device configure your computer for the type of device you re connecting To ...

Page 51: ...ort you ll need to purchase a composite video cable For the best video quality always use a properly shielded cable HINT Toshiba recommends using a cable no longer than 20 feet approximately six meters Using a poor quality cable may result in a dull or fuzzy picture poor color ghosting video noise or loss of video Connecting to the video out composite port Video cables are not included with your c...

Page 52: ...een To do this 1 Connect the monitor s video cable to the RGB port on the back of the computer 2 Connect the device s power cable to a live electrical outlet 3 Turn on the external device 4 Set the display mode by pressing Fn F5 or by setting the Display Properties settings For more information see Directing the display output when you turn on the computer below Directing the display output when y...

Page 53: ...hese settings using the Display Properties Box Set the option for the video controller by clicking Start then Control Panel then Appearance and Themes and clicking Display Choose the Settings tab click the Advanced button select Intel Extreme Graphics select Graphics Properties select the applicable Monitor type click Apply or OK For more information on switching the display output see Connecting ...

Page 54: ...ideo device If the external video device such as an SVGA monitor is capable of displaying at a maximum resolution of 640 x 480 and your system is set for a higher resolution only part of the desktop will appear on the screen You can view the lost area by scrolling to it Since most televisions and video projectors overscan by 15 to 20 percent some of the desktop will be outside the viewing area You...

Page 55: ...nless you purchase an optional Y cable Connecting a Y cable to the computer s PS 2 port allows you to connect a PS 2 compatible mouse and a PS 2 compatible keyboard simultaneously Alternatively you can connect a USB keyboard and mouse to the USB ports Making your external keyboard emulate the Fn key An external keyboard does not have the Fn key contained on the computer s built in keyboard If you ...

Page 56: ...ect the mouse cable to the serial port at the back of the computer Once connected the mouse is ready to use Refer to your mouse documentation for configuration information Connecting a USB mouse To connect a USB mouse connect the mouse cable to the USB port on the computer Once connected the mouse is ready to use Connecting a PS 2 mouse Make sure the computer is off before you attach the mouse Con...

Page 57: ... II set this up when you have loaded the operating system Using a PS 2 mouse simultaneously with AccuPoint II When you connect a PS 2 compatible mouse to the PS 2 port you may use the mouse the AccuPoint II or both When connecting any PS 2 device turn off your computer to prevent any possible hardware damage If you connect a PS 2 mouse to the computer while it is in Standby mode you will not be ab...

Page 58: ...use to work with the computer at the same time You must reboot the computer for the settings to take effect HINT When Auto selected is the default the computer can not detect a PS 2 mouse if you connect it after booting the computer This can be changed in Toshiba Hardware Setup 5 Click OK A message appears stating The changes will take effect next time the machine is rebooted Reboot the machine no...

Page 59: ...ompliant make sure your printer cable is an IEEE 1284 cable Your printer documentation may require you to install the printer software before physically connecting the printer to your computer If you do not install the software as instructed by the printer manufacturer the printer may not function correctly Never connect the printer cable while the computer s power is on Doing so may damage the pr...

Page 60: ...uter s parallel port Use the printer cable illustration as a connection guide Identifying the ends of a parallel printer cable 3 Plug the printer s power cable into a live electrical outlet 4 See your printer documentation for additional configuration steps Setting up your printer Setting up a printer usually involves selecting a printer driver This special program acts as a translator that turns ...

Page 61: ... on your computer The manufacturer s disk may include additional drivers and fonts TECHNICAL NOTE Some printers require a specific installation process In this case the Windows XP operating system Add Printer Wizard will display an error message If this happens refer to your printer installation guide for further instructions To set up a printer with the Add Printer Wizard 1 Click Start and click ...

Page 62: ...ystem recognizes it automatically You can ignore the remainder of this section See your printer manual 4 If the printer you are setting up Is not connected to a network select Local printer attached to this computer Is connected to a network select Network printer or a printer attached to another computer 5 Click Next The Add Printer Wizard looks for a Plug and Play printer If it does not locate o...

Page 63: ...enough to help you tell the difference 9 If you want this printer to be The default printer click Yes Available when specifically requested click No 10 Click Next 11 Click Finish The Windows XP operating system prints a test page 12 To complete the setup click OK You are now ready to print Depending on your program you may see various messages indicating the status of your print job For informatio...

Page 64: ...onnect an optional external USB diskette drive connect the cable to one of the USB ports Connecting an optional external USB diskette drive Connecting external speakers or headphones To attach an external stereo output device 1 Locate the headphone jack on the front of the computer 2 Using any necessary adapters plug the cable from the external audio device into the headphone jack The headphone ja...

Page 65: ... computer is equipped with up to two memory module The two memory slots in this computer provide various memory configurations When additional memory is added or original memory replaced it is recommended that you use only compatible memory In the event original memory is replaced with invalid memory the system will beep and will not boot beyond the BIOS memory check A message may display If this ...

Page 66: ...amaging the computer s screws use a standard Phillips no 1 screwdriver that is in good condition The computer has two memory expansion slots Slot A and Slot B You can install one or two memory modules 1 Shut down your computer completely using the Shut Down command See Powering down the computer on page 101 2 Unplug the computer Installing a memory module with the computer s power on may damage th...

Page 67: ... discharge any static electricity you may have built up To avoid damaging the memory module be careful not to touch its pin connector on the side you insert into the computer 6 Remove the new memory module from its antistatic packaging 7 Insert the memory module in the slot and gently press it down into place The clips on either side of the module will click to secure the module ...

Page 68: ...tart it When you turn on the computer it automatically recognizes the additional memory Removing a memory module If you need to remove a memory module 1 Complete steps 1 6 in Installing a memory module to shut down the computer and open the memory module cover 2 Pull the clips away from the memory module The memory module pops partially out of the slot ...

Page 69: ... Slim SelectBay modules The Slim SelectBay gives you additional flexibility By inserting and removing Slim SelectBay modules you can configure your computer for the task at hand without having to carry unnecessary components with you when you travel For example any one of several modules can be used in the Slim SelectBay CD ROM drive DVD ROM drive The DVD ROM drive can also be used as a standard C...

Page 70: ... your system or visit toshiba com Removing a module from the Slim SelectBay Use caution when lifting or turning your computer Failure to do so may result in damage to components such as cables attached to your computer or to the computer itself 1 Turn off the computer You may also hot swap a module in the Slim SelectBay Stop the module by clicking the Safely Remove Hardware icon on the System Tray...

Page 71: ...when no other module is installed in the Slim SelectBay Inserting a module into the Slim SelectBay To install a module into the Slim SelectBay simply slide the module all the way into the Slim SelectBay Inserting and removing hard drives Depending upon the original hard drive installed in your computer you may wish to increase storage capacity You may add hard drive types based on those available ...

Page 72: ...command See Powering down the computer on page 101 2 Unplug the computer 3 Close the display panel and remove any cables you may have connected 4 Turn the computer upside down 5 Remove the screw on the hard drive cover Removing the hard drive cover screw 6 Lift the hard drive bay cover to expose the hard drive 7 Grasp the plastic tab on the exposed edge of the hard drive and pull it to remove the ...

Page 73: ...he computer 8 Install the new hard drive by sliding it into the hard drive bay and pressing it firmly until it locks Do not force the drive into the computer Inserting the new hard disk drive 9 Replace the hard drive cover and tighten the screw removed in step 5 above ...

Page 74: ...sult in damage to components such as cables attached to your computer or to the computer itself Before you insert a PC Card refer to the documentation that comes with the card to see if you need to do anything before you insert it To insert a PC Card 1 Turn off the computer You may also hot swap a PC Card Stop the PC Card by clicking the Safely Remove Hardware icon on the System Tray After the PC ...

Page 75: ...wer part of the slot Inserting a PC Card 5 When the card is almost all the way into the slot push firmly but gently to ensure a firm connection with the computer Do not force the card into position 6 To lock the PC Card in its slot locate the PC Card lock and slide the lock into the locked position To obtain additional security for your computer see Using a computer lock on page 98 Locking the PC ...

Page 76: ...r slot 3 Press the PC Card eject button once to extend it and push it in to remove the PC Card Press the PC card ejection button once to extend it The PC Card ejects slightly from the slot 4 Grasp the edges of the PC Card and slide it out of the slot Setting up a PC Card for your computer Some PC Cards are ready to use as soon as you install them Others such as hard disk cards network cards and SC...

Page 77: ... LAN or WAN consult your network administrator Send a fax directly from your computer For more detailed information regarding your computer s modem visit Toshiba s Web site at toshiba com Connecting to a phone line Before you can communicate using the modem you need to connect it to a telephone line Your computer s built in modem port provides an RJ 11 jack allowing you to connect the modem to a s...

Page 78: ...designed for use with a standard analog telephone line Do not connect the modem to a digital telephone line A digital line will damage the modem Now you re ready to send a fax or use the modem to connect to an online service or the Internet For more information on using a modem see Setting up for communications on page 130 ...

Page 79: ...must restart your computer to reconnect or your battery runs out of charge while you are working you will lose all work since you last saved See Saving your work on page 89 for further information HINT Some programs have an automatic save feature that can be activated This feature saves your file to the hard disk at preset intervals See your software documentation for details Back up your files to...

Page 80: ...not turn off the computer if a drive indicator light indicates a drive is active Turning off the computer while it is reading from or writing to a disk may damage the disk the drive or both Before turning off the computer use the Turn Off Computer command or Standby command See Powering down the computer on page 101 to learn more about Standby The Windows XP operating system records information su...

Page 81: ...ter s keyboard layout is compatible with a standard full size keyboard it has fewer keys A standard full size keyboard has two Enter Ctrl and Alt keys editing keys cursor positioning keys and a numeric keypad Pressing the Fn key simultaneously in combination with one of the specially marked keys allows you to emulate a full size keyboard Your computer s keyboard has only one Enter and one Ctrl key...

Page 82: ...information see your program documentation Function keys The function keys not to be confused with the Fn key are the 12 keys at the top of the keyboard The function keys F1 through F12 are called function keys because they execute programmed functions when pressed Used in combination with the Fn key function keys marked with icons execute specific functions on the computer For more information se...

Page 83: ...keypad on a desktop computer s keyboard Numeric and cursor control overlay Using the overlay to type numeric data The keys with the numbers on their right front are the numeric overlay keys To turn the numeric overlay on press Fn and F11 simultaneously The numeric mode light on the keyboard indicator panel glows when the numeric overlay is on You can still use the overlay keys to type alphabetic c...

Page 84: ... left front are the cursor control overlay keys To turn the cursor control overlay on press Fn and F10 simultaneously The cursor control mode light on the keyboard indicator panel glows when the cursor control overlay is on To type alphabetic characters while the overlay is on For lowercase letters hold down Fn while you type the letters For uppercase letters hold down both Fn and Shift while you ...

Page 85: ...e 146 To move the cursor gently push the AccuPoint II pointing device in the direction you want the cursor to move Pushing harder on the AccuPoint II pointing device moves the cursor faster The primary AccuPoint II button corresponds to the primary typically left mouse button When a step instructs you to click or choose an item move the cursor to the item then press and release the primary AccuPoi...

Page 86: ...have four options You can Double click the icon for the program on your desktop Use the Start menu Use Windows Explorer or My Computer to locate the program file Use the Run dialog box The next three sections explain how to start a program from the Start menu Explorer and the Run dialog box Starting a program from the Start menu When you install a program the operating system usually puts an icon ...

Page 87: ...an easily see the content of each drive and folder on your computer To use this method you should know the file name and location of the program s executable file this file ends with exe This example opens Wordpad using its file name wordpad exe 1 Click Start then point to All Programs 2 Click Accessories 3 Click Windows Explorer 4 Click My Computer to expand it 5 In the left part of the window un...

Page 88: ...rdpad To close the program click the Close button in the upper right corner of the program s window Starting a program from the Run dialog box This example uses the Run command to start Wordpad 1 Click Start then click Run The Run dialog box appears Sample Run dialog box 2 In the Run dialog box If you know the program s location type the command line For a program in the Windows folder type just t...

Page 89: ...command line from the drop down list Saving your work Before you turn off the computer save your work on the hard disk drive or a diskette This is an important aspect of computing TECHNICAL NOTE Save your data even when you are using the Standby command in case the main battery discharges before you return to work Saving documents is quick and easy so it is a good idea to get in the habit of savin...

Page 90: ...dialog box to specify where to store the document and to give it a file name A sample Save As dialog box 2 Choose the drive and folder where you want your file to be stored 3 Type a file name then click Save HINT To make another copy of the file you are currently working with choose Save As from the File menu and give the new file a different name The Windows XP operating system supports file name...

Page 91: ...For example Microsoft Word saves files with a doc extension Any file name with an extension of doc is assumed to be a Microsoft Word file Creating your own extension is usually unwise since the program is unlikely to recognize a strange extension and may refuse to handle your file correctly Printing your work Your computer must be connected to the printer before you can print Depending on your typ...

Page 92: ...m displays a Print dialog box A sample Print dialog box 3 Specify the print parameters For example the range of pages and number of copies to print 4 Click Print Using a compact disc drive Your computer may have a DVD ROM drive or multi function drive If a DVD ROM or multi function drive is not currently installed in the Slim SelectBay follow the instructions in Using Slim SelectBay modules on pag...

Page 93: ...back to region 1 is counted as two changes For optimum DVD performance it is recommended that you play DVDs while running the computer on AC power Sample DVD CD ROM drive Drive in use indicator light Indicates when the CD ROM or DVD ROM drive is in use Eject button Press to release the disc tray The eject button does not function when the computer s power is off Do not press the eject button or tu...

Page 94: ...ess the eject button Pencil lead can break off inside the computer and damage it Inserting compact discs To insert a compact disc into the DVD ROM or CD ROM drive 1 Make sure the computer is turned on 2 Make sure the in use indicator light is off 3 Press the DVD ROM or CD ROM drive s eject button The disc tray slides partially out of the drive about 1 inch HINT The drive will not open if the compu...

Page 95: ... the center spindle until you feel it click into place Handle DVDs and CDs carefully making contact only with the center hole and edge Do not touch the surface of the disc Do not stack discs If you incorrectly handle the discs you could lose data 8 Make sure the disc is completely on the spindle and is lying flat on the tray If you insert the disc incorrectly it may jam the drive If this happens c...

Page 96: ... it 2 Pull the tray until it is fully open remove the disc and place it in its protective cover 3 Gently push the tray in to close it To remove a compact disc with the computer turned off 1 Insert a slender object such as a straightened paper clip into the manual eject hole 2 Gently pull the tray out until it is fully open remove the disc and place it in its protective cover 3 Gently push the tray...

Page 97: ...completely before inserting it in the drive Using PC Cards TECHNICAL NOTE For PCMCIA compatible PC Cards check the package to make sure they conform to the PCMCIA 2 1 standard or later Other cards may work with your computer but are likely to be much more difficult to set up and use For information on inserting or removing a PC Card see Inserting and removing PC Cards on page 74 Hot swapping With ...

Page 98: ... a mouse you can work with your notebook as if it were a standard office computer An external monitor or projector connects to the RGB port An external PS 2 compatible keyboard or a PS 2 mouse connects to the PS 2 port An optional Y cable lets you connect both devices to the port simultaneously Any serial device can connect to the serial port Using a computer lock For your own peace of mind you ma...

Page 99: ...place 4 Insert the cable s locking end into the security lock slot on the computer then give the key a quarter turn and remove it The computer is now securely locked Also any device in the PC Card slots are now secured to the computer by the locking mechanism Locking the computer Caring for your computer This section gives tips on cleaning and moving your computer For information about taking care...

Page 100: ...as ended the drive indicator light stops glowing and all external peripheral cables are disconnected Do not pick up the computer by its display panel or by the back where the ports are located Although your notebook computer is built to withstand reasonable shock and vibration transport it in a carrying case for long trips You can purchase a carrying case from your Toshiba dealer through the acces...

Page 101: ...e line on page 77 for details Powering down the computer Pushing the power button before shutting down the Windows operating system could cause you to lose your work Make sure the system indicator panel s disk light and the drive in use light are off If you turn off the power while a disk is being accessed you may lose data or damage the disk and or drive When you power down the computer you have ...

Page 102: ... a domain server Use the Shut down command when you are connected to a server When you start up again the computer runs a self test and loads the operating system You must open any programs and files you want to use Factors when choosing Turn Off or Shut down No power is used while the computer is shut down This is the most efficient mode if you will be away from your computer for an extended time...

Page 103: ...In addition you can shut down the computer by either pressing the power button or closing the display panel To use either of these methods you first need to turn it on in Toshiba s Power Saver utility 1 Click Start Control Panel then Performance and Maintenance 2 Click the Toshiba Power Saver icon 3 In the Running on batteries section click the Details button then the System Power Mode tab 4 Selec...

Page 104: ...h settings here button Click DC only to apply the settings only when you are using battery power Click All to apply the settings whenever when you are using battery power or outlet power 6 Click OK 7 Click OK again then close the Control Panel For more information about the Power Saver utility see TOSHIBA Power Saver utility on page 172 NOTE ...

Page 105: ...d disk takes longer than restoring it from memory When you start up again the computer runs a self test loads the operating system and then returns to the mode in which you left it Factors to consider when choosing Hibernation While in Hibernation mode the computer uses no battery power Because the mode of the system is held on the hard disk no data is lost if the main battery discharges When star...

Page 106: ... the computer will go into Hibernation mode when you press the power button When I close the lid Set thisoption toHibernation so that the computer will go into Hibernation mode when you close the display panel 6 Click the Override all Modes with settings here button Click DC only to apply the settings only when you are using battery power Click All to apply the settings whenever when you are using...

Page 107: ... power button until the on off light turns green The computer returns to the screen you were using If you put the computer in Hibernation mode by closing the display panel you can start it again by opening the display panel Using Standby The Standby command puts the computer into a power saving mode Standby holds the current mode of the computer in memory so that when you restart the computer you ...

Page 108: ...e your work first To power down the computer using the Standby command click Start Turn Off Computer and select Stand By Sample Turn Off Computer Windows dialog box If you hold down the Shift key StandBy becomes Hibernate in the Turn Off Computer dialog box To enter hibernation mode hold down the shift key while you select Hibernate The computer saves the status of all open programs and files turn...

Page 109: ...the Toshiba Power Saver icon 3 In the Running on batteries area click the Details button then select the System Power Mode tab 4 Select Standby for the options you want When I press the power button Set this option to Standby to put the computer into Standby mode when you press the power button When I close the lid Set this option to Standby to put the computer into Standby mode when you close the...

Page 110: ...button until the on off light changes to green The computer returns to the screen you were using If you put the computer in Standby mode by closing the display panel you can start it again by opening the display panel Toshiba s online resources Toshiba maintains a number of online sites to which you can connect These sites provide information about Toshiba products give help with technical questio...

Page 111: ...se features active allowing your computer to operate at is maximum energy efficiency so that you can use it for longer periods of time while traveling For more information on managing your power usage see Power usage modes in Windows XP on page 124 This chapter covers all the aspects of using your computer on battery power Running the computer on battery power The computer contains a removable Lit...

Page 112: ...is continuously operated on AC power either through an AC adapter or a docking station for an extended period more than a month the battery may fail to retain a charge It may not function efficiently over the expected life of the battery and the battery light may not indicate a low battery condition In addition to the main battery you may also have a second battery installed in the Slim SelectBay ...

Page 113: ...or cold To ensure that the battery charges to its full capacity wait until it reaches room temperature The battery is almost completely discharged Leave the power connected and the battery should begin charging after a few minutes The main battery charges the RTC battery During normal use the main battery keeps the RTC battery adequately charged Occasionally the RTC battery may lose its charge com...

Page 114: ... Toshiba service representative The battery can explode if not properly replaced used handled or disposed of Dispose of the battery as required by local ordinances or regulations It is seldom necessary to charge the RTC battery because it charges while the computer is on If the RTC battery is low the real time clock and calendar may display the incorrect time and date or stop working When Hibernat...

Page 115: ...INT Be careful not to confuse the battery light with the on off light When the on off light flashes amber it indicates that the system is suspended using Windows XP Standby command Displaying remaining battery power You can monitor the battery s remaining charge The computer calculates the remaining battery charge as it operates based on your current rate of power use To show remaining power 1 Cli...

Page 116: ...ge modes With repeated discharges and recharges the battery s capacity will gradually decrease A frequently used older battery will not power the computer for as long as a new battery even when both are fully charged HINT Wait at least 16 seconds after turning on the computer before trying to monitor the remaining battery power The computer needs this time to check the battery s remaining capacity...

Page 117: ...or more information see TOSHIBA Power Saver utility on page 172 What to do when the battery alarm sounds Your computer can be configured to warn you of a low battery charge condition so you may take the necessary steps to save your work Your Windows operating system offers two alarms before your system shuts down To change the default alarm settings 1 Click Start Control Panel then Performance and...

Page 118: ...battery packs don t drop or knock them Also be careful not to damage the casing or short circuit the terminals To change the battery 1 Save your work 2 Shut down and turn off the computer 3 Remove all cables connected to the computer 4 Turn the computer over 5 If the battery lock is in the locked position towards the center of the computer slide it towards the edge of the computer to unlock it 6 S...

Page 119: ... Disposing of used batteries safely on page 122 8 Insert the charged battery into the slot until the latch clicks The battery pack has been designed so that you cannot install it with reverse polarity If the battery does not slide into the slot easily move the battery release lock to the unlocked position and try again Do not force the battery into position 9 Reset the battery lock to the locked p...

Page 120: ...amage it Avoid touching the metal terminals of the battery with another metal object Short circuiting the battery can cause it to overheat and may cause damage to the battery or the computer Do not incinerate a spent battery as this could cause it to explode and release toxic materials If a battery is leaking or damaged replace it immediately Use protective gloves when handling a damaged battery T...

Page 121: ...nue operating until the battery pack is fully discharged If the battery light LED flashes or there is some other warning to indicate a low battery go to step 4 4 Connect the AC adapter to the computer and the power cord to a power outlet The DC IN or AC power light LED should glow green and the Battery LED should glow amber to indicate that the battery pack is being charged If the DC IN or AC powe...

Page 122: ...battery which can explode if not properly replaced used handled or disposed of Putting spent batteries in the trash is not only irresponsible it may be illegal Dispose of the battery as required by local ordinances or regulations Use only batteries recommended by Toshiba After repeated use the batteries will finally lose their ability to hold a charge and you will need to replace them Under federa...

Page 123: ...ttery Enable Standby or Hibernation which saves power when you turn off the computer and turn it back on again Use Toshiba s power saving options These power saving options control the way in which the computer is configured By using them you can greatly increase the length of time you can use the computer before you need to recharge the battery Toshiba has combined these options into preset power...

Page 124: ... options For more information see TOSHIBA Power Saver utility on page 172 Using a hot key to set the power usage mode You may use a hot key to set the power usage mode To set the power usage mode 1 Press Fn and F2 simultaneously to display the power usage pop up window Sample Power usage mode pop up window 2 While continuing to press Fn press F2 until you select the desired power usage mode The po...

Page 125: ...tions for power Depending on the amount of time you spend away from external power sources the capacity of one battery pack may be sufficient for your needs However if you need more portable power Toshiba provides these options Purchase extra battery packs Install a secondary battery module in the Slim SelectBay See Using Slim SelectBay modules on page 69 Purchase a battery charger that charges on...

Page 126: ...s features to start programs find documents set up system components and perform most other computing tasks HINT The illustrated examples in this guide may appear slightly different from the screens displayed by your system The differences are not significant and do not indicate any change in the functionality of your system Finding your way around the desktop Common desktop features include icons...

Page 127: ...itially displayed on your Windows XP operating system desktop include Recycle Bin Holds files you ve deleted You may be able to retrieve these files until you empty the Recycle Bin TECHNICAL NOTE If you delete a file from a diskette it does not go into the Recycle Bin For more information on the Recycle Bin see Windows Help Internet Explorer The Microsoft browser that provides access to the Intern...

Page 128: ...rating system update information Open documents Adjust system settings Find files Access Windows Help Run programs Suspend system activity and shut down the computer Taskbar Each time you open a program a button associated with that program appears on the taskbar With some programs a button appears on the taskbar for each document or window you open You can use these buttons to quickly switch betw...

Page 129: ...position the cursor over the icon for a few moments and a short description of the task appears Typical tasks in the System tray are Current time Power usage mode Mouse properties and speaker volume To activate a specific task double click the appropriate System tray icon Exchanging data with another computer To transfer a large amount of information between computers you can use the Windows XP Br...

Page 130: ...bar 3 In the dialog box type direct cable connection 4 Follow the online guide instructions Setting up for communications In order to connect to the Internet use an online service or communicate across the telephone lines with another computer you need A modem one comes with your computer A telephone line A browser or communications program An Internet Service Provider ISP or online service if you...

Page 131: ...eed to determine the current COM port name and possibly change it To find out which port your modem is connected to 1 Click Start Control Panel then Printers Other Hardware 2 Click Phone and Modem Options The Phone and Modem Options Properties dialog box displays 3 Click the Modems tab Your modem should be listed next to one of the computer s COM ports 4 Make a note of the COM port number 5 To ver...

Page 132: ...ing your computer to a network You can connect your computer to a network to increase its capabilities and functionality using one of its communication ports Accessing a network To access a network At the office connect an Ethernet cable to the RJ45 jack on your computer For specific information about connecting to the network consult your network administrator While you are at home or traveling y...

Page 133: ...The computer connects to the network Using the Ethernet LAN Port When your computer starts Windows attempts to contact a Dynamic Host Configuration Protocol DHCP server If the computer is not connected to a network it may pause a few minutes as it waits for a reply To avoid this delay you can reconfigure Windows to disable the LAN port To disable the LAN port 1 Click Start Control Panel then Perfo...

Page 134: ...i PC module your computer may display a Safely Remove Hardware icon in the desktop s system tray to indicate that it is in use Do not confuse the system tray s icon with other removable PC Card devices you may have installed You can use the system tray s Safely Remove Hardware icon to turn off your Wi Fi Mini PCI module However if you do so you will need to restart the computer in order to reactiv...

Page 135: ... collection of interlinked documents located on computers connected to the Internet that work together using a specific Internet protocol called Hypertext Transfer Protocol HTTP The World Wide Web offers information as text images audio or video to be referenced from anywhere in the world Special programs called Web browsers are specifically designed to work with HTTP They make it easier to connec...

Page 136: ...SP account or assists you in setting up your computer to work with your existing ISP Once you have established an ISP account you can connect to the Internet 1 Connect your computer s modem to a telephone line For more information on connecting a modem see Connecting your modem to a telephone line on page 77 2 Start your Web browser Have your modem dial the ISP s telephone number and establish a c...

Page 137: ...ks Internet email To send and receive email of your own you need a mailbox on the Web or an email address If you have an account with an ISP you can probably set up an email address at the same time you sign up for the service Internet chat rooms A chat room is a Web site that offers a place where people with similar interests and ideas communicate in real time one on one or in groups by typing me...

Page 138: ...eb browser to transfer large amounts of data Exploring audio features Your computer comes with Windows Media Player software This provides an easy to use full featured multimedia control center You can use your computer to record sounds using an external microphone You can play wav sound files or audio CDs using the built in speakers headphones or external speakers Playing an audio CD Insert an au...

Page 139: ...To stop the CD click the Stop button Before using headphones to listen to an audio CD turn the volume dial down Playing the CD with the volume set too high could damage your ears Playing CDs using Auto Run If you insert a CD into the CD drive and the Auto Run feature does not automatically start your disk try launching the CD manually To do this follow these steps 1 Open the Start menu and select ...

Page 140: ... a DVD ROM or multi function drive that allows you to Play pre recorded DVDs Play pre recorded CDs Read and write files including music to a CD Recordable CD R or CD Rewritable CD RW disc For details on how to use the software please refer to the respective Online Help menus Recording sounds You may record sounds as wav files by connecting an external microphone or other sound source to the microp...

Page 141: ...er Sample Sound Recorder screen 3 Click the Record button 4 Speak normally into the microphone 5 When you ve finished recording click the Stop button The Sound Recorder window displays the new sound file as a waveform You can only record 60 seconds at a time 6 To hear what you just recorded click the Play button 7 To save the file select Save from the File menu Record Stop Play Skip forward Skip b...

Page 142: ...quality 4 Click OK Your new settings take effect the next time you record Using external speakers or headphones Your computer is equipped with a full stereo sound system with internal speakers Instead of using the internal speakers you can connect headphones or a pair of external stereo speakers TECHNICAL NOTE Use amplified speakers that require an external power source Other types of speakers wil...

Page 143: ...Exploring Your Options Exploring audio features 5 375 x 8 375 ver 2 3 To adjust the volume For external speakers use the volume controls on each speaker For headphones use the computer s volume control dial ...

Page 144: ...ces for office computing By connecting optional devices such as an external monitor a full size keyboard and a mouse you can work with your notebook as if it were a standard office computer You can connect any of these optional devices Expansion memory modules Standard 101 key keyboard Traditional mouse or trackball Printer External monitor PC Cards Some are Toshiba devices others are standard com...

Page 145: ...the USB ports on the back of your computer You can connect a local parallel printer through the parallel port on the back of your computer You can connect an external monitor through the video out port on the back of your computer Using an external keyboard If you prefer to use a full size keyboard you can attach one to your computer The computer s PS 2 mouse keyboard port supports any PS 2 compat...

Page 146: ...l keyboard Do not worry you can use a key combination on the external keyboard to emulate the Fn key You can set up this key combination through the Windows Control Panel Toshiba HWSetup icon For more information about Hardware Setup see Toshiba Hardware Setup on page 170 Using a mouse If you prefer you can use a mouse instead of the computer s built in pointing device the AccuPoint II You can use...

Page 147: ... or both If you are connecting a mouse after you have started using the computer begin at step 1 Otherwise proceed to step 2 1 Click Start Turn Off Computer then select Turn Off The operating system shuts off the computer 2 Attach the PS 2 mouse cable to the PS 2 port on the computer HINT Using an optional Y cable allows you to connect a PS 2 mouse and a PS 2 keyboard to the PS 2 port simultaneous...

Page 148: ...ontrol Panel then Printers and Other Hardware 2 Click the Toshiba HWSetup icon 3 Select the Pointing Devices tab 4 Under Pointing Devices Options select one Auto selected configures the PS 2 mouse to work when it is connected at power on or the AccuPoint II to work otherwise Auto selected is normally the default option Simultaneous configures both the AccuPoint II mouse and PS 2 mouse to work with...

Page 149: ...rinter is ECP or IEEE compliant make sure your printer cable is an IEEE 1284 cable Your printer documentation may require you to install the printer software before physically connecting the printer to your computer If you do not install the software as instructed by the printer manufacturer the printer may not function correctly Never connect the printer cable while the computer s power is on Doi...

Page 150: ...r or both 2 Connect the printer cable to the printer and to the computer s parallel port Use the printer cable illustration as a connection guide Identifying the ends of a parallel printer cable 3 Plug the printer s power cable into a live electrical outlet 4 See your printer documentation for additional configuration steps For more information on getting your printer to print see Printing your wo...

Page 151: ... more information TECHNICAL NOTE If you have the manufacturer s disk that came with your printer you can use it to install the printer on your computer The manufacturer s disk may include additional drivers and fonts To set up a printer with the Add Printer Wizard 1 Click Start and click Printers and Faxes The operating system opens a Printers and Faxes window Sample Printers and Faxes window ...

Page 152: ...operating system recognizes it automatically You can ignore the remainder of this section See your printer manual 4 If the printer you are setting up Is not connected to a network select Local printer attached to this computer Is connected to a network select Network printer or a printer attached to another computer 5 Click Next The Add Printer Wizard looks for a Plug and Play printer If it does n...

Page 153: ...inter Wizard prompts you to enter a friendly printer name 8 Enter a name for your printer HINT If you are using more than one printer make sure the name is descriptive enough to help you tell the difference 9 If you want this printer to be The default printer click Yes Available when specifically requested click No 10 Click Next 11 Click Finish The Windows XP operating system prints a test page 12...

Page 154: ...wo available video ports A television via the video out port A video display device such as a video projection unit via the video out port An external SVGA monitor via the RGB monitor port Before connecting your television video projector monitor or other display device configure your computer for the type of device you re connecting To do this refer to your operating system documentation Connecti...

Page 155: ...video Connecting a device to the video out port Video cables are not included with your computer To connect a device to the video out port you ll need to purchase a composite video cable 1 Connect one end of the video cable to the external video device Refer to the documentation provided with the device for the location of its television signal in jack 2 Connect the other end of the video cable to...

Page 156: ...the video cable to the video out port on the computer 2 Connect the monitor s power cable to a live electrical outlet 3 Turn on the external monitor 4 Set the display mode by pressing Fn F5 or by changing the Display Properties settings For more information see the next section Directing the display output when you turn on thecomputer Once you ve connected an external display device you can choose...

Page 157: ...l controller mode TV or other external video device only 3 Release the Fn and F5 key to select the desired setting TECHNICAL NOTE You can also change these settings using the Display Properties Box Set the option for the video controller by clicking Start then Control Panel then Appearance and Themes and clicking Display Choose the Settings tab click the Advanced button select Intel Extreme Graphi...

Page 158: ... Keep in mind that the quality of the display will be limited to the capabilities of the external video device If the external video device such as an SVGA monitor is capable of displaying at a maximum resolution of 640 x 480 and your system is set for a higher resolution only part of the desktop will appear on the screen You can view the lost area by scrolling to it Since most televisions and vid...

Page 159: ...iate access to all the devices For more information see the accessories information packaged with your computer or visit the Web site toshibaaccessories com Using the Wi Fi Mini PCI module Your computer may have an integrated Wi Fi Mini PCI module It is recommended that you do not remove the module from your computer For assistance contact a Toshiba Wireless Authorized Service Partner Accessing th...

Page 160: ...l options or change default options This chapter describes the utilities supplied by Toshiba Fn esse Hotkey utility TOSHIBA Console Toshiba Hardware Setup TOSHIBA Power Saver utility Enabling Hibernation Setting user passwords Using a supervisor password Fn esse Desktop shortcuts and Toshiba s Fn esse program provide quick ways to open programs documents and folders from within any Windows program...

Page 161: ...m program Open a file in its associated program Display a customized folder of programs and or files from which to choose Fn esse also has several keys known as hot keys that perform preassigned operations For more information see Hot Keys on page 208 You can assign any key that is not associated with a hot key or a keyboard overlay Starting Fn esse 1 Click Start point to All Programs Toshiba Util...

Page 162: ... keyboard or pointing device to assign keys To assign a key to open a program or document start Fn esse and either Using the keyboard press and hold the Fn key then press the desired assignment key Using the pointing device move the cursor over the desired key in the Fn esse window and press the secondary button The Assignment Type dialog box appears Sample Fn esse assignment type dialog box Makin...

Page 163: ...st with items from various folders or to pick only a few items from a folder create a new folder containing only the desired programs and documents If you are unsure how to do this refer to your Windows XP operating system documentation 4 Click OK to associate the folder with the key you just selected To open a popup list showing the items in that folder press Fn plus the appropriate key from with...

Page 164: ...Direct or Popup and continue as if you were creating a new assignment To remove the key assignment click Clear Hotkey utility The hotkey utility allows you to receive a confirmation message when you use the hotkey combination for Standby Fn F3 or Hibernation Fn F4 To activate 1 Click Start All Programs Toshiba Utilities then click the Hotkey utility 2 The Hotkey window appears Sample Toshiba Hotke...

Page 165: ...you to customize a range of computer settings To access the control panel 1 Click Start then click All Programs 2 Point to TOSHIBA Console then click the resulting TOSHIBA Console selection The TOSHIBA Console window appears Sample TOSHIBA Console window The TOSHIBA Console offers three categories of features Customizing Your Computer Network Security ...

Page 166: ...nfigFree Network The features in this category are IR Utility Connectivity Doctor Security The features available in this category are Supervisor password User password Power Management The Power Management feature enables you to control your computer s power usage regardless of the source and use the many preset power modes or create one yourself To access Power Management through the TOSHIBA Con...

Page 167: ...ode The preset modes cannot be deleted By changing the options that appear in the TOSHIBA Power Saver Properties window and clicking OK you can reconfigure that function Any options that you change become effective when you click either OK or Apply Plugged in section This section has a single preset power usage mode Full Power You can create other AC power modes but Toshiba recommends use of the p...

Page 168: ... a customized mode create a new mode with the properties you require The DVD Playback mode applies only when a DVD viewing program is playing Creating a new power mode 1 Highlight one of the preset modes 2 Click Create copy 3 A new mode appears with the title Copy Name where Name is the title of the mode you copied Delete this title type in the name for your new power mode then press Enter Customi...

Page 169: ... to remove or install a Slim SelectBay device while your computer is on or hibernating Mobile Extension Service Bay Service this service allows the Slim SelectBay to be removed without turning off the computer Hot Insert Remove Support this service allows the Slim SelectBay device to be stopped and removed without turning off the computer option not available if Bay Service is not checked Warm Ins...

Page 170: ...The Toshiba HWSetup windows displays Sample Toshiba HWSetup window The tabs represent various dialog boxes They are General Allows you to view current BIOS Password Allows you to set the user password and an owner string Device Config Shows the Device configuration options Parallel Printer Allows you to configure the parallel port default settings Pointing Devices Allows you to use both the AccuPo...

Page 171: ...omatically changes the processing frequency and decrease voltage depending on the power source AC Power If your computer is connected to the AC adapter the CPU frequency mode is set to high for faster processing Battery Power If your computer is running on battery power the CPU frequency mode is set to low for slower processing Switching the CPU to low allows you to conserve power and extend the o...

Page 172: ... box and clicking OK you can reconfigure that function You may choose a power saving management strategy to best suit your computing needs If you are running on batteries and the programs that you are using do not require a lot of system resources you may experience longer work sessions by enabling the Normal or Long Life settings Any options that you change become effective when you click either ...

Page 173: ...leaves your computer secure so that nobody can access your files You must enter the password before you can work on your computer Toshiba supports the several types of passwords on your computer An instant password Secures your open programs and files when you temporarily leave the computer A power on password Prevents unauthorized users from starting or restarting the computer A hard disk drive p...

Page 174: ...ball 1 To unlock your system If you have not registered a user password press Enter If you have registered a user password press Enter Type your password then press Enter If you enter the password correctly the computer returns to where it was when you enabled the instant password Setting a user password To register a password for the instant and power on password functions 1 Click Start Control P...

Page 175: ... tries to enter the correct password After an incorrect try an Incorrect Password dialog box will appear Click OK to reenter the password After three incorrect tries this message appears Sorry access denied Reboot is required to regain access You will need to turn off the computer then reboot 6 Click Exit Using a supervisor password A supervisor password prevents other users from changing hardware...

Page 176: ...Security window 4 Click the Supervisor password icon 5 Select Registered 6 Enter a password then enter it again to verify 7 Click OK Deleting a supervisor password 1 Click Start then click All Programs 2 Point to TOSHIBA Console then click the resulting TOSHIBA Console selection The TOSHIBA Console window appears ...

Page 177: ...a supervisor password 5 375 x 8 375 ver 2 3 3 Select Security Sample TOSHIBA Console Security window 4 Click the Supervisor password icon 5 Select Not Registered 6 Enter the correct password 7 Click OK then click OK again to exit ...

Page 178: ...ncounter If all else fails contact Toshiba You will find information on Toshiba s support services at the end of this chapter Problems that are easy to fix Your program stops responding If you are working with a program that suddenly freezes all operations chances are the program has stopped responding You can exit the failed program without shutting down the operating system or closing other prog...

Page 179: ... turns off Your program performs an illegal operation If you receive the message Your program has performed an illegal operation you should record the details of the message and consult the software manufacturer To record the details 1 Click the Details button and select the text the operating system displays The Details button displays information that the software manufacturer needs to help you ...

Page 180: ...thing happens You are probably in Stand By mode and have a software or resource conflict When this happens turning the power on returns you to the problem instead of restarting the system To clear the condition press Ctrl Alt and Del simultaneously Clearing the condition may get the computer running but it will not solve a resource conflict Read the documentation that came with the conflicting dev...

Page 181: ...key to continue If pressing any key does not work press Ctrl Alt and Del to restart the computer The Windows operating system is not working Once you are familiar with the desktop and used to the way the operating system responds to your work routine you can easily detect if the operating system is not working correctly For example The operating system fails to start after the Starting Windows XP ...

Page 182: ...tup menu This section describes each option and when to use the procedure To open the Startup menu 1 Restart your computer 2 Press F8 when your computer starts The Windows Advanced Options menu displays these options Safe Mode Safe Mode with Networking Safe Mode with Command Prompt Enable Boot Logging Enable VGA Mode Last known good configuration your most recent settings that worked Directory Ser...

Page 183: ...dress I typed in Make sure you separated the domain names of the address with the forward slash Check the spelling of each name and the syntax of the address carefully A single incorrect letter or missed character comma instead of period dot or other mistake makes it impossible for your browser to locate the site My browser can not find a site I bookmarked The World Wide Web is constantly changing...

Page 184: ...ry using Windows Help and Support to troubleshoot the problem first For help on hardware conflicts 1 Click Start then click Help and Support 2 Click the Hardware link in the window s left pane A list of category links appear 3 Click the Fixing a hardware problem 4 Choose from specific topics and follow the steps If there is still a problem the operating system should display a message that explain...

Page 185: ...orks These channels of communication are commonly referred to as system resources Interrupt Request Channel The channel to the CPU is called an Interrupt Request IRQ because it interrupts what the processor is doing and requests some of the processor s time Some of the IRQs may be shared by multiple devices This is called IRQ sharing and is normal Direct Memory Access Similarly the data required b...

Page 186: ... instructions about changing settings on the device Fixing a problem with Device Manager Device Manager provides a way to check and change the configuration of a device Changing the default settings using Device Manager can cause other conflicts that make one or more devices unusable Device Manager is a configuration tool for advanced users who understand configuration parameters and the ramificat...

Page 187: ...the type of device the drivers installed and the system resources assigned to the device To check a device s properties 1 Click Start Control Panel then Performance and Maintenance 2 Click Administrative Tools 3 Click the Computer Management icon 4 Click the Device Manager button 5 To view the device s installed double click the device type 6 To view the properties double click the device The oper...

Page 188: ...any static electricity you may have built up To avoid damaging the memory module be careful not to touch its gold connector bar on the side you insert into the computer Incorrectly connected or faulty memory modules may cause errors that seem to be device related It is worthwhile checking for these first 1 Click Start then click Turn Off Computer 2 Click Turn Off The operating system shuts down an...

Page 189: ...r cable will neither power the computer nor recharge the batteries Here are some typical problems and how to solve them The AC power light does not come on when you plug in the AC adapter and power cable Make sure the AC adapter and power cable are firmly plugged into both the wall outlet and the computer If the AC power light still does not come on check that the wall outlet is working properly b...

Page 190: ...ently recharge a partially charged battery it may not charge fully Let the battery discharge completely then try charging it again Check the power options using the Power Management utility Have you added a device such as a PC Card or memory module that takes its power from the battery Is your software using the hard disk more Is the display power set to turn off automatically Was the battery full...

Page 191: ...ate the screen You may have activated the instant password feature by pressing Fn and F1 simultaneously If you have registered a password press the Enter key type the password and press Enter If no password is registered press Enter The screen reactivates and allows you to continue working If you are using the built in screen make sure the display priority is not set for an external monitor To do ...

Page 192: ...ome flickering is a normal result of the way the screen produces colors To reduce the amount of flickering try using fewer colors To change the number of colors displayed 1 Point at the desktop and click with the secondary button 2 Click Properties and then the Settings tab 3 Change the Colors option and click OK For more information see Windows Help A message tells you that there is a problem wit...

Page 193: ...cision technology The small bright dots that appear on your display are an intrinsic characteristic of the TFT manufacturing technology Disk drive problems Problems with the hard disk or with a diskette drive usually show up as an inability to access the disk or as sector errors Sometimes a disk problem may cause one or more files to appear to have garbage in them Typical disk problems are You are...

Page 194: ...e been using your computer for some time your files may have become fragmented Run Disk Defragmenter To do this click Start then click All Programs point to Accessories and System Tools and click Disk Defragmenter Your data files are damaged or corrupted Refer to your software documentation for file recovery procedures Many software packages automatically create backup files You may also be able t...

Page 195: ...isk error message If you are starting the computer from a diskette the diskette in the drive does not have the files necessary to start the computer Replace it with a bootable diskette The drive cannot read a diskette Try another diskette If you can access the second diskette the first diskette not the drive is probably causing the problem Run Error checking on the faulty diskette for instructions...

Page 196: ...l eject button This button is in the small hole next to the disc eject button on the right side of the computer Never use a pencil to press the manual eject button Pencil lead can break off inside the computer and damage it Some discs run correctly but others do not If the problem is with an application CD ROM refer to the software s documentation and check that the hardware configuration meets th...

Page 197: ... occur during installation and setup of new cards If you re having trouble getting one or more of these devices to work together several sections in this chapter may apply Resource conflicts can cause problems when using PC Cards See Using PC Cards on page 97 for more information Card Information Structure When you insert a PC Card into a slot the computer attempts to determine the type of card an...

Page 198: ...ee Using PC Cards on page 97 for information about how to insert PC Cards Make sure all cables are securely connected Occasionally a defective PC Card slips through quality control If another PCMCIA equipped computer is available try the card in that machine If the card malfunctions again it may be defective Resolving PC Card problems Here are some common problems and their solutions The slots app...

Page 199: ...em Use Device Manager to make sure each device has its own I O base address See Fixing a problem with Device Manager on page 186 for more information Since all PC Cards share the same socket each card is not required to have its own address Hot swapping removing one PC Card and inserting another without turning the computer off fails Follow this procedure before you remove a PC Card 1 Double click...

Page 200: ...nter problems The printer will not print Check that the printer is connected to a working power outlet turned on and ready on line Check that the printer has plenty of paper Some printers will not start printing when there are just two or three sheets of paper left in the tray Make sure the printer cable is firmly attached to the computer and the printer Run the printer s self test to check for an...

Page 201: ...m will not receive or transmit properly Make sure the cable from the modem to the telephone line is firmly connected to the computer s modem port and the telephone line jack Check the port settings to make sure the hardware and software are referring to the same COM port See Determining the COM port on page 130 Check the communications parameters baud rate parity data length and stop bits specifie...

Page 202: ...d software to copy everything on the hard disk to a tape Some people use a combination of these methods backing up all files to tape weekly and copying critical files to diskette on a daily basis If you have installed your own programs you should back up these programs as well as your data files If something goes wrong that requires you to reformat your hard disk and start again reloading all your...

Page 203: ...Try the following before contacting Toshiba Review the troubleshooting information in your operating system documentation If the problem occurs while you are running a program consult the program s documentation for troubleshooting suggestions Contact the software company s technical support group for their assistance Consult the dealer from whom you purchased your computer and or program Your dea...

Page 204: ...me and version of the program involved in the problem along with its installation media Information about what you were doing when the problem occurred Exact error messages and when they occurred For technical support call the Toshiba Global Support Centre Within the United States at 800 457 7777 Outside the United States at 949 859 4273 Other Toshiba Internet Web Sites toshiba com Worldwide Toshi...

Page 205: ...3R 8H2 Canada Czech Republic CHG Toshiba s r o Hnevkovskeho 65 61700 Brno Denmark Scribona Danmark A S Naverland 27 DK2600 Glostrup Denmark Finland Scribona TPC OY Sinimäentie 14 P O Box 83 02630 ESPOO Finland France Toshiba Systèmes France S A 7 Rue Ampère 92804 Puteaux Cédex France Germany Toshiba Europe GmbH Leibnizstraße 2 D 93055 Regensburg Germany Greece Ideal Electronics S A 109 Syngrou Ave...

Page 206: ... Luxembourg Toshiba Information Systems Benelux B V Rivium Boulevard 41 2909 LK Capelle a d IJssel The Netherlands Mexico Toshiba de México S A de C V Sierra Candela No 111 6to Piso Col Lomas de Chapultepec CP 11000 Mexico DF Tel 5249 6500 Morocco C B I 22 Rue de Béthune Casablanca Morocco The Netherlands Toshiba Information Systems Benelux B V Rivium Boulevard 41 2909 LK Capelle a d IJssel The Ne...

Page 207: ...in Toshiba Information Systems España S A Parque Empresarial San Fernando Edificio Europa 1a Planta Escalera A 28831 Madrid San Fernando de Henares Spain Sweden Scribona PC AB Sundbybergsväegen 1 Box 1374 171 27 Solna Sweden Switzerland Ozalid AG Herostrasse 7 8048 Zürich Switzerland United Kingdom Toshiba Information Systems U K Ltd Toshiba Court Weybridge Business Park Addlestone Road Weybridge ...

Page 208: ... and off Hot keys have a legend on or above the key indicating the option or feature the key controls Volume Mute Instant password security Fn This hot key enables disables volume mute on your computer When volume mute is enabled no sound will come from the speakers or headphones Fn This hot key blanks the display ...

Page 209: ...n turns off the display and activates instant security Using the mouse or any key will make the screen saver password dialog box appear and you can then type in either a user or supervisor password For the Windows XP operating system you type the user or supervisor password into the Windows security screen dialog box To activate the password feature 1 Click Start Control Panel then Appearance and ...

Page 210: ...in the operating system under battery power are Long Life Normal and High Power DVD Playback Presentation and Super Long Life Sample power usage modes The power usage mode in the Windows operating system under AC power is Full Power only The properties of each mode are set in the Toshiba Power Management utility For more information see Mobile Computing on page 111 ...

Page 211: ...r more information about Stand By mode please see Using Standby on page 107 Fn This hot key puts the computer into Hibernation mode If Hibernation mode is enabled the default a message box is displayed by default to confirm the computer is going into Hibernation mode The message box can be set so it doesn t display Sample Hibernation confirmation box If Hibernation mode is disabled this hot key wi...

Page 212: ...onitor simultaneously External monitor only Built in display panel and external video device simultaneously External video device only Sample display options window In order to use a simultaneous mode you must set the resolution of the internal display panel to match the resolution of the external display device Fn This hot key decreases the screen brightness Fn This hot key increases the screen b...

Page 213: ...vices installed in your computer for systems with Wi Fi only The wireless modes are Wi Fi enabled This enables the Wi Fi module Wi Fi disabled This disables the Wi Fi module Fn This hot key turns the cursor control overlay on and off Fn This hot key turns the numeric overlay on and off Fn This hot key turns the scroll lock feature on and off ...

Page 214: ...rsal power supply you can use worldwide This appendix shows the shapes of the typical AC power cable connectors for various parts of the world USA and Canada UL approved CSA approved United Kingdom BS approved Australia AS approved Europe VDA approved NEMKO approved ...

Page 215: ... Device Settings The Device Settings utility is used to enable and disable any of the wired wireless and infrared for systems with infrared network devices You can also change the device properties of your wired and wireless local area network LAN and specify settings to automatically switch between wired and wireless LAN For more information see Device Settings on page 219 Profile Settings The Pr...

Page 216: ...tor utility must be installed in order to enable Quick Connect For more information see Quick Connect on page 222 Getting Started This section contains information about the ConfigFree main screen and how to start and configure ConfigFree ConfigFree Main Screen ConfigFree main screen Stay on the task tray Select this check box to display the ConfigFree icon in the taskbar Options Use to configure ...

Page 217: ... the Start button and then point to Programs Point to the TOSHIBA ConfigFree folder and then click ConfigFree Double click the ConfigFree icon on the taskbar Click the ConfigFree icon on the taskbar and then click the desired utility Press the Toshiba Console button if applicable to your system to open the Toshiba Console and then click the ConfigFree icon Configuring ConfigFree The ConfigFree Opt...

Page 218: ...uivalent Privacy key settings if applicable also display Infrared for systems with infrared and dial up devices are not tested by the Connectivity Doctor If a problem or potential problem is detected an exclamation point displays in the Connectivity Doctor screen at the relevant location You can then view a possible cause and solution for the problem by clicking on the exclamation point For exampl...

Page 219: ...atically refreshes However you can also use the Refresh button to refresh the screen Device Settings The Device Settings screen displays a list of all wired wireless and infrared for systems with infrared devices that are connected to the network Detailed information about each device such as the driver version number and the status are also displayed ...

Page 220: ...out the network connection Enable Disable You can easily enable or disable any of the listed devices simply by selecting the desired device and then clicking the Enable Disable button Each time a device is enabled or disabled the status of the device will change Enable Wireless when cable disconnect occurs Select this check box to enable the Auto Switch feature For more information see Using Auto ...

Page 221: ...ile Viewing registered profiles Details The Details button displays the ConfigFree Details screen This screen displays detailed information for each profile and can be used to view the various settings for each registered profile Auto Switch The Auto Switch button accesses the Auto Switch feature For more information see Using Auto Switch on page 223 Internet Options The Internet Options button op...

Page 222: ...To switch the profile that is being used select the profile you want to switch to and then click Switch Quick Connect The Quick Connect feature switches the Wireless LAN connection to connect to the Toshiba Wireless Projector As a result you will not be able to use the network to connect to a Toshiba Wireless Projector when the wireless LAN Configuration is set to Ad hoc If you are connected to an...

Page 223: ...ree Using Auto Switch The Auto Switch feature contains options for automatically switching network devices and profiles if a network connection should fail Auto Switch Cable Disconnect This option automatically switches network devices if a wired network cable is disconnected For more information see Auto Switch Cable Disconnect on page 224 Auto Switch SSID If your notebook computer is connected t...

Page 224: ...to a wireless LAN device However if the cable connection to only one wired LAN device is disconnected ConfigFree will not switch to a wireless device Auto Switch SSID The Auto Switch SSID option automatically switches to a different profile if your notebook computer is connected to a wireless LAN network and a network failure occurs ConfigFree detects the Service Set Identifier SSID of the wireles...

Page 225: ...pear in this user s guide AC alternating current BIOS basic input output system bps bits per second CD compact disc CD ROM compact disc read only memory CD RW compact disc rewrite memory CMOS complementary metal oxide semiconductor COM1 communications port 1 serial port COM2 communications port 2 serial port CPU central processing unit ...

Page 226: ...able FCC Federal Communications Commission FIR fast infrared GB gigabyte HDD hard disk drive HTML Hypertext Markup Language IEEE Institute of Electrical and Electronics Engineers I O input output IRQ interrupt request ISP Internet service provider KB kilobyte LAN local area network LCD liquid crystal display LPT1 line printer port 1 parallel port LSI large scale integration MB megabyte MIDI Musica...

Page 227: ...ls using active matrix technology Also known as a TFT display in its simplest form there is one thin film transistor TFT for each cell This type of display works well with notebook computers because of its shallow depth and high quality color Active matrix displays are viewable from wider angles than most passive matrix displays adapter A device that provides a compatible connection between two un...

Page 228: ...ions stored in read only memory ROM containing the information the computer needs in order to check hardware and load the operating system when you start up the computer bit Short for binary digit A bit is the smallest unit of information used by a computer A group of eight bits is a byte See also byte bits per second bps A way of measuring the speed at which information is passed between two devi...

Page 229: ...stead of magnetic means for reading data See also CD Compare DVD ROM central processing unit CPU The chip that functions as the brain of the computer It takes information from outside sources such as memory or keyboard input processes the information and sends the results to another device that uses the information character Any letter number or symbol you can use on the computer Some characters a...

Page 230: ...2 cache cursor A symbol that indicates the current position on the screen The shape of the cursor varies depending on the program you re using and what you re doing D default The setting selected by a program when the user does not specify an alternative setting device A component attached to the computer Devices may be external outside the computer s case or internal inside the computer s case Pr...

Page 231: ...nsity diskette high density diskette document Any file created with an application and if saved to disk given a name by which it can be retrieved See also file double click To press the AccuPoint control button or mouse button rapidly twice without moving the AccuPoint or mouse In the Windows operating system this refers to the primary AccuPoint control button or left mouse button unless otherwise...

Page 232: ...ocument See also document file allocation table FAT The section of a disk that keeps track of the location of files stored on the disk file name A set of characters that uniquely identifies a file within a particular folder It consists of two parts the actual name and the file name extension See also file extension file extension The three characters following the period pronounced dot at the end ...

Page 233: ...y hard disk in a computer is usually fixed but some computers have secondary hard disks that are removable By default the hard disk is referred to as drive C hardware The physical components of a computer system Compare software Hibernation A feature of many Toshiba notebook computers that saves to the hard disk the current state of your work including all open files and programs when you turn the...

Page 234: ... improve processing speed See also cache CPU cache L2 cache L2 level two cache Memory cache installed on the motherboard to help improve processing speed It is slower than L1 cache and faster than main memory See also cache CPU cache L1 cache LAN local area network A group of computers or other devices dispersed over a relatively limited area and connected by a communications link that enables any...

Page 235: ...M ROM microprocessor See central processing unit CPU MIDI Musical Instrument Digital Interface A standard for connecting musical instruments synthesizers and computers The MIDI standard provides a way of translating music into a form computers can use and vice versa modem Short for modulator demodulator A device that converts information from digital to analog and back to digital enabling informat...

Page 236: ...ams that controls how the computer works Examples of operating systems are Windows 98 Second Edition and Windows XP Professional P palette See color palette parallel Processes that occur simultaneously In communications it means the transmission of more than one bit of information at a time On your computer the parallel port provides a parallel communications interface between the computer and an ...

Page 237: ...tion and utility See also operating system application utility properties The attributes of an object or device For example the properties of a file include the file s type size and creation date R RAM random access memory Volatile memory that can be written to as well as read By volatile we mean that information in RAM is lost when you turn off your computer This type of memory is used for your c...

Page 238: ...omputer reads when you start it up See also BIOS memory Compare RAM S select To highlight or otherwise specify text data or graphics with the intent to perform some operation on it serial Processes that occur one at a time In communications it means the transmission of one bit at a time sequentially over a single channel On your computer the serial port provides a serial interface between the comp...

Page 239: ... USB allows hot swapping of peripherals See also bus hot swapping serial upload To send a file to another computer through a modem or network See also download USB See universal serial bus USB utility A computer program designed to perform a narrowly focused operation or solve a specific problem Utilities are often related to computer system management V W Web See World Wide Web Wi Fi A trademarke...

Page 240: ...ys Fn esse 162 audio wav files 140 audio features 138 Auto Run 139 B batteries changing 113 running on 168 battery caring for 120 changing 118 charge does not last 190 charging 46 48 charging before use 42 conserving power 123 not charging 189 power usage hot key 124 power usage mode 210 removing 119 RTC real time clock 112 unlocking 118 battery alarms 117 battery power displaying remaining 115 mo...

Page 241: ...setup 42 computer friendly environment 37 computing tips 79 connecting to a power source 43 connection set up 133 critical applications 2 Ctrl keys 82 D desktop major features 126 desktop exploration 126 desktop icons 127 Device Manager 186 checking properties 187 disabling a device 186 187 devices keyboard 55 mouse 56 Disk Defragmenter 194 disk drive corrupted damaged data files 194 missing files...

Page 242: ...ice connecting 145 external diskette drive connecting 64 external display adjusting 158 external display adjusting 53 external monitor not working 193 using 154 external speakers 64 F FAT File Allocation Table 193 FCC Notice Declaration of Conformity Information 3 FCC requirements 4 file extensions 91 file names 91 files backing up 79 100 printing 92 saving 89 FN keys 82 Fn esse 86 starting 161 us...

Page 243: ...3 internet connecting to 136 features 137 surfing 136 uploading and downloading files 138 internet button 86 internet explorer icon 127 internet service providers 135 ISPs 135 J jack RJ 11 78 K keeping comfortable 38 key assign 162 changing 164 direct assign 162 popup 163 removing 164 key assignment viewing existing 163 key assignments changing or removing existing 164 keyboard character keys 81 c...

Page 244: ... office computing 144 opening the display panel 46 optional devices 144 LapLink cable 129 other documentation 35 overlay keys 83 P P S mouse connecting 56 147 parallel printer connecting 145 password deleting a supervisor 176 disabling a user 175 supervisor set up 175 passwords instant using 174 setting user 173 PC Card checklist 198 CIS Card Information Structure 197 computer stops working 199 co...

Page 245: ... in drive 195 cannot access DVD ROM multi function 195 changing display properties 192 checking device properties 187 compact discs not running correctly 196 computer hangs when PC Card inserted 199 computer will not power up 180 contacting Toshiba 33 203 corrupted damaged data files 194 Device Manager 186 disabling a device 186 187 disk drive is slow 194 display is blank 191 DVD ROM multi functio...

Page 246: ...n 127 RJ 11 jack 78 RTC real time clock battery 112 Run dialog box 88 S safety icons 35 saving files 89 screen blank 191 doesn t look normal flickers 192 scroll button 86 seating 39 security 166 selecting a place to work 37 SelectServ 36 serial mouse connecting 56 145 146 setting up adding memory 65 setting up a connection 133 setting up your computer 42 shut down 49 shutting down more quickly 103...

Page 247: ...sword disabling 175 user passwords setting 173 using a file extension 91 using the AccuPoint II pointing device 85 utilities Power Management 166 Toshiba Power Extensions 172 utility Toshiba Power Saver 172 V video cables 51 155 video display device connecting 51 154 video limitations 54 158 video projector adjusting display 53 volume mute hot key 208 W warranty SelectServ 36 Web sites Support Onl...

Page 248: ...Index 248 Wizards Dial Up Networking Wizard 132 work habits 41 Y Y cable 57 147 ...

Reviews: