background image


95 


Remote Software Setup 


Installing Remote Software 


1.


On the client computer, insert the Surveillix Software CD into the CD-ROM.  The CD should play automatically. 


2.


When prompted, select the Install Remote Software option.  Follow the installation instructions carefully. 


3.


When the software finishes installing, close any open installation windows. 


Create a New Remote Connection 


 1.


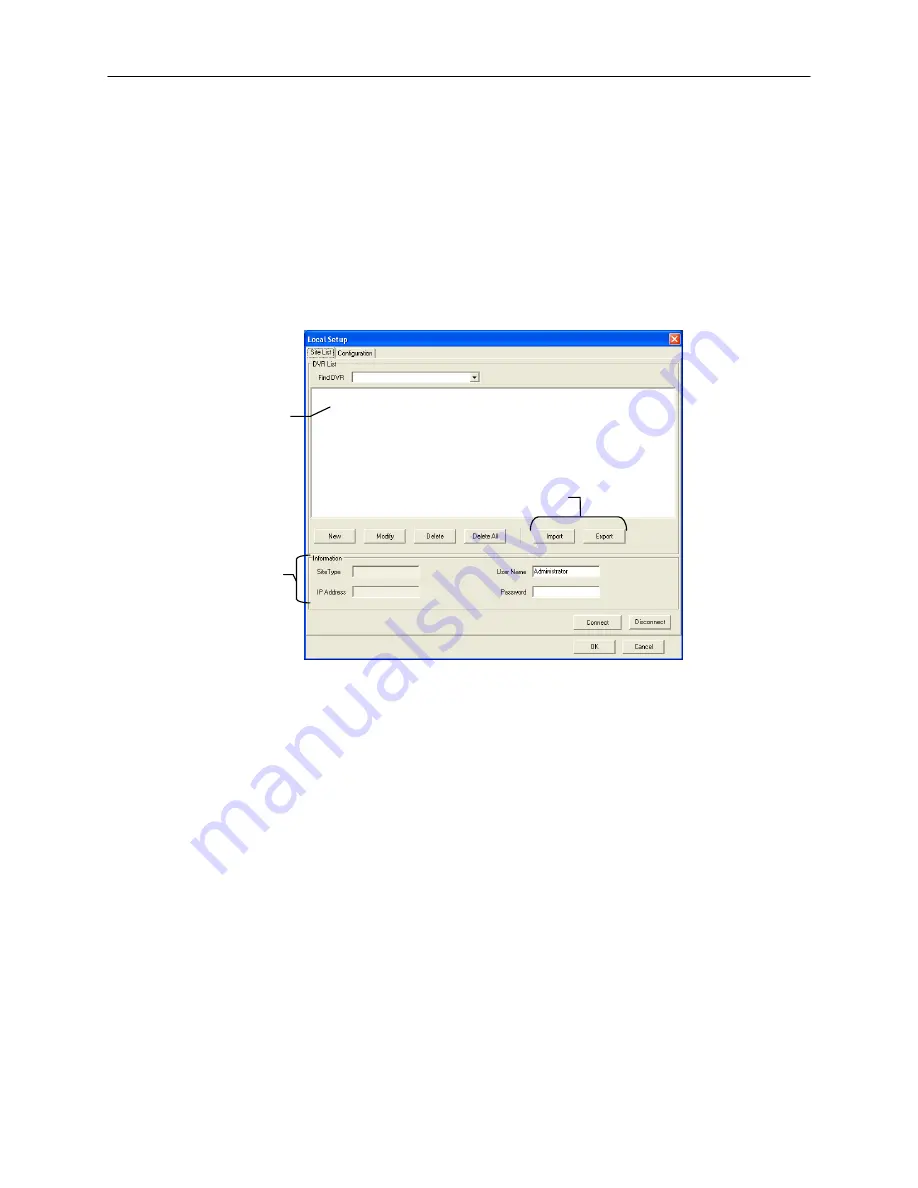
Select Start > Programs > Surveillix > Remote > Surveillix Remote Center.  The Surveillix Remote Software opens and the 
Local Connection window opens. 

2.


Click New to open the Site Info window. 

3.


Select the Site Type and enter a Site Name.  The Site Name will be the name displayed inside the connection box to help 
identify the unit. 

4.


Enter the IP Address of the DVR server.  By default the DVR is set to connect using DHCP. 

5.


Enter the Center Port.  This setting is specified on the server. 

6.


Click OK

7.


Click on the newly created connection and enter the login username and password. (case sensitive) 

8.


Click Connect


DVR Site List

Selected Site Information

Import/Export saved configurations

Summary of Contents for Surveillix NVS16-X

Page 1: ...1 Network Video Recorder NVS User Manual NVS8 X NVS16 X NVS32 X model no Please carefully read these instructions before using this product Save this manual for future use ...

Page 2: ...ii ...

Page 3: ...USINESS INTERRUPTION OR LOSS OF BUSINESS INFORMATION EVEN IF TOSHIBA HAS BEEN ADVISED OF THE POSSIBILITY OF SUCH DAMAGES AND WHETHER IN AN ACTION OR CONTRACT OR TORT INCLUDING NEGLIGENCE This software and documentation are copyrighted All other rights including ownership of the software are reserved to DVR Support Center TOSHIBA and Surveillix are registered trademarks of TOSHIBA CORPORATION in th...

Page 4: ...Your Responsibilities The above warranty is subject to the following conditions 1 You must retain the bill of sale or provide other proof of purchase 2 You must schedule service within thirty days after you discover a defective product or part 3 All warranty servicing of this product must be made by the Surveillix DVR Repair Facility 4 The warranty extends to defects in material or workmanship as ...

Page 5: ...items placed against them paying particular attention to cords at plugs convenience receptacles and the point where they exit from the product 8 Overloading Do not overload wall outlets extension cords or integral convenience receptacles as this can result in a risk of fire or electrical shock 9 Lightning For added protection for this product during storm or when it is left unattended and unused f...

Page 6: ...e original part Unauthorized substitutions may result in fire electric shock or other hazards 19 Safety Check Upon completion of any service or repairs to this unit ask the service technician to perform safety checks to determine that the unit is in proper operating condition BATTERY EXPLOSION CAUTION STATEMENT CAUTION Risk of Explosion if Battery is replaced by an Incorrect Type Dispose of Used B...

Page 7: ...mation carefully Moisture condensation occurs during the following cases When this product is brought directly from a cool location to a warm location When this product is moved to a hot and humid location from a cool location When this product is moved to a cool and humid location from a warm location When this product is used in a room where the temperature fluctuates When this product is used n...

Page 8: ...OLTAGES ARE PRESENT INSIDE THE ENCLOSURE DO NOT OPEN THE CABINET REFER SERVICING TO QUALIFIED PERSONNEL ONLY CAUTION CAUTION TO REDUCE THE RISK OF ELECTRIC SHOCK DO NOT REMOVE COVER OR BACK NO USER SERVICEABLE PARTS INSIDE REFER SERVICING TO QUALIFIED SERVICE PERSONNEL C A U T I O N RISK OF ELECTRIC SHOCK DO NOT OPEN ...

Page 9: ...sidential installation This equipment generates uses and can radiate radio frequency energy and if not installed and used in accordance with the instructions may cause harmful interference to radio communications However there is no guarantee that interference will not occur in a particular installation If this equipment does cause harmful interference to radio or television reception which can be...

Page 10: ...the provisions of EN55022 2006 EN61000 4 2 1995 A1 A2 2001 EN61000 4 6 1996 A1 2001 EN55024 1998 A1 2001 A2 2003 EN61000 4 3 1995 A1 2002 EN61000 4 8 1994 A1 2001 EN61000 3 2 2006 EN61000 4 4 1995 A1 A2 2004 EN61000 4 11 2004 EN61000 3 3 1995 A1 2001 A2 2005 EN61000 4 5 1995 A1 2001 LOW VOLTAGE DIRECTIVE 73 23 EEC as amended by Article 13 of 93 68 EEC per the provisions of EN 60950 1 2001 ...

Page 11: ...7 OPTIONAL COMPONENTS 28 NVS BASICS 29 SETTING THE TIME AND DATE 30 ACCESSING THE DVR UTILITY 30 Exporting DVR Settings 30 Importing DVR Settings 31 Changing Video Format 31 DISPLAY SCREEN 32 Live Camera Options 32 CAMERA VIEW 33 Recording Status Indicator 33 Special Recording 33 SCREEN DIVISION BUTTONS 34 SETUP OPTIONS 35 SETUP OVERVIEW 36 CAMERA SETUP 37 NETWORK VIDEO 38 Connecting a Network Dev...

Page 12: ...ting a Special Day Schedule 48 System Restart Setup 49 Create System Restart Schedule 49 GENERAL SETUP 50 Voice Warning 50 Connecting to a Wide Screen Display 51 Hybrid Sensor Setup 51 Volume 51 Auto Sequence Setting 52 Create Custom Auto Sequence 52 NETWORK SETUP 53 INFORMATION 54 ADMINISTRATIVE SETUP 55 Disk Management 55 Setting Up DDNS 56 Enable DDNS 56 Set the IP Address 56 User Management 57...

Page 13: ...mark Data 69 INDEX SEARCH 70 Performing an Index Search 70 Index Search Results Display 70 PREVIEW SEARCH 71 Performing a Preview Search 72 GRAPHIC SEARCH 72 Performing a Graphic Search 72 OBJECT SEARCH 73 Performing an Object Search 73 MOTION SEARCH 74 Performing a Motion Search 74 AUDIO PLAYBACK 74 SEARCH IN LIVE 75 BACKING UP VIDEO DATA 77 BACKUP OVERVIEW 78 Nero Express 78 General Screen Overv...

Page 14: ... SEARCH ALARM WINDOW 93 View Recorded Video 93 Export Video 93 REMOTE SOFTWARE OVERVIEW 94 Remote Software Setup 95 Installing Remote Software 95 Create a New Remote Connection 95 Configuring the DVR 96 Configuring the Server for Remote Connection 96 DIGITAL VERIFIER OVERVIEW 97 Installing the Digital Verifier 97 Using the Digital Verifier 97 BACKUP VIEWER OVERVIEW 98 Installing Backup Viewer 98 L...

Page 15: ... unit All troubleshooting and repair procedures that may be shown are for reference and minor repair only Because of the complexity of the individual components and subassemblies no one should attempt to make repairs at the component level or to make modifications to any printed wiring board Improper repairs can create a safety hazard And any indications of component replacement or printed wiring ...

Page 16: ...16 ...

Page 17: ...re enables users to establish recording schedules create motion detection zones use PTZ controls and configure alarm inputs and outputs for each of the system s cameras With the latest advancements in the NVS Server Software searching and indexing your video archive has never been easier Video can now be found viewed and exported in a number of file formats with just a few clicks The Surveillix NV...

Page 18: ...18 ...

Page 19: ...19 CONTROLS AND CONNECTIONS This chapter includes the following information Input Output connector locations Front Panel Controls and LEDs Rear Panel Connectors ...

Page 20: ... performance and versatile 4U Aluminum Rack Mount case allowing easy storage of multiple NVS for enterprise applications Every Surveillix NVS Unit comes equipped with the latest technology Intel CPU 100 1000 Gigabit Ethernet 1GB of System Memory DVD RW Recorder Full Duplex High Fi Sound Functionality ...

Page 21: ... that will be commonly used for data removal retrieval and backup replacement The most common components and buttons are shown below LOCK OPEN LOCK OPEN LOCK OPEN LOCK OPEN Cooling Fan Air Intake DVD RW Drive Hard Drive Array Hard Drive Activity Power LEDs On Off Power Switch USB Ports ...

Page 22: ...ll be using Below is a diagram that outlines the location and description of each connector DVI D 1394 AC Power Connector Secondary Power Switch PS 2 Mouse Input PS 2 Keyboard Input DVI D Port SVGA Output Fire Wire RJ 45 Network Jack USB Ports Audio Line In Speaker Out Mic In S Video Out SVGA Monitor Out ...

Page 23: ...23 GETTING STARTED This chapter includes the following information Included Components Setting up your NVS Hardware Optional Components ...

Page 24: ...nit If any of the following items are missing contact your dealer to arrange a replacement Included Components NVS Unit Mouse NVS Key Manual Repair CD Software Installation CD Keyboard Rackmount Attachments with Screws Power Cable Manual 1 Digital Video Recor HVR NVR UserManua HVR8 X HVR32 X NVR8 X NVR16 X HVR16 X model no Please carefully read these instructions before using this product Save thi...

Page 25: ...only shaped like an arrow Your mouse has two buttons a left button and a right button Quickly pressing and releasing one of these buttons is called clicking Sometimes you will need to double click or click the same button twice quickly In this manual click means to position your mouse cursor on an icon and to single click the left button When a right click is required this is stated clearly Double...

Page 26: ... to the rear of the DVR Unit See Rear Panel Connectors for more information WARNING To reduce the risk of electrical shock or damage to the equipment Do not disable the power grounding plug The grounding plug is an important safety feature Plug the power cord into a grounded earthed electrical outlet that is easily accessible at all times Disconnect the power from the computer by unplugging the po...

Page 27: ... drive power button to turn off power to the hard drive you wish to remove 2 Turn the button lock to the open position and push the handle release button 3 Pull the lever outward while removing the hard drive Reverse steps to install LOCK OPEN LOCK OPEN LOCK OPEN LOCK OPEN Alarm Light Hard Drive Power Buttons Reset Button Release Handle Button Lock Handle Release ...

Page 28: ...4PKVM 4 Channel KVM Switch The 4 Channel KVM switch allows you to have multiple boxes up to 4 using only one keyboard mouse and monitor You can simply switch between the DVRs using the keyboard Hot Swappable Redundant Power Supplies Every DVR has the option of a dual redundant hot swappable power supply In the event of a component failure the inoperable power supply may be removed leaving the DVR ...

Page 29: ...29 NVS BASICS This chapter includes the following information Registration and Upgrade Turning the DVR on and off Becoming familiar with the Display screen Defining Screen Divisions ...

Page 30: ... of the Desktop and selecting Shut Down ACCESSING THE DVR UTILITY Exporting DVR Settings Exporting DVR settings can help configure multiple DVRs quickly or reconfigure a unit that has failed Some things must be kept in mind when using this feature You cannot use this function on DVRs that are different models When upgrading from certain software versions This feature cannot be used when upgrading ...

Page 31: ...of the settings file to import and click Open 5 Click Yes to import the data file 6 Click the OK button to close the VFormat Utility Changing Video Format 1 Exit to Windows by clicking the Exit button on the Display screen and selecting Restart in Windows Mode See the Display screen section later in this chapter 2 Click Start Programs Surveillix VFormat 3 Select the appropriate video setting from ...

Page 32: ...amiliar with these options as this is the screen that will be displayed the majority of the time Live Camera Options Right click a camera on the Display screen to display these options Full Screen Instant Recording Search In Live Opens Search Display Backup Center PTZ Controller Current Date Time Sensor Status Relay Outputs Screen Division buttons Opens Setup Display Open TV Out Options ...

Page 33: ...DVR Special Recording Text is displayed on the camera indicating what type of Special Recording is activated SENSOR Sensor is displayed when a sensor associated with a given camera is activated INSTANT Instant Recording is a manual activation of the recording for the selected camera Regardless of the recording method Instant Recording will start the camera recording and also flag the video for fut...

Page 34: ...Area To return to a different Multi Camera View select a different Screen Division option from the Screen Division menu 2nd Nine Camera View Displays cameras 8 16 in the Video Display Area To return to a different Multi Camera View select a different Screen Division option from the Screen Division menu Multi Camera View Displays a group of cameras within the Video Display Area All Camera View Disp...

Page 35: ...35 SETUP OPTIONS This chapter includes the following information Setup Overview Camera Setup Motion Frame Setup Schedule Sensor Network Information Administrative ...

Page 36: ... recorded video that is saved on the DVR and keep it longer You can optimize the type of recording done by adding motion detection to this as well again increasing the amount of useful video DVR Access By setting up the access passwords you can tightly control the types of access an individual may have This ensures the security and integrity of the DVR Camera Naming By naming each camera you can e...

Page 37: ... Network Device PTZ Enables setup and use of Network Camera and PTZ Functionality Setup Network Device Opens the Network Device Setup menu Registration Opens the Registration menu for entering Unlock Codes to activate the software Online Registration Opens the Online Registration menu for activating pre registered software Camera Name Specify a name for each camera Define Camera Name Selected Came...

Page 38: ...dot Toshiba VivoTek Connecting a Network Device Connecting Manually 1 From the Display screen click Setup 2 Click Network Video 3 Click the Add Remove Device tab 4 Select your network device from the Device Type list 5 Type a Device Name 6 Type the IP URL address Port User ID and Password of the device 7 Click Add Automatic Camera Finder Connected Devices ...

Page 39: ...and Password of the device 8 Click Update Assigning a Network Device to a Channel 1 From the Display screen click Setup 2 Click Network Video 3 Click the Channel Setup tab 4 Click an available channel on the Channel List 5 Type the desired Position Name 6 Select the appropriate network device added previously 7 If the device has PTZ capabilities select the PTZ Camera check box to enable 8 If suppo...

Page 40: ...u use most Click Select Column to add or remove specific columns Capture FPS Record FPS Schedule Manufacturer Model IP Address Port Number Resolution Frame Rate Codec Quality GOP PTZ Accessing the Configuration Menu Use the Surveillix interface to access basic network device menu functions 1 From the Display screen click Setup 2 Click Network Video 3 Click the Channel Setup tab 4 Highlight the des...

Page 41: ... code generated using the MAC address of the computer running the software The following steps illustrate how to obtain a unique System ID Locating the System ID 1 From the Display screen click Setup 2 Click Network Cameras 3 Click the License tab 4 Click Copy to copy the System ID Obtaining the Unlock Code 1 Open an Internet browser and go to http register surveillixdvrsupport com 2 Type the Prod...

Page 42: ...ing the Upgrade 1 Return to Setup Network Cameras License 2 Enter the Unlock Code generated by the Surveillix Registration Site into the License Key box 3 Click Register and confirm that the new License Key is listed in the Channel Connection License box 4 Click OK Unlocking New Network Device Follow the instructions above for registering the NVR upgrade to unlock any additional network devices ...

Page 43: ...e click the mouse at each point and double click to close the shape 8 Click OK 9 Move the sliders to adjust motion sensitivity and the noise filter 10 Define the pre alarm and post alarm recording time for a motion event Pre Alarm 0 50 Seconds The number of seconds the DVR records before motion is detected Post Alarm MOTION 0 50 Seconds The number of seconds the DVR records after motion is detecte...

Page 44: ... a motion event occurs Regular Interval Recording Regular Interval Recording allows users to record a single frame every few minutes or hours when there is no motion This option is only available when Motion recording or Sensor recording is selected in the recording schedule To enable Regular Interval Recording 1 Select the Regular Interval Recording check box 2 Specify how often to take an image ...

Page 45: ...rding desired In addition this window contains the System Restart options that allow the user to perform basic system maintenance by automatically scheduling the DVR to restart periodically Single Day Selection Multi Day Selection Open Restart Setup Window Create Special Day Recording Schedules Recording Schedule Window Emergency IP Setup Recording Mode Options ...

Page 46: ...sor event occurs the associated cameras will begin recording as a Sensor Event Sensor Recordings will be flagged and searchable using the Index Search Mode Cameras are associated to sensors in the Camera Setup menu Single Day Selection Multi Day Selection Open Restart Setup Window Create Special Day Sensor Schedules Sensor Schedule Window Emergency IP Setup Alarm Options ...

Page 47: ...on sends a Map Alarm to Central Station software such as SCS Multi Site Management EMERGENCY AGENT This option sends the Alarm Event to the Emergency Agent software Motion can be designated as an alarm event Often motion does not need to be treated as an Alarm event Ex During work hours motion that occurs is expected and should not be treated as an alarm However after business hours any motion tha...

Page 48: ...ing the arrow to the right of the Date Bar 3 Highlight the time blocks within the Recording Schedule window for the camera s selected Once the desired Time Blocks are highlighted click a Recording Mode button 4 When finished creating the schedule the Save Special Day Note The special day should now appear as a date in the Special Day Schedule Deleting a Special Day Schedule 1 Select a date from th...

Page 49: ... on the Setup screen 2 Click Restart Setup 3 Select the day s of the week to schedule an automatic system restart and select the check box to enable shut down Note This step alone does not trigger the DVR to restart only to shut down 4 Specify the time of day to schedule the system restart 5 Select the Restart option Note If Off is selected the DVR will shut down at the specified time but not rest...

Page 50: ...play Size Select from available monitor display sizes Use to correctly display video on wide screen monitors Voice Warning The DVR allows users to play a sound file when either a Motion event or Sensor event occurs This file can be a custom created sound file that is unique to the application The selected WAV file is played through speakers attached to the DVR 1 Click the Open Sound File icon to b...

Page 51: ... on the Display screen and then click General 8 Under Display Settings select the Use Full Screen check box and then select the correct resolution from the Display Size list 9 Click Apply Hybrid Sensor Setup This interface is used to link Hard Contact Sensor Inputs from supported Network Devices to the DVR Software Volume The volume control allows fine tuning of the volume settings on the DVR Volu...

Page 52: ... Mode Create non standard screen divisions Skip 0 FPS Channel Sequence skips cameras with no video signal Create Custom Auto Sequence 1 Open General setup and click Sequence Setting 2 Click individual cameras in the left pane or click Select All to include all cameras in the sequence 3 Select an Interval time in seconds to display each screen in the sequence 4 Select screen division options for ap...

Page 53: ...y Agent and enable Remote Access Transport Rate A bandwidth throttle based on percentage of free network Web Viewer iDVR Enables Disables access to the DVR using the Web Viewer interface Use with Emergency Agent Enable RS 232 Keyboards PTZ Between DVR and Remote Client Settings for Video Sent to Remote Client Use with Remote Connections ...

Page 54: ... relative to the DVR and store tech support and contact number information Site Code A user specified unique identification name used by other DVR software to identify the DVR Remote Emergency Agent SCS Digital Signature Verifier User Defined Contact Numbers Current Server Software Version Total HDD Available HDD Space Enter comments ...

Page 55: ...isplays the partition scheme and health status of the Hard Disk Drives in the DVR This window is often used to troubleshoot a DVR or verify the amount of Hard Drive storage installed For more information about Disk Management consult a Windows XP manual Select Date Log Data Display Export Log Data 1 to 7 days ...

Page 56: ...ess To set the IP address of the DVR follow the steps below 1 On the Display screen click Exit and choose Restart in Windows Mode 2 Right click My Network Places and click Properties 3 On the General tab click Internet Protocol TCP IP and then click Properties 4 Select Use the following IP address 5 Enter the following values or as specified by the department responsible for network administration...

Page 57: ...og into the User Management Console Note The Delete User button immediately deletes the user use cautiously Add a New User 1 From the Display screen click Administrative 2 Click User Management 3 Click Add User to open the User window 4 Enter a User Name and Password 5 Enable appropriate Permissions 6 Select Cameras and Audio channels to hide from the user 7 Assign a User Rank 8 Click OK to save c...

Page 58: ...dministrator password and click OK 5 Select a user from the Select User box and click Update User 6 Set the user s rank using the User Rank list and click OK to save changes Changing the Administrator Password 1 Inside Administrative setup click User Management When the prompt appears click Change Password 2 Enter the new password and click OK Default Administrator Password The default administrat...

Page 59: ...n if necessary 7 If using a secondary email account select the Use Secondary SMTP check box and complete the SMTP information 8 Click Test to check settings 9 Click Apply when finished Users 1 Set up the General tab first 2 Click the Users tab 3 Select the type of Event to send email on 4 Enter the User Name and E mail Address of an email recipient 5 Click Add 6 Repeat for additional recipients an...

Page 60: ...x 3 Define the number of minutes 4 Select an Alert Option Beep or Popup Message if desired 5 Click Apply Recording Data Check 1 Setup the General and Users tabs first see above 2 Select the Recording Data Check check box 3 Define the number of hours between data checks 4 Select the Action Method 5 Click Apply ...

Page 61: ...Select the type of SMART event to trigger an action 5 Define the maximum HDD temperature 6 Select an action method 7 Click Apply Alarm Event 1 Setup the General and Users tabs first see above 2 Select the Use Email Alarm check box 3 Define the number of minutes between recording data checks 4 Select Motion and or Sensor to send and alert on that type of event 5 Click Apply 6 Click Close to return ...

Page 62: ... person is detected and the user wants to flag that section of video for easy retrieval at a later date Activate Instant Recording 1 From the Display screen double right click the camera on which to enable instant recording An INSTANT label will be placed on the upper right corner of the video 2 To turn the Instant Recording option off double right click the camera a second time Searching Instant ...

Page 63: ...63 SEARCH This chapter includes the following information Search Overview Daylight Saving Time Index Search Preview Search Graphic Search Motion Search ...

Page 64: ...The following chapter describes how to use the DVR Search features Note Audio Channel buttons are only viewable when one camera is selected Play Controls Back Frame Moves video back one frame Rewind Rewinds video Stop Stops video playback Play Plays video Forward Frame Moves video forward one frame Current Date Time Playback Date Time Audio Channels Hour Minute Control Bar Screen Division buttons ...

Page 65: ...n Video from a Saved Location Previously saved video clips or backup files can be searched for content Find file by date and time or by name 1 Click Open to search for the saved file 2 Select a file from the list of saved clips and backup files or search by start hour 3 Click OK to open the saved file Time Sync The Time Sync option synchronizes a single channel of video to playback in real time Or...

Page 66: ... manual for more information 3 Click Print to print the selected images Note The message NO DEFAULT PRINTERS INSTALLED will display if no printer is installed DAYLIGHT SAVING TIME The DVR automatically adjusts for Daylight Saving Time changes When the hour jumps forward no video is lost because an hour is skipped However when the hour falls back there is a duplicated hour that under normal circums...

Page 67: ... Windows supplied or third party compression and decompression module called a codec AVI is used to export a video clip 1 From the Search screen click Save 2 Select the Export Type Image File JPG or AVI File Note Different image format types provide different file sizes quality and compatibility Image File a Select Quality 50 100 When size is not an issue set the quality to 100 AVI File a Enter th...

Page 68: ...ark in the Title box 8 Enter a memo or notes in the More Information box 9 You may also select additional channels to include video at different locations recorded at the same time 10 Click Create Modify Bookmarks You can modify a previously created bookmark to change the start or end time of the clip add additional comments change the title or add additional cameras 1 From the Search screen click...

Page 69: ...additional information 7 Click Backup to start the backup Note If backing up to a removable USB device click the Unplug or Eject Hardware button after backup is complete to safely remove the device Single Clip Backup Using Bookmark Data 1 From the Search screen click the Save button 2 Select the drive from the file tree to save data to Hard disk drive removable drive CD DVD drive 3 Click Use Bookm...

Page 70: ...od 5 Select an event type to search Sensor Motion Instant Record or select the All Event option 6 Click OK There may be a delay while results are returned Results will be displayed in a column on the left side of the screen Each line represents a segment of video If no results are found NO IMAGE FOUND will appear in the column 7 Once the results are displayed double click any one to play the assoc...

Page 71: ...at appears has 24 images displayed Each image represents the first second of each hour If there is no image recorded during that period then nothing will be displayed When an hour is selected by double clicking on the image a new screen appears with 6 images Each of these images represents a 10 minute segment of video within the selected hour Once a 10 minute segment is selected by double clicking...

Page 72: ...ect the 1 minute segment of video to play A single image displays If needed return to the previous 10 image view by right clicking on an image 6 Use the Play controls to play the video of the selected segment 7 To exit out of the Preview search with the current image still selected click Preview Search again to clear it GRAPHIC SEARCH The Graphic Search option displays video in graph format Perfor...

Page 73: ...ouse on the video display to define a motion region area Resize by pulling on the small square boxes located on the outer perimeter of the area 5 Click Start Search the Object Search Filter Information window will open 6 Select an End date time One hour is the default setting 7 Adjust the sensitivity if necessary 8 Click OK 9 Select a motion event from the search results list displayed on the righ...

Page 74: ...ming a Motion Search 1 From the Search screen select a camera Motion Search can only be performed on one camera at a time 2 Click Graphic Search and then click Motion Search 3 Click the calendar icon to select a day 4 Adjust the motion level line 5 Adjust the timeline display settings 6 Click the play button to start playback Tip You can drag the blue line on the Timeline or motion level box to ad...

Page 75: ...e video within seconds of an alarm event or suspicious activity 1 Move the mouse cursor over the desired live video display on the Live Display screen 2 Press the scroll button on the mouse 3 The search in live Controls will display at the bottom of the image 4 Use the controls to pause rewind move frame by frame or resume playing as desired ...

Page 76: ...76 NOTES ...

Page 77: ...77 BACKING UP VIDEO DATA This chapter includes the following information Overview Saving Video to a DVD Saving Video from a Single Camera Scheduling Regular Video Backup ...

Page 78: ...rded to The DVR backs up video data using a proprietary compression format that can only be read by the DVR Backup Program This ensures the integrity of the data Throughout the backup process the DVR will continue recording without interruption This is the result of the tremendous multiplexing power of the DVR which allows it to perform virtually all functions without disrupting the recording proc...

Page 79: ...1 Click Backup on the Display screen 2 Select the date or dates to back up using the calendar Dates highlighted in blue contain recorded data 3 Select the blocks of time to back up using the Hour Minute grid Blocks of time with recorded video are highlighted in green Blocks of time selected for backup are highlighted in red 4 Select the backup drive or drives under Select Backup Media or click Net...

Page 80: ...enter window 3 Set the Start Time and End Time under Time Setup 4 Select the cameras to back up in the Channel Selection box 5 Select the Backup Drive to save the backup video to 6 Select the Include Viewer check box to include the Backup Viewer Application 7 Enter pertinent clip information into the Clip Information section in the Description box 8 Click Backup to begin the backup process A progr...

Page 81: ... Backup Media menu or the Network Drive button To save to a local drive or partition you must first rename the location Backup 7 Check the Overwrite on Disk Full check box to overwrite previous scheduled backups when the disk becomes full 8 Click Save Backup Setting to save the current backup setting and return to the Display screen Specifying Scheduled Backup Drives In order to use the Scheduled ...

Page 82: ...82 NOTES ...

Page 83: ...83 LAN ISDN PSTN CONNECTIONS This chapter includes the following information Overview Configuring TCP IP Settings Connecting to a LAN LAN ISDN PSTN Connections ...

Page 84: ...TING TO A LAN USING TCP IP The networking options of the DVR can create and edit all Network settings available on Windows XP Embedded The DVR comes equipped with a 10 100 Network Interface Card NIC This card uses a standard RJ 45 connector Configuring TCP IP Settings 1 On the Display screen click Exit and select Restart in Windows Mode 2 Right click the My Network Places icon located on the deskt...

Page 85: ...85 WEB VIEWER This chapter includes the following information Overview Configuring the Web Viewer ...

Page 86: ...ive video from virtually any computer with an internet connection using Microsoft Internet Explorer In order to log in to the DVR server a user account must be made for the user This ensures that only authorized personnel are allowed to log in In addition each user can be assigned different privileges that allow them or deny them access to different functions For example a user can be granted acce...

Page 87: ...he IP address of the DVR into the Address Bar 3 When attempting this for the first time on a computer a window will open and you will be asked to accept an Active X installation Select Yes to this NOTE If you receive a message saying Internet Explorer security settings do not allow you to download Active X components then you will need to adjust the browser security settings One way to do this is ...

Page 88: ...88 ...

Page 89: ...89 INCLUDED SOFTWARE SETUP This chapter includes the following information Emergency Agent Overview Remote Software Overview Digital Verifier Backup Viewer ...

Page 90: ...menu if necessary It is recommended that the default setting should be used unless the port must be changed 4 Click the Schedule Setup button Enter the IP Address of the computer running the Emergency agent software 5 Click the box next to the IP Address to enable it 6 Select the Sensor radio button 7 Create a schedule for the appropriate sensor 8 Click Apply Configuring the Client PC All configur...

Page 91: ...ration settings for activating an audible indicator or popup window when the Emergency Agent receives an event EMERGENCY AGENT WINDOW Filter Event List 1 Select a DVR from the DVR List in the Filter Options section 2 Select the Date to include 3 Select the type of Events to include 4 Select the event levels Review Dismiss Critical Default 5 Click the On button to display filtered event listings DV...

Page 92: ...ck Setup 2 Type the desired text in the box below the Alarm Confirmation List NOTE The items in the Alarm Confirmation List will be available on a list under Status Setting in main Emergency Agent screen 3 Click Add 4 Click OK to save changes and close the window ...

Page 93: ...ed video 3 Select the Continue Playing check box to watch all recorded events When cleared playback stops at the end of the alarm event 4 Select the Same Camera check box to watch all events recorded by a single camera 5 Click Apply after making any changes Export Video 1 Double click an event listing to open the Search Alarm window 2 Use the play controls to locate the desired video 3 Click the R...

Page 94: ...ser is allowed to access setup or control a PTZ camera at any given time The pictures per second passed to the Remote Client vary greatly depending on the connection type and speed In order to log in to the DVR server a user account must be made for the user This ensures that only authorized personnel are allowed to log in In addition each user can be assigned different privileges that allow them ...

Page 95: ...lix Remote Center The Surveillix Remote Software opens and the Local Connection window opens 2 Click New to open the Site Info window 3 Select the Site Type and enter a Site Name The Site Name will be the name displayed inside the connection box to help identify the unit 4 Enter the IP Address of the DVR server By default the DVR is set to connect using DHCP 5 Enter the Center Port This setting is...

Page 96: ...ch data Configuring the Server for Remote Connection 1 Enter Setup on the DVR 2 Click Network to open the Network menu 3 Clear the Disable Remote Control check box You should now be allowed to adjust port settings if necessary Note If you are using a Firewall it may be necessary to adjust the port settings on both the DVR and the Firewall Contact the Network Administrator for more information 4 Cl...

Page 97: ...Verifier option to begin installation 3 When the Welcome screen appears click Next 4 When the Setup Complete window appears click Finish Installation is complete Using the Digital Verifier 1 Open the Digital Verification program by selecting Start Programs Surveillix Digital Verifier Digital Signature Verifier 2 Click the Browse button to load the JPG image 3 Enter the Site Code of the DVR that th...

Page 98: ...he POS component or select No for a basic install Click Next Note The POS component is only necessary when connecting to a server running the POS Upgrade 5 When the Choose Destination Location window opens click Next This will install Backup Viewer in the default destination folder 6 Select the shortcuts to install or clear all boxes for no shortcuts Click Next 7 When the InstallShield Wizard Comp...

Page 99: ...personnel are allowed to log in In addition each user can be assigned different privileges that allow them or deny them access to different functions Configuring the Server for Remote Connection 1 Enter Setup on the DVR 2 Click the Network Setup Button 3 Uncheck the Disable Remote Control option You should now be allowed to adjust port settings if necessary NOTE If you are using a Firewall it may ...

Page 100: ...100 ...

Page 101: ...101 APPENDIX The Appendix contains technical specifications for many of the NVS internal components ...

Page 102: ... 25 PPS PAL Motion Detection Up to 15 Regions Per Channel Adjustable Sensitivity Remote Operation Full Remote Control Through PSTN ISDN ADSL LAN and TCP IP Remote Software Compatible with Microsoft Windows 2000 XP Vista PAN TILT ZOOM Built in Software Interface Recording Mode Continuous Motion Detection Sensor Scheduled Recording Backup USB DVD RW Digital Signature Supports Digital Signature Verif...

Reviews: