


69
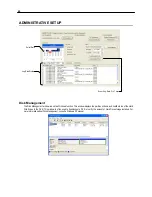
Adjust the Brightness of an Image
1.
Select an image to adjust by double-clicking on the desired image. Multiple images cannot be adjusted at one time.
2.
Move the Brightness slide bar to the right or left to adjust the brightness.
3.
Reset the Brightness by moving the slider back to the center of the bar.
Zooming in on an Image
1.
Select an image to adjust by double-clicking on the desired image. Multiple images cannot be adjusted at one time.
2.
Move the Zoom slide bar to the right or left to zoom in or out of an image.
3.
Reset the Zoom by moving the slider back to its original position on the bar.
Zooming in on a Portion of an Image
1.
Right-click the area of interest on the image and select Zoom.
- or – Double-right-click the image.
2.
Repeat to zoom in further.
3.
Continue clicking the right mouse button and the image zoom will cycle back to the original size.
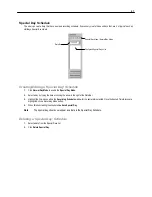
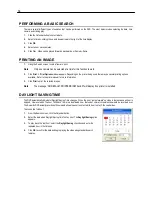
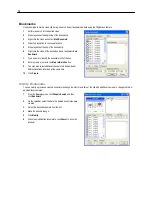
Open Video from a Saved Location
Previously saved video clips or backup files can be searched for content. Find file by date and time or by name.
1.
Click Open to search for the saved file.
2.
Select a file from the list of saved clips and backup files or search by start hour.
3.
Click OK to open the saved file.
Time Sync
The Time Sync option synchronizes a single channel of video to playback in real time. Ordinarily the video may playback slower or
faster depending on several factors, including how many PPS recorded and number of cameras playing at the same time.
1.
Select a single image to synchronize by double-clicking on an image.
2.
Click Time Sync. The video will now playback in real time.
Clean Image
The DVR is capable of recording video using one of three different resolutions. When using the 720 x 480 resolution, two fields are
mixed. Because of the timing gap between the two fields, according to the standardized image rules, after image might occur to high
speed moving images. The Surveillix DVR allows the user to remove this by clicking the Clean Image button.
Summary of Contents for Surveillix NVS
Page 2: ...ii ...
Page 16: ...16 ...
Page 18: ...18 ...
Page 20: ...20 ...
Page 38: ...38 ...
Page 80: ...80 NOTES ...
Page 88: ...88 NOTES ...
Page 94: ...94 NOTES ...
Page 97: ...97 LDAP INTEGRATION This chapter includes the following information Installing LDAP ...
Page 100: ...100 NOTES ...
Page 104: ...104 ...
Page 116: ...116 ...