background image

3. APPEARANCE 

3. 3 Connectors 

3-3 

EO1-13021


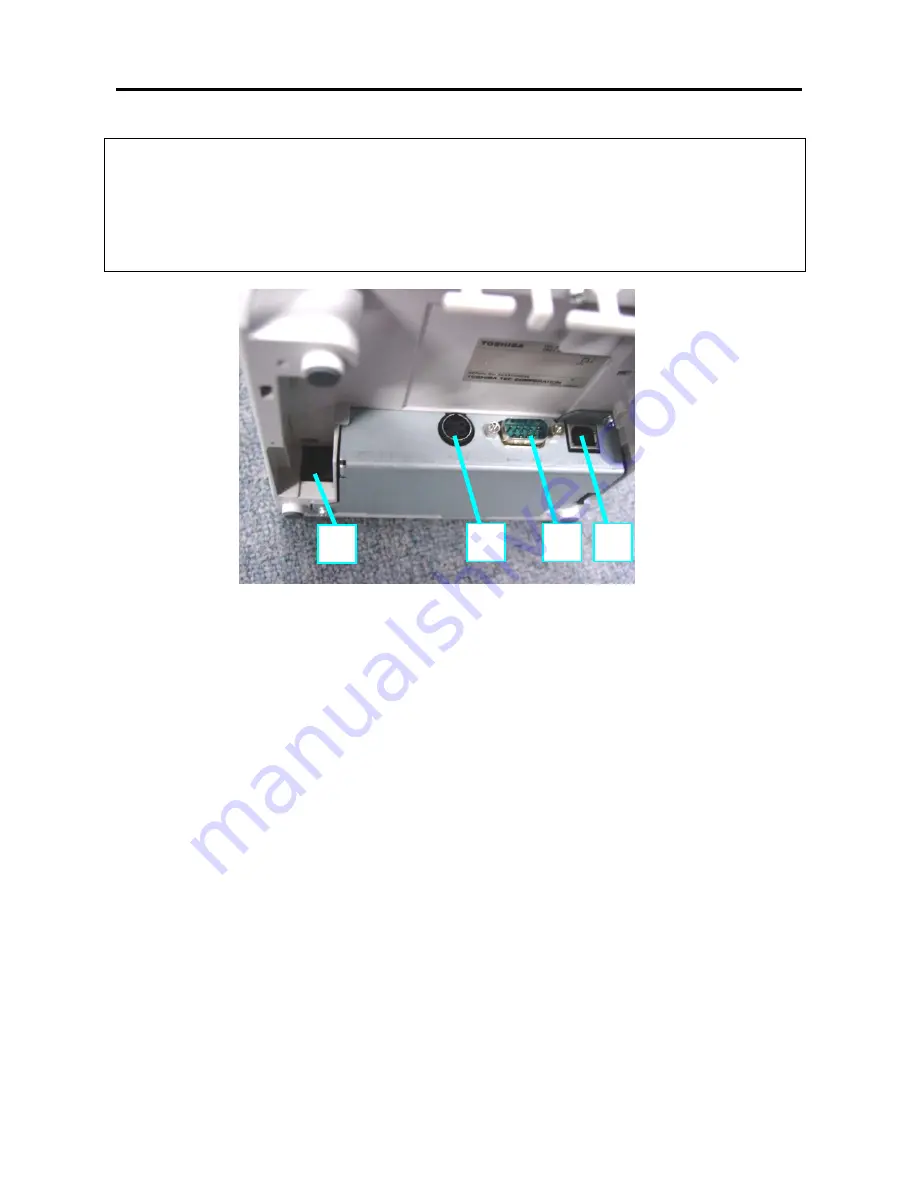
3.3 Connectors 


CAUTION! 
1.The drawer interface connector is exclusively for connecting the drawer. Do not connect a phone 

line or any other cables than the drawer cable to this connector. Doing so may cause a failure of 
the phone line and this printer. 

2.To the DC24V connector (socket connector), do not connect anything other than the built-in AC 

adapter. 

3.The built-in AC adapter is exclusively for this printer. Do not use it for any other machines. 


[DC24V] (Socket connector) 

The built-in AC adapter su24V power to the printer through this connector. Do not connect 
anything other than the TOSHIBA TEC Specified AC adapter. 
  

[Serial interface connector]  

An interface cable which connects the printer to a POS terminal or Personal Computer is connected to 
this connector. A RS-232C interface cable (Serial I/F model) is needed for this connector. 
 

[USB interface connector]  

An interface cable which connects the printer to a POS terminal or Personal Computer is connected to 
this connector. A USB I/F (V2.0 Full Speed) is needed for this connector. 
 

4 [Drawer interface Connector] [CDKO] (6 pin modular connector) 

A drawer cable which connects the printer to a drawer is connected to this connector. To this connector, 
a TOSHIBA drawer can be connected. Do not connect anything other than the connectable drawer.  

 
NOTE: 
For connectable drawers, refer to your nearest authorized TOSHIBA TEC representati

ve.  


 1

 2

 3

Summary of Contents for SPAA-206-R1

Page 1: ...TOSHIBA REMOTE RECEIPT PRINTER TRST A15 SERIES Owner s Manual ...

Page 2: ...tal device pursuant to Part 15 of the FCC Rules These limits are designed to provide reasonable protection against harmful interference when the equipment is operated in a commercial environment This equipment generates uses and can radiate radio frequency energy and if not installed and used in accordance with the instruction manual may cause harmful interference to radio communications Operation...

Page 3: ...g with wet hands as this may cause electric shock If the machines share the same outlet with any other electrical appliances that consume large amounts of power the voltage will fluctuate widely each time these appliances operate Be sure to provide an exclusive outlet for the machine as this may cause fire or electric shock Do not place metal objects or water filled containers such as flower vases...

Page 4: ...umidity dust or gas Ensure the printer is operated on a level surface Any data stored in the memory of the printer could be lost during a printer fault Try to avoid using this equipment on the same power supply as high voltage equipment or equipment likely to cause mains interference Unplug the machine whenever you are working inside it or cleaning it Keep your work environment static free Do not ...

Page 5: ...g the Power Cord and Interface Cable 5 2 5 2 Connecting the Drawer 5 4 5 3 Loading the Receipt Roll 5 5 5 4 Self Test Print 5 7 6 GENERAL MAINTENANCE 6 1 6 1 Cleaning 6 1 6 1 1 Cleaning the Print Head and Platen 6 1 6 1 2 Cleaning the Covers 6 1 6 2 Removing Jammed Paper 6 2 7 TROUBLESHOOTING 7 1 CAUTION 1 This manual may not be copied in while or in part without prior written permission of TOSHIB...

Page 6: ...ly to help gain the maximum performance and life from your printer For most queries please refer to this manual and keep it safe for future reference 1 2 Features Due to a paper drop in mechanism the paper replacement can be done by just dropping a new paper roll and closing the cover This also makes the print head cleaning easy This printer prints in thermal direct method at high speed max 170 mm...

Page 7: ...ser defined characters and logos are downloadable in the flash memory Line spacing 7 52 default and variable lines per inch Printable bar codes UPC A UPC E JAN13 EAN JAN8 EAN Code 39 Code 128 Interleaf 2 of 5 Codabar PDF417 Code 93 Cut method Partial Cut Paper Thermal paper roll 80 mm x dia 83 mm Max Thermal paper roll 58 mm x dia 83 mm Max Interface RS232C I F or USB I F V2 0 Full Speed Parallel ...

Page 8: ... use of the TRST A15 TOSHIBA remote receipt printer It is installed into the printer when using a 58 mm wide receipt roll Y Cable KIT A10 Y10 U QM R A 1 0 m printer interface cable Printer side USB Interface Connector DC24V Socket Connector POS terminal side Powered USB Connector Y Cable KIT A10 Y25 U QM R A 2 5 m printer interface cable Printer side USB Interface Connector DC24V Socket Connector ...

Page 9: ...specified paper may shorten the head life of the printer resulting in problems with print quality cause a paper feed failure or shorten the cutter life All paper should be handled with care to avoid any damage to the paper Read the following guideline carefully Do not store the paper for longer than the manufacturer s recommended shelf life Store the paper in a cool dry place Avoid areas where the...

Page 10: ... Blinking Blue The Error LED indicates an error by blinking FEED Button Used to feed receipt paper A touch of this button causes one line feed Pressing and holding it feeds the paper continuously When the power switch is turned on while the FEED button is pressed and held the printer will perform a self test print Feed Button Printer Cover LED Power Switch Top Cover Cover Open Button ...

Page 11: ... Do Where to Go Receipt paper is out Change the paper now Do not run a transaction without paper as the data may be lost See Loading the Receipt Roll in chapter 5 3 Receipt cover is open Close the cover The printer will not operate with the cover open Knife failure Open the receipt cover and check the knife Clear any jammed paper you can see Tear off any excess paper against the tear off blade NOT...

Page 12: ...ing other than the TOSHIBA TEC Specified AC adapter 2 Serial interface connector An interface cable which connects the printer to a POS terminal or Personal Computer is connected to this connector A RS 232C interface cable Serial I F model is needed for this connector 3 USB interface connector An interface cable which connects the printer to a POS terminal or Personal Computer is connected to this...

Page 13: ...tronics parallel port To communicate with the TOSHIBA POS terminal a Centronics interface cable is required Centronics cable 36 pins Interface Cables For the serial interface model use the RS 232C cable which satisfies the following pin configuration and the specification of the connector For the USB interface model use the USB cable which satisfies the following pin configuration and the specific...

Page 14: ...4 SET UP PROCEDURE 4 1 Requirements for Operation 4 2 EO1 13021 RS 232C cable pin configuration TRST A15 9 Pin Female 9 Pin Female ...

Page 15: ... 4 3 EO1 13021 USB cable connector Parallel Interface Type Option IEEE 1284 B receptacle PIN No Signal 1 STROBE 2 9 PD1 8 10 ACK 11 BUSY 12 PERROR 13 SELECT 14 AUTOFD 31 INIT 32 FAULT 36 SELECTIN 19 30 GND 15 18 N C 33 35 N C 1 2 3 4 Printer View End ...

Page 16: ... Insert the power cord into the AC inlet 4 Connect the interface cable to a TOSHIBA POS terminal and plug in the power cord to the AC outlet 5 If a drawer is desired to be connected connect the drawer interface cable to the printer 6 Secure the drawer ground wire to the ground terminal on the rear of the printer 7 Turn the printer power ON 8 Open the printer cover 9 Load the receipt roll into the ...

Page 17: ...electric shock or broken wire 4 When it thunders unplug the power cord Lightning stroke may cause fire or electric shock 5 Keep the power cord away from a heater The cover of the power cord may be melted causing fire or electric shock 6 Do not connect the power cord to the AC outlet provided on the POS terminal such as ST 5600 ST 5500 etc CAUTION 1 When separating the AC adapter please contact you...

Page 18: ...and the power cord firmly 1 Turn the printer power OFF 2 Insert the power cord into the AC inlet 3 Connect and secure the interface cable to the interface connector in the correct orientation Serial interface Secure the connector with the screws USB interface Securely insert the connector until a positive click is heard Parallel interface Secure the connector with the locking tabs Serial Interface...

Page 19: ...TALLATION PROCEDURE 5 1 Connecting the Power Cord and Interface Cable 5 3 4 Connect the interface cable to the TOSHIBA POS terminal or Personal Computer and then plug in the power cord to the AC outlet Interface cable ...

Page 20: ...connector 6 pin modular connector A Drawer cable which connects the printer to a drawer is connected to this connector To this connector a TOSHIBA drawer can be connected Do not connect anything other than the connectable drawer NOTE For connectable drawers refer to your nearest authroized TOSHIBA TEC representative Ground terminal 6 pin modular connector The drawer interface cable s ground wire i...

Page 21: ...paper by applying heat to the paper to react with the chemicals on the paper surface A red line which appears on the reverse side of the receipt paper indicates that the paper is almost used up WARNING The print head becomes very hot while printing Never touch the print head to avoid getting burned Standard operating temperature of printer is 5 o C to 50 o C Please do not operate out of range for ...

Page 22: ...print quality cause a paper feed failure or shorten the cutter life 2 Do not subject the thermal receipt roll to water oil or heat source as this will darken the paper 3 Load the receipt roll in the correct orientation Failure to do this may cause a paper jam error 4 Care must be taken not to damage the print head and platen when the printer cover is opened as this may cause a poor print or a prin...

Page 23: ...printer while holding the Paper Feed Button The printer will print the Current Setting Form then cuts the paper to print the Mfg Adjustment Menu 3 If you do not hold the Paper Feed Button while power up the printer it will go to Online Mode This menu allows you to print different test patterns Selections are made using the Paper Feed Button Mfg Adjustment Menu Select a sub menu EXIT 1 Click Rollin...

Page 24: ...ntinuously When Rolling ASCII Print Rcpt is selected printer prints the following menu After selection of the printing side test print will start SELECT PRINTING SIDE Front Side Only 1 Click Back Side Only 2 Click Double Side 3 Click Enter code then hold Button DOWN at least 1 second to validate Press the Paper Feed Button to stop the test Rolling ASCII Stop and exit test Long Click Page number O ...

Page 25: ...ter prints the following menu After selection of the printing side test print will start Press the Paper Feed Button to start or stop the test SELECT PRINTING SIDE Front Side Only 1 Click Back Side Only 2 Click Double Side 3 Click Enter code then hold Button DOWN at least 1 second to validate Press the Paper Feed Button to stop the test H Print test Stop and exit test Long Click Page number HHHHH ...

Page 26: ...ted printer prints the following menu After selection of the printing side test print will start Press the Paper Feed Button to start or stop the test SELECT PRINTING SIDE Front Side Only 1 Click Back Side Only 2 Click Double Side 3 Click Enter code then hold Button DOWN at least 1 second to validate Press the Paper Feed Button to continue or stop the test Duty Check Print Stop and exit test Short...

Page 27: ... test START CURRENT SETTING PRINTING Return Main Menu Short Click Start Printing Long Click NOTE Press the Paper Feed Button for at least one second to validate the selection Current Setting Form Model number TRST A15 Serial number 12345678901 Boot Firmware Version V00 02 Revision 00 CRC DEEB Flash Firmware Version V00 06 Revision 00 CRC 6696 SBCS Version V00 01 Revision 00 ...

Page 28: ...d element as static built up may damage the print head To help retain the high quality and performance of your printer it should be cleaned regularly The greater the usage on the printer the more frequent the cleaning i e low usage weekly high usage daily 6 1 Cleaning 6 1 1 Cleaning the Print Head and Platen 1 Turn the power OFF and open the printer cover 2 Clean the print head element cross hatch...

Page 29: ...per DO NOT USE any sharp implement or tool as these will damage the printer 4 Clean the print head and platen then remove any further dust or foreign objects 5 Re load the receipt roll Refer to Section 5 3 Loading the Receipt Roll 6 After closing the printer cover turn the power ON The printer will initialize the auto cutter to restore the printer stand by ...

Page 30: ...e receipt roll loaded properly Does a paper jam error occur Refer to Section 5 3 and load the receipt roll properly Refer to Section 6 2 and remove the jammed paper and re load the receipt roll No printing is performed though the POWER LED lights Is the interface cable connected correctly Does the specification of the interface cable meet that of the POS terminal or the printer Connect the interfa...

Page 31: ...formación sólo concierne a los Estados Miembros de la UE El uso del símbolo de un contenedor con ruedas tachado indica que este producto no puede ser tratado como si fuera un residuo doméstico Asegurando que nos deshacemos de este producto de forma correcta ayudaremos a evitar potenciales consecuencias negativas tanto para el medio ambiente como para la salud pública que podrían producirse debido ...

Page 32: ...E EO1 13021A ...

Reviews: