Toshiba SD2010KB Owner'S Manual Download Page 20

E

ng

lis

h

Playback Feature/DVD Menu Options

to convert and the number of files which already stored in 

the USB should be less than 500 files.) 

- You can find the converted MP3 files  in the folder  

named “CONVERT” in the USB device;  

For every converting, a new sub directory by the name 

between “000” to “196” will be created. Software will 

search for an empty slot between “000” to “196” to create 

the new folder.

If there are other folders in disc or USB,it will be smaller 

than 196.

- During the converting process, do not pull out the USB 

flash memory .

- The connection may not be available depending on the 

type of your USB flash drive.

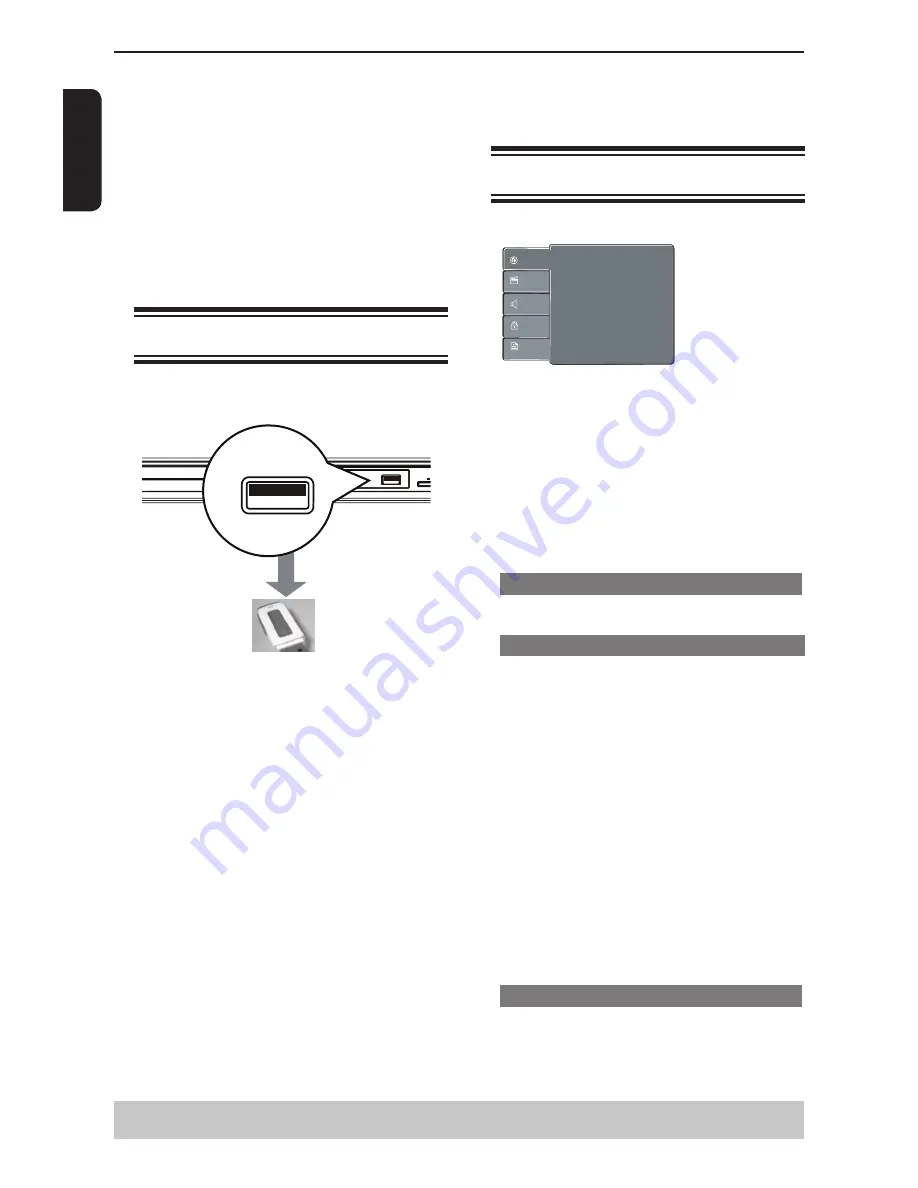
Playing USB Flash Memory


You can play or view the data files (JPEG, DivX

®

 and 

MP3) in the USB flash memory. However, editing or 

copying the data file is not possible.


USB

USB

A

  Plug the USB flash memory directly to the USB jack 

on the front of this unit.

B

  Press USB on the remote control to call up the DISC/

USB mode selection menu.

C

  Use 

 / 

 to select “USB”, then press OK to access 

the data in the drive.

D

  Use 

 / 

 to select a desired file and press OK to 

start playback.


 It only supports FAT format (FAT 12/16/32). It does 

not support NTFS.


 The maximum USB flash memory capacity 

supported is according to FAT32 file system 

specification. It cannot playback files whose file size 

exceed the FAT 32 file system specification.


 For more playback information, see ‘Playing MP3/

JPEG/Kodak picture CD’ for details.

E

  Press STOP 

x

 to stop playback. 

F

6

Press USB on the remote control, then select DISC 

by using OK button to exit from the menu and switch 

to disc mode.


 You can remove the USB flash memory now.


Tips:


- The unit can only support up to a maximum of 200 

folders and 500 files.


- When connecting USB jack , use USB 

flash 

memory only.


- Copy-protected files are not playable.


- The connection may not be available depending on 

the type of your USB flash memory.


This DVD Player setup is carried out via the TV, 

enabling you to customise the DVD player to suit 

your particular requirement.

Using the Language  setup menu

A

  Press SETUP on the remote control.

  

 The system setup menu appears.


OSD language          :
Subtitle                      :

:

Audio                        

:

DVD Menu                 

English

Off

English
English

Language

Video

Audio

Misc

Rating

DivX Subtitle                :

Standard   


B

  Press 

 / 

 to select {

Language

 }, then press 

.

C

  Press 

 / 

 to select an item, then press 

 to 

access.


Example: { 

OSD language

 }

  

The options for the selected item appears.

  

If the selection in the menu is greyed out, that 

       means the feature is not available or not possible to 

change at the current state.

D

  Use 

/

 to select a setting and press OK to 

confirm.


Example: { 

English

 }


The setting is selected and setup is completed.

E

  To exit, press SETUP.


OSD Language


This menu contains various language options for the    

language displayed on the screen.  

Subtitle/Audio/DVD Menu


These menus contain various language options 

for Subtitle, Audio and 

DVD Menu which may be 

recorded on the DVD. 


Tips: 


-Some DVD video discs may be set to display 

subtitles in a different language other than your 

selection. A prior subtitle language may be 

programmed on the disc.


-Some DVD video discs allow you to change subtitle 

selections only via the disc menu. If this is the case, 

press the MENU button and choose the appropriate 

subtitle language  from the selection on the disc 

menu.


-Some DVD video discs may not be played in a 

different audio language that you selected. A prior 

language may be programmed on the disc.


-Some DVD discs may not include your pre-selected 

language . In this case, the DVD player 


automatically displays disc menus consistent with


the disc’s initial language setting. 

DivX

®

 Subtitle


If your 

DivX

® 

files include a subtitle file (see page 

17 for the supported file formats), you may select a 

supported DivX

®

 subtitle language by region.

A

    In ‘Language’, press 

/

 to select 

DivX Subtitle

 }, then press 

.


Helpful hint

:  Press 

 to go back to previous menu item.


          Press SETUP to exit the menu item.

Summary of Contents for SD2010KB

Page 1: ...USB ...

Page 2: ...ience receptacles and the point where they exit from the apparatus 10 Only use attachments accessories specified by the manufacturer 11 Use only with the cart stand tripod bracket or table specified by the manufacturer or sold with the apparatus When a cart is used use caution when moving the cart apparatus combination to avoid injury from tip over 12 Unplug this apparatus during lightning storms ...

Page 3: ...d or legs with the fixings provided according to the instructions DON T listen to headphones at high volume as such use can permanently damage your hearing DON T leave equipment switched on when it is unattended unless it is specifically stated that it is designed for unattended operation or has a stand by mode Switch off using the switch on the equipment and make sure that your family know how to...

Page 4: ...ed when in standby mode To disconnect this equipment completely from the mains power pull out the power plug from the wall outlet Environmental Information All unnecessary packaging has been omitted The packaging has been made easy to separate into three materials cardboard box polystyrene foam buffer and polyethylene bags protective foam sheet Your DVD player consists of materials which can be re...

Page 5: ...f disc or condition of the recording If you are having trouble playing a certain disc remove the disc and try a different one Improperly formatted disc will not play on this DVD Player WARNING RISK OF ELECTRIC SHOCK Never attempt to service this product yourself Opening and removing the covers may expose you to dangerous voltage or other hazards Failure to follow this WARNING may result in death o...

Page 6: ...owing information is only for EU member States The use of the symbol indicates that this product may not be treated as household waste By ensuring this product is disposed of correctly you will help prevent potential negative consequences for the environment and human health which could otherwise be caused by inappropriate waste handling of this product For more detailed information about recyclin...

Page 7: ...guage 13 Playback from Disc Playable discs 13 14 Playback Feature Starting disc playback 14 Basic playback control 14 15 Operations for video playback DVD VCD SVCD 15 Selecting various repeat functions 15 16 Viewing the disc playback Information 16 Special DVD Features 16 Special VCD and SVCD Features 16 17 Playing a DivX Disc 17 Playing MP3 JPEG Kodak picture CD 17 18 MP3 Converter 18 19 Playing ...

Page 8: ...ble not supplied To hear the sound of this DVD player through your TV use the audio cables white red to connect AUDIO OUT L R jacks of the DVD player to corresponding AUDIO IN jacks on the TV cable not supplied Using Component Video Jacks Y PB PR IMPORTANT The progressive scan video quality is only possible when using Y PB PR and a progressive scan TV is required A Use the component video cables g...

Page 9: ... on the stereo system cable not supplied Connecting to a Digital AV Receiver Receiver has a PCM Dolby Digital or MPEG decoder A Select one of the video connections CVBS VIDEO IN SCART IN or COMPONENT VIDEO IN depending on the options available on your TV B Connect the COAXIAL jack of the DVD player to the corresponding Digital Audio In jack on your Receiver cable not supplied C Set the DVD Player ...

Page 10: ... any connections make sure that all the devices are disconnected from the power outlet Connecting the power cord After everything is connected properly plug in the AC power cord to the power outlet Never make or change any connections with the power switched on ...

Page 11: ...digital audio equipment Product Overview Front and Rear panels I 2ON STANDBY Turns the player on or switches it to standby mode B X PLAY PAUSE Starts or pauses playback STOP Stops playback USB jack Input for USB flash memory SCART OUT Connects to SCART input of a TV Y PB PR Component Video Out Connects to Y PB PR input of a TV VIDEO Out CVBS Connects to CVBS Video input of a TV No disc Bad disc Mu...

Page 12: ...mode 16 A B Repeats playback from point A to B on a disc 15 SLOW Do a slow forward 15 CLEAR Delete the mistyped entries or cancel some functions REMOTE SIGNAL EMITTER 12 Point remote control to the sensor on the front panel 2ON STANDBY 12 14 To switch the DVD player to ON or standby mode T SEARCH 16 Start playback from a designated point SETUP 12 19 Enters or exits the system setup menu 15 17 18 C...

Page 13: ...een the lowest and highest channels and may be called FRONT A V IN or VIDEO See your TV s manual for more details Or you may go to channel 1 on your TV then press the Channel down button repeatedly until you see the Video In channel Or the TV remote control may have a button that chooses different video modes C If you are using external equipment such as audio system or receiver turn it on and sel...

Page 14: ...io and DVD Menu languages If the language selected is not available on the disc the disc s default language will be used instead OSD language English Subtitle Auto Language Video Audio Misc Rating DivX Subtitle Standard DVD Menu Audio English German Polish Hungarian Portuguese French A Press SETUP B Press to select Language then press C Press to highlight one of the options below then press Subtit...

Page 15: ...nc This is an official DivX Certified device that plays DivX video Visit www divx com for more information and software tools to convert your files into DivX video ABOUT DIVX VIDEO ON DEMAND This DivX Certified device must be registered in order to play DivX Video on Demand VOD content To generate the registration code locate the DivX VOD section in the device setup menu Go to vod divx com with th...

Page 16: ...ear all the programmed tracks titles chapters D Press STOP twice to cancel program playback Operations for video playback DVD VCD SVCD Using the disc menu Depending on the disc a menu may appear on the TV screen once you load in the disc To select a playback feature or item Use or number buttons on the remote control then press OK to start playback To access or remove the menu Press MENU on the re...

Page 17: ...ime desired time of the disc For DVD Title Chapter Time desired time of the disc B Use the number buttons 0 9 to input a valid number or time 0 cannot be input as the first number This function only apply to DVD VCD CD SVCD C Press OK to confirm The playback skips to the selected title chapter track time Angle When Angle information appears on the screen press ANGLE button on the remote control re...

Page 18: ...der During MP3 CD DA JPEG DivX files playback If Repeat All or Repeat Off and Random are selected all the tracks will be played randomly and endlessly If Repeat Single is selected Random cannot be Helpful hint The operating features described here might not be possible for certain discs Always refer to the instructions supplied with the discs During playback pressing RETURN will return to the menu...

Page 19: ...ID3 On Off On Create ID3 with the converted MP3 Off Does not create ID3 with the converted MP3 Tips The player can only support up to 500 files or 198 folders If there are more than 500 files or 198 folders total in disc and USB as a result of this converting converting will be stopped and a message Too many files or folders in device will appear on the screen The total number of files in the CD w...

Page 20: ...the type of your USB flash memory This DVD Player setup is carried out via the TV enabling you to customise the DVD player to suit your particular requirement Using the Language setup menu A Press SETUP on the remote control The system setup menu appears OSD language Subtitle Audio DVD Menu English Off English English Language Video Audio Misc Rating DivX Subtitle Standard B Press to select Langua...

Page 21: ...D Menu Options Helpful hint Press to go back to previous menu item Press SETUP to exit the menu item then press Fill Fill the screen with decoded image Original Display image as its original size Height Fit Fit the screen height with image height Width Fit Fit the screen width with image width Auto Fit Automatically display the decoded image on screen at a suitable size Pan Scan Automatically disp...

Page 22: ... Press SETUP on the remote control The system setup menu appears Digital Output Night Mode Down Sampling All Off On Language Video Audio Misc Rating 3D Effects Off B Press to select Audio then press C Press to select an item then press to access Example Night Mode The options for the selected item appears If the selection in the menu is greyed out that means the feature is not available or not pos...

Page 23: ...ble for your children or have certain discs played with alternative scenes A In Rating press to select Parental control then press B Use the number buttons to enter the four digit password then press OK See Changing the Password on this page C Press OK again to list the parental level 1 Kid Safe Suitable for children 2 G General Audience recommended as acceptable for viewers of all ages 3 PG Paren...

Page 24: ...mputer onto a CD R RW or DVD R RW for playback on this DVD player Tips All the downloaded movies from DivX Registration can only be played back on this DVD player Time search feature is available during DivX movie playback DivX Deregistration DivX deregistration code is used for deregistering the DVD player from the DivX VOD service through the DivX website For more information visit website www d...

Page 25: ...l Outputs Video output 1 0 V p p 75 Ω pin jack x 1 Video output SCART 1 0 V p p 75 Ω SCART socket x 1 Component video output Y 1 0 V p p 75 Ω pin jack x 1 P B P R 700 mV p p 75 Ω pin jack x 2 Audio output SCART 2 0 V rms 10K Ω SCART socket x 1 Audio output COAXIAL DIGITAL 0 5 V p p 75 Ω pin jack x 1 Audio output ANALOG 2 0 V rms 10K Ω pin jacks L R x 1 Supplied Accessories Remote control SE R0335 ...

Page 26: ... as follow 1 Press OPEN CLOSE on the DVD Player 2 When the disc tray is opened press number button 1 on the remote control for a few seconds Sometimes a small amount of picture distortion may appear depending on the disc being played back This is not a malfunction May be caused by View Mode Setting see page 20 Set to Original for normal viewing Connect DVD Player directly to the TV Make sure the d...

Page 27: ...e Scan on off Operations may not be permitted by the disc Refer to the instructions of the disc jacket Use a commonly available cleaning CD DVD to clean the lens before sending the DVD Player for repair Press STOP twice before selecting system setup menu Depending on the disc availability some menu items cannot be selected Ensure that the output of the Video Out signal is switch to P Scan Componen...

Page 28: ...on this unit MP3 MPEG Audio Layer 3 MP3 is a method of compressing files You can copy MP3 files on CD RW R or DVD R RW discs from a computer and play back the files on this unit Multichannel DVD is specified to have each sound track constitute one sound field Multi channel refers to a structure of sound tracks having three or more channels Parental control A function of the DVD to limit playback o...

Reviews: