


DVD Functions
Information
Español
Precautions
Setup
VCR Functions
EN
– 5 –
Table of Contents
Maintenance
SERVICING
• Please refer to relevant topics on the “Troubleshooting”
on page 27 before returning the unit.
• If this unit becomes inoperative, do not try to correct the
problem by yourself. There are no user-serviceable parts
inside. Turn off, unplug the power plug, and please call
our help line to locate an Authorized Service Center.
CLEANING THE CABINET
• Use a soft cloth slightly moistened with a mild detergent
solution. Do not use a solution containing alcohol, spirits,
ammonia or abrasive.
CLEANING DISCS
• When a disc becomes dirty, clean it with a cleaning cloth.
Wipe the disc from the center to out. Do not wipe in a
circular motion.
• Do not use solvents such as benzine, thinner, commer-
cially available cleaners, detergent, abrasive cleaning
agents or antistatic spray intended for analog records.
CLEANING THE DISC LENS
• If this unit still does not perform properly although you
refer to the relevant sections and to “Troubleshooting”
in this Owner’s Manual, the laser optical pickup unit may
be dirty. Consult your dealer or an Authorized Service
Center for inspection and cleaning of the laser optical
pickup unit.
DISC HANDLING
• When you handle a disc hold it by its edge and try not to
touch the surface of the disc.
• Always store a disc in its protective case when it is not
used.
AUTO HEAD CLEANING
• Automatically cleans video heads as you insert or remove
a cassette tape, so you can see a clear picture.
• Playback picture may become blurred or interrupted
while the TV program reception is clear. Dirt accumu-
lated on the video heads after a long period of use, or
the usage of rental or worn cassette tapes can cause this
problem. If a streaky or snowy picture appears during
playback, the video heads in your unit may need to be
cleaned.
1. Please visit your local audio/video store and purchase a
good quality VHS video head cleaner.
2. If a Video head cleaner does not solve the problem,
please call our toll free customer support line found on
the cover of this manual to locate an authorized service
center.
Note:
• Remember to read the instructions along with the video head cleaner
before use.
• Clean video heads only when problems occur.
PRECAUTIONS
Laser Safety ..............................................................................................................2
IMPORTANT SAFETY INSTRUCTIONS ............................................3
Installation Location .............................................................................................4
Avoid the Hazards of Electrical Shock and Fire ..........................................4
Moisture Condensation Warning.....................................................................4
About Copyright ....................................................................................................4
Notice for Progressive Scan Output ...............................................................4
Auto Power Off and Screen Saver Function (DVD Only) .........................4
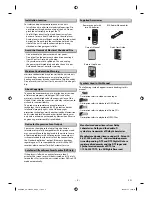
Supplied Accessories ............................................................................................4
Symbols Used in this Manual ............................................................................4
Maintenance ............................................................................................................5
SETUP
Choosing a Disc / Cassette Tape ...................................................6
Playable Media........................................................................................................6
Unplayable Media..................................................................................................6
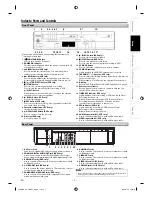
Index to Parts and Controls ...........................................................7
Front Panel ...............................................................................................................7
Rear Panel .................................................................................................................7
Remote Control ......................................................................................................8
Installing the Batteries for the Remote Control .........................................8
DVD Display Panel .................................................................................................9
VCR Display Panel ..................................................................................................9
Selecting DVD or VCR Operation .....................................................................9
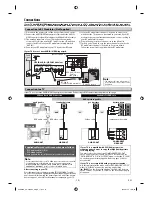
Connections .................................................................................10
Connection to RF Modulator (Not Supplied) ........................................... 10
Connection to a TV............................................................................................. 10
Connection to an Audio System ................................................................... 11
Connection to an External Tuner .................................................................. 11
Preparation for Use .....................................................................12
Turning on Unit for the First Time ................................................................ 12
Clock Setting ........................................................................................................ 12
VCR FUNCTIONS
Playback ......................................................................................13
When You Playback a Cassette Tape Recorded in Hi-Fi Stereo ......... 13
Other Operations .........................................................................13
Index Search ......................................................................................................... 13
Time Search .......................................................................................................... 13
Auto Repeat .......................................................................................................... 14
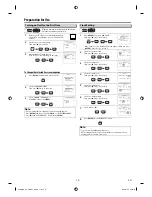
Recording .....................................................................................14
Recording & One-touch Timer Recording (OTR) ..................................... 14
Timer Recording .................................................................................................. 14
Notes for Timer Recording & One-touch Timer Recording (OTR) ..... 15
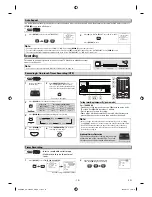
Satellite Link ......................................................................................................... 16
Copying a Cassette Tape ................................................................................. 16
DVD to Cassette Tape Duplication ............................................................... 17
DVD FUNCTIONS
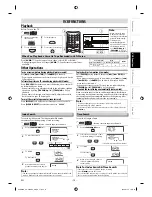
Playback ......................................................................................17
On-Screen Display .......................................................................18
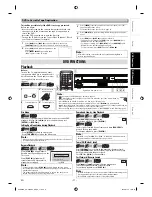
JPEG Playback .............................................................................19
Search Functions .........................................................................20
Using Track Search ............................................................................................. 20
Using Title / Chapter Search ........................................................................... 20
Using Time Search .............................................................................................. 20
Marker Setting ..................................................................................................... 20
Repeat / Random / Programmed Playback ................................21
Repeat Playback .................................................................................................. 21
Repeat A-B Playback .......................................................................................... 21
Random Playback ............................................................................................... 21
Programmed Playback...................................................................................... 21
Special Settings ...........................................................................22
Subtitle Language .............................................................................................. 22
Audio Language .................................................................................................. 22
Camera Angles ..................................................................................................... 22
Black Level Setting ............................................................................................. 22
Stereo Sound Mode ........................................................................................... 22
Virtual Surround .................................................................................................. 22
DVD Setting .................................................................................23
LANGUAGE Setting ............................................................................................ 23
DISPLAY Setting .................................................................................................. 24
AUDIO Setting ...................................................................................................... 24
PARENTAL Setting .............................................................................................. 25
OTHERS Setting ................................................................................................... 26
Reset to the Default Setting (Except for PARENTAL Setting) ............. 26
INFORMATION
Troubleshooting ..........................................................................27
Specifications ..............................................................................28
Language Code List .....................................................................28
LIMITED WARRANTY ....................................................................29
Español ........................................................................................32
Note to CATV system installer:
• This reminder is provided to call the cable TV system installer’s attention
to Article 820-40 of the National Electrical Code, which provides
guidelines for proper grounding - in particular, specifying that the cable
ground shall be connected to the grounding system of the building, as
close to the point of cable entry as possible.
E8EB5UD_SD-V296KU_EN_ES_v1.indd 5
E8EB5UD_SD-V296KU_EN_ES_v1.indd 5
2008/07/14 10:36:17
2008/07/14 10:36:17


