


– 4 –
EN
Symbols Used in this Manual
The following symbols appear in some headings in this
manual.
: Description refers to video cassette tapes.
: Description refers to playback of DVD-Video.
: Description refers to playback of Audio CDs.
: Description refers to playback of JPEG files.
Manufactured under license from Dolby
Laboratories. Dolby and the double-D
symbol are trademarks of Dolby Laboratories.
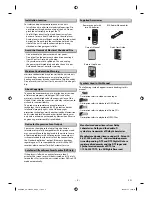
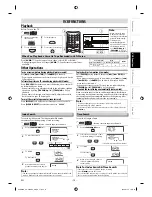
Supplied Accessories
Remote control with
two AA batteries
RCA Audio/Video cables
Owner's Manual
Manufactured under license under U.S. Patent #:
5,451,942 & other U.S. and worldwide patents
issued & pending. DTS and DTS Digital Out are
registered trademarks and the DTS logos and
Symbol are trademarks of DTS, Inc.
©1996-2007 DTS, Inc. All Rights Reserved.
Owner’s Manual
Quick Start Guide
Return Stop Sheet
Auto Power Off and Screen Saver Function (DVD Only)
If the player is left with no activity for more than 5
minutes, the screen saver will be activated, and if it is left
for another 25 minutes, the unit switches from DVD to VCR
mode automatically.
The unauthorized recording, use, distribution, or revision
of television programs, videotapes, DVDs and other
materials, is prohibited under the copyright laws of the
United States and other countries, and may subject you to
civil and/or criminal liability.
This product incorporates copyright protection
technology that is protected by U.S. patents and other
intellectual property rights. Use of this copyright
protection technology must be authorized by Macrovision,
and is intended for home and other limited viewing uses
only unless otherwise authorized by Macrovision. Reverse
engineering or disassembly is prohibited.
Moisture condensation may occur inside the unit when it
is moved from a cold place to a warm place or after
heating a cold room or under conditions of high humidity.
Do not use this unit at least for 2 hours until its inside gets
dry.
Consumers should note that not all high definition
television sets are fully compatible with this product and
may cause artifacts to be displayed in the picture. In case
of picture problems with 480 progressive scan output, it
is recommended that the user switch the connection to
the “standard definition” output. If there are questions
regarding your TV set compatibility with this 480p DVD
recorder, please contact Toshiba Customer Service.
For safety and optimum performance of this unit:
• Install the unit in a horizontal and stable position. Do
not place anything directly on top of the unit. Do not
place the unit directly on top of the TV.
• Shield it from direct sunlight and keep it away from
devices of intense heat. Avoid dusty or humid places.
Avoid places with insufficient ventilation for proper heat
dissipation. Do not block the ventilation holes on the
sides of the unit. Avoid locations subject to strong
vibration or strong magnetic fields.
• Do not handle the power cord with wet hands.
• Do not pull on the power cord when disconnecting it
from AC outlet. Grasp it by the plug.
• If, by accident, water is spilled on this unit, unplug
the power cord immediately and take the unit to our
Authorized Service Center for servicing.
Installation Location
Avoid the Hazards of Electrical Shock and Fire
Moisture Condensation Warning
About Copyright
Notice for Progressive Scan Output
E8EB5UD_SD-V296KU_EN_ES_v1.indd 4
E8EB5UD_SD-V296KU_EN_ES_v1.indd 4
2008/07/14 10:36:14
2008/07/14 10:36:14


