background image

45

■  

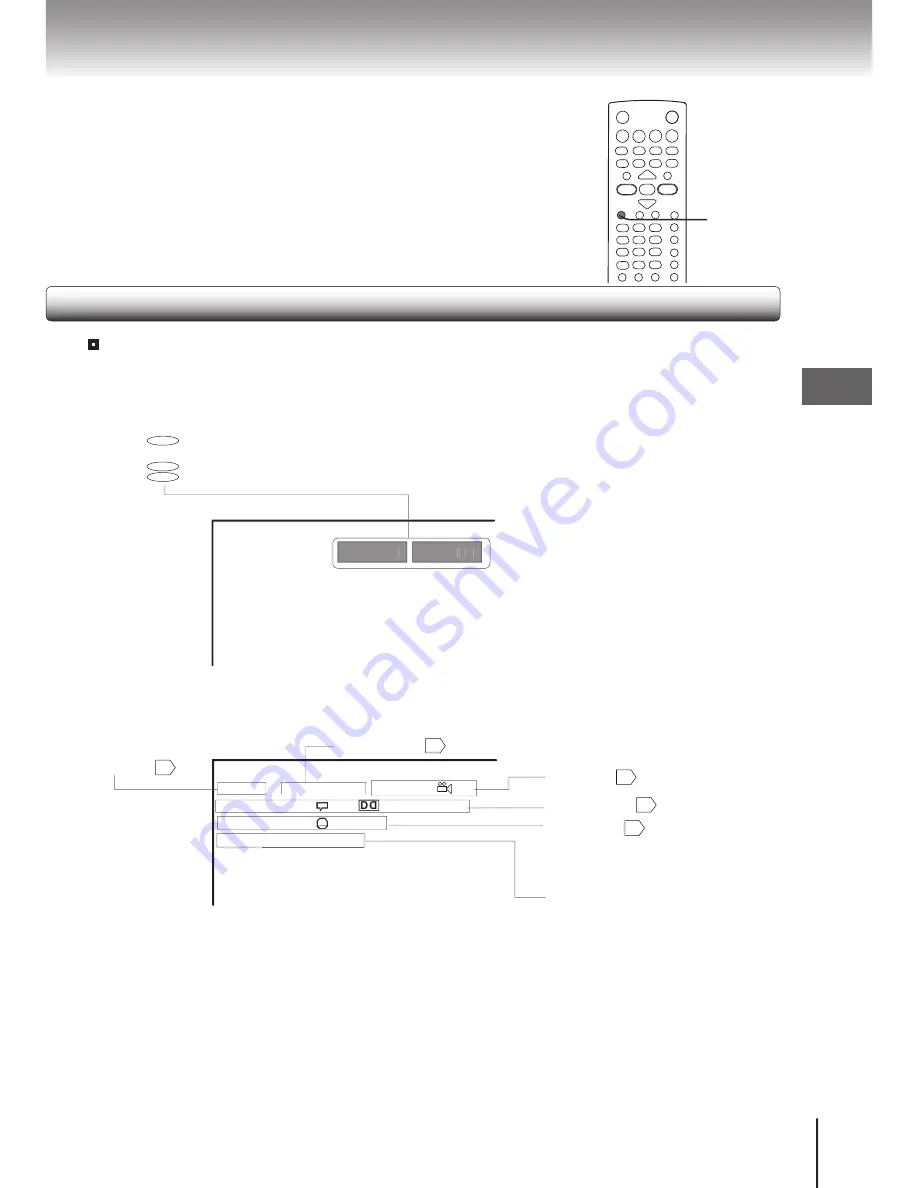
Viewing the operational status

1  Press DISPLAY once.

The following display appears.

Time counter

Elapsed time/remaining time of the current title

Elapsed time/remaining time of the current track

2  Press DISPLAY twice.

The following display appears.

00:16:24

01:47:36

DVD                              00:16:24    01:47:36

Title 1/3     Chapter 11/28  Angle              1/1 

Audio                      1/2         D 5.1 ch ENG

Subtitle                   4/4  ENG

Bitrate            4.543Mbps

3  To turn off the display, press DISPLAY again.

Note


Some discs may not display the time counter.

Bit rate (Mbit/s)

Amount of picture, sound and subtitle 

data in the DVD video disc transferred 

per second.

The larger the value is, the more data 

processed, but this does not necessarily 

insure better picture quality.

Title number 


29

Title 1/3     Chapter 11/28  Angle              1/1 

Subtitle Setting 


40

Language setting 


41

Title 1/3     Chapter 11/28  Angle              1/1 

Title 1/3     Chapter 11/28  Angle              1/1 

Angle Setting 


39

Title 1/3     Chapter 11/28  Angle              1/1 

A

Title 1/3     Chapter 11/28  Angle              1/1 

Title 1/3     Chapter 11/28  Angle              1/1 

S

Bitrate           4.543Mbps

DISPLAY

Chapter number 


29

Title 1/3     Chapter 11/28  Angle              1/1 

D                              00:16:24    01:47:36

D                              00:16:24    01:47:36

DVD

VCD

CD

Advanced

 playback

Summary of Contents for SD-K741

Page 1: ...TOSHIBA DVD VIDEO PLAYER SD K741SU OWNER S MANUAL Introduction Connections 18 Basic playback 24 32 Advanced playback Function setup 56 Others 64 2004 Toshiba Corporation 2 C C ...

Page 2: ...ce contact an authorized service location Use of controls or adjustments or performance of procedures other than those specified herein may result in hazardous radiation exposure To prevent direct exposure to laser beam do not try to open the enclosure Visible and invisible laser radiation when open and interlocks defeated DO NOT STARE INTO BEAM FCC NOTICE This equipment has been tested and found t...

Page 3: ...on for future reference Location of the required label THIS PRODUCT COMPLIES WITH DHHS RULE 21 SUBCHAPTER J PARTS 1040 10 AND 1040 11 AT DATE OF MANUFACTURED THIS DEVICE COMPLIES WITH PART 15 OF THE FCC RULES OPERATION IS SUBJECT TO THE FOLLOWING TWO CONDITIONS 1 THIS DEVICE MAY NOT CAUSE HARMFUL INTERFERENCE AND 2 THIS DEVICE MUST AC CEPT ANY INTERFERENCE RECEIVED INCLUDING INTERFERENCE THAT MAY ...

Page 4: ...it will protect you if you observe the fol lowing procedures for installation use and servicing This unit is fully transistorized and does not contain any parts that can be repaired by the user DO NOT REMOVE THE CABINET COVER OR YOU MAY BE EXPOSED TO DANGEROUS VOLTAGE REFER SERVICING TO QUALIFIED SERVICE PERSONNEL ONLY 1 Read these instructions 2 Keep these instructions 3 Heed all warnings 4 Follo...

Page 5: ...g prong The wide blade or the third prong are provided for your safety If the provided plug does not fit into your outlet consult an electrician for replacement of the obsolete outlet 10 Protect the power cord from being walked on or pinched particularly at plugs convenience recep tacles and the point where they exit from the apparatus 11 Only use attachments accessories specified by the manufacture...

Page 6: ...s has been exposed to rain or moisture does not operate normally or has been dropped 15 When you use headphones keep the volume at a moderate level If you use the headphones continu ously with high volume sound it may cause hearing damage 16 Do not overload wall outlets extension cords or integral convenience receptacles as this can result in a risk of fire or electric shock 17 The apparatus shall ...

Page 7: ...seri ous personal injury and apparatus malfunction 21 If the apparatus should smoke or smell immediately disconnect the power cord from the wall outlet Wait until the smoke or smell stops then ask your dealer for a check and repair Neglecting to do so may cause fire 22 While it is thundering do not touch the connecting cables or the apparatus 23 The apparatus includes lead an ingredient of solder u...

Page 8: ...tion wring well and wipe Use a dry cloth to wipe it dry Do not use any type of solvent such as thinner and benzine as they may damage the surface of the DVD video player If you use a chemical saturated cloth to clean the unit follow that product s instructions Notes on moisture condensation Moisture condensation damages the DVD video player Please read the following carefully Moisture condensation...

Page 9: ...o disc Chapter 1 Chapter 2 Chapter 1 Chapter 2 Chapter 3 Title 1 Title 2 Chapter 1 Chapter 2 C DVD Video disc VIDEO CD audio CD Track 1 Track 2 Track 3 Track 4 Track 5 VIDEO CD audio CD Each title chapter or track is assigned a number which is called title number chapter number or track number respectively There may be discs that do not have these numbers Notes on copyright It is forbidden by law ...

Page 10: ...utes Approx 20 minutes Disc Mark Contains Disc Size Maximum playback time The following discs are also available DVD R discs of DVD video format CD R CD RW discs of CD DA format Some of these discs may be incompatible You cannot play discs other than those listed above You cannot play DVD RAM discs or non standardized discs etc even if they may be labeled as above This DVD video player uses the NT...

Page 11: ...g a specific chapter or track 29 Advanced playback Accessing a Specific Location Directly 32 Entering the time counter of the desired location 32 Setting a bookmark 32 Repeating a Specific Segment 33 Repeating a specific segment 33 Playing in a Varied Order 34 Playing titles chapters or track in a varied order 34 Playing in a Favorite Order 35 Setting titles chapters or tracks in a favorite order 35 Z...

Page 12: ...t panel See the page in for details ON STANDBY indicator 24 ON Lit in green Standby mode Not lit Disc tray 24 DVD display Remote Sensor 15 PLAY button 24 STOP button 27 PAUSE button 26 SKIP button 29 OPEN CLOSE button 24 ON STANDBY button 24 Introduction Identification of Controls ...

Page 13: ...panel Rear panel Rear S VIDEO OUT jack 18 VIDEO OUT jack 18 VIDEO OUT Y PB PR Component video jacks 19 ANALOG AUDIO OUT L R jacks 18 19 BITSTREAM PCM DIGITAL COAXIAL AUDIO OUT jack 21 22 Power cord Introduction ...

Page 14: ... STANDBY button 24 REV button 26 FWD button 26 CLEAR button 29 RETURN button 56 PAUSE STEP button 25 26 PLAY button 24 MENU button ZOOM button 36 PLAY MODE button 34 E P M button 37 E A M button 38 PROGRESSIVE button 19 T button 29 A B RPT button 33 SLOW button 27 MEMORY button 35 ENTER button 28 MENU button Use the MENU button to display the menu in cluded on many DVD video disc To operate a menu...

Page 15: ...ing with the remote control Point the remote control at the remote sensor and press the buttons Distance Maximum of 7 m 23 feet from the front of the remote sensor Angle Approximately 30 from each direction of the front of the remote sensor Do not expose the remote sensor of the DVD video player to a strong light source such as direct sunlight or other illumination If you do so you may not be able...

Page 16: ......

Page 17: ...an audio system and TV equipped with component video inputs Connecting to an amplifier equipped with a Dolby Digital decoder Connecting to an amplifier equipped with Dolby Surround Pro Logic Connecting to an amplifier equipped with a DTS decoder Connecting to an amplifier equipped with a digital audio input ...

Page 18: ...connect the DVD video player to a VCR TV VCR combination or video selector playback picture may be distorted as DVD video discs are copy protected Analog audio out will not have sound DTS playback If the TV has an S video input connect the DVD video player with an S video cable When using an S video cable do not connect the yellow video cable S video cable not supplied white red yellow To audio in...

Page 19: ...witching interlace video output to progressive scan be sure to set Video Output to Y PBPR You can temporarily switch the output signal for better picture quality Press PROGRESSIVE on the remote control during stop Notes Refer to the owner s manual of the connected equipment as well When you connect the DVD video player to other equipment be sure to turn off the power and unplug all of the equipmen...

Page 20: ...k an external 5 1 channel DTS Digital SurroundTM decode system must be connected to the BITSTREAM PCM AUDIO OUT jack of the DVD video player Notes DO NOT connect the BITSTREAM PCM AUDIO OUT jack of the DVD video player to the AC 3 RF input of a Dolby Digital Receiver This input on your A V receiver is reserved for Laser disc use only and is incompatible with the BITSTREAM PCM AUDIO OUT jack of the...

Page 21: ...olby Digital recording system Make the following setting On screen display Select Page Digital Output Bitstream 56 60 Recording system D 42 Connecting to an amplifier equipped with Dolby Surround Pro Logic Dolby Surround Pro Logic You can enjoy the dynamic realistic sound of Dolby Surround Pro Logic by connecting an amplifier and speaker system right and left front speakers a center speaker and one ...

Page 22: ...ing setting On screen display Select Page Digital Output Bitstream or PCM 56 60 Recording system DTS 42 2 channel digital stereo You can enjoy the dynamic sound of 2 channel Digital stereo by connecting an amplifier equipped with a digital audio input and speaker system right and left front speakers On screen display Select Page Digital Output PCM 56 60 Make the following setting To COAXIAL type di...

Page 23: ...Basic playback Begin your operation Playing a Disc Variable Speed Playback Locating a Desired Section ...

Page 24: ...Neglecting to do so may cause serious personal injury OPEN CLOSE SKIP PAUSE STOP PLAY VOON STANDBY 1 3 2 4 STOP ON STANDBY indicator PAUSE PLAY OPEN CLOSE PLAY Note Video CD with PBC If you set Video CD with PBC in the player the MENU screen is appeared and you can choose a scene from MENU screen You can select PBC On or Off to press PBC button on the remote control If you press RETURN button on t...

Page 25: ...rn off the screen saver press the PLAY button Automatic Power Off function If the DVD video player is stopped or the screen saver is engaged for approximately 20 minutes the DVD video player automatically turns itself off To pause playback still mode Press PAUSE STEP during playback To resume normal playback press the PLAY button The sound is muted during still mode To stop playback Press STOP Rem...

Page 26: ...LAY To resume normal playback Press PLAY Notes The DVD video player mutes sound and subtitles during reverse and forward scan of DVD video discs And it also mutes sound during fast forward or fast reverse play of audio CDs The playback speed may differ depending on the disc PLAY Press REV or FWD during playback REV Fast reverse playback FWD Fast forward playback Each time you press the REV or FWD ...

Page 27: ...beginning regardless of the location where you stopped playback 1 Press STOP twice The DVD video player deletes the memory of the location 2 Press PLAY Playback starts from the beginning of the current chapter Playback starts from the beginning of the disc Notes Resuming cannot function when you change the parental lock setting or select a disc menu language you play a PBC featured VIDEO CD while ...

Page 28: ...umber with the number buttons 3 Press ENTER Playback starts from chapter 1 of the selected title Notes The instructions above describe basic procedures which may vary depending on the contents of the DVD video disc If different instructions appear on the TV screen follow those instructions If you display the top menu during playback and press the TOP MENU button again without selecting any title t...

Page 29: ... on the front panel during playback the DVD video player performs fast reverse or fast forward playback You can vary the speed by pressing the button repeatedly Press SKIP or repeatedly to access the chapter or track number you want Playback starts from the selected chapter or track To locate succeeding chapter or tracks Playback starts from the beginning of the current chapter or track when you p...

Page 30: ......

Page 31: ...ating a Specific Segment Playing in a Varied Order Playing in a Favorite Order Zooming a Picture Selecting the Picture Enhancement E P M Selecting the Sound Enhancement E A M Selecting the the Camera Angle Selecting Subtitles Selecting a Language On screen Display Operation Playing MP3 WMA Files Viewing JPEG Files ...

Page 32: ...uring playback The following menu appears 2 Press the ENTER button at the piont you want to locate The point is registered as a bookmark 3 Press the buttons to highlight the next two spaces to set the bookmarks as you preferred Bookmark Bookmark Bookmark T SEARCH Notes You can save three bookmarks There may be a difference between a marked point and the location you actually jump to Some points ma...

Page 33: ...and starts repeat playback of the selected segment A B Notes Some discs may not permit A B repeat operation You can specify a segment only within the current title or track VIDEO CD Audio CD There may be a slight difference between point A and the location where playback actually resumes depending on the disc To resume normal playback Press A B RPT until Rep Off appears on the TV screen Rep A Rep ...

Page 34: ...rder Random Off Repeat Off Resumes normal playback If you press the PLAY MODE button during playback the DVD video player automati cally enters the selected playback mode after finishing the current title chapter or track 2 Press PLAY MODE The DVD video player automatically enters selected playback mode To resume normal playback While the display appears on the screen press the ENTER button repeate...

Page 35: ...ghted bar to the item you want to cancel 2 Press CLEAR To resume normal playback from memory playback Press MEMORY button Press to move the highlighted bar to Clear All then press the ENTER All the input programmes will be cleared Press PLAY button to resume normal playback Normal playback will start from first location To program during playback If you press the MEMORY button during playback a pro...

Page 36: ...on repeatedly until the icon Off appears on the TV screen Notes Some discs may not respond to zoom feature During some scenes the buttons may not work as described Zooming does not work on subtitles or menus included on DVD video discs The magnification level varies depending on the setting of TV shape you select 59 1 2 3 Off 1 2 3 Off 1 2 3 Off 1 2 3 Off 1 2 3 Off 1 2 3 Off 1 2 3 Off 1 2 3 Off 1 2...

Page 37: ...d for enhanced picture clarity Sharpness For sharpness reproduction To exit the picture enhancement selection Press E P M again Note Actual effect to picture may vary depending on the TV Make a selection according to your preference Video Enhance Brightness 08 Sharpness 08 Brightness 08 Brightness 08 Sharpness 08 Sharpness 08 E P M E P M Selecting the Picture Enhancement E P M Selecting the pictur...

Page 38: ...ding on the disc When the DVD video player is connected to an amplifier equipped with Dolby Pro Logic select 3D Off Otherwise Dolby Pro Logic may function differently than usual 1 Press E A M Thesoundenhancement icon appears 2 Select the sound enhancement by pressing the E A M button repeatedly Each time you press the button the sound enhancement changes 3D To obtain expansive virtual surround soun...

Page 39: ...multiple angles angle icon will be displayed for about 3 seconds press the ANGLE button e g 2 Press ANGLE while the angle icon is displayed on the TV screen Each time you press the ANGLE button the camera angle changes Notes You cannot change the camera angle during still playback If you pause a picture immediately after changing a camera angle the resumed playback picture may not display the new ...

Page 40: ...e subtitle function to off During some scenes the subtitles may not appear immediately after you press the SUBTITLE button Some DVD video discs will allow you to make subtitle selections and turn subtitles on or off only via the disc menu To turn subtitles off Press the SUBTITLE button repeatedly until appears on the screen Notes When you turn on the DVD video player or replace a disc the player r...

Page 41: ...e e g Selecting sound channels of VIDEO CDs You can switch left and right channels by pressing the AUDIO button repeatedly during playback Notes When you turn on the DVD video player or replace a disc the player returns to the initial default setting If you select a sound track which is not included on the disc the DVD video plays a prior sound track programmed on the disc Some discs allow you to ...

Page 42: ...PCM YES Audio CD Linear PCM 44 1 kHz 16 bit PCM PCM YES DTS Bitstream Bitstream Noise MP3 WMA PCM PCM YES 3D sound enhancement can function Signals of 96kHz from the BITSTREAM PCM jack are depressed to 48 kHz by down sampling process when 3D On is selected 38 a copyright protected disc is played Quantization bit of signals of 20 bit or higher which is output from the BITSTREAM PCM jack is 16 bit i...

Page 43: ...ay operation Press NAVI The following display appears Each time you press the NAVI button the on screen display changes as follows See the pages in 44 for details on the features e g When playing a DVD video disc Select by pressing then press ENTER to access the feature 1 3 24 28 00 23 53 Off NAVI DVD VCD CD On screen Display Operation Advanced playback NAVI ENTER ...

Page 44: ...se playback 00 23 53 Displays elapse time of the current title or track Continued 1 3 24 28 Total titles Chapter Total chapters Chapter number To display the current chapter number Title number Track number To display the current title or track number On screen Display Operation Continued On screen Display Operation Continued On screen Display Operation Continued Advanced playback On screen Displa...

Page 45: ...y the time counter Bit rate Mbit s Amount of picture sound and subtitle data in the DVD video disc transferred per second The larger the value is the more data processed but this does not necessarily insure better picture quality Title number 29 Title 1 3 Chapter 11 28 Angle 1 1 Subtitle Setting 40 Language setting 41 Title 1 3 Chapter 11 28 Angle 1 1 Title 1 3 Chapter 11 28 Angle 1 1 Angle Settin...

Page 46: ...ress number buttons 1 10 to select the track which you want the DVD video player will play the selected track If the track number is bigger than 10 press 10 first then next number Notes You can select a track by designating a track number Press the T button and input the number you want to play press ENTER Letters of a file folder name overflowing the given space will not be displayed You cannot play...

Page 47: ...andards in order to achieve optimal playback quality Pre recorded DVDs are automatically set to these standards There are many different types of recordable disc formats including CD R containing MP3 WMA files Given the fact that technology in this area is still maturing Toshiba cannot guarantee that all genre of recordable discs will produce optimal playback quality The technical criteria set out ...

Page 48: ...the on screen displays of the DVD video player If the TV is adjusted to other sizes e g WIDE images will appear to be horizontally expanded For details refer to the owner s manual of your TV 1 Press OPEN CLOSE to open the disc tray 2 Place a CD that contais JPEG files on the disc tray 3 Press OPEN CLOSE The disc tray closes and the DVD video player reads the loaded disc e g When a JPEG disc is load...

Page 49: ... can return to the folder list Pressing the OPEN CLOSE button to open the disc tray can also quit the playback STOP To view a single image To pause slide show Press PAUSE STEP PAUSE STEP To confirm a photo number See 51 To magnify an image See 52 To rotate an image See 52 To return to the thumbnail view See 52 1 3 PAUSE STEP STOP Advanced playback ...

Page 50: ...R 3 Select the viewing options at your preference Viewing a single image see 51 TOP MENU Next Prev To display a folder list 1 Press STOP button during playback e g A folder list appears You can select a folder file to play at your preference 2 Press buttons to select your desired file and then press the ENTER or PLAY button to start playback CD 2 213 HI RES 1 2 3 4 5 6 7 8 9 10 16001 16002 16003 160...

Page 51: ... Some files may not display their own entire image depending on their size PLAY Notes To turn it off press the T button While a photo number image is displayed use the number buttons to select a desired photo number and press the ENTER button The slide show will begin from that selected image To search a photo number 1 Press T The menu appears on the TV screen T SEARCH Search Track To confirm a phot...

Page 52: ...election of the magnification level Note The DVD video player may re display an image if you rotate it To display a folder list Press STOP button during playback You can select a folder file to play See To return to the thumbnail view Press TOP MENU See TOP MENU STOP To rotate an image 1 Press ANGLE during playback e g 2 Press ANGLE repeatedly Each time you press the ANGLE button you can set rotatio...

Page 53: ...ed as follows Playable discs CD ROM CD R 650MB 74min only CD RW is not recommendable CD physical format Mode 1 Mode 2 XA Form 1 File system ISO9660 level 1 2 or Joliet File name A file name should be in alphabet and numerals only and must incorporate JPG extension e g JPG Total number of folders Less than 256 Total number of files Less than 1000 Some files may not display their own entire image depen...

Page 54: ......

Page 55: ...Function setup You can customize the default settings to your preference Customizing the Function Settings Table of Languages ...

Page 56: ...lect the setting you want to change then press ENTER 4 Change the selection by by referring to the corresponding pages 58 then press ENTER 5 Change step 3 and 4 to change other setting To select another operation go back to step 2 6 Press SETUP The on screen display disappears ENTER ENTER SETUP To return to the previous display Press the RETURN button Notes To quit the procedure press the SETUP bu...

Page 57: ...according to the aspect ratio of your TV 59 Video Output To select a proper video output mode corresponding to your connected TV 59 Video Digital Output To select an output sound format corresponding to your system connection 60 Audio Password To turn the parental lock function on or off 60 Parental When the parental lock feature is activated the settings can be changed 61 Default To install the i...

Page 58: ...iate subtitle language from the selection on the disc menu Video Audio Parental OSD Menu Subtitle English Audio English DVD Menu English enu English enu English enu enu Video Audio Language Language Video Audio Language Video Audio Video Audio Language OSD Menu Subtitle English To play sound track in English Français To play sound track in French Español To play sound track in Spanish Note Some DV...

Page 59: ...cted If you select 16 9 and own a 4 3 TV set the DVD playback picture will be horizontally distorted during playback Images will appear to be horizontally compressed Always be sure that your TV shape conforms to the actual TV in use Language Audio Parental TV Shape Video Output CVBS 4 3Lettrer Box Lettrer Box Lettrer Audio Video Audio Video Audio Audio Video TV Shape CVBS Select when you connect y...

Page 60: ...olled may vary from disc to disc For example if the disc allowed you could edit out violent scenes unsuitable for children and replace them with more suitable scenes or lock out playback of the disc altogether DVD video discs may or may not respond to the parental lock settings This is not a defect in the DVD video player Make sure this function works with your DVD video discs The parental lock fe...

Page 61: ... select 7 discs rated higher than level 7 are locked out and cannot be played The parental lock level is equivalent to the following ratings Forgetting your password If you forget the password you can erase your current password by pressing number button 0 on the remote control four times then press ENTER button to confirm the setting Language Video Audio Password Parental 8 Adult Default Yes Paren...

Page 62: ...OC OM OR PA PL PS Guarani Gujarati Hausa Hindi Croatian Hungarian Armenian Interlingua Interlingue Inupiak Indonesian Icelandic Hebrew Yiddish Javanese Georgian Kazakh Greenlandic Cambodian Kannada Kashmiri Kurdish Kirghiz Latin Lingala Laotian Lithuanian Latvian Lettish Malagasy Maori Macedonian Malayalam Mongolian Moldavian Marathi Maltese Burmese Nauru Nepali Norwegian Occitan Afan Oromo Oriya ...

Page 63: ...Others Before calling Service Personnel Specifications LIMITED UNITED STATES WAR RANTY DVD PLAYERS EXCHANGE WARRANTY ...

Page 64: ... the playback pictures The effect of copy protection Connect the DVD video player directly to the TV Avoid connecting the DVD video player to a VCR or TV VCR combination 18 The DVD video player does not start playback No disc is inserted Insert a disc 24 An unplayable disc is inserted Insert a playable disc Check the disc type and color system 10 The disc is placed upside down Place the disc with ...

Page 65: ...ption 15W Mass 1 7kg External dimensions 430 51 235mm W H D Signal system Standard NTSC Laser Semiconductor laser wavelength 650 nm Frequency range DVD linear sound 48 kHz sampling 20 Hz to 20kHz 96 kHz sampling 20 Hz to 20kHz Signal to noise ratio More than 90dB Audio dynamic range More than 80dB Harmonic distortion Less than 10 Wow and flutter Below measurable level less than 0 001 W PEAK Operati...

Page 66: ...h the first rental or thirty 30 days from the date of shipment to the rental firm whichever comes first Commercial Units DVD PLAYERs sold and used for commercial pur poses have a limited ninety 90 day warranty for all parts labor Owner s Manual and Demographic Card You should read this owner s manual thoroughly before operating this DVD PLAYER You should com plete and mail the enclosed Demographic ca...

Page 67: ...ITED THE FOREGOING WAR RANTY IS EXCLUSIVE AND IN LIEU OF ALL OTHER WARRANTIES GUARANTEES AGREEMENTS AND SIMILAR OBLIGATIONS OF TACP OR THI WITH RESPECT TO THE REP AIR OR REPLACEMENT OF ANY PARTS IN NO EVENT SHALL TACP BE LIABLE FOR CONSEQUENTIAL OR INCIDENTAL DAMAGES No person agent distributor dealer or company is authorized to change modify or extend the terms of these warranties in any manner w...

Page 68: ...TOSHIBA Printed in China ...

Reviews: