background image

27

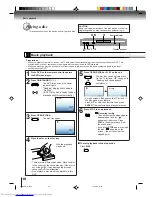
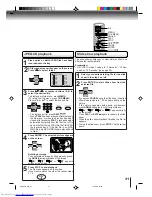
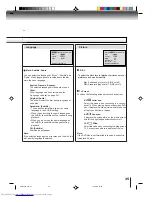
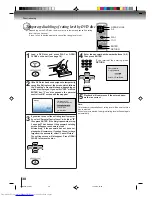
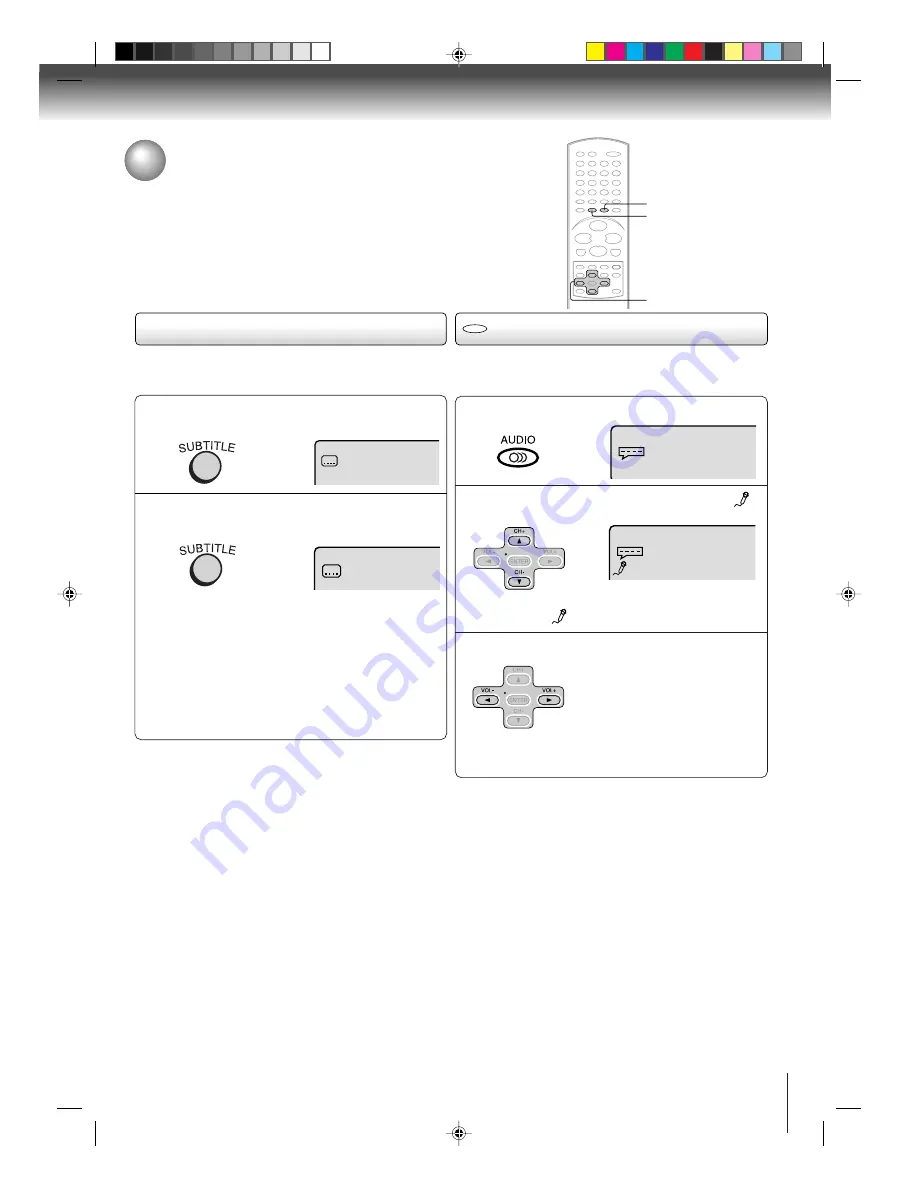
During DVD KARAOKE disc playback, press
AUDIO.

2

On : The primary vocal is output

when it is recorded on the  disc.

Off : The primary vocal is not output.

Press 

B


or 

A

 to select “On” or “Off”.

Subtitles/Karaoke playback

You can turn the vocal on or off recorded on the DVD
KARAOKE.

Notes:

• The vocal output feature is used during playback of Dolby

Digital (multi-channel) recorded DVD KARAOKE discs. This
feature allows you to turn off vocal audio tracks, or restore
them for background accompaniment.

• When playing Karaoke, connect appropriate audio equipment

such as an amplifier to the DVD video player.

1

3

C

/

D

/

B

/

A

Press 

C


or 

until the KARAOKE symbol (

)

appears.

• If you play non-Karaoke disc, the KARAOKE

symbol (

) does not appear.

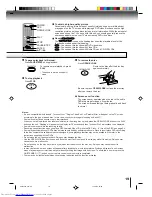
Off

1/8 Eng Dolby Digital

Spatializer Off

1/8 Eng Dolby Digital

SUBTITLE

AUDIO

When playing back a disc recorded with subtitles, you
can select the subtitle language or turn the subtitle off.

To turn off the subtitle, press SUBTITLE until
“Off” appears.

• The on screen display will disappear after a

few seconds.

1

Notes:
• Depending on the DVD, you may not be able to change

subtitles, or to turn subtitles on or off.

• While playing a DVD, the subtitle may change when you

open or close the disc tray.

• In some cases, a selected subtitle language may not be

changed immediately.

Off

Subtitles

Karaoke playback

DVD

Press SUBTITLE repeatedly during playback
until your desired language appears.

1/8 Eng

2

• The on screen display will disappear after a

few seconds.

  2C01501A P25-31

12/16/03, 19:59

27

Summary of Contents for SD-K740

Page 1: ...DVD VIDEO PLAYER SD K740SU OWNER S MANUAL DIGITAL VIDEO 2004 Toshiba Corporation 2C01501A COVER 12 16 03 19 58 1 ...

Page 2: ...ference to radio or television reception which can be determined by turning the equipment off and on the user is encouraged to try to correct the interference by one or more of the following measures Reorient or relocate the receiving antenna Increase the separation between the equipment and receiver Connect the equipment into an outlet on a circuit different from that to which the receiver is con...

Page 3: ...NNEL ONLY 1 Read these instructions 2 Keep these instructions 3 Heed all warnings 4 Follow all instructions 5 Do not use this apparatus near water 6 Clean only with dry cloth 7 Do not block any ventilation openings Install in accordance with the manufacturer s instructions 8 Do not install near any heat sources such as radiators heat registers stoves or other apparatus including amplifiers that pr...

Page 4: ...Unplug this apparatus during lightning storms or when unused for long periods of time 14 Refer all servicing to qualified service personnel Servicing is required when the apparatus has been damaged in any way such as power supply cord or plug is damaged liquid has been spilled or objects have fallen into the apparatus the apparatus has been exposed to rain or moisture does not operate normally or ...

Page 5: ... electric shock Never spill liquid of any kind on the apparatus 18 Keep your fingers well clear of the disc tray as it is closing Neglecting to do so may cause serious personal injury 19 Do not place a heavy object on or step on the apparatus The object may fall causing serious personal injury and serious damage to the apparatus 20 Do not use a cracked deformed or repaired disc These discs are eas...

Page 6: ... precision device If the optical pick up lens and disc drive parts are dirty or worn down the picture quality will deteriorate To obtain a clear picture we recommend regular inspection and maintenance cleaning or parts replacement every 1 000 hours of use depending on the operating environment For details contact your nearest dealer Notes on moisture condensation Moisture condensation damages the ...

Page 7: ...rack 3 Track 4 Track 5 Structure of disc contents Normally DVD video discs are divided into titles and the titles are sub divided into chapters Video CDs and Audio CDs are divided into tracks DVD video disc Video CD Audio CD Each title chapter or track is assigned a number which is called title number chapter number or track number respectively There may be discs that do not have these numbers Not...

Page 8: ...e way as an audio CD Video CD equipped with PBC function Version 2 0 In addition to operation of a Video CD not equipped with the PBC function you can enjoy playback of interactive software with search function by using the menu displayed on the TV screen Menu Playback Some of the functions described in this owner s manual may not work with some discs Playable discs This DVD video player can play ...

Page 9: ... reverse or fast forward directions 20 Playing fram by frame 20 Playing in slow motion 20 Locating a chapter or track 20 Advanced playback Zooming 21 Locating desired scene 21 Marking the scenes 22 Returning to the scenes 22 Repeat playback 23 A B Repeat playback 23 Program playbck 24 Random playback 24 Changing angles 25 Title selection 25 DVD menu 25 Changing soundtrack language 26 Setting surro...

Page 10: ...EO OPTICAL AUDIO VEDIO COAXIAL DIGITAL AC Power cord COMPONENT VIDEO OUT Y P B PR jacks 14 16 17 16 17 14 S VIDEO OUT jack VIDEO OUT jack COAXIAL DIGITAL AUDIO OUT jack OPTICAL DIGITAL AUDIO OUT jack AUDIO OUT L R jacks 15 14 15 COMPONENT S VIDEO selector switch 14 15 When connecting the optical digital cable remove the cap and fit the connector into the jack firmly When not using the jack keep th...

Page 11: ...RACK indicator TRACK Message or number indicator Title chapter track playing time or other information Play indicator Pause indicator Repeat mode indicators ALL REPEAT REPEAT REPEAT A B CD indicator CD TRACK DVD CD TRACK Some discs may not display track numbers or elapsed time Dimmer function This function will change the brightness of the FL display during Power on status 1 Press FL DIM once to d...

Page 12: ...EN CLOSE button 18 Direction buttons CH Ð VOL Ð buttons 21 40 Number buttons 0Ð9 21 TV button 40 FL DIM button 21 ANGLE button 25 SETUP button 33 RETURN button 33 AUDIO button 26 A B RPT button 23 PROGRAM button 40 ENTER button 21 PROGRESSIVE button 32 100 button 40 MENU button Use the MENU button to display the menu included on many DVD video discs To operate a menu follow the instructions in DVD...

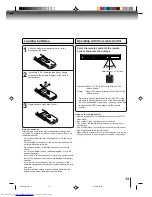
Page 13: ...of about 1 second to ensure the correct mode of operation 2 3 Loading batteries Within about 7 m 23 feet Install two AAA batteries supplied paying attention to the polarity diagram in the battery compartment Replace the compartment cover Notes on batteries Improper use of batteries may cause battery leakage and corrosion To operate the remote control correctly follow the instructions below Do not ...

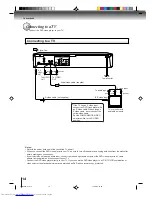
Page 14: ...set has one audio input connect the left and right audio outputs of the DVD video player to a Y cable adapter not supplied and then connect to your TV Connect the DVD video player directly to your TV If you connect the DVD video player to a VCR TV VCR combination or video selector the playback picture may be distorted as DVD video discs are copy protected TV or monitor with audio video inputs To w...

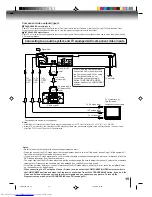
Page 15: ... video inputs Signal flow OUT PUT COMPONENT Y L R PB PR S VIDEO OPTICAL AUDIO VEDIO COAXIAL DIGITAL To PR VIDEO OUT To audio inputs of the amplifier red white red white To Y VIDEO OUT To PB VIDEO OUT To Y video input To PB video input To PR video input To AUDIO OUT TV or monitor with ColorStream component video inputs Audio system If the TV has the Component input connect the DVD video player with...

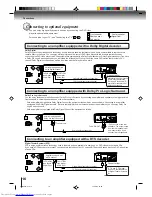
Page 16: ...are trademarks of Digital Theater Systems Inc Dolby Digital Dolby Digital is the surround sound technology used in theaters showing the latest movies and is now available to reproduce this realistic effect in the home You can enjoy motion picture and live concert DVD video discs with this dynamic realistic sound by connecting the DVD video player to a 6 channel amplifier equipped with a Dolby Digi...

Page 17: ...C 3 RF input of a Dolby Digital Receiver This input on your A V Receiver is reserved for Laserdisc use only and is incompatible with the OPTICAL DIGITAL AUDIO OUT jack or COAXIAL DIGITAL AUDIO OUT jack of the DVD video player Connect the OPTICAL DIGITAL AUDIO OUT jack or COAXIAL DIGITAL AUDIO OUT jack of the DVD video player to the OPTICAL or COAXIAL input of a Receiver or Processor Refer to the o...

Page 18: ...eading display will change to No Disc If DVD disc has already loaded playback will start automatically Press OPEN CLOSE The disc tray opens Place the disc on the disc tray With the playback side down There are two different disc sizes Place the disc in the correct guide on the disc tray If the disc is out of the guide it may damage the disc and cause the DVD to malfunction Do not place a disc whic...

Page 19: ...the disc tray Doing so may cause the unit to malfunction In many instances a menu screen will appear after playback of a movie is completed Prolonged display of an on screen menu may damage your television set permanently etching that image onto its screen To avoid this be sure to press the ON STANDBY I button on your remote control once the movie is completed There may be a slight delay between y...

Page 20: ...ack Press PLAY Notes The sound is muted during slow motion playback The Video CD can not play Reverse Slow Press SKIP or repeatedly to display the chapter or track number you want Playback starts from the selected chapter or track To locate succeeding chapters or tracks Playback starts from the beginning of the current chapter or track When you press twice in quick successions playback starts from...

Page 21: ...ed point to play back To check the title chapter and time press DISPLAY 1 4 2 3 Note In case of the Video CD playback with PBC the SEARCH does not work To turn off PBC see page 28 C D B A ZOOM 0 9 ENTER DISPLAY CLEAR SEARCH Search Time Title Chapter Enter 0 9 Clear Search Search Time Title Chapter Enter 0 9 Clear Search Search Time Title Chapter Enter 0 9 Clear Search 12 In the zoom mode press ZOO...

Page 22: ...the Marker Follow the above steps 1 2 then press CLEAR DVD VCD DVD VCD ENTER CLEAR MARKER C D Marker 2 Marker 1 Marker 3 Enter Clear Marker Marker 2 Marker 1 Marker 3 Enter Clear Marker 27 00 54 Marker 2 Marker 1 Marker 3 Enter Clear Marker 27 16 08 54 25 31 00 01 02 Marker 2 Marker 1 Marker 3 Enter Clear Marker 27 16 08 54 25 31 00 01 02 Press MARKER during playback Select the blank Marker using ...
Page 23: ...the screen A B DVD VCD CD ENTER D B A PLAY MODE A B RPT Repeat Off Enter Play Mode Play Mode Off Repeat Off Enter Play Mode Notes Some discs may not work with the repeat operation In case of Video CD with PBC repeat functions are prohib ited during playback DVD Press B B B B B A A A A A or ENTER once or twice to select Chapter or Title The unit automatically starts repeat playback after finishing ...

Page 24: ...m Enter 0 9 Clear Play Mode Note In playing back the Video CD with PBC you can not set Random playback Notes In playing back the Video CD with PBC you can not set Program playback The program is cancelled when you open the disc tray or turn the power off Play Mode Repeat Off Enter Play Mode Off PLAY ENTER C D B A PLAY MODE PLAY 0 9 CLEAR Advanced playback To change the program 1 In the program mod...

Page 25: ...on the DVD you may not be able to select the title Depending on the DVD a title menu may simply be called a menu or title in the instructions supplied with the disc 2 DVD menu Press C C C C C D D D D D B B B B B A A A A A to select the desired item DVD Some DVDs allow you to select the disc contents using the menu When you play back these DVDs you can select the subtitle language and sound track l...

Page 26: ...d sound This DVD video player equipped with a SPATIALIZER VIRTUAL SURROUND It can produce the effect of being in a cinema or a concert hall Spatializer 3 Dimensional Sound Processing provided by Desper Products Inc Certain audio features of this product manufactured under a license from Desper Products Inc Spatializer and the circle in square device are trademarks owned by Desper Products Inc 2 To...

Page 27: ...ars If you play non Karaoke disc the KARAOKE symbol does not appear Off 1 8 Eng Dolby Digital Spatializer Off 1 8 Eng Dolby Digital SUBTITLE AUDIO When playing back a disc recorded with subtitles you can select the subtitle language or turn the subtitle off To turn off the subtitle press SUBTITLE until Off appears The on screen display will disappear after a few seconds 1 Notes Depending on the DV...

Page 28: ... disc the status display will appear on the screen and continue displaying 00 34 56 01 12 33 00 34 56 01 12 33 1 9 Title 1 99 1 8 1 32 Chapter 1 999 EngDolby Digital Eng 00 12 04 32 00 12 04 32 Track PBC 34 56 71 33 Track 11 99 To make status display disappear press DISPLAY again Audio CD DVD VCD CD Disc status VCD To turn off the PBC Press number button 1 in the stop mode then press ENTER ENTER D...

Page 29: ...letters on the screen Long file names will be condensed The music files recorded by Hierarchical File System HFS cannot be played Limitations on display The maximum number for display is 16 letters Available letters for display are the following capital or small alphabets of A through Z numbers of 0 through 9 and _ under score Other letters than those above are replaced in hyphen Notes on MP3 WMA ...

Page 30: ...ng PLAY playback begins automatically starting from the first file In this case if the first file is an MP3 WMA file only MP3 WMA files are played back in order If the first file is a JPEG file the first JPEG file is played back 3 0 9 Enter Play Mode 1 72 2 3 4 5 Japan CD R Bay Bridge CLOSE MY EYES DIVE TO BLUE Honey 8 9 10 11 12 flower Lies and Truth winter fall Rain Strawberry 6 BLUE EYES 13 Wel...

Page 31: ...reen 4 Press STOP to end playback The file menu appears on the screen If you want to watch the other file repeat steps 3 4 5 JPEG CD playback Select your desired starting file for the slide show in the step 3 as left 2Press ENTER to start slide show from the selected file If you press PAUSE during the slide show the slide show stops temporary 4 appears briefly on the picture If the picture appears...

Page 32: ...progressive scan output from the unit In such a case select PROGRESSIVE scan Off Once PROGRESSIVE scan on all other video outputs are disabled except component video outputs You cannot make the progressive scanning mode active in following cases The disc is played back The COMPONENT S VIDEO selector switch is set to S VIDEO position There are two types of source content in pictures recorded in DVD...

Page 33: ...performance to your preference ENTER C D B A RETURN Enter Setup Return Language Picture Parental Other Sound Repeat step 3 and 4 to change other settings To select another operation go back to step 2 Function setup Press B or A to select the desired section then press D or ENTER Press C or D to select the desired option 4 Change the selection using C D B A or ENTER by reffering to the correspondin...

Page 34: ... ratio of your TV To turn on or de activate the operational status dis play on the screen To select a preferred setting for the slide show play back To select a preferred file type for playing back a CD containing a mixture of file types To select On or Off for DRC Dynamic Range Con trol Input 4 digital password to set the parental level To select a preferred parental level for the parental settin...

Page 35: ...te If the selected language is not recorded on the disc the first priority language is selected Tv Screen Display 4 3 Enter Setup Return Language Picture Parental Other Sound On JPEG Interval Select Files All Off Off E B L E B L To select the black level of playback pictures set your preference and monitor s ability On Enhanced grey scale 0 IRE cut off Off Standrard grey scale 7 5 IRE cut off Tv S...

Page 36: ... press the buttons On On screen displays appear when you press the buttons factory setting Off On screen displays do not appear when you press any buttons All Displays all files Music Only Displays only MP3 WMA files Pictures Only Displays only JPEG files Dialogue On DRC TV Off DRC Std Enter Setup Return Language Picture Parental Other Sound Off On Loud sound such as explosion or the like is toned...

Page 37: ...el 1 Press C or D to select Password 2 Press number buttons 0 9 to enter the password you have stored 3 Press ENTER The rating is now unlocked 4 Press C or D to select Parental then press B or A to change the parental level 5 Press C or D to select Password then press number buttons 0 9 to enter the password Note You can change the password if you want 6 Press ENTER Now the parental level is chang...

Page 38: ...0 5 PLAY Reading ENTER RETURN PLAY 0 9 OPEN CLOSE If the DVD disc has been designed to temporarily cancel the Rating level the screen which follows the Reading screen will change depending on which disc is played If you select YES with the ENTER key Your disc exceeds the parental control level screen will then appear If you wish to cancel the set rating level temporar ily select Parental Control L...

Page 39: ...an 2425 Thai 3018 Bihari 1218 Hungarian 1831 Oriya 2528 Tibetan 1225 Breton 1228 Icelandic 1929 Panjabi 2611 Tigrinya 3019 Bulgarian 1217 Indonesian 1924 Pashto Pushto 2629 Tonga 3025 Burmese 2335 Interlingua 1911 Persian 1611 Turkish 3028 Byelorussian 1215 Irish 1711 Polish 2622 Turkmen 3021 Cambodian 2123 Italian 1930 Portuguese 2630 Twi 3033 Catalan 1311 Japanese 2011 Quechua 2731 Ukrainian 312...

Page 40: ...d 01 TOSHIBA 07 PANASONIC 13 SHARP old 02 RCA GE 08 SHARP New 14 ZENITH 03 SONY 09 SANYO FISHER 15 PANASONIC 04 MITSUBISHI 10 MAGNAVOX 16 PIONEER 05 JVC 11 GOLDSTAR 06 HITACHI 12 SAMSUNG 0 9 PROGRAM POWER INPUT SELECT 100 DISPLAY ENTER CH VOL While holding down PROGRAM enter the two digits of your TV s brand code listed below using number buttons 0 9 then elease PROGRAM Point the remote control at...

Page 41: ...control are exhausted Correction Connect the power plug securely into the wall outlet Select the appropriate video input mode on the TV so the picture from the DVD video player appears on the TV screen Connect the video cable securely into the appropriate jacks Set the COMPONENT S VIDEO selector to the appropriate position Set the PROGRESSIVE scan Off Select the correct input mode of the audio rec...

Page 42: ...ating conditions Temperature 5 C to 40 C Operation status Horizontal Outputs Video output 1 0 V p p 75 Ω negative sync pin jack 1 S video output Y 1 0 V p p 75 Ω negative sync Mini DIN 4 pin 1 C 0 286 V p p 75 Ω Component video output Y 1 0 V p p 75 Ω negative sync pin jack 1 PB PR 0 7 V p p 75 Ω pin jack 2 Audio output BITSTREAM PCM 0 5V p p 75 Ω pin jack 1 COAXIAL Audio output BITSTREAM PCM Opti...

Page 43: ... from TACP and THI are effective only if the DVD Player is purchased and operated in the U S A or Puerto Rico 3 Labor service charges for installation set up and adjustment of customer controls are not covered by these limited warranties 4 These limited warranties extend only to defects in materials or workmanship as limited above and do not extend to any DVD Player or accessories which have been ...

Page 44: ... The time within which action must be commenced to enforce any obligation of TACP or THI arising under this limited warranty or under any law of the United States or of any state thereof is hereby limited to 90 days from the date you discovered or should have discovered the defect This limitation does not apply to implied warranties arising under the law of any state of the U S A HOW STATE LAW REL...

Page 45: ...ede radiar energía de radiofrecuencia y si no se instala y utiliza de acuerdo con las instrucciones puede causar interferencias perjudiciales en las radiocomunicaciones Sin embargo no existe ninguna garantía de que tales interferencias no se produzcan en una instalación particular Si este equipo causa interferencias perjudiciales lo que podrá determinarse desconectando y volviendo a conectar su al...

Page 46: ...a pisado o estrujado particularmente en la parte de los tomacorrientes de los prolongadores de enchufes y en el punto en el que sale del aparato 11 Utilice solamente las fijaciones accesorios especificados por el fabricante 12 Utilice solamente el carrito estante trípode soporte o mesa recomendado por el fabricante o vendido con el aparato Cuando utilice un carrito tenga cuidado al mover la combin...

Page 47: ...ntal del controlador remoto 1 2 3 Inserción de las pilas OPEN CLOSE 1 2 3 Reproducción básica 4 Conexión a un televisor DTS y DTS Digital Surround son marcas de Digital Theater Systems Inc A propósito de las ilustraciones del compartimiento de pilas Hay dos tipos de compartimiento de pilas en los controladores remotos proporcionados Esto no significa que haya diferencia en el funcionamiento de los...

Page 48: ...ight mediante un método que protege ciertas patentes de EE UU y otros derechos de propiedad intelectual pertenecientes a Macrovision Corporation y otros propietarios de derechos La utilización de esta tecnología de protección deberá ser autorizada por Macrovision Corporation y tiene como fin la utilización en el hogar y otros usos de contemplación limitados a menos que Macrovision Corporation auto...

Reviews: