– 100 –
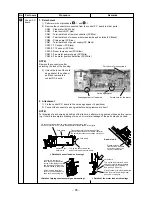
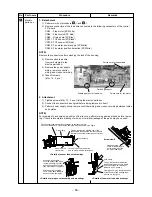
2 fixing screws for heat exchanger
Fixing band
Fixing band for
heat exchanger
3 screws
Piping cover
Piping cover
No.
12
Part name
Heat
exchanger
Procedure
1. Detachment
1) Recover refrigerant gas.
2) Remove the refrigerant pipe at indoor unit
side.
3) Perform work of procedure
10
-1.
4) Take off screws (Ø4 × 10, 3 pcs.) fixing the
piping cover to remove the piping cover.
5) While holding the heat exchanger, remove
fixing band and fixing screws (Ø4 × 10, 3 pcs.)
and then remove the heat exchanger.
2. Attachment
1) Mount parts in order, heat exchanger
→
fixing band
→
piping cover
→
drain pan
→
bell mouth
→
electric parts box as original.
NOTE)
Arrange wires as original.
2) Attach the removed connectors and wires as
original.
3) Connect the refrigerant pipe as original, and
then perform vacuuming.
Remarks
Wind pipe cover over the header,
attach a sensor on it.
(Do not set the head of tie wrap upward.)
<Details of sensor lead wire drawing>
TCJ sensor
(Black)
TC sensor
(Red)


