


~ 25 ~
GB
~ 25 ~
UH/U
l
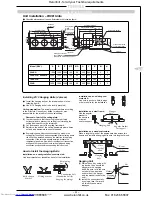
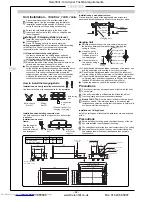
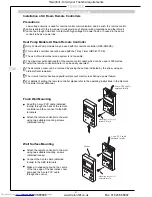
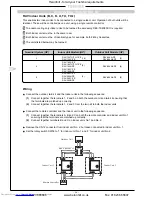
Connection to the unit is via a 1’’ BSP male connection
– to ensure a waterproof seal, PTFE thread tape must
be used. The maximum lift of the condensate pump
from the drain outlet is 360mm and the maximum
overall lift from the underside of the ceiling to the centre
of the drain piping is 600mm. These values must not be
exceeded otherwise unit flooding will occur when the
drain pump is switched off.
360mm (max)
100mm
(max)
600mm (max)
Ceiling
Cassette
D
RAIN
P
IPING
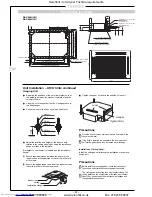
Ensure that the drain piping indoors is correctly
heat-insulated otherwise condensation will result.
Also, insulate the section which connects it to the
indoor unit.
If nylon cable ties are used to secure the insulation,
do not over-tighten them causing the deformation of
the heat insulation because this will reduce the
effectiveness of the insulation.
Use hard PVC adhesive for joining the pipes to
ensure that there will be no leakage.
Take care not to apply any force or pressure at the
unit side where the drain piping exits the indoor
unit.
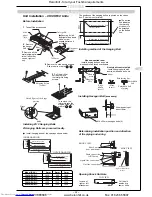
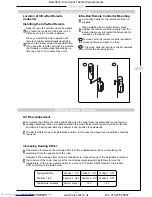
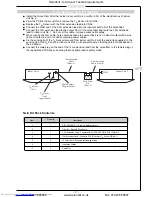
The drain piping must be placed on a downward
gradient (1/100 or greater) and there should be no
upward or downward curves in the pipe which
obstruct the drainage, unless a drain pump is
employed.
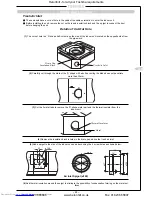
The drain pipe should not extend for more than
20m horizontally. If the pipe has to be extended
horizontally for a considerable distance it must be
sufficiently supported to prevent warpage, also
increasing the gradient is recommended.
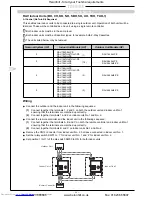
When one drainage system is used for a multiple
number of indoor units, install the piping as shown
below:
!
!
!
!
!
!
15-20m
Support clamp
Insulator
Downward gradient
1/100 or greater
Make this distance as long as possible – approx 10cm
Downward gradient
1/100 or greater
Upward
curve
Downward
curve
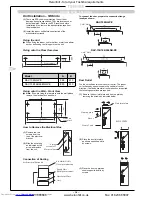
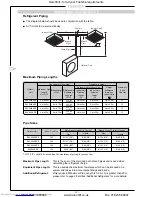
Piping Material and Heat Insulator
Heat Insulator*
Hard PVC pipe**
Drain pan
Drain hose
Hard PVC adhesive
*
Heat Insulator:
Polyethylene foam (thickness 6mm)
**
Piping Material:
Hard PVC pipe nominal diameter inside Ø20mm
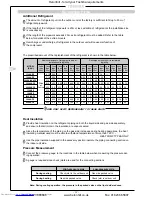
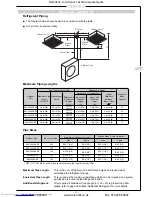
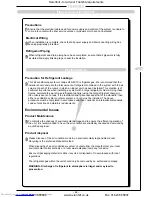
Fixing the Drain Pan
CH/CHR/C Rear Attachment
SH/SHR Bottom Attachment
l
Screw the drain pipe fixing plate to the lower part of the
rear/bottom knockout and attach the drain pipe with the
nylon band. The knot in the nylon band should be on
the inner side (above the drain pipe fixing plate). When
the drain pipe alone is attached to the rear/bottom, use
the drain pipe knockout only.
Cut the slit
portion with a
saw
Rear/Bottom knockout
Nylon band
(supplied)
Drain Pipe
(Use the screw
from shipping
fixture)
Screw
Drain pipe
fixing plate
(supplied)
Refrigeration
pipes
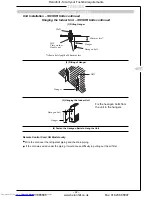
CH/CHR/C
Right or Left attachment of Drain Hose
l
For attachment on the left, open up the knockout.
Attach the drain hose from right to left and the plug
from left to right. The plug is not tapered and should be
fully inserted. After attaching the pipe, seal the remain-
ing gap in the knockout with the heat insulating material
supplied (cut to an appropriate shape).
Precautions
Drain Pipe
!
Rear knockout for drain
pipe
7
3
Heronhill - for all your Toshiba requirements
Tel: 01823 665660
www.heronhill.co.uk
Fax: 01823 665807


