9
Toshiba 1115551210 (EN)
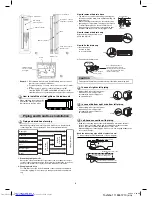
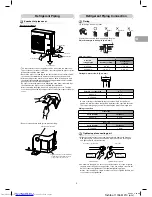
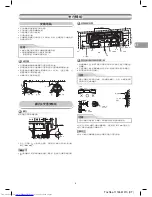
2. Insert a fl are nut into the pipe and fl are the pipe.
Projection margin in fl aring : A (Unit : mm)
Rigid (clutch type)
Outer dia.
of copper pipe
A
R410A tool used
Conventional
tool used
∅
9.52 mm
0 to 0.5
1.5 to 2.0
∅
15.88 mm
1.0 to 1.5
2.0 to 2.5
Flaring dia. meter size : A (Unit : mm)
Outer dia. of copper pipe
+0
–0.4
A
∅
9.52 mm
13.2
∅
15.88 mm
19.7
* In case of fl aring for R410A with the conventional fl are tool, pull it out
approx. 0.5 mm more than that for R22 to adjust to the specifi ed fl are size.
The copper pipe gauge is useful for adjusting the projection margin size.
Piping connection
Liquid side
Outer diameter
Thickness
∅
9.52 mm
0.8 mm
Gas side
Outer diameter
Thickness
∅
15.88 mm
1.0 mm
A
90
Refrigerant Piping Connection
Refrigerant Piping
Tightening of connecting part
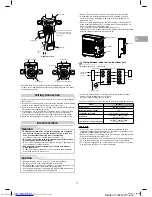
1. Align the centers of the connecting pipes and fully tighten the fl are nut
with your fi ngers. Then fi x the nut with a wrench as shown in the fi gure
and tighten it with a torque wrench.
Flaring
1. Cut the pipe with a pipe cutter.
Knockout of pipe cover
Knockout procedure
Obliquity
Roughness
Warp
Pipe
Die
Half union or packed valve
Fix with wrench.
Flare nut
Tighten with torque wrench.
Internally
threaded side
Externally
threaded side
• The indoor/outdoor connecting pipes can be connected in 4 directions.
Take off the knockout part of the pipe cover through which pipes or wires
will pass through the base plate.
• Detach the pipe cover and tap on the knockout section a few times with
the shank of a screwdriver. A knockout hole can easily be punched.
• After punching out the knockout hole, remove burrs from the hole and
then install the supplied protective bush and guard material around the
passage hole to protect wires and pipes.
Be sure to attach the pipe covers after pipes have been connected. Cut
the slits under the pipe covers to facilitate the installation.
After connecting the pipes, be sure to mount the pipe cover. The pipe
cover is easily mounted by cutting off the slit at the lower part of the pipe
cover.
* Be sure to wear heavy work gloves while working.
Rear direction
Pipe cover
Side direction
Front direction
Down direction
Supplied protective bush
Supplied passage hole guard material
* Attach the guard material securely
so that it does not come loose.
A
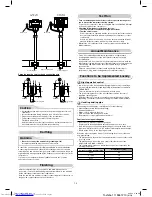
2. As shown in the fi gure, be sure to use two wrenches to loosen or tighten
the fl are nut of the valve on the gas side. If you use a single crescent, the
fl are nut cannot be tightened to the required tightening torque.
On the other hand, use a single crescent to loosen or tighten the fl are nut
of the valve on the liquid side.
TSB 1115551210_EN.indb 9
TSB 1115551210_EN.indb 9
6/18/14 9:03 AM
6/18/14 9:03 AM

