background image

46

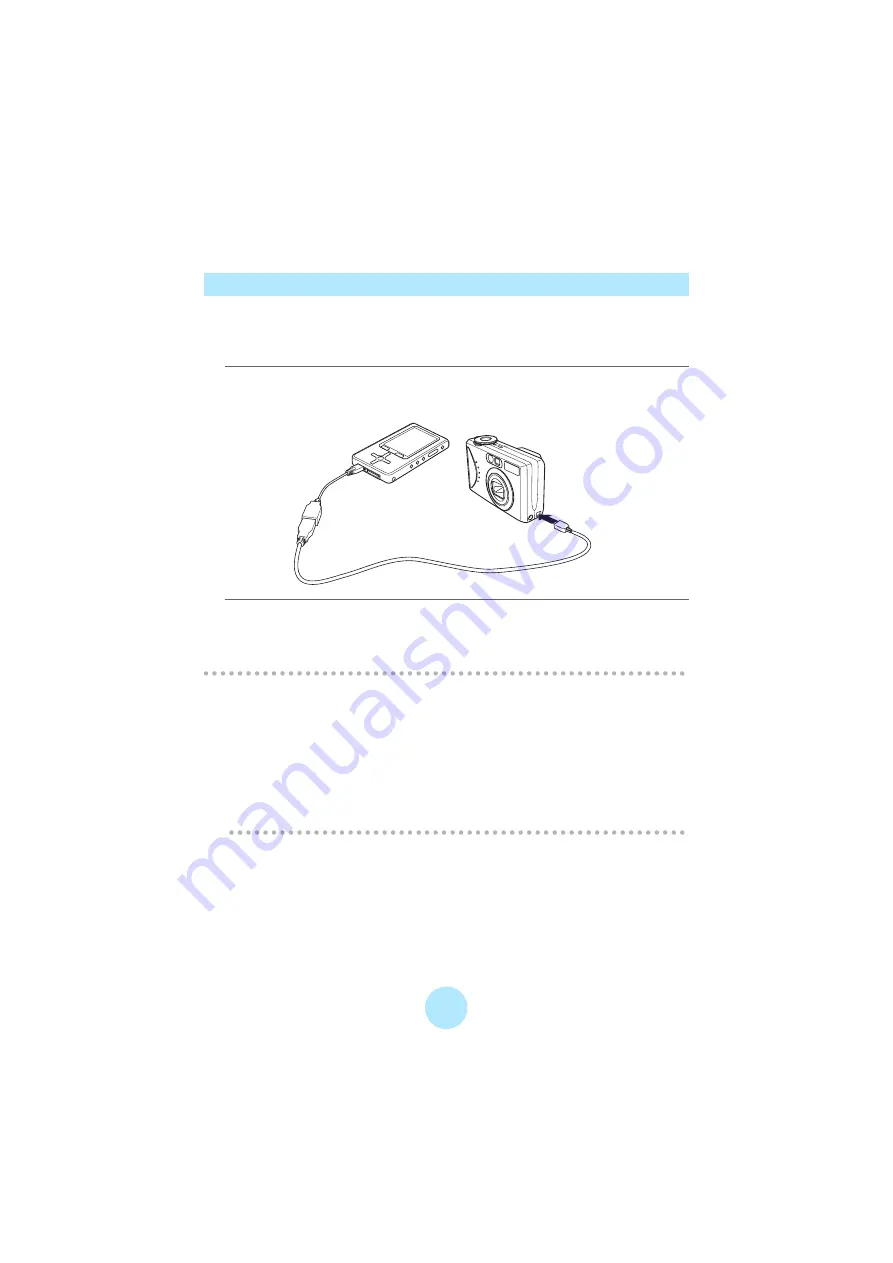
Downloading Photos from a Digital Camera to the gigabeat

You can transfer photos stored in a digital camera to the gigabeat by connecting the 

gigabeat directly to the digital camera which supports USB mass storage or PTP. 

Operation cannot be guaranteed for all devices.

a

Connect the gigabeat and digital camera using the conversion 

cable included.

b

Select “yes” when prompted and press OK.

All transferable data in the digital camera such as photos and movies are 

transferred to the gigabeat.

/

Note

-

gigabeat may not work properly when connected to a digital camera via USB 

hub.

-

Because of the gigabeat USB bus power supply restrictions, some digital 

cameras may not be connected or USB function of the gigabeat may not be 

used temporarily. 

In this case, disconnect the digital camera. And then turn off the power of the 

gigabeat and turn the power back on. 

Summary of Contents for Portable MP3 Player

Page 1: ...1 Portable Media Center Owner s Manual TOSHIBA CORPORATION 2006 All Rights Reserved ...

Page 2: ...rolonged view of the screen Pull over in a safe and legal manner before attempting to access a function of the system requiring prolonged attention Even occasional short scans to the screen may be hazardous if your attention has been diverted away from your driving task at a critical time Volume Setting Do not use this product while driving a car Do not raise the volume excessively Keep the volume...

Page 3: ...nect the equipment into an outlet on a circuit different from that to which the receiver is connected Consult the dealer or an experienced radio TV technician for help Only peripherals complying with the FCC Class B limits may be attached to this equipment Operation with noncompliant peripherals or peripherals not recommended by Toshiba is likely to result in interference to radio and TV reception...

Page 4: ...en classified according to the seriousness of the risk and the icons highlight these instructions as follows Indicates a potentially hazardous situation which if not avoided could result in death or serious injury Indicates a potentially hazardous situation which if not avoided may result in minor or moderate injury Indicates a potentially hazardous situation which if not avoided may result in pro...

Page 5: ...uct or any inflammable objects to enter the product Do not cause foreign objects to enter or drop into the holes in the terminals and other openings or gaps It may result in fire or electric shock possibly resulting in serious injury Turn off the power and refrain from using the product on an airplane in a hospital or other place where use of the product is prohibited Using the product in these pl...

Page 6: ... may leak resulting in ignition or explosion possibly resulting in serious injury Do not use the product in a humid or steamy environment nor use it in a place that is dusty or subject to lamp soot Doing so may result in fire or electric shock possibly resulting in serious injury Remove the cables when moving the product Failure to do so may damage the cables resulting in fire or electric shock po...

Page 7: ...njury Use the product in a well ventilated place Do not drop the product or subject it to strong impact The product may be damaged or fire or electric shock may result possibly resulting in serious injury Do not swing the product around when transporting or carrying it The product may strike a person or object resulting in injury If you should experience an abnormal sensation on your skin immediat...

Page 8: ...pose may result in fire or damage possibly resulting in serious injury Insert the power plug firmly into the power outlet If the power plug is not fully inserted fire or electric shock may result possibly resulting in serious injury When removing the power plug from the power outlet do not pull directly on the cable Always hold the plug to remove it Pulling the plug by the cable may damage the cab...

Page 9: ...oying Music 28 Downloading Tracks 28 Downloading Tracks from a Music CD to Your PC 28 Transferring Tracks from the PC to the gigabeat 29 Listening to Music 32 Playback Functions 35 Repeat Play Random Play 36 Changing the EQ 37 Adjusting Audio Quality 38 Using a Quick List for Playback 39 Creating a Quick List 39 Deleting Tracks from the Quick List 40 Playing the Playlist 41 Managing Tracks 42 Rati...

Page 10: ...videos Viewing photos from your gigabeat on your TV 66 Enjoying TV 69 Downloading TV Shows 69 Viewing Recorded TV Programs 70 Selecting a TV Show to Play 70 Enjoying Radio 72 Using the Radio 72 Set Channels Using Auto Preset 72 Manually Add Channels 74 Modifying Channel Settings 75 Deleting Channel Settings 76 Listening to the FM Radio 77 Selecting a station 77 Changing Settings 78 Adjusting the D...

Page 11: ...11 Terminology 94 Possible Error Messages Main Unit 95 Troubleshooting 96 Frequently Asked Questions 98 Specifications 99 ...

Page 12: ...go and Reader are trademarks or registered trademarks of Adobe Systems Incorporated in the United States and or other countries Macintosh is a registered trademark of Apple Computer Inc The product names referred to in this manual may be registered trademarks or trade marks of their respective companies Included accessories AC Adapter AC Adapter Cable Software CD ROM Earbuds USB Cable Safety Preca...

Page 13: ...s and other countries and may subject you to civil and or criminal liability You must obtain any required permission from copyright owners to download or use copyrighted content Toshiba cannot and does not grant such permission Recorded Data Tracks that have been damaged or erased due to a problem in the product or PC may not be recovered About This Product This product incorporates copyright prot...

Page 14: ...oduct in a trouser pocket etc When you sit down the product may receive strong impact and sustain damage Do not forcibly press in the buttons on the front surface A strong force will be exerted on the internal parts and may damage them or cause malfunction and failure Location of Use Using this product near a radio television cellular phone etc may cause radio interference If interference should o...

Page 15: ... extremely low temperatures Do not subject the product to sudden changes in temperature as condensation may occur Do not use the product in a thunderstorm Do not place the product near a magnet speaker or other object generating a magnetic field Do not place the product where it will be subject to strong vibrations Do not place or drop an object on the product Do not place the product where it wil...

Page 16: ... a prolonged period the built in battery may discharge completely If this should happen recharge the battery before using the product The recharging time will vary depending on the condition of the built in battery ambient temperature etc Using the product at low temperatures will shorten the continuous playback time The built in battery can be recharged approximately 500 times This number is an e...

Page 17: ...o not pull directly on the cable Do not drop the AC adapter or otherwise subject it to strong impact Do not use the AC adapter in a hot humid place Do not use the AC adapter on an object that is easily affected by temperature increases Heat marks may remain where the AC adapter has been placed The AC adapter is designed for indoor use only The surface temperature of the AC adapter may increase whi...

Page 18: ...tton d VOL VOL button e SKIP button f PLAY PAUSE button g SKIP button h AC adapter jack i Strap attachment hole j Display screen Color screen k BACK button l START button m Plus Touch button n OK button referred to as ok in this manual o BATTERY switch Comes from the factory in the off position When not using the gigabeat for extended periods switch this to off and it will extend the life of your ...

Page 19: ...e the battery Preparation Set the BATTERY switch on the bottom of the main unit to ON Using the AC Adapter Connect the AC adapter to the gigabeat in the order A to C shown below It takes approximately 3 hours to fully charge the gigabeat Battery icon display Battery Status Charging Fully charged Charging completed A B Connect to outlet C ...

Page 20: ...r supply function of the PC and may not be possible depending on the model of PC When a USB connection is made with a PC that cannot support charging the connection may soon be lost and the USB function of the PC may not be available for use temporarily If this happens restart the PC connect the AC adapter to the gigabeat and then once again make a USB connection with the PC The gigabeat may not b...

Page 21: ...harge indicates the battery remaining p 27 If the battery remaining is very low connect the AC adapter to the gigabeat The built in battery may not be charged using a USB If the battery remaining reaches low and the power has run out connect the AC adapter to the gigabeat The built in battery cannot be charged using a USB If the built in battery has run out recharge the battery in full before usin...

Page 22: ...USB 2 0 protocol must be installed on the PC If the PC can only transfer at USB 1 1 speeds then the device will transfer information using USB 1 1 PC Requirements 1 Operating System Microsoft Windows XP Home Edition XP Professional XP Media Center Edition Windows XP Service Pack 2 is recommended CPU 300MHz or faster 1 5GHz is recommended RAM 128MB or more 512MB is recommended Hard disk space 100MB...

Page 23: ... Player 10 is already installed on the PC continue the installation procedure Files necessary to work with the gigabeat will be installed on the PC aInsert the included CD ROM into the PC bClick the Install Windows Media Player 10 button Even when Windows Media Player 10 is already installed on the PC continue the installation procedure Files necessary to work with the gigabeat will be installed o...

Page 24: ... connect the gigabeat to the PC you will see an operation screen appear p 29 Note If the battery is low when you connect the gigabeat to your PC you should also plug in the AC adapter otherwise some of the data being transferred could be lost While transferring data to the gigabeat never disconnect the USB cable or AC Adapter If the screen displays Updating do not disconnect the gigabeat Do not di...

Page 25: ...rations Selection of any menu items starts from this screen START button Displays the Start screen in which you can select a menu item to operate Back button Returns you to the previous screen OK button Confirms the item selection made with the Plus Touch button and performs the associated function Plus Touch button Touch the top bottom left or right to select a menu item ...

Page 26: ...he top or bottom of the Plus Touch button to move between the selection items Touch the left or right of the Plus Touch button to change the items Confirming your selection Press the OK to perform the function of the selected item ...

Page 27: ...n a display takes a long time to appear such as with large photo files Play Pause Rewind Forward Lock Elapsed Time bar Battery Power Charging Charging completed Battery Power This will flash if the battery life drops to zero elapsed time and remaining time Each time you press OK it switches the elapsed and remaining time display Random play p 36 Repeat play p 36 Track Number Artist name Album titl...

Page 28: ...f your PC bStart Windows Media Player 10 cClick the Rip button dTurn off the check boxes for tracks you do not want to download eClick the Rip Music button Note For details refer to the help information about Windows Media Player 10 This activity is not currently legal in Australia c Rip button e Rip Music button dCheck boxes ...

Page 29: ...o this device and click OK cSelect Automatic or Manual for the PC gigabeat synchronization method Automatic Synchronization automatically starts Manual Proceed to Step4 dWhen Windows Media Player 10 opens select the content to transfer in the Library tab Microsoft product screen shot s reprinted with permission from Microsoft Corporation ...

Page 30: ...lower right hand corner Note When synchronization is set to Automatic and the synchronized data are deleted from the PC the data will also be deleted from the gigabeat next time connected to the PC Do not use the gigabeat as a backup for the PC library Data conversion may be performed during the transfer depending on the WMA file format you chose ...

Page 31: ...art to the gigabeat the album info with picture has to be imported to Windows Media Player 10 in advance Importing album art aIn the Library tab right click the album and then select the Find Album Info bSearch the album info you want to import cClick the Finish ...

Page 32: ...oying Music Listening to Music Example Selecting tracks from artists aFrom the Start screen select my music and press OK bScroll to the left or right and select artists cSelect the desired artist and press OK ...

Page 33: ...ay not be playable 1 PLAY LIMIT EXCEEDED The play limit during which playback is possible has been exceeded and playback is not possible Renew the subscription and perform synchronization 2 SYNCHRONIZE WITH THE PC The message is displayed when the gigabeat hasn t been connected to the PC for a prolonged period or after a reset In this circumstance playback is enabled by synchronization with Window...

Page 34: ...t using the Plus Touch button to change your screen layout Displays elapsed time and track information Displays elapsed time track information and the album art Displays elapsed time and large format album art Lists tracks available a thumbnail of the album art and the elapsed and remaining time ...

Page 35: ...he art is not transferred to the gigabeat Playback Functions Controlling the Volume Press the VOL or VOL button Volume display appears for about one second The setup screen allows you to set the shuffle repeat settings as well as EQ settings ...

Page 36: ...scroll to the left or right using the Plus Touch button to display the track setup screen bPress repeat and then OK Random Play aWhile a track is playing back scroll to the left or right using the Plus Touch button to display the Setup screen bSelect shuffle and press OK ...

Page 37: ...ou can select the desired equalizer mode aWhile a track is playing back scroll to the left or right using the Plus Touch button to display the Setup screen bSelect the equalizer setup cPress OK and select the desired tone ...

Page 38: ...y sound compensation technology is co developed by Kyushu Institute of Technology Center for Human Quality of Life through IT and TOSHIBA aFrom the Start screen select Harmonics and press OK bSelect on and press OK Note Playback with the Harmonics on WAV audio data and WMA 9 Lossless use more battery power for playback than MP3 and WMA Continuous playback time will be reduced accordingly ...

Page 39: ... Start screen select my music and press OK bScroll to the left or right using the Plus Touch button and select songs albums genres or artists cSelect the desired track album genre or artist to be added to the quick list dSelect add all to quick list or add to quick list and press OK ...

Page 40: ...m the Start screen select my music and press OK bScroll to the left or right using the Plus Touch button and select playlists cSelect quick list and press OK dSelect remove all from quick list and press OK eWhen prompted select yes and press OK ...

Page 41: ...tart screen select my music and press OK bScroll to the left or right using the Plus Touch button and select playlists cSelect the quick list or playlist transferred from Windows Media Player 10 and press OK dSelect play all and press OK ...

Page 42: ... button to display the Setup screen bSelect the stars cPress OK to change the number of stars Each time you press the OK button the number of stars changes When tracks are synchronized to Windows Media Player 10 the track information in this application is updated to reflect the new evaluation results determined by the gigabeat ...

Page 43: ...eat to your PC bStart Windows Media Player 10 cClick the Sync tab The contents of the gigabeat appear in the right window dFrom Music in the right window select the item you want to delete eRight click to display a menu Select Delete from device from the menu ...

Page 44: ...ize media files to this device and click OK cSelect Automatic or Manual for the PC gigabeat synchronization method Automatic Synchronization automatically starts Manual Proceed to Step4 If already set this screen is not displayed Click the Set up Sync button in the Sync tab to set automatic synchronization dIf it doesn t start automatically start Windows Media Player 10 ...

Page 45: ... Sync List gClick the Start Sync button in the lower right hand corner Note To display All Pictures in the tree view turn on the check box for Enable picture support for devices in Tools Options Player To add images to the All Pictures library use Windows Media Player 10 to search images on the PC For details refer to Help in Windows Media Player 10 ...

Page 46: ...conversion cable included bSelect yes when prompted and press OK All transferable data in the digital camera such as photos and movies are transferred to the gigabeat Note gigabeat may not work properly when connected to a digital camera via USB hub Because of the gigabeat USB bus power supply restrictions some digital cameras may not be connected or USB function of the gigabeat may not be used te...

Page 47: ...t screen select my pictures and press OK bScroll to the left or right using the Plus Touch button and select view by folder cSelect Copied from Card or Camera and press OK dSelect the folder for the photo you want to delete and press OK ...

Page 48: ...photo setup screen The top and bottom of Plus Touch button will be the right and left when the orientation of display is landscape gSelect delete and press OK hSelect yes when prompted and press OK A confirmation message that the file has been completely deleted is displayed iPress OK Note Selecting delete all in Step 5 deletes all photos in the folder ...

Page 49: ...ce for Images To download photos from a digital camera directly to the gigabeat you can reserve free space for storing images aFrom the Start screen select settings and press OK bSelect reserve space and press OK cPress OK ...

Page 50: ...50 dSelect a capacity for the free space you want to reserve and press OK Note You cannot save data from your PC in the reserved space ...

Page 51: ...rted by Folder aFrom the Start screen select my pictures and press OK bScroll to the left or right using the Plus Touch button and select view by folder cSelect a folder to display and press OK dSelect a photo to be displayed in full screen and press OK ...

Page 52: ...res and press OK bScroll to the left or right Plus Touch button to select view by date cSelect a month and year for display and press OK dSelect a photo to be displayed in full screen and press OK Note Photos taken without a date stamp are placed in the Unknown Date folder ...

Page 53: ...he orientation of display is landscape Zoom aScroll to the left or right Plus Touch button to display the photo setup screen The top and bottom of Plus Touch button will be the right and left when the orientation of display is landscape bSelect zoom in and press OK Pressing OK again returns the photo to its original size Top Bottom Bottom Top landscape portrait ...

Page 54: ...aller cannot be zoomed If you press the left right top or bottom of the Plus Touch button during display of an enlarged photo you can move the photo left right or up down Changing the Orientation of a Photo aPress the START button bSelect settings and press OK cSelect pictures and press OK dSelect display and press OK ...

Page 55: ...e photo display screen Displaying Photo Information Touch the left or right of the Plus Touch button While a photo is displayed the name and date of the photo appear together with the Play Pause icon and Battery Power icon If a track is playing information about the track also appears ...

Page 56: ...g Track Information aScroll to the left or right Plus Touch button to display the photo setup screen bSelect show music and press OK You can return to the thumbnail display of the photos by pressing the BACK button ...

Page 57: ... the Start screen select my pictures and press OK bScroll to the left or right using the Plus Touch button to select view by folder or view by date cSelect the folder or date you wish to view in the slideshow dSelect play slide show and press OK ...

Page 58: ...splay p 53 Changing the Slide Interval aDuring the slideshow press the left or right of the Plus Touch button to display the photo setup screen bSelect the transitions row cPress OK to select an interval of time When you repeatedly press the OK button intervals are selected in the following order 3 sec 5 sec 7 sec 10 sec 15 sec and 30 sec dScroll to the left or right using the Plus Touch button to...

Page 59: ...om Order aDuring the slideshow press the left or right of the Plus Touch button to display the photo setup screen bSelect shuffle and press OK cScroll to the left or right using the Plus Touch button to return to the original screen ...

Page 60: ...oto aUsing the USB cable connect the gigabeat to your PC bClick the Sync tab cFrom Pictures select the item you want to delete dRight click to display a menu Select Delete from device from the menu The selected photo will be deleted from the gigabeat ...

Page 61: ...en prompted cSelect Automatic or Manual for the PC gigabeat synchronization method Automatic Synchronization automatically starts Manual Proceed to Step4 If already set this screen is not displayed Click the Set up Sync button in the Sync tab to set automatic synchronization dIf it doesn t start automatically start Windows Media Player 10 eSelect the videos to transfer in the Library tab ...

Page 62: ...ssible Renew the subscription rental and perform synchronization 2 SYNCHRONIZE WITH THE PC The message is displayed when the gigabeat hasn t been connected to the PC for a prolonged period or after a reset In this circumstance playback is enabled by synchronization with Windows Media Player 10 Data conversion may be performed during the transfer depending on the WMV file format you chose WMV files...

Page 63: ...aOn the Start screen select my videos and press OK bSroll to the left or right using the Plus Touch button to select sort by date sort by source or sort by name cSelect the video you want to play and press OK dSelect play and press OK ...

Page 64: ...from where you left off or restart from the beginning fSelect resume or play from beginning and press OK Changing the Screen Orientation aPress the START button The video will be paused and the Start screen will appear bSelect settings and press OK cSelect video and press OK ...

Page 65: ...andscape or portrait and press OK fPress the BACK button to return to the video playback screen Deleting Video Data You can delete videos in the same way as Deleting Tracks p 43 From Video in the right window select the item you want to delete ...

Page 66: ... your gigabeat on your TV aConnect the gigabeat to the TV by using the included AV cable bFrom the Start screen select settings and press OK cSelect display and press OK Connect the AV cable to the V OUT jack Headphone jack on the gigabeat To AV IN Jacks ...

Page 67: ...ideo is played on the TV screen nothing appears on the screen of the gigabeat When the gigabeat is turned off it returns to the gigabeat screen You can control the volume by pressing the VOL or VOL button on the side of the main unit Note During the tv out the use of AC adapter is recommended ...

Page 68: ...he Start screen select settings and press OK bSelect display and press OK cSelect tv system and press OK dSelect NTSC or PAL and press OK Select NTSC for TVs used in the North America Select PAL for TVs used in the Australia New Zealand ...

Page 69: ...on the remote control for Media Center Edition Main Menu cSelect More Programs dSelect Sync To Device eFrom the Manage List page select Add More fFrom the Add More page select Recorded TV gFrom the Add More Recorded TV page select the shows to transfer to the gigabeat hSelect Save iFrom the Manage List page use the arrow buttons on the remote control to prioritize the list Transfer begins with the...

Page 70: ...Selecting a TV Show to Play aOn the Start screen select my tv and press OK bScroll to the left or right using the Plus Touch button to select sort by date or sort by name cSelect the TV show you wish to play and press OK dSelect play and press OK ...

Page 71: ...71 Note Only Programs that were recorded or transferred using Windows XP Media Center Edition 2005 or later will be registered in my tv Any other videos will appear in the my videos folder ...

Page 72: ...he Start screen select radio and press OK bPress the left or right of the Plus Touch button and select the group Channel can be set to either group 1 or group 2 separately cScroll to the top or bottom using the Plus Touch button and select Setup and press OK dSelect Area ...

Page 73: ...hanges as follows Middle High Low hSelect Auto Preset and press OK A confirmation message appears iSelect yes and press OK Auto Preset starts and a received frequency will be automatically assigned to a channel beginning from channel 01 jPress OK after a confirmation message appears that Auto Preset completes Note Up to 30 channels per 1 group can be assigned Earbuds cable functions as an antenna ...

Page 74: ...press OK bPress the left or right of the Plus Touch button and select the group cScrolling to the top or bottom of the Plus Touch button select Add new preset and press OK dScroll to the top or bottom to select the frequency of the radio station you want to listen to ...

Page 75: ...nel Settings aFrom the Start screen select radio and press OK bPress the left or right of the Plus Touch button and select the group cSelect a channel to change the setting of and press OK dSelect Manual Tuning and press OK The frequencies are displayed ...

Page 76: ...nnel is displayed and then it returns to the previous screen Deleting Channel Settings aFrom the Start screen select radio and press OK bPress the left or right of the Plus Touch button and select the group cSelect a channel to delete and press OK dSelect Delete and press OK eSelect yes and press OK The channel is deleted and you return to the previous screen ...

Page 77: ...ect the group cPressing the top or bottom of the Plus Touch button select a channel frequency you want to listen Listening to the FM Radio aFrom the Start screen select radio and press OK bPressing the top or bottom of the Plus Touch button select Add new preset and press OK cPress the top or bottom of the Plus Touch button to select the frequency you want to listen to ...

Page 78: ...78 Changing Settings Adjusting the Display Backlight OFF Time aFrom the Start screen select settings and press OK bSelect display and press OK cSelect backlight and press OK ...

Page 79: ...s performed and press OK Note The backlight stays on while playing TV shows videos and slideshow and while playing music with the AC adapter connected Adjusting Brightness aFrom the Start screen select settings and press OK bSelect display and press OK cSelect brightness and press OK ...

Page 80: ...elect your preferred setting and press OK Using effects You can set how your gigabeat operates using the effects setup screen aFrom the Start screen select settings and press OK bSelect effects and press OK ...

Page 81: ...81 cSelect screen effects and press OK dSelect on and press OK ...

Page 82: ...82 Changing the Language and Region Changing the Onscreen Language aFrom the Start screen select settings and press OK bSelect international and press OK cSelect language and press OK ...

Page 83: ...ight of the Plus Touch button to select yes and then press OK Changing the Region You can change the format to display date time and numbers aFrom the Start screen select settings and press OK bSelect international and press OK cSelect standards and press OK ...

Page 84: ...84 dSelect the region and press OK eScroll to the left or right using the Plus Touch button to select yes and press OK ...

Page 85: ...85 Changing Settings Operation Settings Setting Sound Effects aFrom the Start screen select settings and press OK bSelect effects and press OK cSelect sounds and press OK ...

Page 86: ...86 dSelect on and press OK Adjusting Scroll Speed aFrom the Start screen select settings and press OK bSelect effects and press OK cSelect scrolling speed and press OK ...

Page 87: ...87 dSelect from slow normal and fast and press OK ...

Page 88: ...tings Resetting the gigabeat Returning to the Factory Settings aFrom the Start screen select settings and press OK bSelect restore original settings and press OK cScroll to the left or right to select yes and press OK ...

Page 89: ...m the Start screen select settings and press OK bSelect information and press OK cSelect Portable Media Center contents or legal and press OK The version of Portable Media Center the number of items stored in the gigabeat and used available space ...

Page 90: ...tists my pictures view by date view by folder my videos sort by date sort by source sort by name radio Setup Area Sensitivity Auto Preset Add new preset settings music shuffle off on repeat off on equalizer none acoustic classical electronic hip hop jazz pop rock display time elapsed remaining ...

Page 91: ...econds shuffle off on display landscape portrait video display landscape portrait display backlight 1 second 5 seconds 15 seconds 1 minute always on brightness 1 dim 2 3 4 5 bright tv out off on tv system NTSC PAL effects screen effects on off sounds on off scrolling speed slow normal fast ...

Page 92: ...rlands English Canada English United Kingdom English United States French Belgium French Canada French France French Luxembourg French Switzerland German Austria German Germany German Luxembourg German Switzerland Japanese Spanish Spain International Sort Swedish reserve space none 256 MB 512 MB 1 GB 2 GB restore original settings yes no ...

Page 93: ...93 settings information Portable Media Center contents legal Harmonics on off ...

Page 94: ...rom PC Subscription Service As pertaining to this product subscriptions services typically allow their members to pay a set fee per month to enjoy as many tracks as they like which will play back on the device as long as the monthly subscription is kept active This differs from paying a set fee per track and using that track in an unlimited fashion WindowsXP Media Center Edition 2005 Based on Wind...

Page 95: ...aged Transfer the item into gigabeat again The license for this item has expired See Portable Media Center Help on your computer Transfer the item onto the gigabeat again There is a problem with the license for this item See Portable Media Center Help on your computer The license data for the item is damaged or expired Transfer new data into gigabeat again The Media Library is not available See Po...

Page 96: ...connected to a PC p 24 The battery is consumed quickly after charge The built in battery has failed Replace with a new battery To replace the built in battery contact TOSHIBA Customer Service p 16 Playback will not work There is no track Use Windows Media Player 10 to transfer tracks p 29 There is no sound The Earbuds are not connected properly Check the connection between the Earbuds and main uni...

Page 97: ...defaults p 88 Note If the built in timer is reset and subscription cannot be played connect the gigabeat to the PC to synchronize with Windows Media Player 10 The charge indicator turned off while the AC adapter was connected The charge is automatically stopped to limit the temperature increase in the gigabeat This is a safety feature Keep the gigabeat in the charging operation Charging will resum...

Page 98: ...e p 101 in this owner s manual for a list of tracks that can be played on the gigabeat Q How can I switch the language back to the previous selection A Set the language as follows 1 Press the Start button to display the Start screen 2 Select the item at the bottom and press OK 3 Select the sixth item from the top and press OK 4 Select the item on the top and press OK 5 Select the language to switc...

Page 99: ...ayback time Audio data Approximately 12 hours 2 128kbps 44 1Hz WMA audio tracks backlight off Video data Approximately 2 5 hours 2 500kbps WMV video Excluding content protected with Windows Media DRM10 The built in battery fully charged using the AC adapter Normal temperature 25 C Factory default volume The continuous playback time is a reference value but is not guaranteed since the actual playba...

Page 100: ...he existence of display pixels that might not light or might be lit all the time however please note that this does not constitute malfunction of the product and is not covered by your warranty Operating conditions Temperature 5 to 35 C Humidity 30 to 80 RH No condensation Color screen 2 4 inch diagonal QVGA low temperature polysilicon TFT color panel 4 FM Radio 87 5 MHz to 107 9 MHz USB port USB2...

Page 101: ...n the gigabeat have the following combinations of sampling frequency and bit rate Tracks with another combination may not play properly MP3 stereo Sampling frequency 8 16 22 05 44 1 48 kHz Bit rate 32 to 320 kbps MP3 mono Sampling frequency 8 11 16 22 05 32 44 1 kHz Bit rate 16 to 64 kbps WMA stereo Sampling frequency 8 16 22 05 32 44 1 48 kHz Bit rate CBR 32 to 320 kbps VBR 32 to 355 kbps WMA mon...

Page 102: ...S_00_US_UE ...

Reviews: