DISASSEMBLY INSTRUCTIONS
B3-2
Fig. 3-5-B
Traverse Holder
Main Chassis Ass'y
3-7: RACK FEED ASS'Y (Refer to Fig. 3-7-A)
Remove the screw
1
.
Remove the Rack Feed 1 Spring, Rack Feed 1/2 and
Rack Feed Lever.
Lever Switch
The Lever should be position
between A and B.
B
Rack Loading
A
NOTE
1.
2.
3.
4.
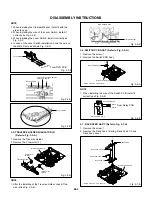
When installing the Clamper Magnet, install it with the
green face up.
When installing the wire of the Lever Switch, install it
correctly as Fig. 3-4-B.
When installing the Lever Switch, install it correctly as
Fig. 3-4-C.
In case of the Lever Switch installation, hook the wire on
the Main Frame as shown Fig. 3-4-D.
Fig. 3-4-B
Fig. 3-4-C
Fig. 3-4-D
3-5: TRAVERSE HOLDER/INSULATOR (F)
(Refer to Fig. 3-5-A)
1.
2.
Remove the Traverse Holder.
Remove the 2 Insulator (F).
Main Chassis Ass’y
Insulator (F)
(Black)
Traverse Holder
Insulator (F)
(Black)
Fig. 3-5-A
Lever Switch
Blue
White
Red
From DVD PCB
NOTE
1. After the installing of the Traverse Holder, check if the
wire is like Fig. 3-5-B.
3-6: SWITCH PCB ASS'Y (Refer to Fig. 3-6-A)
Remove the screw
1
.
Remove the Switch PCB Ass'y.
1.
2.
1.
2.
1
Rack Feed 1
Rack Feed Lever
Rack Feed 2
Rack Feed 1 Spring
Main Chassis Ass'y
Fig. 3-6-A
When installing the wire of the Switch PCB, install it
correctly as Fig. 3-6-B.
Fig. 3-6-B
From Relay PCB
Switch PCB Ass'y
1
Main Chassis Ass'y
• Screw Torque: 4
±
0.5kgf•cm
NOTE
1.
Switch PCB Ass'y
Black
White
Main Chassis Ass'y
Fig. 3-7-A
• Screw Torque: 3.5
±
0.5kgf•cm


