background image

1. Setting Up Wireless Network

GN-1041 Operator’s Manual — Setting Up the Infrastructure Mode

25

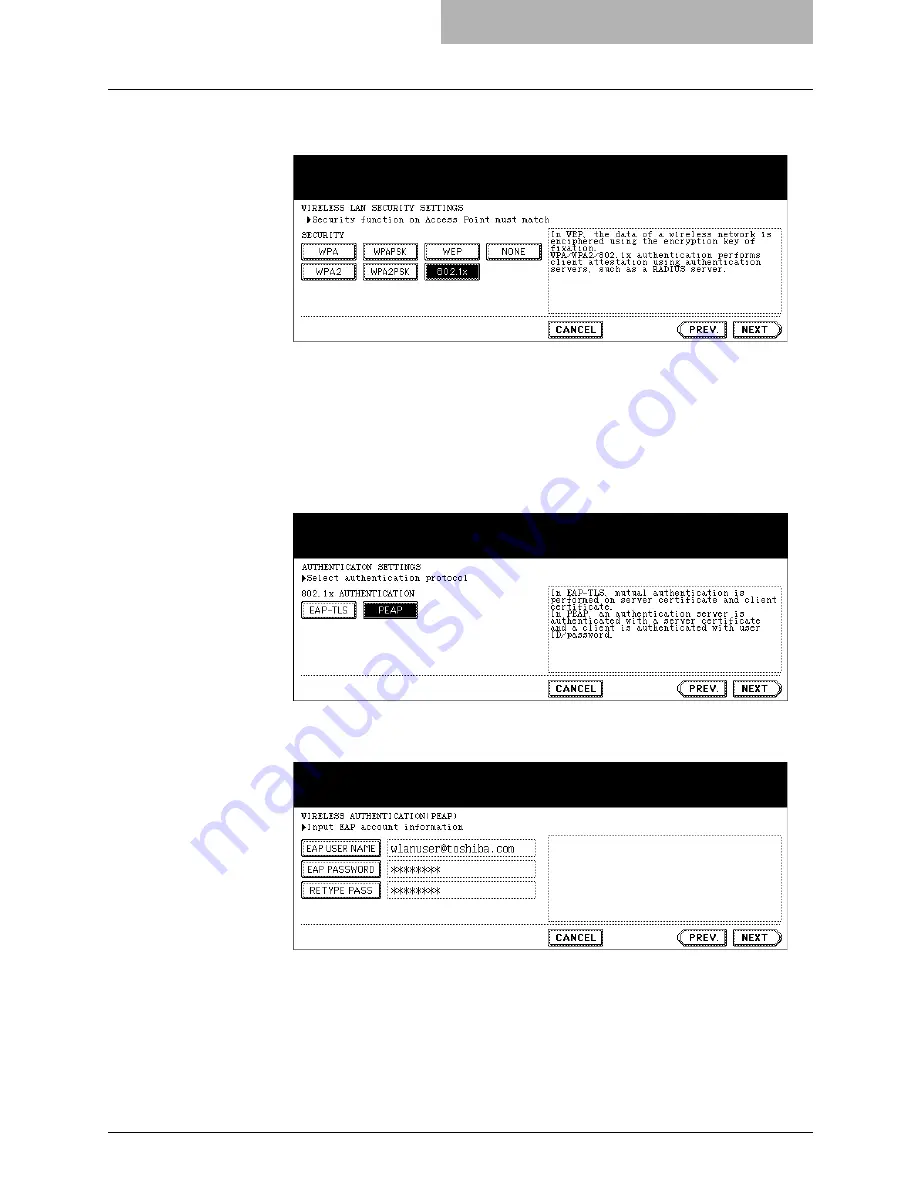
1.

Press the [WPA], [WPA2], or [802.1x] button and press the 
[NEXT] button.

The AUTHENTICATION SETTINGS screen is displayed.

NOTES:

When the [802.1x] button is selected, only the Dynamic WEP can be selected for 
the encryption setting.  When the [WPA] or [WPA2] button is selected, TKIP or 
AES(CCMP) can be selected.

When GN-1040 is connected, the [WPA], [WPA2], and [WPA2PSK] buttons cannot 
be selected.

2.

Press the [PEAP] button and press the [NEXT] button.

The WIRELESS AUTHENTICATION (EAP-TLS) screen is displayed.

3.

Enter the following items and press the [NEXT] button.

z

[EAP USER NAME]

Press this to enter the EAP user name that is used for the authentication.

NOTE:

In the EAP USER NAME, enter the user name in “User Name@FQDN” format.
Example: [email protected]

z

[EAP PASSWORD]

Press this to enter the EAP password that is used for the authentication.

Summary of Contents for GN-1041

Page 1: ...MULTIFUNCTIONAL DIGITAL SYSTEMS Operator s Manual for Wireless LAN Module GN 1041 ...

Page 2: ...y Wi Fi certification as defined by the Wi Fi Alliance Wireless LAN and your Health Wireless LAN products like other radio devices emit radio frequency electromagnetic energy The level of energy emitted by Wireless LAN devices however is far much less than the electromagnetic energy emitted by wireless devices like for example mobile phones Because Wireless LAN products operate within the guidelin...

Page 3: ... generates and places where static electricity or radio interference generates Depending on environment radio waves can not reach to the product Bluetooth and Wireless LAN devices operate within the same radio frequency range and may interfere with one another If you use Bluetooth and Wireless LAN devices simultaneously you may occasionally experience a less than optimal network perfor mance or ev...

Page 4: ...ation of Conformity This device complies with the essential requirements of the R TTE Directive 1999 5 EC with essential test suites as per standards EN 300 328 2 Electromagnetic compatibility and Radio Spectrum Matters ERM Wideband Trans mission systems Data transmission equipment operating in the 2 4 GHz ISM band and using spread spectrum modulation techniques EN 301 489 17 Electromagnetic compa...

Page 5: ...F Hiermit erklärt TOSHIBA TEC dass sich dieser diese dieses GN 1041 in Übereinstimmung mit den grundlegenden Anforderungen und den anderen relevanten Vorschriften der Richtlinie 1999 5 EG befindet BMWi Hiermit erklärt TOSHIBA TEC die Übereinstimmung des Gerätes GN 1041 mit den grundleg enden Anforderungen und den anderen relevanten Festlegungen der Richtlinie 1999 5 EG Wien ΜΕ ΤΗΝ ΠΑΡΟΥΣΑ TOSHIBA ...

Page 6: ...cifications designs and other contents of this document are subject to change without notice The contents of this document are believed to be accurate however if any discrep ancies noted should be brought to the attention of TOSHIBA authorized dealer or service engineer Notwithstanding the foregoing the manufacturer is unable to accept any claims for losses or lost profits etc Resulting from the u...

Page 7: ...CC 5 Regulatory Notice for Channel Use in France 6 Approved Countries Regions for use for the Toshiba Wireless LAN 6 NOTES 6 Table of Contents 7 1 Setting Up Wireless Network 9 Before Setting Up Wireless Network 10 Planning for Installation 10 1 Determine the Network Type 10 2 Determine the SSID 11 3 Determine the Security Mode 11 Setting Up the Infrastructure Mode 13 Select Network Type 13 Specif...

Page 8: ... 8 ...

Page 9: ...TTING UP WIRELESS NETWORK This section describes about the preparations before setting up the wireless settings of the equipment Before Setting Up Wireless Network 10 Setting Up the Infrastructure Mode 13 Setting up the Ad Hoc Mode 35 Disabling Wireless Network 44 ...

Page 10: ...inting Guide NOTES To access the equipment through the Wireless LAN from the client computers the client computers must have the Wireless LAN Module When you enable the wireless network the existing NIC will be disabled This equipment cannot connect the wired network and wireless network at the same time Planning for Installation Before setting up the Wireless LAN Module for your wireless LAN netw...

Page 11: ...Point In the Ad Hoc Mode you must assign the same SSID that is assigned to other client computers To access the devices each other in the Ad Hoc Mode the same SSID must be assigned to each device 3 Determine the Security Mode This equipment supports the following wireless security modes WPA WPA2 802 1x Using the WPA WPA2 802 1x authentication you can restrict the access to the wireless network usi...

Page 12: ...PSK authentication The TKIP provides a different key for per packet with a message integrity check This key will be changed for every fixed interval The AES is the next generation cryptography algorithm that the U S government improves to replace the DES and 3DES This authentication method is suitable for a small wireless network and easy to add the security because the authentication server is no...

Page 13: ...Select the Security Mode P 19 Select Security Mode Select Network Type First access the WIRELESS SETTING screen from the ADMIN menu from the Touch Panel Display to select the network type for the wireless network NOTE If you are not sure what network type to select see the following section to determine the network type first P 10 1 Determine the Network Type Selecting the network type 1 Press the...

Page 14: ... the administrator password and press the ENTER button The ADMIN menu is displayed 5 Press the WIRELESS SETTINGS button The WIRELESS SETTINGS menu is displayed 6 Press the WIRELESS SETTINGS button The WIRELESS SETTINGS screen is displayed NOTE It may take a time to display the WIRELESS SETTINGS screen ...

Page 15: ...Infrastructure Mode 15 7 Press the ON button and press the NEXT button The NETWORK TYPE screen is displayed 8 Press the INFRASTRUCTURE button and press the NEXT button 9 The SSID SETTINGS screen displayed Continue to the procedure for specifying the SSID P 16 Specify SSID ...

Page 16: ...ipment can search the available SSID automatically from the wireless network Then you can select the SSID from the list 1 Press the AVAILABLE NETWORK button The AVAILABLE NETWORK screen is displayed 2 Select the SSID that this equipment will connect and press the ENTER button The screen returns to the SSID SETTINGS screen NOTES The available network may not displayed according to the communication...

Page 17: ...frastructure Mode 17 3 Press the NEXT button 4 The WIRELESS LAN SECURITY SETTINGS screen is dis played Continue to the procedure for specifying the Security Mode P 19 Select Security Mode Entering the SSID manually 1 Press the SSID button The letter entry screen is displayed ...

Page 18: ... 2 Enter the SSID using the keyboard and digital keys and press the ENTER button The screen returns to the SSID SETTINGS screen 3 Press the NEXT button 4 The WIRELESS LAN SECURITY SETTINGS screen is dis played Continue to the procedure for specifying the Security Mode P 19 Select Security Mode ...

Page 19: ...tion with the EAP TLS protocol you must install user certification file and CA certification file in the equipment This equipment uses the user certification file to authenticate the access rights to the wireless network and the RADIUS server authenticate this equipment using the CA certification file NOTE When using the WPA WPA2 802 1x authentication with the EAP TLS protocol you must install the...

Page 20: ...THENTICATION EAP TLS screen is displayed 3 Press the EAP USER NAME button The letter entry screen is displayed 4 Enter the EAP user name using the keyboard and digital keys and press the ENTER button The screen returns to the WIRELESS AUTHENTICATION EAP TLS screen NOTE In the EAP USER NAME enter the user name in User Name FQDN format Example wlanuser toshiba com ...

Page 21: ...ment using TopAccess If the specified certification file is not installed in the equipment the error message to input correct file name will be displayed z PASSWORD Press this to enter the password for the user certification file SUPPLEMENT When pressing the USER CERTIFICATE or PASSWORD button the letter entry screen is displayed Enter the value using the keyboard and digital keys and press the EN...

Page 22: ...ntry screen is displayed Enter the value using the keyboard and digital keys and press the ENTER button to set the entry 8 Specify the following items and press the NEXT button z FULL AGREEMENT of SERVER NAME Select the ON button to confirm whether the RAIUS server name in the server certification file and the input RADIUS server name is same or not When the ON button is selected press the RADIUS ...

Page 23: ... Dynamic WEP encryption The Dynamic WEP provides the encryption using WEP technology and it allows the WEP key to change dynamically for every fixed interval The Dynamic WEP does not support the PEER KEY for IEEE802 1x NOTES When WPA or WPA2 is selected for the security mode only TKIP or AES CCMP can be selected When 802 1x is selected for the security mode and GN 1040 is used either TKIP AES CCMP...

Page 24: ...creen that you want to change and then repeat the operation 12 Press the YES button to shut down the equipment The wireless settings apply after restarting the equipment Selecting WPA WPA2 802 1x security mode with PEAP protocol Using the WPA WPA2 802 1x authentication with the PEAP protocol you must install the CA certification file in the equipment This equipment uses the user name and password ...

Page 25: ...d TKIP or AES CCMP can be selected When GN 1040 is connected the WPA WPA2 and WPA2PSK buttons cannot be selected 2 Press the PEAP button and press the NEXT button The WIRELESS AUTHENTICATION EAP TLS screen is displayed 3 Enter the following items and press the NEXT button z EAP USER NAME Press this to enter the EAP user name that is used for the authentication NOTE In the EAP USER NAME enter the u...

Page 26: ...tification file is not installed in the equipment the error message to input correct file name will be displayed SUPPLEMENT When pressing the CA CERTIFICATE the letter entry screen is displayed Enter the value using the keyboard and digital keys and press the ENTER button to set the entry 5 Specify the following items and press the NEXT button z FULL AGREEMENT of SERVER NAME Select the ON button t...

Page 27: ... Dynamic WEP encryption The Dynamic WEP provides the encryption using WEP technology and it allows the WEP key to change dynamically for every fixed interval The Dynamic WEP does not support the PEER KEY for IEEE802 1x NOTES When WPA or WPA2 is selected for the security mode only TKIP or AES CCMP can be selected When 802 1x is selected for the security mode and GN 1040 is used either TKIP AES CCMP...

Page 28: ... to change the settings press the PREV button to move back to the screen that you want to change and then repeat the operation 9 Press the YES button to shut down the equipment The wireless settings apply after restarting the equipment Selecting WPAPSK WPA2PSK security mode The WPAPSK WPA2PSK is an authentication method using the PSK Pre Shared Key between the Access Point and other wireless devic...

Page 29: ...nt key for per packet with a message integrity check This key will be changed for every fixed interval AES CCMP Select this to use AES encryption The AES is the next generation cryptography algorithm that the U S government improves to replace the DES and 3DES z PSK PASS PHRASE Press this to enter the PSK Pass Phrase The PSK is created by using the this pass phrase You must enter the same pass phr...

Page 30: ...ion If you do not have to specify the fixed rate select AUTO When AUTO is selected this equipment will use appropriate rate depending on the condition Generally select AUTO The communication may fail unexpectedly if you select a static transmit rate 4 Confirm the settings and press the FINISH button The shut down screen is displayed SUPPLEMENT If you want to change the settings press the PREV butt...

Page 31: ...P 1 Press the WEP button and press the NEXT button The WIRELESS ENCRYPTION WEP screen is displayed NOTE When GN 1040 is connected the WPA WPA2 and WPA2PSK buttons cannot be selected 2 Enter the following items and press the NEXT button z WEP ENCRYPTION Select the bit length of the WEP key z KEY ENTRY METHOD Select the character code for the WEP key z WEP KEY Press this to enter the WEP key The max...

Page 32: ...ion If you do not have to specify the fixed rate select AUTO When AUTO is selected this equipment will use appropriate rate depending on the condition Generally select AUTO The communication may fail unexpectedly if you select a static transmit rate 4 Confirm the settings and press the FINISH button The shut down screen is displayed SUPPLEMENT If you want to change the settings press the PREV butt...

Page 33: ...layed NOTE When GN 1040 is connected the WPA WPA2 and WPA2PSK buttons cannot be selected 2 Specify the following items and press the NEXT button z TRANSMIT POWER Select the low transmit power if you want to limit the area that the wireless communication is enabled If you do not have to limit the area select 100 z TRANSMIT RATE Select the transmit data capacity for wireless communication If you do ...

Page 34: ...and press the FINISH button The shut down screen is displayed SUPPLEMENT If you want to change the settings press the PREV button to move back to the screen that you want to change and then repeat the operation 4 Press the YES button to shut down the equipment The wireless settings apply after restarting the equipment ...

Page 35: ...he Security Mode P 40 Select Security Mode Select Network Type First access the WIRELESS SETTING screen from the ADMIN menu from the Touch Panel Display to select the network type for the wireless network NOTE If you are not sure what network type to select see the following section to determine the network type first P 10 1 Determine the Network Type Selecting the network type 1 Press the USER FU...

Page 36: ...ator password and press the ENTER button The ADMIN menu is displayed 5 Press the WIRELESS SETTINGS button The WIRELESS SETTINGS menu is displayed 6 Press the WIRELESS SETTINGS button The WIRELESS SETTINGS screen is displayed 7 Press the ON button and press the NEXT button The NETWORK TYPE screen is displayed ...

Page 37: ... AD HOC button and press the NEXT button NOTE You can specify the between 1 to 11 for the channel However if there is a channel that has already been used for Ad Hoc network use the same channel 9 The SSID SETTINGS screen displayed Continue to the procedure for specifying the SSID P 16 Specify SSID ...

Page 38: ...g the SSID manually NOTE If you are not sure how the SSID must be specified see the following section to deter mine the SSID P 11 2 Determine the SSID Entering the SSID manually 1 Press the SSID button The letter entry screen is displayed 2 Enter the SSID using the keyboard and digital keys and press the ENTER button The screen returns to the SSID SETTINGS screen 3 Press the NEXT button ...

Page 39: ...Wireless Network GN 1041 Operator s Manual Setting up the Ad Hoc Mode 39 4 The WIRELESS LAN SECURITY SETTINGS screen is dis played Continue to the procedure for specifying the Security Mode P 19 Select Security Mode ...

Page 40: ...EP or NONE can be selected for the security mode If you are not sure what security mode to select see the following section to deter mine the security mode P 11 3 Determine the Security Mode Selecting WEP security mode The WEP is a data encryption method using the WEP key between the Access Point and other wireless devices 1 Press the WEP button and press the NEXT button The WIRELESS ENCRYPTION WE...

Page 41: ...igital keys and press the ENTER button to set the entry 3 Select the transmit power and press the NEXT button Select the low transmit power if you want to limit the area that the wireless communication is enabled If you do not have to limit the area select 100 4 Confirm the settings and press the FINISH button The shut down screen is displayed SUPPLEMENT If you want to change the settings press th...

Page 42: ...NOTE If you do not set no security anyone how knows the SSID can connect to the wireless network Therefore it is recommended to set the security if it is possible 1 Press the NONE button and press the NEXT button The TRANSMIT POWER and RATE SETTING screen is displayed 2 Select the transmit power and press the NEXT button Select the low transmit power if you want to limit the area that the wireless...

Page 43: ...press the FINISH button The shut down screen is displayed SUPPLEMENT If you want to change the settings press the PREV button to move back to the screen that you want to change and then repeat the operation 4 Press the YES button to shut down the equipment The wireless settings apply after restarting the equipment ...

Page 44: ...NIC you must disable the wireless network Disabling the wireless network 1 Press the USER FUNCTIONS button on the control panel to enter the User Functions menu 2 Press the ADMIN button The ADMINISTRATOR PASSWORD screen is displayed 3 Press the PASSWORD button The input screen is displayed 4 Enter the administrator password and press the ENTER button The ADMIN menu is displayed 5 Press the WIRELES...

Page 45: ...TTINGS button The WIRELESS SETTINGS screen is displayed 7 Press the OFF button and press the NEXT button The NETWORK TYPE screen is displayed 8 Press the FINISH button The shut down screen is displayed 9 Press the YES button to shut down the equipment The wireless settings apply after restarting the equipment ...

Page 46: ...1 Setting Up Wireless Network 46 GN 1041 Operator s Manual Disabling Wireless Network ...

Page 47: ...2 Appendix GN 1041 Operator s Manual 47 2 APPENDIX This section describes the specification and glossary of terms Specification 48 Troubleshooting 49 Glossary 50 ...

Page 48: ...2400 to 2472MHz Aerial Power 10mW MHz or below Security Static WEP Key Length 40bit WiFi Standard 104bit 128bit Dynamic WEP Authentication Method TLS 1 PEAP 2 Key Exchange Method 802 1x WPA WPA2 PSK TKIP AES CCMP WPA WPA2 TLS TKIP AES CCMP 1 Supported RADIUS server Funk Odyssey Server WiFi Standard Microsoft Windows 2000 2003 Server WiFi Standard 2 Supported RADIUS server Microsoft Windows 2000 20...

Page 49: ...on method Illegal parameter Unsupported version of the TLS protocol may be used Make sure to use the supported version of the TLS pro tocol No certificate No certificate is installed or you do not specify the certif icate file name Make sure to install the certificate and specify the certificate file name correctly Peer error certificate Installed CA certificate cannot verify the server certifi ca...

Page 50: ... before trans mitting and do not transmit if they can hear transmissions from other wireless terminals CSMA CA is CSMA plus additional collision avoidance functions DS Direct Sequence A type of spectrum diffusion signal using narrow band modulation with phase modula tion in which the diffusion is by means of phase modulation using a broad band diffu sion signal pseudo random strings ESS ID Extende...

Page 51: ... on communication lines RSSI Receive Signal Strength Indication A numeric indicator of incoming signal strength RTS Request To Send In communication via AP transmission is controlled by CSMA CA plus RTS In RTS a wireless terminal asks the AP if it is able to transmit and only transmits after an OK to send acknowledgement signal is returned This serves to avoid unnecessary collisions when hidden te...

Page 52: ...2 Appendix 52 GN 1041 Operator s Manual Glossary ...

Page 53: ...INDEX INDEX 53 INDEX ...

Page 54: ...PTION BETWEEN AP AND STA 23 27 ENCRYPTION INTENSITY 22 26 F FULL AGREEMENT of SERVER NAME 22 26 I INFRASTRUCTURE 15 Infrastructure Mode 10 K KEY ENTRY METHOD 31 40 N NONE 33 42 P PEAP 11 25 PSK PASS PHRASE 29 T TKIP 12 TRANSMIT POWER 23 27 30 32 33 TRANSMIT RATE 24 28 30 32 33 U USER CERTIFICATE 21 W WEP 12 31 40 WEP ENCRYPTION 31 40 WEP KEY 31 41 WIRELESS ENCRYPTION TYPE 29 WPA 11 19 25 WPAPSK 12...

Page 55: ...GN 1041 OME05009000 ...

Page 56: ...2 HIGASHIGOTANDA SHINAGAWA KU TOKYO 141 8664 JAPAN MULTIFUNCTIONAL DIGITAL SYSTEMS Operator s Manual for Wireless LAN Module GN 1041 2005 TOSHIBA TEC CORPORATION All rights reserved R05082091200 TTEC 2005 10 ...

Reviews: