Chapter 1 PREPARATIONS
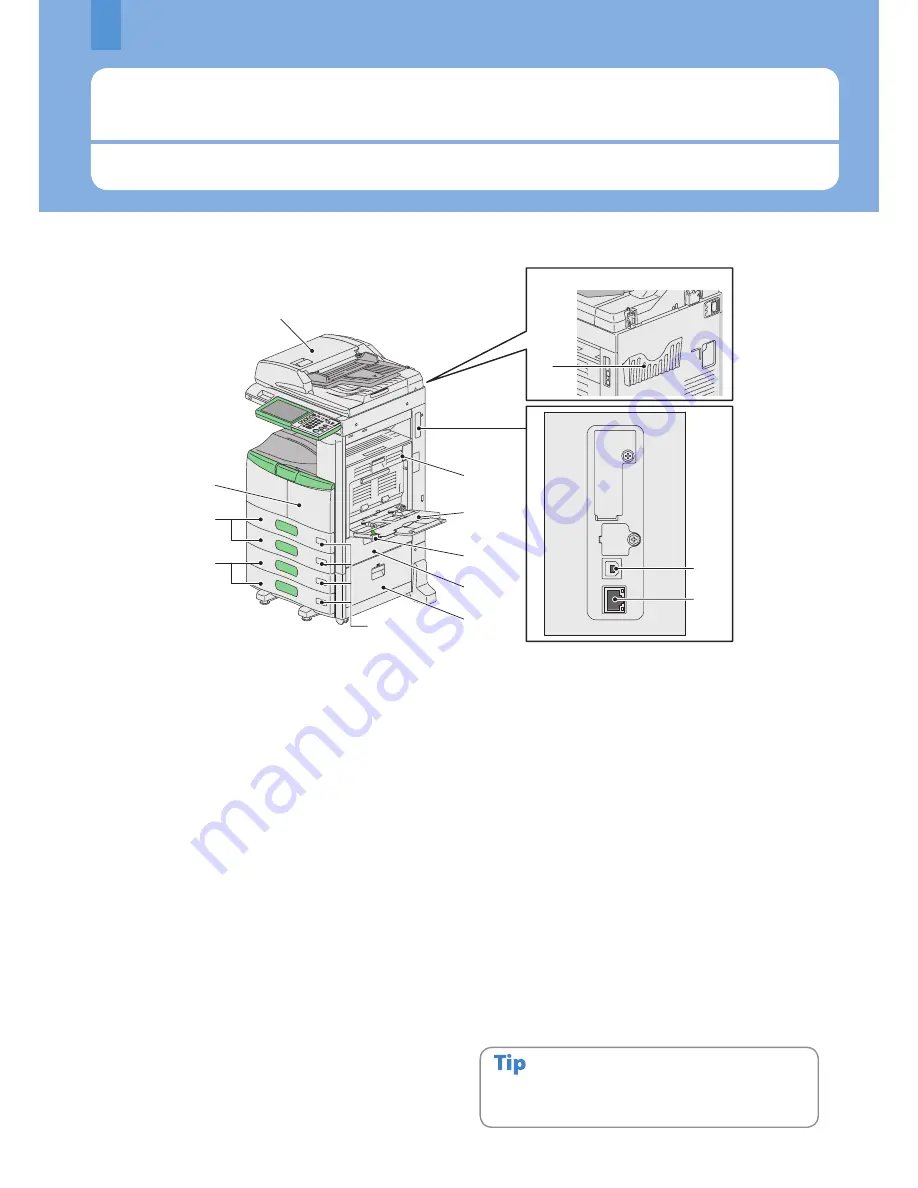
Description of Each Component
This section describes the names and operations of the equipment, control panel and touch panel.
6
1.
Reversing Automatic Document Feeder
(optional, MR-06)
The stack of originals is scanned one sheet at a time. Both
sides of the originals can be scanned. A maximum of 100
sheets (80 g/m
2
or 20 lb. Bond) can be placed in one go.
(The maximum number of sheets that can be set may vary
depending on the media type of the originals.)
.
Operator’s Manual Pocket (back side, optional,
KK-1660)
Keep the manual in this pocket.
.
USB terminal (4-pin)
Use this terminal when connecting this equipment to a PC
with a commercially available USB cable.
4.
Network interface connector
Use this connector when connecting this equipment to a
network.
5.
Automatic duplexing unit
This unit makes copies on both sides of the paper. Open it
when paper jams occur.
6.
Bypass tray
Use this to perform printing on special media types such
as OHP film, etc.
&
P.23 “Bypass copying” in this manual
7.
Paper holding lever
Use this to locate paper on the bypass tray.
8.
Paper feed cover
Open this cover when releasing paper misfed in the
drawer feeding area.
9.
Paper feed cover (optional)
Open this cover when releasing paper misfed in the Paper
Feed Pedestal (optional).
10.
Paper size indicator
The size of the paper set in the drawer can be checked.
11.
Paper Feed Pedestal (optional, KD-10) and
Additional Drawer Module (optional, MY-104)
Use the Paper Feed Pedestal to add one drawer. The
Additional Drawer Module (optional) can be installed in
this device.
1.
Drawer
A maximum of 550 sheets of plain paper can be placed in
one go.
&
P.15 “Placing paper” in this manual
1.
Front cover
Open this cover when you replace the toner cartridge and
clean the charger.
Front / Right side
13
12
11
10
1
5
6
7
8
9
3
4
Back side
2
Items marked (optional) are sold separately. In addition to
those on P.6 and P.7, you will find more on other pages.
&
P.58 “Options” in this manual.
Summary of Contents for E-studio306lp
Page 1: ...MULTIFUNCTIONAL DIGITAL SYSTEMS Quick Start Guide ...
Page 37: ...Replacing Toner Cartridge 36 Regular Cleaning 37 Chapter 3 MAINTENANCE ...
Page 41: ...Troubleshooting 40 Chapter 4 TROUBLESHOOTING ...
Page 45: ...Chapter 5 ADVANCED FUNCTIONS Advanced Functions 44 ...


