background image

Getting Started with e-Filing Web Utility    55

An administrator can also set up the e-Filing notifications using the TopAccess in the administra-
tor mode.  For more information about setting up the notifications for the e-Filing, please see the 

TopAccess Guide

.

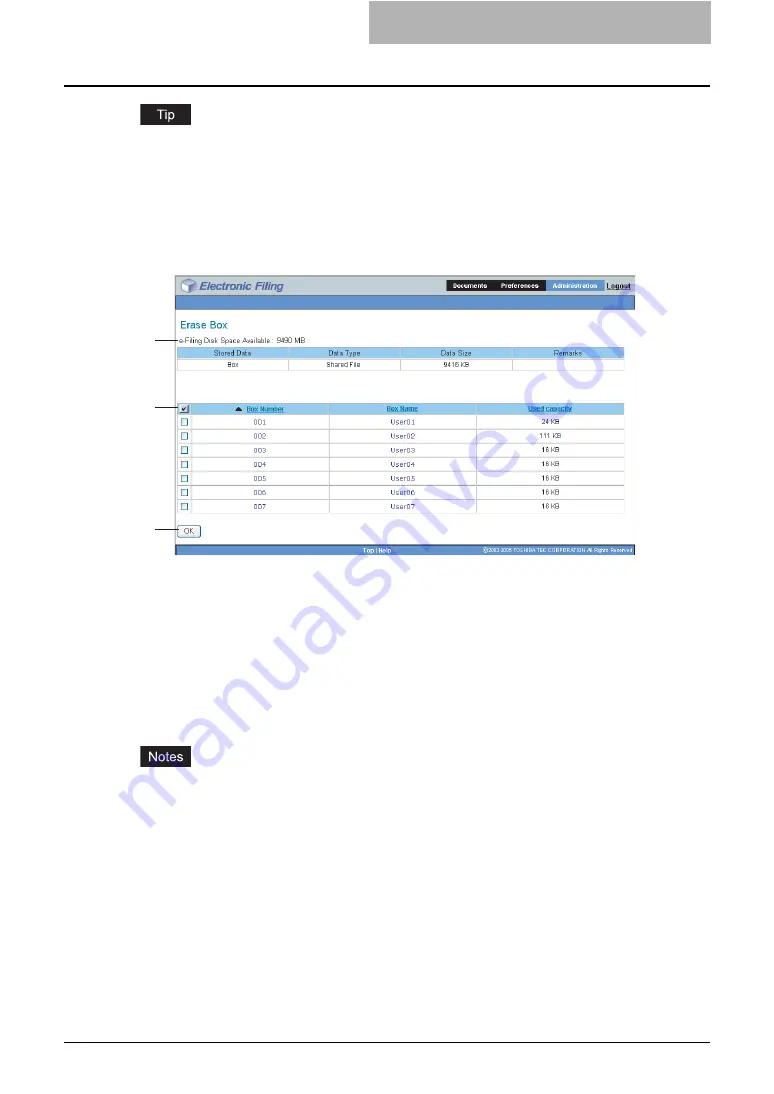
— Erase Box Subtab

This subtab enables you to manually delete user boxes that are no longer required or have 
become corrupted.  Use this feature to restore the available hard disk space.

1) e-Filing Disk Space Available

This displays the available hard disk space for storing e-Filing data.

2) Box Number/Box Name/Used Capacity

This displays a list of all user boxes.  When you click the box number link, the Box Properties 
window opens and you can see the detail properties of the box.
To erase the box, select the check box in front of each box, then click [OK].

3) [OK]

Click this to delete selected boxes.  Before clicking on this, you should check the check 
boxes of user boxes that you want to delete.

y

You cannot delete the public box.

y

For instructions on how to erase user boxes, please refer to the following section.


 P.212 “Erasing Box Data”

Login Link

The “Login” link that is displayed next to the main tabs allows you to login as a system adminis-
trator.


 P.56 “Administrator Login Page”

You can perform the administrative function from the Administration tab that will be displayed 
after you login as a system administrator.


 P.54 “Administration Tab”

1

2

3

Summary of Contents for e-STUDIO 850 Series

Page 1: ...MULTIFUNCTIONAL DIGITAL SYSTEMS e Filing Guide ...

Page 2: ......

Page 3: ...gle System and may not copy the Software for any reason except as neces sary to use the Software on a single System Any copies of the Software shall be subject to the conditions of this Agreement You may not nor cause or permit any third party to modify adapt merge translate reverse compile reverse assemble or reverse engineer the Software You may not use the Software except in accordance with thi...

Page 4: ...e rent assign or transfer this license or the Software Any attempt to sublicense lease rent assign or transfer any of the rights duties or obligations hereunder is void You agree that you do not intend to and will not ship transmit directly or indirectly the Software including any copies of the Software or any technical data contained in the Software or its media or any direct product thereof to a...

Page 5: ...ration in the US and other countries y Apple AppleTalk Macintosh Mac TrueType and LaserWriter are trademarks of Apple Computer Inc in the US and other countries y Postscript is a trademark of Adobe Systems Incorporated y Netscape is a trademark of Netscape Communications Corporation y IBM AT and AIX are trademarks of International Business Machines Corporation y NOVELL NetWare and NDS are trademar...

Page 6: ...viation of electronic filing Lineup of Our Manuals Thank you for purchasing the TOSHIBA multifunctional digital systems e STUDIO850 Series We have provided you with these manuals for the operation of this equipment Select and read the manual best suited to your needs Quick Start Guide This Quick Start Guide describes the initial setup method of this equip ment and accessories of this product such ...

Page 7: ... explains the guidelines for setting up network servers to provide various network services and troubleshoot ing for network administrators Printing Guide This Printing Guide explains how to install the client software for printing from Microsoft Windows Apple Mac OS and UNIX computers and print to the equipment Scanning Guide This Scanning Guide explains how to operate the scanning function of th...

Page 8: ...our PC download and install it from the website of Adobe Systems Incorporated Network Fax Guide This Network Fax Guide explains how to use the network fax function that enable users to operate fax and internet fax sending from a client computer via network User Management Guide This User Management Guide describes how to manage this equipment using the functions of Department Management User Manag...

Page 9: ...icates a potentially hazardous situation which if not avoided could result in death serious injury or serious damage or fire in the equipment or sur rounding assets Indicates a potentially hazardous situation which if not avoided may result in minor or moderate injury partial damage of the equipment or surrounding assets or loss of data Indicates a procedure you should follow to ensure the optimal...

Page 10: ...8 Preface ...

Page 11: ...anaging Boxes 36 Managing Documents 43 Getting Started with e Filing Web Utility 50 Accessing e Filing Web Utility 50 About Main Tabs 51 Creating and Managing Boxes and Folders 56 Managing Documents 75 Chapter 3 How to Edit Documents About Document Control Buttons 106 Working with Pages in Your Documents 107 Displaying Document and Page Properties 107 Copying Pages from One Document to Another 108...

Page 12: ...s 177 Running e BRIDGE Viewer 178 Using e BRIDGE Viewer 182 How to Use Main Window 204 Chapter 5 System Administration Safeguarding Data 212 Erasing Box Data 212 Using e Filing Backup Restore Utility 214 Installing e Filing Backup Restore Utility 214 How to use e Filing Backup Restore Utility 216 Chapter 6 Menu Functions Web utility File Menu Functions 234 New Box 234 New Folder 235 Open 235 Renam...

Page 13: ...ious 256 Next 256 End 256 Layout Menu Functions 257 Insert Blank Page 257 Chapter 7 Troubleshooting Troubleshooting for e Filing Web Utility 260 Limitations and Considerations 260 Error Messages 260 TWAIN and File Downloader Errors 263 TWAIN Driver and File Downloader Error Conditions 263 INDEX 267 ...

Page 14: ...12 TABLE OF CONTENTS ...

Page 15: ...1 Overview This section describes overview of the e Filing features Features and Functions 14 Organizing Documents 14 Using the Systems 16 Managing the Systems 17 System Requirements 17 ...

Page 16: ...up to 200 of these boxes and secure them with a password If the User Box is protected by a password you must login with the password for that box or login with the system admin istrator s password only when accessing with e Filing web utility to access the User Box Use this folder for confidential information and for draft documents that you are not ready to share You can create only one level of ...

Page 17: ...d Forward is available only when the optional Fax unit is installed y Delete the documents in e Filing when they are no longer needed For instructions on how to store documents in the Boxes and Folders please refer to the fol lowing section P 24 Storing Documents 4 Pages Each document can contain up to 1000 pages e Filing web utility allows you to display the pages in a document ...

Page 18: ...Documents P 152 Retrieving e Filing Documents e BRIDGE Viewer y Viewing Documents with e BRIDGE Viewer P 177 Viewing Documents with e BRIDGE Viewer e Filing Web Utility y Creating user boxes P 56 Creating New Boxes y Deleting user boxes P 59 Deleting Boxes y Creating folders P 58 Creating New Folders y Deleting folders P 61 Deleting Folders y Renaming documents P 76 Renaming Documents y Deleting d...

Page 19: ...g system y Microsoft Internet Explorer Version 5 5 with Service Pack 2 or later y Netscape Navigator Version 7 2 or later y The minimum display resolution required for these browsers is 800 x 600 y When using the Internet Explorer the Privacy setting must be set to Medium on the browser Do not set Block All Cookies or High for the Privacy function For instructions on how to set the Privacy setting...

Page 20: ... again before accessing e Filing How to set the Cookies settings in Netscape Navigator When you are using the Netscape Navigator make sure the Cookies setting is set correctly as described as following The following procedure describes how to set the Cookies setting in Netscape 7 1 1 Run Netscape Navigator and select Preferences in the Edit menu y The Preferences dialog box appears ...

Page 21: ... or Enable cookies based on privacy settings y When you select Enable all cookies go to step 5 y When you select Enable cookies based on privacy settings continue to next step 3 When you select Enable cookies based on privacy settings click View y The Privacy Settings dialog box appears 4 Select medium in the Level of Privacy option and click OK ...

Page 22: ...ows 2000 Service Pack 4 Windows XP Service Pack 1 Service Pack 2 Windows Server 2003 Service Pack 1 y Required Software TWAIN compliant software for the TWAIN driver only Microsoft Internet Explorer 5 5 Service Pack 2 or later must be installed Microsoft Internet Explorer is enabled to access the e Filing web utility on this equipment The proxy settings must be configured correctly to enable the a...

Page 23: ...Features and Functions 21 y OS Windows 2000 Service Pack 4 Windows XP Service Pack 1 Service Pack 2 ...

Page 24: ...1 Overview 22 Features and Functions ...

Page 25: ...ls Using the Control Panel 24 Storing Documents Using the Printer Driver 33 Getting Started with Control Panel 36 Creating and Managing Boxes 36 Managing Documents 43 Getting Started with e Filing Web Utility 50 Accessing e Filing Web Utility 50 About Main Tabs 51 Creating and Managing Boxes and Folders 56 Managing Documents 75 ...

Page 26: ... received Internet Faxes to e Filing using Received Internet Fax Forward A document that is stored by Copying and storing to e Filing is proper for output and not for importing as an image into your computer To get the best image quality for importing an image into your computer please store the document by Scanning to e Filing y Registering a mailbox can be performed from the Touch Panel Display ...

Page 27: ... box in which you want to store the data and press the ENTER button y Select either the Public Box button or desired user box button y If the user box that you want to store the data is not shown in the list press the Next or Prev buttons to change the list on the screen If the user box that you want to store the data has not been registered you must register the user box first ...

Page 28: ...tore the original s in an existing folder select the folder and press the OPEN FOLDER button to display the list in the folder and then press the ENTER button If you want to store the original s in the selected box press the ENTER button y The screen returns to the SCAN TO E FILING screen 8 Press the DOCUMENT NAME button if you want rename the docu ment name of the scanned data y The letter entry ...

Page 29: ... YES button to copy another original or press the FINISHED button to finish copying y When the original is set on the Automatic Document Feeder this screen is not dis played Scan to e Filing When you want to store the document in e Filing to retrieve scanned images into your computer it is recommended to store the document using Scan to e Filing rather than Copy and Stored to e Filing The Scan to ...

Page 30: ...on about placing the originals see Operator s Manual for Basic Func tion 2 Press the SCAN button on the control panel to enter the scan menu y The basic scan menu is displayed 3 Press the SCAN TO E FILING button y The SCAN TO E FILING screen is displayed 4 Press the BOX FOLDER button y The box list screen is displayed ...

Page 31: ...e digital key If the user box that you want to store the data has not been registered you must register the user box first For setting up the user boxes see e Filing Guide The instruction on how to set up the user boxes using the touch panel also describes in Operator s Manual for Basic Function 6 If you select a user box that a password is set the password entry screen may be displayed If the pas...

Page 32: ...he original s in the selected box press the ENTER button y The screen returns to the SCAN TO E FILING screen 8 Press the DOCUMENT NAME button if you want rename the docu ment name of the scanned data y The letter entry screen is displayed Enter the value using the keyboard and digital keys and press the ENTER button to set the entry 9 Press the EDIT button to set the scanning conditions y The scre...

Page 33: ... Press this when scanning the originals that contain texts TEXT PHOTO Press this when scanning originals that contain texts and photos PHOTO Press this when scanning originals that contain photos printed on photographic paper GRAY SCALE Press this when scanning originals as gray scale pictures y RESOLUTION 600 Press this when scanning originals in 600 dpi 400 Press this when scanning originals in ...

Page 34: ...pression for scan data This can be set only when the GRAY SCALE button is selected at the ORIGINAL MODE option 12 Specify the following items as you require and press the Enter button y BACKGROUND ADJUSTMENT Press light or dark buttons to specify the background for scanning manually y SHARPNESS Press light or dark buttons to specify the sharpness for scanning manually 13 Press the ENTER button y T...

Page 35: ...s y If you want to cancel the storage of the scanned data press the JOB CANCEL but ton y You can change the setting of the original type and scanning conditions using the EDIT button before pressing the SCAN button Storing Documents Using the Printer Driver From an application that runs under a Windows operating system you can send a document as a print job to the e Filing with the printer driver ...

Page 36: ...rocedures for displaying the properties dialog for the printer driver may be different depending on an application that you are using See your applications manual about dis playing the printer properties dialog box 4 Display the Print Job tab and select Store to e Filing 5 Select Public Box to save a print job to a public box 6 If you print a job as well as saving it to a box check the Print box 7...

Page 37: ... applications manual about dis playing the printer properties dialog box 4 Display the Print Job tab and select Store to e Filing 5 Select user box number to be save If the Enable SNMP Communication is enabled on the Configuration tab only the user boxes that have been set up will be displayed in the drop down box 6 Enter the password for the user box in the Password field 7 If you print a job as ...

Page 38: ...at any user may need to work with y User Box Each user can create his own user box or a user box that can be shared with other specific members The user box also can be protected by a password Users can then store dis play edit and print confidential documents which can be their own or others To access the password protected user box users must enter the password for the box Before storing documen...

Page 39: ...ol Panel 37 Creating a user box 1 Press the e FILING button on the control panel 2 Select a blank button numbered from 001 to 200 and then press the SETUP button 3 Press the BOX NAME button y The letter entry screen is displayed ...

Page 40: ...e The maximum size of a box name is 32 characters 5 If you want to protect the user box with a password enter the 5 digit password in the Password and Retype Password fields y To set a password press the Password field enter the 5 digit password using the digital keys and press the SET button to set the entry After pressing the SET but ton the Retype Password field will be highlighted and then ent...

Page 41: ...r box button that you want to edit and then press the EDIT button y When the password has been set to the selected user box the password entry screen is displayed In that case continue to next step y When the password had not been set to the selected user box skip to Step 4 3 If the password entry screen is displayed enter the 5 digit pass word using digital keys and press the ENTER button ...

Page 42: ...ox is deleted all folders and documents in the deleted user box will be deleted Deleting a user box 1 Press the e FILING button on the control panel 2 Select a user box button that you want to delete and then press the DELETE button y When the password has been set to the selected user box the password entry screen is displayed In that case continue to next step y When the password had not been se...

Page 43: ...selected user box y The user box is deleted Deleting Folders Users can delete a folder from the Control Panel y Users cannot create a folder from the Control Panel Users can create a folder using the e Filing web utility P 58 Creating New Folders y Once the folder is deleted all documents in the deleted folder will be deleted Deleting a folder 1 Press the e FILING button on the control panel ...

Page 44: ...s been set to the selected user box the password entry screen is displayed In that case continue to next step y When the password had not been set to the selected user box skip to Step 4 3 If the password entry screen is displayed enter the 5 digit pass word using digital keys and press the ENTER button 4 Select the folder that you want to delete and press the DELETE button ...

Page 45: ...e Control Panel users can perform P 43 Deleting Documents P 45 Printing Documents Deleting Documents Users can delete a document from the Control Panel If you want to delete all documents in a folder or box you can delete the folder or box instead of deleting each document Deleting a document 1 Press the e FILING button on the control panel ...

Page 46: ...t to the selected user box the password entry screen is displayed In that case continue to next step y When the password had not been set to the selected user box skip to Step 4 3 If the password entry screen is displayed enter the 5 digit pass word using digital keys and press the ENTER button 4 If the document is stored in a folder select the folder and press the OPEN FOLDER button ...

Page 47: ... document y The folder is deleted Printing Documents This equipment allows users to print a document stored in e Filing P 45 Printing an Entire Document P 48 Selecting Test Print Printing an Entire Document To print an entire document from the Control Panel perform the following operation Printing a document 1 Press the e FILING button on the control panel ...

Page 48: ...t to the selected user box the password entry screen is displayed In that case continue to next step y When the password had not been set to the selected user box skip to Step 4 3 If the password entry screen is displayed enter the 5 digit pass word using digital keys and press the ENTER button 4 If the document is stored in a folder select the folder and press the OPEN FOLDER button ...

Page 49: ...change the selection to the BOOKLET or TABLET button y If you want to change the finishing options such as group printing stapling or hole punching press the middle left button shown as the SORT button in the above screen and change the selection to the desired finishing option y If you want to change the destination tray press the lower left button shown as the TRAY 2 button in the above screen a...

Page 50: ...ontrol panel 2 Select a box button that contains a document you want to print and then press the ENTER button y When the password has been set to the selected user box the password entry screen is displayed In that case continue to next step y When the password had not been set to the selected user box skip to Step 4 3 If the password entry screen is displayed enter the 5 digit pass word using dig...

Page 51: ...he TEST PRINT button 6 Specify the First Page and Last Page field y This screen is displayed as the Last Page field is selected If you want to specify the page range enter the last page number using the digital keys in the Last Page field and press the SET button Then the First Page field is highlighted and enter the first page number 7 Press the PRINT button y The document is printed ...

Page 52: ...http 192 168 1 2 8080 e FilingBox efb asp For example DNS name of this equipment is mfp 00000236 http mfp 00000236 8080 e FilingBox efb asp If the SSL is enabled for the HTTP network service e Filing web utility also will be accessed using SSL When the User Management Setting is enabled the login page will be displayed when access ing the e Filing web utility URL In that case please enter the user...

Page 53: ... is 123456 if you have not change the administrator password 3 Click Login y The Administration tab appears in the main tabs You can log off from the e Filing web utility in administrator mode To log off click the Logout link or close your web browser About Main Tabs e Filing web utility s interface consists of three main tabs located in the upper right corner of the web browser s window the Docum...

Page 54: ...ments that you want to work with In the Documents frame the following icons are displayed according to the items Box Icons Folder Icons Document Icons This icon indicates a closed box This icon indicates a opened box This icon indicates a closed box that is protected by a password This icon indicates a opened box that is protected by a password This icon indicates the closed folder This icon indic...

Page 55: ...era tion using the Mailbox function Fax Received Forward function and Internet Fax Received Forward function When the icon is displayed as a white icon it indicates that the document is cur rently in View mode When the icon is displayed as a blue icon it indicates that the document is currently in Edit mode This icon indicates a document that was created by merging several documents When the icon ...

Page 56: ... thumbnail images displayed on the screen 1 Default Document View You can select the Thumbnail or List view The system displays your documents in the selected view until you choose another option from the View menu Default is Thumbnail view 2 Load number thumbnail per view Use the drop down list to select the number of thumbnail images displayed on the screen 4 8 or 12 Default is 8 3 Save Click th...

Page 57: ...t of all user boxes When you click the box number link the Box Properties window opens and you can see the detail properties of the box To erase the box select the check box in front of each box then click OK 3 OK Click this to delete selected boxes Before clicking on this you should check the check boxes of user boxes that you want to delete y You cannot delete the public box y For instructions o...

Page 58: ...lders P 59 Deleting Boxes and Folders P 64 Renaming Box and Folder P 68 Displaying Box and Folder Properties Creating Boxes and Folders e Filing web utility provides two box types Public box and User box y Public Box All users can access the main Public box to create edit move and delete public documents and folders Use the Public box to store documents that any user may need to work with y User B...

Page 59: ...sure you are selecting e Filing in the Documents frame and click the File menu and select New Box y The New Box window appears 3 Select a box number in the Box Number drop down box and enter the box name in the Box Name field y Users cannot select existing box numbers in the Box Number drop down box Only undefined box numbers appear in the drop down box y Box names consist of any ASCII characters ...

Page 60: ...Modifying Box Properties Creating New Folders Users can create up to 100 folders in each box However users can only create single level folders in each box Users cannot create subfolders in the folders Creating a folder in a box 1 Click the Documents tab y The Documents tab page is displayed 2 In the Documents frame select a box where you want to create a folder 3 If you select a box that is prote...

Page 61: ...boxes and folders When the box has been protected with a password users must enter the password to delete the boxes and folders Users can also delete folders in the public box but not the public box Administrators also can delete all user boxes and folders using the administrator password P 59 Deleting Boxes P 61 Deleting Folders Deleting Boxes Users can delete user boxes and folders in any box If...

Page 62: ...the Documents frame select a user box that you want to delete You cannot delete the public box 3 If you select the user box which is protected with a password the Password Authentication window appears Enter the password in the Box Password field and click OK You can also enter the administrator password to open the user box instead of the box password ...

Page 63: ... Users can delete folders in the Public box and User box If a folder is deleted all documents in the folder are also deleted You can also delete folders from the Touch Panel Display For the instruction to delete folders from the Touch Panel Display please refer to the following section P 41 Deleting Folders Deleting folders 1 Click the Documents tab y The Documents tab page is displayed ...

Page 64: ...nt to delete 3 If you select a box that is protected with password the Password Authentication window appears Enter the password in the Box Password field and click OK y All folders and documents in the box are displayed in the Contents frame You can also enter the administrator password to open the user box instead of the box password ...

Page 65: ...der in the Documents frame clicking on the Edit menu and selecting Delete In that case make sure no documents are checked in the Contents frame If any documents are checked they will be deleted instead of the selected folder 5 Click the Edit menu and select Delete y The confirmation message dialog box appears 6 Click OK y The selected folders are deleted ...

Page 66: ...aming Boxes P 66 Renaming Folders Renaming Boxes You can rename user boxes Do not turn off the power of the equipment when changing the box name All folders and docu ments in the box will be lost if the power is turned off while the system is saving a new name Users can rename user boxes from the Touch Panel Display For instructions on how to rename user boxes from the Touch Panel Display please r...

Page 67: ...k OK You can also enter the administrator password to open the user box instead of the box password 4 Click the File menu and select Rename y The Rename Box window appears Make sure no folder or document is checked in the Contents frame If a folder or docu ment is checked it will be renamed instead of the selected box 5 Edit the name in the Name field and click OK y The confirmation dialog box app...

Page 68: ...system is saving a new name Renaming folders 1 Click the Documents tab y The Documents tab page is displayed 2 In the Documents frame select the box that contains the folder you want to rename 3 If you select a box that is protected with a password the Password Authentication window appears In this case enter the password in the Box Password field and click OK y All folders and documents in the bo...

Page 69: ...e one folder at a time 5 Click the File menu and select Rename y The Rename Folder window appears Users can also rename a folder by selecting the folder in the Documents frame clicking on the File menu and selecting Rename In that case make sure no document is checked in the Contents frame If a document is checked it will be renamed instead of the selected folder ...

Page 70: ...you must enter the password to modify the box proper ties Also users can display the folder properties Administrators can also modify all protected user boxes properties and public box properties using the administrator password P 68 Modifying Box Properties P 72 Displaying Folder Properties Modifying Box Properties You can display and modify the box properties y If you want to modify the public b...

Page 71: ...s protected with a password the Password Authentication window appears Enter the password in the Box Password field and click OK You can also enter the administrator password to open the user box instead of the box password 4 Click the File menu and select Properties y The Box Properties window appears In the Box Properties window you can see the box properties ...

Page 72: ...2 Getting Started 70 Getting Started with e Filing Web Utility 5 If you want to edit the box properties click Change Properties y The Change Box Properties window is displayed ...

Page 73: ... documents will be deleted after the specified days have been passed Send email when an error occurs Check this to send a notification message to the specified Email address when an error occurs When you check this enter an Email address in the Email Address field Send email when job is completed Check this to send a notification message to the specified Email address when a job is completed When ...

Page 74: ...tting in the TopAccess Administration tab Maintenance Notification page For more information refer to the TopAccess Guide 7 Click Save y The box properties are modified and the Box Properties window is displayed 8 Click OK to close the Box Properties window Displaying Folder Properties Users can only display the folder properties Displaying folder properties 1 Click the Documents tab y The Documen...

Page 75: ... to display 3 If you select a box that is protected with password the Password Authentication window appears Enter the password in the Box Password field and click OK y All folders and documents in the box are displayed in the Contents frame You can also enter the administrator password to open the user box instead of the box password ...

Page 76: ...n also display a folder properties by selecting a folder in the Documents frame clicking on the File menu and selecting Properties In that case make sure no docu ment is checked in the Contents frame If a document is checked it displays the proper ties of checked document instead of the selected folder 5 Click the File menu and select Properties y The Folder Properties window appears In the Folder...

Page 77: ...cted box folder or several pages of a selected document This is the default view Use it to manage documents and files P 75 Using the Thumbnails View y List view displays file names and properties in a tabular format Use it to manage boxes and folders containing a large number of files P 76 Using the List View Using the Thumbnails View This is the default view unless you choose a different one It d...

Page 78: ... than Thumbnail view for managing boxes and folders that con tain a large number of files Click the check boxes to select a single file or multiple files that you want to move copy delete or print To display your files in the List view go to the View menu and select List Renaming Documents You can rename the documents Do not turn off the power of the equipment when changing the document name The d...

Page 79: ...e Documents frame select a box or folder that contains the document you want to rename 3 If you select a box that is protected with a password the Password Authentication window appears Enter the password in the Box Password field and click OK You can also enter the administrator password to open the user box instead of the box password ...

Page 80: ...clicking on the File menu and selecting Rename In that case even if you mark the check boxes of pages in the Contents frame e Filing operates renaming for the selected document in the Documents frame 5 Enter the document name in the Name field and click OK y You can enter up to 64 characters in the Name field The confirmation dialog box appears 6 Click OK y The document is renamed Deleting Documen...

Page 81: ... Documents frame select a box or folder that contains the documents you want to delete 3 If you select a box that is protected with a password the Password Authentication window appears Enter the password in the Box Password field and click OK You can also enter the administrator password to open the user box instead of the box password ...

Page 82: ...ed in the Contents frame If any pages are checked the alert message will be dis played because pages cannot be deleted in View mode 5 Click OK y The documents are deleted Printing Documents You can print documents and images from boxes and folders in the e Filing web utility repository This topic explains how to use your web browser to print an entire document P 80 Printing an Entire Document P 85...

Page 83: ...hat contains the document you want to print 3 If you select a box that is protected with a password the Password Authentication window appears Enter the password in the Box Password field and click OK You can also enter the administrator password to open the user box instead of the box password ...

Page 84: ...lect Print Document from the File menu You can also print the document by selecting a document in the Documents frame and selecting the Print Document in the File menu However you cannot print individual pages even if you mark the check boxes of the pages displayed in the Contents frame y The Print Properties window appears ...

Page 85: ...ed only when you enter more than one copy in the Number of Copies field Rotate Sort Copies Select this to output the document as changing the output orientation in each copy This is enabled only when you enter more than one copy in the Number of Copies field When this is selected the Destination option automatically set to the inner tray To perform the Rotate Sort Copies the portrait and landscape...

Page 86: ...t a cover on a sheet fed from a different tray than the Paper Source option To enable back cover printing check on the box and select the location from where a cover sheet is to be fed and the print style to be used Cover Sheet Insertion Insert Pages This sets sheet insertion printing which allows you to insert a sheet between pages or print a specific page on a sheet fed from a tray other than th...

Page 87: ...n you want to stop the print of the stored document during the operation select the job you want to stop from the PRINT JOB screen or SCAN JOB screen and then press the DELETE button at the Control Panel Selecting Test Print Test Print function allows you to simply print a copy of document using the default print proper ties settings Printing a document using Test Print 1 Click the Documents tab y...

Page 88: ...istrator password to open the user box instead of the box password 4 Mark the check box of the document you want to print and select Test Print from the File menu You can also perform test print by selecting a document in the Documents frame and selecting the Test Print in the File menu However you cannot print individual pages even if you mark the check boxes of the pages displayed in the Content...

Page 89: ...splayed You can click Cancel to close the Test Print Properties window without printing 7 Click Close to return to the Documents tab page When you want to stop the print of the stored document during the operation select the job you want to stop from the PRINT JOB screen or SCAN JOB screen and then press the DELETE button at the Control Panel Archiving Documents The e Filing web utility allows you...

Page 90: ...becomes impossible If you close the window by clicking the X button turn off and on the power of the equipment To upload the archived file to the e Filing please refer to the following section P 91 Uploading Archived Documents Downloading an archived document The following procedure describes an example of how to download an archived document when using the Microsoft Internet Explorer 1 Click the ...

Page 91: ...ocument in the Documents frame clicking on the File menu and selecting Archive Document However you cannot archive individual pages even if you mark the check boxes of the pages displayed in the Contents frame 5 Click OK to start archiving 6 The Archive Document window appears During the archive pro cess you can quit archiving by clicking Cancel y After archiving is completed Your document has bee...

Page 92: ...Utility 7 Click the file name link to download the archived file y The File Download dialog box appears 8 Click Save y The Save As dialog box appears 9 Locate the folder where you want the archived file saved and click Save y It starts downloading the file ...

Page 93: ...nnot upload to the folder in the box Extracted documents will be added directly to the box y If a same name document already exists in the box the extracted document will be renamed by adding 3 digit number to the original name y Do not close the main window and child window by clicking the X button If you did upload ing the archived documents becomes impossible If you close the window by clicking...

Page 94: ... frame 3 If you select a box that is protected with a password the Password Authentication window appears Enter the password in the Box Password field and click OK You can also enter the administrator password to open the user box instead of the box password 4 Select Upload Archived Document from the File menu y The Upload Archived Document window appears ...

Page 95: ...load Archived Document window and the folder path of the selected file will be displayed in the Archived File field 7 Click OK y The confirmation dialog box appears 8 Click OK to start uploading If you select other than the archived file the error message File format doesn t corre spond is displayed If the message is displayed make sure to select a correct archived file and try again ...

Page 96: ...cument window 11 Click Cancel to close the window y The documents are added in the selected box Sending Email You can send selected documents as Emails from the e Filing web utility When you perform this function this equipment creates Email as attaching the selected docu ments as files and sends Email directly from the equipment To use the Send Email function the Email configuration of the equipm...

Page 97: ...at contains the document you want to archive 3 If you select a box that is protected with a password the Password Authentication window appears Enter the password in the Box Password field and click OK You can also enter the administrator password to open the user box instead of the box password ...

Page 98: ...lect Send Email from the File menu y The Send Email page is displayed y Users can also send a document as an Email by selecting the document in the Docu ments frame clicking on the File menu and selecting Send Email y Users can also send up to 100 individual pages or documents by marking the check boxes displayed in the Contents frame ...

Page 99: ...he desired subject in the field From Address Enter the Email address of the sender When the recipient replies the message will be sent to this Email address From Name Enter the sender name of the Email document Body Enter the body message of the Email document You can enter up to 1000 characters including spaces File Format Select the file format that the received document will be converted File N...

Page 100: ... groups from the address book P 101 Searching for recipients in the LDAP server P 103 Removing the contacts from the recipient list Entering the recipients manually Using this method you can add a recipient manually to the Recipient List 1 Click Destination Setting to open the Recipient List page 2 Click New y The Contact Property page is displayed 3 Enter the Email address of the recipient in the...

Page 101: ...his method you can select recipients from the address book 1 Click Destination Setting to open the Recipient List page 2 Click Address Book y The Address Book page is displayed 3 Check the Email boxes of users you want to add as the recipients If you want to sort recipient list by a specific group select the desired group name at the Group drop down box ...

Page 102: ... the desti nation settings P 103 Removing the contacts from the recipient list 5 Click Save y The contacts are added as the destinations Selecting the groups from the address book By this method you can select groups from the address book 1 Click Destination Setting to open the Recipient List page 2 Click Address Group y The Address Group page is displayed 3 Check the Group boxes that contain the ...

Page 103: ...fore saving the desti nation settings P 103 Removing the contacts from the recipient list 5 Click Save y The contacts are added as the destinations Searching for recipients in the LDAP server By this method you can search for recipients in the registered LDAP server and in the address book 1 Click Destination Setting to open the Recipient List page 2 Click Search y The Search Contact page is displ...

Page 104: ...equipment at the Directory Service Name drop down box you can search for recipients in the address book of this equipment y TopAccess will search for the recipients that match the entries y Leaving the field blank allows wild card searching However you must specify one of them 4 Click Search y TopAccess will start searching for recipients in the LDAP server and the Search Address List page will di...

Page 105: ...ecipient list before saving the desti nation settings P 103 Removing the contacts from the recipient list 7 Click Save y The contacts are added as the destinations Removing the contacts from the recipient list 1 Check the check boxes of the contacts that you want to remove from the recipient list and click Delete y The selected contacts are removed from the recipient list ...

Page 106: ...2 Getting Started 104 Getting Started with e Filing Web Utility ...

Page 107: ...th Pages in Your Documents 107 Displaying Document and Page Properties 107 Copying Pages from One Document to Another 108 Copying Pages from a Document to a Box or Folder 113 Deleting Pages from a Document 117 Inserting a Blank Page into Documents 120 Moving Pages within a Document 124 Moving and Merging Documents 129 Moving Documents 129 Merging Documents 131 ...

Page 108: ...s button when the document status indicates In Use you cannot enter the Edit mode and the message The Document is being used Please try again later is displayed y Save Button Click this to save the document that you edit This button is displayed only when you are in the Edit mode where the document status indicates Editing When you click this the document is saved and returns to the View mode y Ca...

Page 109: ...nt Properties and Page Properties window that contains the details of the document or page To display the Document Properties window mark the check box of a document and select Properties from the File menu To display the Page Properties window mark the check box of a page and select Properties from the File menu The Document Properties window contains following information y Location where the do...

Page 110: ...g the document to which you want to copy pages Merging pages to another document 1 Click the Documents tab y The Documents tab page is displayed 2 In the Documents frame select a box or folder that contains the document you want to copy 3 If you select a box that is protected with a password the Password Authentication window appears Enter the password in the Box Password field and click OK You ca...

Page 111: ...r the Edit mode y The Contents frame displays the pages in the Edit mode To cut pages from the document you must enter to the Edit mode If you want to copy pages from the document you do not need to enter the Edit mode If the document status indicates In Use you cannot enter the Edit mode because another user currently edits the document 6 Mark the check boxes of the pages that you want to copy an...

Page 112: ...ument will be saved as new document If you do not change the document name the original document will be overwritten The Contents frame displays the pages in the View mode Do not close the Save Document window by clicking the X button The operations may no longer work properly If you close the window by clicking the X button turn off and on the power of the equipment 9 In the Documents frame selec...

Page 113: ...tor password to open the user box instead of the box password 11 In the Documents frame select the document into which you want to insert the copied pages y The pages of the document are displayed in the Contents frame 12 Click Edit to enter the Edit mode y The Contents frame displays the pages in the Edit mode If the document status indicates In Use you cannot enter the Edit mode because another ...

Page 114: ... Documents 13 Click the space between the pages where you want to insert the copied pages y The arrow indicators move to the space between the pages where you clicked 14 Click the Edit menu and select Paste y The copied pages are inserted between the pages ...

Page 115: ...ten The document is saved and returns you to the View mode Do not close the Save Document window by clicking the X button The operations may no longer work properly If you close the window by clicking the X button turn off and on the power of the equipment Copying Pages from a Document to a Box or Folder You can copy one or more pages from a document and insert them in a box or folder Copying page...

Page 116: ...ect a box that is protected with a password the Password Authentication window appears Enter the password in the Box Password field and click OK You can also enter the administrator password to open the user box instead of the box password 4 In the Documents frame select the document that you want to copy y The pages of the document are displayed in the Contents frame ...

Page 117: ...ust enter to the Edit mode To copy pages from the document you need not enter the Edit mode If the document status indicates In Use you cannot enter the Edit mode because another user currently edits the document 6 Mark the check boxes of the pages that you want to copy and select Copy or Cut from the Edit menu 7 If you cut pages from the document click Save to save the docu ment y The Save Docume...

Page 118: ...o not change the name the original document will be overwritten The Contents frame displays the pages in the View mode Do not close the Save Document window by clicking the X button The operations may no longer work properly If you close the window by clicking the X button turn off and on the power of the equipment 9 Select a box or folder where you want to insert the copied pages in the Documents...

Page 119: ...click OK You can also enter the administrator password to open the user box instead of the box password 11 Click the Edit menu and select Paste y The document containing the copied page is created in the selected box or folder Deleting Pages from a Document You can delete pages from the document Deleting pages from a document 1 Click the Documents tab y The Documents tab page is displayed ...

Page 120: ...select a box that is protected with a password the Password Authentication window appears Enter the password in the Box Password field and click OK You can also enter the administrator password to open the user box instead of the box password 4 In the Documents frame select the document whose pages you want to delete y The pages of the document are displayed in the Contents frame ...

Page 121: ... in the Edit mode If the document status indicates In Use you cannot enter the Edit mode because another user currently edits the document 6 Mark the check boxes of the pages that you want to delete and select Delete from the Edit menu y The confirmation dialog box appears 7 Click OK y The selected pages are deleted ...

Page 122: ...nt will be overwritten The Contents frame displays the pages in the View mode Do not close the Save Document window by clicking the X button The operations may no longer work properly If you close the window by clicking the X button turn off and on the power of the equipment Inserting a Blank Page into Documents You can insert the blank page into a document You can select a different size for the ...

Page 123: ...is protected with a password the Password Authentication window appears Enter the password in the Box Password field and click OK You can also enter the administrator password to open the user box instead of the box password 4 In the Documents frame select the document into which you want to insert a blank page y The pages of the document are displayed in the Contents frame ...

Page 124: ... the document status indicates In Use you cannot enter the Edit mode because another user currently edits the document 6 Click the space between the pages where you want to insert a blank page y The arrow indicators move to the space between the pages where you clicked 7 Click the Layout menu and select Insert Blank Page y The Insert Blank Page window appears ...

Page 125: ...g with Pages in Your Documents 123 8 Select the paper size and orientation of the inserted blank page and click OK y A blank page is inserted between the pages 9 Click Save y The Save Document window appears ...

Page 126: ...to the View mode Do not close the Save Document window by clicking the X button The operations may no longer work properly If you close the window by clicking the X button turn off and on the power of the equipment Moving Pages within a Document You can move pages within a document to arrange the page order Moving pages within a document 1 Click the Documents tab y The Documents tab page is displa...

Page 127: ...ministrator password to open the user box instead of the box password 4 In the Documents frame select the document whose pages you want to arrange y The pages of the document are displayed in the Contents frame 5 Click Edit to enter the Edit mode y The Contents frame displays the pages in the Edit mode If the document status indicates In Use you cannot enter the Edit mode because another user curr...

Page 128: ...t you want to move between other pages and select Cut from the Edit menu y The selected pages are copied to the clipboard and deleted from the document 7 Click the space between the pages where you want to insert the copied pages y The arrow indicators move to the space between the pages where you clicked ...

Page 129: ...127 8 Click the Edit menu and select Paste y The copied pages are inserted between the pages 9 Continue the procedure from Step 6 to 8 to arrange pages 10 After you complete arranging the pages click Save y The Save Document window appears ...

Page 130: ...ent it will be saved as new document If you do not change the name the original document will be overwritten The document is saved and returns you to the View mode Do not close the Save Document window by clicking the X button The operations may no longer work properly If you close the window by clicking the X button turn off and on the power of the equipment ...

Page 131: ...er to help you manage the documents Moving documents from one box or folder to another 1 Click the Documents tab y The Documents tab page is displayed 2 In the Documents frame select a box or folder that contains the document you want to move 3 If you select a box that is protected with a password the Password Authentication window appears Enter the password in the Box Password field and click OK ...

Page 132: ... clipboard and deleted from the current box or folder 5 In the Documents frame select a box or folder where you want to paste the documents 6 If you select a box that is protected with a password the Password Authentication window appears Enter the password in the Box Password field and click OK You can also enter the administrator password to open the user box instead of the box password ...

Page 133: ...ire document and insert its pages into another document The document that you want to insert is the source document The document that you want to merge it into is the destination document Merging documents into a document 1 Click the Documents tab y The Documents tab page is displayed 2 In the Documents frame select a box or folder that contains the source documents ...

Page 134: ...e password in the Box Password field and click OK You can also enter the administrator password to open the user box instead of the box password 4 Mark the check boxes of the source documents and select Copy from the Edit menu y The selected documents are copied in the clipboard 5 In the Documents frame select a box or folder that contains the destination document ...

Page 135: ...the administrator password to open the user box instead of the box password 7 In the Documents frame select the destination document y The pages of the document are displayed in the Contents frame 8 Click Edit to enter the Edit mode y The Contents frame displays the pages in the Edit mode If the document status indicates In Use you cannot enter the Edit mode because another user currently edits th...

Page 136: ...e you want to merge the documents y The arrow indicators move to the space between the pages where you clicked 10 Click the Edit menu and select Paste y The copied documents are merged between the pages If the multiple documents have been copied the documents are merged in an order from oldest one ...

Page 137: ...e document it will be saved as a new document If you do not change the name the original document will be overwritten The document is saved and returns you to the View mode Do not close the Save Document window by clicking the X button The operations may no longer work properly If you close the window by clicking the X button turn off and on the power of the equipment ...

Page 138: ...3 How to Edit Documents 136 Moving and Merging Documents ...

Page 139: ... for Installation 138 Installing the e Filing Client Software 139 Uninstalling the e Filing Client Software 145 Repairing Client Software 150 Retrieving e Filing Documents 152 How to Import e Filing Documents 152 How to use TWAIN Driver and File Downloader 157 Viewing Documents with e BRIDGE Viewer 177 Features and Functions 177 Running e BRIDGE Viewer 178 Using e BRIDGE Viewer 182 How to Use Main...

Page 140: ...tored in the e Fil ing by the Copy to e Filing Print to e Filing Scan to e Filing and Received Fax and Internet Fax to e Filing functions The TWAIN driver can be selected the TWAIN compliant applications such as Adobe Photoshop and retrieve document from e Filing The File Downloader can work as an application to import e Filing documents to your local hard disk Also you can use the e BRIDGE Viewer...

Page 141: ...vice Pack 4 Windows XP Service Pack 1 Service Pack 2 Before Installing Client Software Before installing the client software confirm the followings to perform an appropriate installation When e Filing Client Software Have Been Installed If the e Filing client software have been installed from other e STUDIO Client Utilities CD ROM uninstall the e Filing client software then install them from the e...

Page 142: ...ge when using the Windows NT 4 0 Windows 2000 Windows XP or Windows Server 2003 1 Insert the Client Utilities CD ROM into the CD ROM drive y The installer automatically starts and the Choose Setup Language dialog box appears When the installer does not automatically start double click Setup exe in the Client Utilities CD ROM 2 Select your language and click OK y The InstallSheild Wizard dialog box...

Page 143: ...ick Next y If you want to change where the programs are installed click Browse In the dialog box appears select the folder and click OK The Setup Type screen is displayed 6 Select Custom and click Next y The Select Components screen is displayed ...

Page 144: ...g software Network Fax software and scan software in the list For more information about these software please see the Printing Guide Network Fax Guide and Scanning Guide 8 Click Next y The Select Program Folder screen is displayed When you select printer drivers and N W Fax driver the Select Port dialog box appears In that case see the Printing Guide or Network Fax Guide for the instruction 9 Cli...

Page 145: ... computer now and click Finish to restart your computer Installing from TopAccess If the system administrator has uploaded the software to this equipment you can use TopAc cess to install the software on your workstation y When using Windows Server 2003 that the Service Pack is installed the installation from TopAccess cannot be performed In that case please install the software in the other metho...

Page 146: ...oftware link at the bottom of the screen y The Install Client Software page opens 2 Click the Install Client1 link to download the installer file 3 Download the installer file on your desktop by following the prompts 4 Double click the InstallClient1 exe file that you downloaded y The installer starts and the InstallShield Wizard dialog box appears ...

Page 147: ...all all client software that have installed from the Client Utilities CD ROM or you can uninstall only e Filing client software P 145 Uninstalling the all Client Utilities Software P 147 Uninstalling only e Filing Client Software Uninstalling the all Client Utilities Software The following describes an uninstallation on Windows XP The procedure is the same when other versions of Windows are used 1...

Page 148: ...stalling e Filing Client Software 2 Select TOSHIBA e STUDIO850 Series Client and click Change Remove y The InstallShield Wizard dialog box appears 3 Select Remove and click Next y The Confirm Uninstall dialog box appears 4 Click OK ...

Page 149: ...es You can restore the data and settings when you re install the client software 6 Select Yes I want to restart my computer now and click Finish to restart your computer y Some files may be deleted after restarting the computer Uninstalling only e Filing Client Software The following describes an uninstallation on Windows XP The procedure is the same when other versions of Windows are used ...

Page 150: ...g Client Software 1 Open Control Panel and double click the Add or Remove Pro grams icon y The Add Remove Programs dialog box appears 2 Select TOSHIBA e STUDIO850 Series Client and click Change Remove y The InstallShield Wizard dialog box appears ...

Page 151: ...e components that you want to uninstall and click Next 5 Click Yes to delete the setting files y Deleting files starts If you want to re install the client software later click No to remain the setting files You can restore the data and settings when you re install the client software ...

Page 152: ...oftware Repairing Client Utilities Software The following describes an installation on Windows XP The procedure is the same when other versions of Windows are used y Do not perform preparing the client software on Windows XP that the Service Pack 2 is not installed In that case uninstall the client software and then install again to repair the client software y Before repairing the software please...

Page 153: ...is displayed specify the network path or queue name and click Next The instructions on how to specify the network path or queue name varies depending on how you want to connect to the equipment For instructions please see the instructions of the installation described in the Printing Guide 2 Select Yes I want to restart my computer now and click Finish to restart your computer ...

Page 154: ...lled you must obtain the software separately Importing e Filing Document into an Application The TWAIN driver allows you to import an e Filing document into your TWAIN compliant appli cation y Before retrieving the stored document in e Filing using the TWAIN driver you should perform the Copy to e Filing Print to e Filing or Scan to e Filing operations You can also store the received faxes or Inte...

Page 155: ...e TopAccessDocMon Local Dis covery dialog box appears In this case search the equipment in your network and con figure the connection P 157 When You Are Running the First Time 5 In the box tree window browse the box where the desired e Filing document is saved 6 If the selected Box requires a password the Password dialog box appears Enter the 5 digit password of the Box and click OK You can enter ...

Page 156: ...ays the contents in the List view y You can also do following using the TWAIN Driver interface P 163 Deleting e Filing Documents P 172 Displaying the Box Folder Document and Page Properties P 174 Shrinking Documents P 175 Adding a New Device Using Network Discovery P 175 Changing the Target Device for Retrieving e Filing Documents 8 If you want to remove the document from e Filing after retrieving...

Page 157: ...eatures when the optional Fax unit is installed Retrieving e Filing documents using the File Downloader 1 Click the Start menu select All Programs and click TOSHIBA e STUDIO File Downloader in the TOSHIBA e STUDIO Client pro gram folder y The e STUDIO File Downloader window opens When you are running the File Downloader the first time the TopAccessDocMon Local Discovery dialog box appears In this ...

Page 158: ...d 3 If the selected Box requires a password the Password dialog box appears Enter the 5 digit password of the Box and click OK You can enter the administrator password instead of the 5 digit password 4 Select a document and click Save As y The message Do you want to Remove the Selected Page s or Document after retrieval is displayed ...

Page 159: ...g the Target Device for Retrieving e Filing Documents 5 If you want to remove the document from e Filing after retrieving click Yes If you want to leave the document in e Filing click No y You can cancel retrieving a document by clicking Cancel The Save As dialog box appears 6 Locate the folder where you want to save the document Enter the file name in the File Name field select the file format in...

Page 160: ... device automatically 1 In the TopAccessDocMon Local Discovery dialog box click Start Discovery to begin the process y It locates all the compatible devices in your network 2 When the process is completed found devices are listed in the list If the process continues for a long time it is because too many network clients are on the network In that case you can configure the discovery using the Adva...

Page 161: ...ct from the list and click OK y You are connected to the selected device and the TWAIN driver or File Downloader window is displayed Discovering the device manually 1 In the TopAccessDocMon Local Discovery dialog box click Manual Selection y The Manual Selection dialog box appears ...

Page 162: ... and File Downloader do not support the IPX SPX connection Name Enter the printer name Location Enter the location of the printer You must enter Name and IP Address 3 The entered printer is added in the list Select the printers that you want to monitor from the list and click OK y The TWAIN driver or File Downloader connects to the selected device and displays the TWAIN Driver for e STUDIO window ...

Page 163: ...network This is available only when the TCP IP protocol is installed When this is enabled select how it searches devices in the TCP IP network Search local subnet Select this to search devices in local subnet Specify a range Select this to search devices in specific range of IP addresses When this is selected enter the IP addresses in From field and To field to specify the range How to use the Mai...

Page 164: ... the check mark is displayed in this menu all documents will be retrieved in 300x300 dpi You can cancel shrinking to half by clicking on this menu again P 174 Shrinking Documents View menu List Click this menu to display the List view in the Content window Details Click this menu to display the Details view in the Content window Thumbnail Size Click a desired thumbnail size from Small Medium and L...

Page 165: ...to delete the selected documents or pages 8 Close Click this to exit the TWAIN driver or File Downloader 9 Status Bar This displays the communication status number of pages or the document that you selected and the IP address of the equipment to be connected Deleting e Filing Documents You can delete a document or page s in a document from e Filing using the TWAIN driver and File Downloader Main w...

Page 166: ... box at the specified interval You can enable the Automatic Download by specifying the details using the Automatic Down load Wizard The documents will be deleted automatically after the documents are downloaded P 165 Starting the Automatic Download Once you enable the Automatic Download it becomes impossible for you to operate other func tions using the File Downloader To operate other functions y...

Page 167: ...u want to download the documents and enter the 5 digit password if the selected box is protected by a password Then click Next You can enter the administrator password instead of the 5 digit password 3 If the documents that you want to download are stored in a folder click Advanced y The Automatic Download Wizard 2 4 dialog box appears y If you do not have to select a folder click Next and skip to...

Page 168: ...ad and click Next y The Automatic Download Wizard 3 4 dialog box appears 5 Click Browse y The Browse for Folder dialog box appears If you previously set the Automatic Download the folder path that you specified is dis played in the Target Folder field If you do not have to change the folder you can click Next and skip to Step 8 ...

Page 169: ...Retrieving e Filing Documents 167 6 Locate the folder that you want to save the documents and click OK 7 Click Next y The Automatic Download Wizard 4 4 dialog box appears ...

Page 170: ...y and Print Source Parameter Select the file compression type for save document You can also enable shrinking the documents by checking the Shrink To Half check box This options are valid only for the documents stored by Copy to e Filing or Print to e Filing Polling Time Interval Enter the polling time interval to start downloading in minutes Document Deletion Check this when you want to delete do...

Page 171: ...c Download P 169 Stopping the Automatic Download y If you want to confirm the settings and status after you enable the Automatic Down load you can display the Automatic Download Summary dialog box from the Auto matic Download command P 170 Displaying the summary and status Stopping the Automatic Download 1 Click the File menu and select Stop in Automatic Download y The Automatic Download Result di...

Page 172: ...will be disabled You can also display the log file by clicking View Log File When you click View Log File the log file will be opened using the default text editor Displaying the summary and status Displaying the summary and status for the Automatic Download can be operated only when the Automatic Download is enabled ...

Page 173: ...t Summary in Automatic Down load y The Automatic Download Summary dialog box appears 2 Click OK to close the dialog box You can also display the log file by clicking View Log File When you click View Log File the log file will be opened using the default text editor ...

Page 174: ...you can see the following information about the selected box y Contains Number and type of contents in the box y Size Total size of contents in the box y Preservation Period for Documents The number of days to retain the document before deleting it automatically y EMail Address For Notification Email address that the notification will be sent to y Status Ready means a box is ready to edit or to be...

Page 175: ...lder is ready to edit or to be deleted Busy means a folder cannot be modified or deleted y Created Date the folder was created y Modified Date the folder was previously modified Document and Page Properties In the Document Information or Page Information dialog box you can see the following informa tion about the selected document Property Tab The Property tab is only displayed for the Document In...

Page 176: ... Resolution Resolution of the page y Image Size Pixel size of the page y Paper Size Paper size of the page y Size Data size of the page Shrinking Documents The Shrink to Half function allows you to retrieve a 600x600dpi document as a 300x300dpi doc ument This feature is only available for the documents that are originally stored to the e Filing by the Copy to e Filing or Print to e Filing feature ...

Page 177: ...the Box Select menu and select Device Discovery The TopAccessDocMon Local Discovery dialog box appears and discovers the devices in your net work to add a new connection For further instruction on how to discover the devices using the TopAccessDocMon Local Discovery dialog box see the following section P 157 When You Are Running the First Time After you add other devices in the connection list you...

Page 178: ...get device for retrieving e Filing documents 1 Click the Box Select menu and select Select Devices y The Select Device dialog box appears 2 Select the name of the equipment that you want to connect to and click OK y The target device has been changed to the selected equipment ...

Page 179: ...FF File tif tiff Bitmap File bmp y To view the document images the corresponding applications such as the applications below which can open or edit the files for the file type must be installed Microsoft Word File Microsoft Word RTF File Microsoft Word Microsoft PowerPoint File Microsoft PowerPoint Microsoft Excel File Microsoft Excel CSV File Microsoft Excel PDF File Adobe Acrobat Reader Plain Te...

Page 180: ...ocuments can be managed System Requirements The e BRIDGE Viewer is available for following environments y Display Resolution 1024 x 768 dots or more is recommended y Display Color High Color 16bit or higher is recommended y CPU Pentium 300 MHz minimum Pentium 1GHz or faster recommended y Protocol TCP IP Required to download the e Filing documents from the equipments y OS Windows 2000 Service Pack ...

Page 181: ...or occurs during a operation such as downloading e Filing documents the Notifica tion Area Status Area icon will be displayed as icon From the Notification Area Status Area menu you can operate the following commands y Open e BRIDGE Viewer You can open the Main Window of the e BRIDGE Viewer y Stop Download Stop Update You can stop downloading the e FIling documents or updating the document images ...

Page 182: ...ssary only when e BRIDGE Viewer could not find the sup ported equipment on your network In that case the status field will display Trial y The license validation is successfully performed only when the connection to the following equipments is established If you establish the connection to the equipment other than the following equipments the license validation cannot be performed e STUDIO3510c Se...

Page 183: ...Viewing Documents with e BRIDGE Viewer 181 4 Click Cancel y The Activate e BRIDGE Viewer dialog box disappears ...

Page 184: ...you require You can use the e BRIDGE Viewer normally if you do not change the default settings in other settings You can configure the settings in the Settings dialog box that can be displayed by selecting Set tings in the Edit menu The Settings dialog box includes the following setting windows 1 Folder In the Folder window you can perform the folder registrations Only the documents in the registe...

Page 185: ...older setting My Scan Folder setting Disk Space setting and so on P 191 Configuring System Settings Configuring Folder Registrations In order to view the documents in your computer using the e BRIDGE Viewer you must register the folders that contains the documents that you want to manage Only the documents in the registered folders can be viewed using the e BRIDGE Viewer Even if you register the f...

Page 186: ...uments in all sub folders in the selected folder To unregister a registered folder select the folder and remove the check on Register this folder To unregister the registered sub folders also remove the check on Include all Sub folders 3 Folder Information This displays the information of the selected folder Name This displays the name of the selected folder Sub Folders This displays the number of...

Page 187: ...ured Therefore you must configure each box to download the documents to view the documents using the e BRIDEG Viewer The e Filing Box settings can be performed in the e Filing Box window of the Settings dialog box that can be displayed by selecting Settings in the Edit menu 1 Select Device The names of equipment that the connections are configured are displayed This software will search the equipm...

Page 188: ...ox Configuring File Types To Be Registered In the File Types window you can specify the file types of documents that will be viewed in the e BRIDGE Viewer The File Types settings can be performed in the File Types window of the Settings dialog box that can be displayed by selecting Settings in the Edit menu 1 File Types Check the file types that you want to view in the e BRIDGE Viewer The document...

Page 189: ...e documents to be viewed in the e BRIDGE Viewer Last Accessed Select this to arrange the order in the Last Accessed Date Last Modified Select this to arrange the order in the Last Modified Date Created Select this to arrange the order in the Created Date 3 Reassign Folder Color You can reassign the folder color that displayed in the Color Bar automatically by clicking the Reassign button The folde...

Page 190: ...interval When this is checked select the number of hours in the drop down box 3 Download e Filing Interval Select the number of minutes to download the e Filing documents from the equipment 4 FAX Alert This sets whether displaying the alert message after downloading the received FAX docu ment that is stored in the e Filing box by a relay box or Internet Fax or Fax Received For ward Alert when new ...

Page 191: ...r that is set on Windows Operating System The Printer settings can be performed in the Printer window of the Settings dialog box that can be displayed by selecting Settings in the Edit menu 1 Select e STUDIO Select the default printer to be commonly used for printing a document from the e BRIDGE Viewer The selected printer will be selected as the default printer in the Print dialog box of the e BR...

Page 192: ...sign The Memo settings can be performed in the Memo window of the Settings dialog box that can be displayed by selecting Settings in the Edit menu 1 Memo Selection You can change the memo design by importing the memo design files that are provided from TOSHIBA To import the memo design file click Import and select the memo design file 1 ...

Page 193: ...r If you want to change the folder click Browse and specify the folder When you change the my scan folder all files in the old folder are moved to the My Scan folder created in the specified folder 3 Disk Space You can specify the maximum disk space that can be used for the e BRIDGE Viewer Maximum Disk Space Specify the size of maximum disk space that the e BRIDGE Viewer can be used for the docume...

Page 194: ...o view the documents in e Filing boxes you must first configure the connection to the equipment and the boxes that the documents are downloaded For instructions on how to configure the connection please see the following section P 185 Configuring e Filing Box Settings When the connection to the equipment is successfully configured the e Filing documents are downloaded as PDF files and they are sto...

Page 195: ...t Download e Filing y Start downloading the e Filing documents from the equipment that the connections are configured If the e Filing Box settings have not been configured the message No documents to download is displayed in the Status bar In that case make sure that you configure the e Filing Box settings correctly P 185 Configuring e Filing Box Settings y You can also download the e Filing docum...

Page 196: ...iewer at the very first time only demo files are registered to view in the e BRIDGE Viewer If you want to disappear the demo files you must unregister the folder that the demo files are included The demo files are included in the DEMO folder in the e BRIDGE Viewer program folder For the instructions on how to unregister the folder see the fol lowing section P 183 Configuring Folder Registrations Y...

Page 197: ...udes the macros because you must select whether enabling the macros before opening the document Also this may happen when the Auto Update function is activated and opening the PDF file with Adobe Acrobat Reader and when opening the file that a password is set To register these files correctly change the application settings or file settings so that the documents can be opened without the popup mes...

Page 198: ...o 5 pages You can change the maximum pages that are displayed for each document in the Page limit option in the Update settings P 188 Configuring Update Settings Rotating Document View You can rotate the Document View Rotating Document View 1 Click the View menu and select Rotate Right or Rotate Left y The Document View is rotated y You can also rotate the Document View by right clicking the Docum...

Page 199: ...ring the documents the related application will be launched in the back ground to create the document image However the document cannot be registered if the application cannot be launched in the background in case that a popup message is displayed to open the document For example this happens when registering the Microsoft Office document that includes the macros because you must select whether en...

Page 200: ... file types The documents can be filtered based on the following file types y PowerPoint File ppt y Word File doc rtf y Excel File xls csv y PDF File pdf y Plain Text File txt y HTML File html htm y Image Data File jpg gif png tif tiff bmp 1 Click the Filter menu and select the file type that you want to dis play y It only displays the file types that the check marks are displayed in the left You ...

Page 201: ...n be scrolled through in the Document View The File Name field is hidden where there is not enough space to display To display the File Name field resize the width of the Main window until there is enough space in the tool bar for the File Name field to display Managing Documents You can perform the following functions with the documents in the e BRIDGE Viewer P 199 Attaching or Editing Memos P 20...

Page 202: ...Click the Edit menu and select Memo New y The memo window appears in the document y You can also attach a new memo by right clicking the document and select New Memo y You can also attach a specific design of a new memo by selecting a design name command under the Memo command in the Edit menu y You can also attach a new memo by clicking the New Memo icon y You can also attach a specific design of...

Page 203: ... Edit y The memo window becomes editable You can also edit a memo by right clicking the memo and select Edit 2 Edit the memo in the memo window and click OK Changing a design of a memo 1 Right click the memo that you want to change the design and select the design name command in Memo Design y The design of the selected memo is changed ...

Page 204: ...ument View with the Windows Explorer by y Selecting Show Folder in the File menu From the Folder Tree you can also open the selected folder with the Windows Explorer by y Double clicking the folder in the Folder Tree y Right clicking the folder and select Show Folder Printing Documents You can print the document directly from the e BRIDGE Viewer without opening the document with a corresponding ap...

Page 205: ...er that is selected in the Name drop down box can be specified in the Printer settings P 189 Configuring Printer Settings y When printing a TIFF file from the e BRIDGE Viewer Adobe Acrobat Reader must be installed y When you print several copies of the document it is recommended to print a docu ment from an application When the several copies of the document is printed from e BRIDGE Viewer the pri...

Page 206: ... new message will be created using the default Email application with attaching the document How to Use Main Window When you run the e BRIDGE Viewer the Main window appears and lets you perform various functions more than viewing documents in the Main window 1 Menu Bar You can select various functions from the menu P 205 Menu Bar Commands 1 2 3 4 6 5 ...

Page 207: ...ng Folder Registrations 4 Document View This displays the document images in the selected folder or its subfolders The application associated with the document needs to be installed on the computer to view the document image For example to view a text file an application such as Notepad needs to be installed You can scroll through the documents using the mouse wheel or the up and down arrow keys i...

Page 208: ...you want to download the e Filing documents immediately P 193 Downloading e Filing Documents y Update You can start updating the document images manually As the default this software is con figured to update the document images while the screensaver is up You can use this com mand when you want to update the document images immediately P 194 Updating Document Images y Exit You can exit the Main Wi...

Page 209: ...96 Scrolling Through Pages y Rotate Right You can rotate the Document View 90 degrees to the right P 196 Rotating Document View y Rotate Left You can rotate the Document View 90 degrees to the left P 196 Rotating Document View y Hide Document You can hide the displayed document If you select this command the displayed document will not be displayed in the e BRIDGE Viewer until you restore the docu...

Page 210: ...u again to release filtering the selected design Help menu y e BRIDGE Viewer Help You can display the Online Help for e BRIDGE Viewer y Activate e BRIDGE Viewer You can perform the license validation manually This software automatically performs the license validation when connecting the equipment This command is used to perform the license validation immediately If the connection to the equipment...

Page 211: ...erformed when downloading the e Filing docu ments or updating the document images is in progress You can start updating the document images manually As the default this software is configured to update the document images while the screen saver is up You can use this command when you want to update the doc ument images immediately P 194 Updating Document Images You can start downloading the e Fili...

Page 212: ...You can filter the documents that any memos are attached to be displayed in the Document View You can also select the designs to filter the docu ments that only the selected designs of memo are attached to be displayed in the Document View P 198 Filtering Documents The documents that includes the search text in the file name will be filtered P 198 Filtering Documents You can cancel all filters tha...

Page 213: ...ion describes system administration of e Filing features Safeguarding Data 212 Erasing Box Data 212 Using e Filing Backup Restore Utility 214 Installing e Filing Backup Restore Utility 214 How to use e Filing Backup Restore Utility 216 ...

Page 214: ...fore no longer usable Erasing the box data 1 Log on to the Administrator page P 50 Logging On the Administrator Page y The Erase Box page is displayed It is recommended to archive the documents in the boxes before deleting the boxes Once the boxes are deleted you cannot restore the documents in the boxes P 87 Archiving Documents You can display the Box Properties window by clicking the box number ...

Page 215: ...Safeguarding Data 213 3 Click OK y The selected user boxes are deleted from the e Filing ...

Page 216: ...orer 5 5 Service Pack 2 or later must be installed Microsoft Internet Explorer is enabled to access the e Filing web utility on this equipment The proxy settings must be configured correctly to enable the access The browser must not be offline To backup restore e Filing data using e Filing Backup Restore Utility the FTP Server option that can be set in the Network settings of TopAccess must be ena...

Page 217: ... appears 5 Select I accept the terms of the license agreement and click Next y The Choose Destination Location screen is displayed 6 Click Next y If you want to change where the programs are installed click Browse In the dialog box appears select the folder and click OK The Select Program Folder screen is displayed ...

Page 218: ...ou to restart your computer If it does select Yes I want to restart my computer now and click Finish to restart your computer How to use e Filing Backup Restore Utility The e Filing Backup Restore Utility allows you to create a backup file for e Filing data from the equipment and restore e Filing data from a backup file into the equipment Running e Filing Backup Restore Utility After installing th...

Page 219: ...ars configure the connection to the equipment P 217 When You Are Running the First Time 2 Enter the administrator s password and click OK 3 The e Filing Backup Restore Utility main window appears When You Are Running the First Time When you access the e Filing Backup Restore Utility the first time the TopAccessDocMon Local Discovery dialog box appears In this case search the equipment in your netw...

Page 220: ... in your network 2 When the process is completed found devices are listed in the list If the process continues for a long time it is because too many network clients are on the network In that case you can configure the discovery using the Advanced button P 220 Configuring Discovery Settings 3 Select the equipment that you want to connect from the list and click OK y The e STUDIO e Filing Backup R...

Page 221: ...ection dialog box appears 2 Enter each item to specify the network address of the device and click OK IP Address Enter the IP address of the printer IPX Address This is disabled because the e Filing Backup Restore Utility does not support the IPX SPX connection Name Enter the printer name Location Enter the location of the printer You must enter Name and IP Address ...

Page 222: ...s software can backup or restore the data only from the e STUDIO3510c Series e STUDIO451c Series e STUDIO850 Series e STUDIO452 Series e STUDIO282 Series e STUDIO4511 Series e STUDIO350 Series e STUDIO280 Series 2 Network Enable IPX SPX Search This is disabled because the e Filing Backup Restore Utility does not support the IPX SPX connection 3 Network Enable TCP IP Search Select this to search fo...

Page 223: ...tomatic Backup Click this menu to configure the automatic backup function This is available only when displaying the Backup tab P 224 Backing Up e Filing Data Automatically Exit Click this menu to close the e Filing Backup Restore Utility Main window Edit menu Select All Click this menu to check all checkboxes of the e Filing boxes displayed in the Contents window Clear All Click this menu to clea...

Page 224: ...selected restore file includes 6 Backup Restore When the Backup tab is displayed the Backup button will be displayed Click this to backup e Filing data from the equipment P 222 Backing Up e Filing Data Manually When the Restore tab is displayed the Restore button will be displayed Click this to restore e Filing data into the equipment P 227 Restoring e Filing Data 7 Status Bar This displays the st...

Page 225: ... path to save a backup file directly in the Target File field However a backup file cannot be saved when you specify the path using an IP address When you want to specify a network folder enter the network without using an IP address y The backup file must saved as a ZIP file You cannot save it in another format More over you must specify the zip extension for the file name to enable the Backup bu...

Page 226: ...fy the backup type 4 Check the boxes that you want to backup and click Backup y It starts backing up e Filing data When backing up e Filing data is completed the Backup Information dialog box appears Please make sure that the hard disk space for saving a backup file is available in your computer The size of a backup file may become the same size of the e Filing box disk space 5 Click OK Backing Up...

Page 227: ...til backing up completes y Backing up the e Filing data may take few hours Therefore if the equipment receives many print jobs N W Fax jobs received faxes while backing up the e Filing data Job Full error may occur Backing up e Filing Data Automatically 1 Click Browse in the Backup tab y The Open dialog box appears y You can also enter the path to save a backup file directly in the Target File fie...

Page 228: ...ype Full Backup Backup the all data in the selected boxes Incremental Backup Backup only the updated data since the last backup If you connect to the e STUDIO4511 Series e STUDIO450 Series or e STUDIO280 Series you cannot specify the backup type 4 Check the boxes that you want to backup automatically Then click the File menu and select Automatic Backup y The Automatic Backup dialog box appears ...

Page 229: ...ct the interval to apply the automatic backup from OnlyOnce Daily Weekly or Monthly Setting Select whether the automatic backup will be performed when any of selected boxes have been deleted 6 The automatic backup is enabled and disable the main window When you want to cancel the automatic backup click Cancel Schedule to select Exit in the File menu Restoring e Filing Data To restore e Filing data...

Page 230: ...ility will be disabled y While restoring the e Filing data any print jobs N W Fax jobs and received faxes are held in the equipment until restoring completes y Restoring the e Filing data may take few hours Therefore if the equipment receives many print jobs N W Fax jobs received faxes while restoring the e Filing data Job Full error may occur When you want to delete all e Filing data in the equip...

Page 231: ...OK y It starts restoring e Filing data When restoring e Filing data is completed the Restore Information dialog box appears When the same box number exists in the equipment the box properties such as a box name and password setting cannot be restored from the backup file 5 Click OK Initializing e Filing Storage When you want to delete all e Filing data in the equipment before restoring perform the...

Page 232: ... will be deleted Adding a New Device Using Local Discovery You can add a new connection to other equipment by searching the equipment in your network This enables you to add several devices that you can connect using the e Filing Backup Restore Utility To add a new connection click the Devices menu and select Device Discovery The TopAc cessDocMon Local Discovery dialog box appears and discovers th...

Page 233: ... device for back ing up or restoring e Filing data using e Filing Backup Restore Utility Selecting the target device 1 Click the Devices menu and select Select e STUDIO y The Select Device dialog box appears 2 Select the name of the equipment that you want to connect to and click OK y The target device has been changed to the selected equipment ...

Page 234: ...5 System Administration 232 Using e Filing Backup Restore Utility ...

Page 235: ... Archive Document 236 Upload Archived Document 237 Test Print 238 Print Document 239 Properties 245 Page Properties 249 Send Email 250 Edit Menu Functions 253 Select All 253 Invert Selection 253 Cut 253 Copy 253 Paste 253 Delete 254 View Menu Functions 255 Thumbnail 255 List 256 Beginning 256 Previous 256 Next 256 End 256 Layout Menu Functions 257 Insert Blank Page 257 ...

Page 236: ... When you select the New Box function from the File menu the New Box window appears 1 Box Number Select the 3 digit box number In the Box Number drop down box only undefined box num bers are displayed 2 Box Name Enter the box name to be created You can enter any ASCII characters except and Do not use a space or period at the beginning or end of the name The max imum size of a box name is 32 charac...

Page 237: ...OK Click this to create a new folder 3 Cancel Click this to cancel creating a new folder Open You can open select box folder or document using this function The Open function is enabled when you select a box folder or document in the Contents frame When you select Open from the File menu the selected box folder or document opens in the Documents frame and you can see the contents in the Contents f...

Page 238: ...elect at least one item will be displayed When you select Archive Document from the File menu the confirmation dialog box appears When you click OK in the confirmation dialog box the Archive Document window will appear and display the process of archiving the documents During the process you can click Cancel to quit archiving and close the window When the archive process is completed the window wi...

Page 239: ...ad Archived Docu ment window will appear 1 Archive File Enter the path to the archive file or click Browse to select the archive file 2 OK Click this to upload selected archive file 3 Cancel Click this to cancel uploading an archive file After you click OK in the Upload Archived Document window the confirmation dialog box appears When you click OK in the confirmation dialog box the Upload Archived...

Page 240: ...um number of copies that is allowed for the department and user will be displayed in the upper right of the page 1 All Pages Select this to print all pages of the document 2 first page number last page number Pages Select this to specify the pages to be printed Enter the first of page and end of page num ber to be printed in each field 3 Department Code Enter the 5 digit department code This must ...

Page 241: ...lex Select whether the document is printed on both sides of the paper or not None Select this if you do not want to print both side of paper Book Select this to print both sides of the paper which will be bound along the vertical side of the paper so that the pages can be turned over right and left Tablet Select this to print both sides of the paper with a vertical reversal to be bound along the h...

Page 242: ...lect Automatically selects the paper set in this equipment according to the printed document size When other than Plain or Thick1 is selected in the Paper Type option paper is fed from the Bypass Tray Drawer 1 Paper is fed from the Drawer 1 Drawer 2 Paper is fed from the Drawer 2 Drawer 3 Paper is fed from the Drawer 3 This cannot be selected if Drawer 3 is not installed Drawer 4 Paper is fed from...

Page 243: ...t without hole punches Center Top Select this to create holes on the upper side and print Middle Left Select this to create holes on the left side and print This option is grayed out if a hole punch unit is not installed 12 Page Number This sets where the page number is printed Position Select the position the page number will be printed Initial Page Enter the page number starts with between 1 to ...

Page 244: ...nt side of the cover sheet and the back side of the cover will be blank 16 Use Back Cover This sets back cover printing which allows you to insert or print a back cover on a sheet fed from a different tray than the Paper Source option To enable back cover printing check on the box and select the location from where a back cover sheet is to be fed and the print style to be used Source Select the lo...

Page 245: ...s Tray in the Source drop down box the message Press JOB STATUS button will be displayed in the touch panel When pressing the JOB STATUS button the message Place Paper in the Bypass tray Press the START button will be displayed Then place the paper in the Bypass tray and press the START button y The selectable values in the Source drop down box vary depending on the optional devices installed on t...

Page 246: ...ified page will be blank The page is printed on the front side of the inserted sheet and the 2 sided printing continues from the next page y If Print on both sides of page is selected while the Duplex option is set to either Book or Tablet and you enter an even numbered page printed on the back side of the paper for the Pages field the specified page will be blank The specified page and the next p...

Page 247: ...rce drop down box vary depending on the optional devices installed on this equipment Duplicate When you check on this you can print previous page images on the inserted sheet 19 Paper Type Insert When you select Bypass Tray for the paper source of either the Use Front Cover User Back Cover Insert Pages or Interleave Pages option select the paper type for the paper fed from the Bypass Tray 20 Print...

Page 248: ...ame and then select File and Properties the Box Properties window will appear When you display the Box Properties window you can click Change Properties to modify the box properties If you click Change Properties in the Box Properties window the Change Box Properties window will appear 12 1 5 2 6 7 8 9 10 3 4 11 ...

Page 249: ...ror occurs When you check this enter an Email address in the Email Address field 8 Send email when job is completed Check this to send a notification message to the specified Email address when a job is com pleted When you check this enter an Email address in the Email Address field 9 Advanced automatic delete notification Check this to enable the Email notification which will send a notification ...

Page 250: ...ies the Folder Properties window appears 1 Location This displays the directory where the folder is located 2 Contains This displays the number of files the folder contains 3 Created This displays the date and time the folder was created 4 Modified This displays the date and time the folder was last modified 5 OK Click this to close the window 1 2 3 4 5 ...

Page 251: ...This displays the date and time the document was created 5 Modified This displays the date and time the document was last modified 6 Last Accessed This displays the date and time the document was last accessed by any user 7 OK Click this to close the window Page Properties You can display the page properties by selecting a page in a document within the Documents frame selecting the desired page wi...

Page 252: ... This displays the paper size of the page 5 Size This displays the data size of the page 6 OK Click this to close the window Send Email You can send selected documents as Emails from the e Filing web utility When you perform this function this equipment creates Email as attaching the selected docu ments as files and sends Email directly from the equipment To use the Send Email function the Email c...

Page 253: ...r enter the desired subject in the field 4 From Address Enter the Email address of the sender When the recipient replies the message will be sent to this Email address 5 From Name Enter the sender name of the Email document 6 Body Enter the body message of the Email document You can enter up to 1000 characters including spaces 7 File Format Select the file format that the received document will be...

Page 254: ...artment Code Enter the department code if required 11 Send Click this to send the e Filing documents as Email This cannot be clicked when no destina tion is defined 12 Cancel Click this to cancel sending Email 13 Reset Click this to restore the default settings ...

Page 255: ...m temporary storage if you cut or copy another item or log off When you cut items the Paste function is enabled Cut and then Paste to move documents and pages Copy This function is enabled when you select a document in the Documents frame and check one or more documents in the Contents frame Also you can copy pages in a document When you copy items the system temporarily stores the items that you ...

Page 256: ...ions Delete This function is enabled when you select one or more items from the Contents frame When you click Delete from the Edit menu the system asks you for confirmation Click OK to delete the selected item s or Cancel to abort the Delete function ...

Page 257: ...ious Next and End P 255 Thumbnail P 256 List P 256 Beginning P 256 Previous P 256 Next P 256 End Thumbnail When you click Thumbnail e Filing web utility displays several small images of files or pages in the Contents frame Files are represented by their first page Each image is identified by its file name or page number A check box below each image allows you to select it ...

Page 258: ...num ber of files Beginning When you click Beginning e Filing web utility displays the first items in the Contents frame Previous When you click Previous e Filing web utility displays the previous set of items in the Contents frame Next When you click Next e Filing web utility displays the items that immediately follow those dis played in the Content frame End When you click End e Filing web utilit...

Page 259: ...unction from the Layout menu the Insert Blank Page window will appear 1 Paper Size The list at the left in the window shows the available paper size that can be inserted as a blank page Select the paper size of the blank page to be inserted 2 Orientation The list at the right in the window shows the orientation Select the orientation of the blank page to be inserted 3 OK Click this to insert the b...

Page 260: ...6 Menu Functions Web utility 258 Layout Menu Functions ...

Page 261: ...ibes about troubleshooting for e Filing features Troubleshooting for e Filing Web Utility 260 Limitations and Considerations 260 Error Messages 260 TWAIN and File Downloader Errors 263 TWAIN Driver and File Downloader Error Conditions 263 ...

Page 262: ...nish the session and close the e Filing main window y Do not perform any operations while displaying the contents or processing a operation Error Messages When any error message is displayed find the error message from the table below and trouble shoot the problem Message Corrective Action Internal error occurred Please restart e Fil ing Turn OFF and ON the power of the equipment and then try agai...

Page 263: ...and create a new folder You can create up to 100 folders in each box Cannot create a document Maximum number of documents has been reached Delete unnecessary documents and create a new document You can create up to 400 documents in each box and folder Cannot insert Page Maximum number of pages has been reached Delete unnecessary pages and insert a new page A document can contain up to 200 pages Pa...

Page 264: ...ng used A document contained in the box is being used by another user Try again after another user finishes using the document The document is being used Please try again later The selected document is being used by another user Try again after another user fin ishes using the document File format doesn t correspond Please con tact Administrator Contact your administrator to convert the archive fi...

Page 265: ...rink To Half P 265 Cannot Acquire Multi page Document Cannot Find the Device Problem Description Cannot find this equipment using the Local Discovery or Network Discovery feature Corrective Action Confirm the following statements y The equipment and your computer is correctly connected to the TCP IP network y The default gateway setting is correctly set up if the equipment is connected to a differ...

Page 266: ...a multi page TIFF file In that case the File Downloader saves the black and white document as single page TIFF files and color document as JPEG files If you want to save the document as one file save it as a PDF file Cannot Open TIFF File Saved Using File Downloader Problem Description Cannot open the TIFF file that has been saved using the File Downloader Corrective Action When you select TIFF fo...

Page 267: ... Problem Description Cannot acquire a multipage document from an application Corrective Action Some applications do not support multi page scan from TWAIN I F or need to be configured to acquire multi page documents See the user documentation of an application that you use ...

Page 268: ...7 Troubleshooting 266 TWAIN and File Downloader Errors ...

Page 269: ...arameter 168 Copying pages and creating a new document 113 Cover Sheet Insertion Insert Pages 84 Cover Sheet Insertion Interleave Pages 84 Cover Sheet Insertion Use Back Cover 84 Cover Sheet Insertion Use Front Cover 84 Created 248 249 Current Folder Indicator 192 Cut 206 253 D Data Folder 191 Default Document View 54 Delete 119 162 164 254 Delete document automatically 71 247 Delete from e Filing...

Page 270: ...SS 32 L Last Accessed 249 List 162 256 Load number thumbnail per view 54 Location 160 219 248 249 M Manual Selection 159 219 Maximum Disk Space 191 Maximum Document Number 191 Memo Edit 201 206 Memo New 200 206 Memo Design 201 memo design files 190 Memo Selection 190 Menu Bar 53 162 204 205 221 Merging documents into a document 131 Merging pages to another document 108 MIXED ORIGINAL SIZE 31 Modif...

Page 271: ...47 Send email when job is completed 71 247 Settings 182 207 SHARPNESS 32 Shift Margin Back 84 Shift Margin Front 84 Show Color Bar 187 Show Folder 202 206 Shrink To Half 162 Shrink to Half 175 SINGLE 2 SIDED SCAN 31 Size 249 250 Sort Copies 83 239 Specify a range 161 221 Staple 83 241 Start Discovery 158 218 Status Bar 205 Stop Download 179 206 Stop Update 179 206 STORE TO E FILING 25 Store to e F...

Page 272: ...270 INDEX ...

Page 273: ...DP 5200 6000 7200 8500 OME050005C0 ...

Page 274: ...2 17 2 HIGASHIGOTANDA SHINAGAWA KU TOKYO 141 8664 JAPAN MULTIFUNCTIONAL DIGITAL SYSTEMS e Filing Guide 2005 TOSHIBA TEC CORPORATION All rights reserved R05022077903 TTEC Ver03 2006 06 ...

Reviews: