background image

Introduction

1.

3

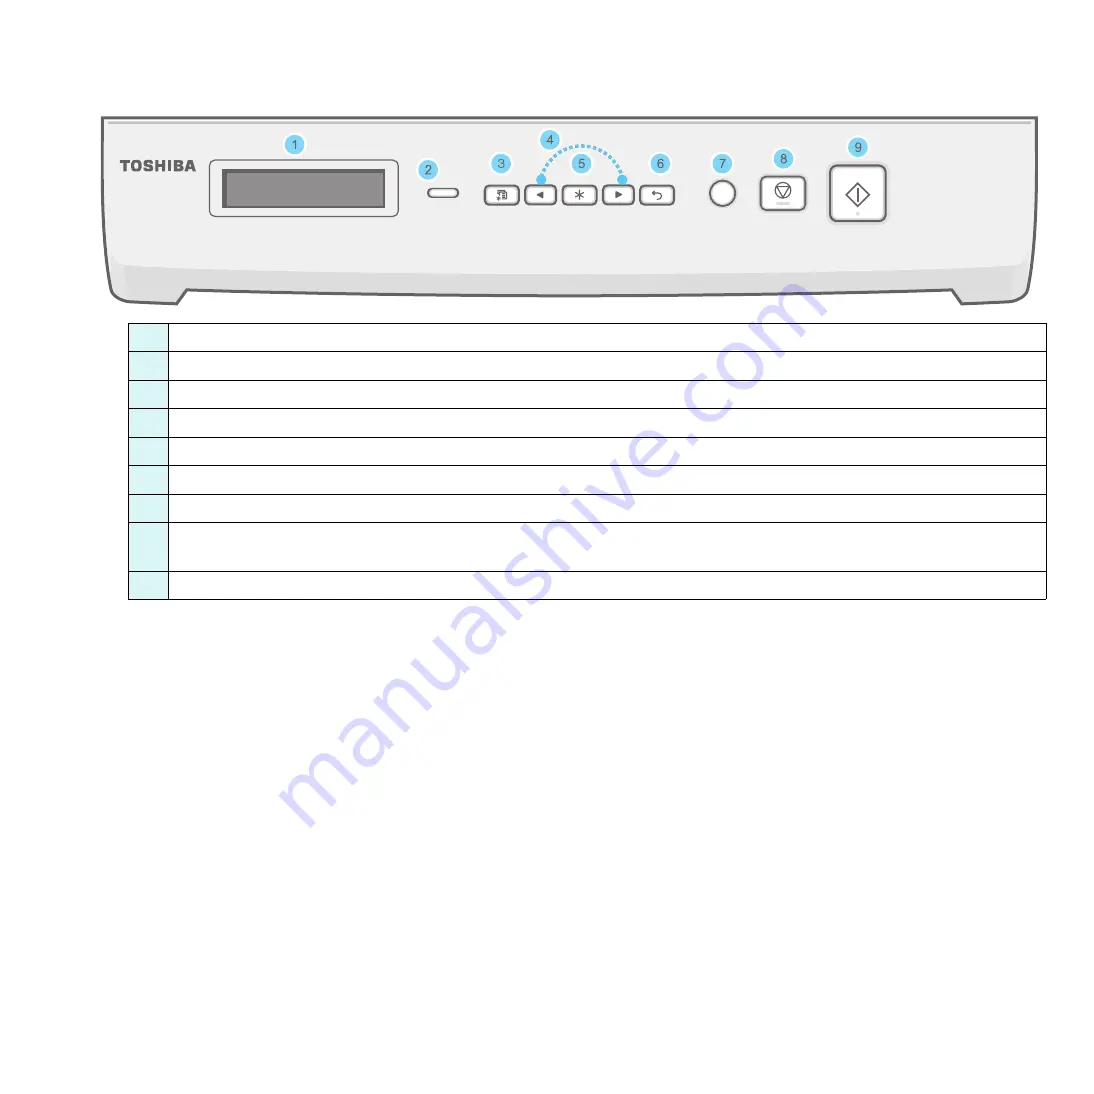
Control panel functions

1

Displays the current status and prompts during an operation. 

2

Status

- Shows the status of your machine. See page 9.3.

3

Menu

- Enters Menu mode and scrolls through the available menus.

4

Scroll through the options available in the selected menu.

5

OK

- Confirms the selection on the display.

6

Back

- Sends you back to the upper menu level.

7

Copies

- Allows you to enter the number of copies.

8

Stop/Clear

- Stops an operation at any time.

In Standby mode, clears/cancels the copy options, such as the resolution, the document type setting, the copy size, and the number of copies. 

9

Start

- Starts a job.

Summary of Contents for e-studio 180s

Page 1: ......

Page 2: ...mation contained herein e STUDIO180S is model name of TOSHIBA TEC CORPORATION TOSHIBA TEC and TOSHIBA TEC logo are trademarks of TOSHIBA TEC CORPORATION IBM and IBM PC are trademarks of International Business Machines Corporation Microsoft Windows Windows 98 Windows Me Windows 2000 Windows XP and Windows Vista are registered trademarks of Microsoft Corporation All other brand or product names are ...

Page 3: ...ftware 2 7 Programs for Windows 2 7 Printer driver features 2 7 System requirements 2 8 3 Loading original documents and paper Loading document 3 1 Selecting print materials 3 2 Supported paper types and sizes 3 2 Paper size supported in each mode 3 3 Guidelines for selecting and storing print materials 3 3 Loading paper 3 5 In the paper input tray 3 5 In the manual feeder 3 5 Setting the paper si...

Page 4: ...edistributing the toner cartridge 8 3 Replacing the toner cartridge 8 4 Consumable and replacement parts 8 5 9 Troubleshooting Clearing paper jams 9 1 In the paper input tray 9 1 In the manual feeder 9 1 In the fuser area or around the toner cartridge 9 2 In the paper exit area 9 2 Tips for avoiding paper jams 9 3 Understanding the Status LED 9 3 Understanding display messages 9 4 Solving other pr...

Page 5: ...rvice personnel under the following conditions When any part of the power cord plug or connecting cable is damaged or frayed If liquid has been spilled into the machine If the machine has been exposed to rain or water If the machine does not operate properly after instructions have been followed If the machine has been dropped or the cabinet appears damaged If the machine exhibits a sudden and dis...

Page 6: ...on and other European countries with separate collection systems This marking shown on the product or its literature indicates that it should not be disposed with other household wastes at the end of its working life To prevent possible harm to the environment or human health from uncontrolled waste disposal please separate this from other types of wastes and recycle it responsibly to promote the ...

Page 7: ...otice shall be effective to the fullest extent permissible at law For the avoidance of doubt nothing in this notice shall be taken to exclude or limit TOSHIBA TEC CORPORATION s liability for death or personal injury caused by TOSHIBA TEC CORPORATION s negligence or TOSHIBA TEC CORPORATION s fraudulent misrepresentation 2 All warranties conditions and other terms implied by law are to the fullest e...

Page 8: ...IND EITHER EXPRESS OR IMPLIED INCLUDING BUT NOT LIMITED TO THE IMPLIED WARRANTIES OF MERCHANTABILITY FITNESS FOR A PARTICULAR PURPOSE TITLE AND NON INFRINGEMENT TTEC AND ITS SUPPLIERS DISCLAIM ANY WARRANTY RELATING TO THE QUALITY AND PERFORMANCE OF THE SOFTWARE IF THE SOFTWARE PROVES DEFECTIVE YOU AND NOT TTEC OR ITS SUPPLIERS SHALL BE RESPONSIBLE FOR THE ENTIRE COST OF ALL NECESSARY SERVICING REP...

Page 9: ...WEEN YOU AND TTEC AND ITS SUPPLIERS AND SUPERSEDES ANY PROPOSAL OR PRIOR AGREEMENT ORAL OR WRITTEN OR ANY OTHER COMMUNICATION RELATING TO THE SUBJECT MATTER OF THIS LICENSE AGREEMENT TOSHIBA TEC Corporation 6 78 Minami cho Mishima shi Shizuoka ken 411 8520 Japan ...

Page 10: ...ed material postcard and heavy paper The paper input tray supports 250 sheets of A4 letter sized paper Create professional documents Print Watermarks You can customize your documents with words such as Confidential See the Software Section Print Posters The text and pictures of each page of your document are magnified and printed across the sheet of paper and taped together to form a poster See th...

Page 11: ...components of your machine Front view 1 document cover 6 manual feeder guides 2 document glass 7 paper input tray 3 control panel 8 manual feeder 4 front cover 9 output tray 5 toner cartridge 10 scan unit Rear view 1 rear cover 3 power receptacle 2 USB port 4 power switch ...

Page 12: ...lable menus 4 Scroll through the options available in the selected menu 5 OK Confirms the selection on the display 6 Back Sends you back to the upper menu level 7 Copies Allows you to enter the number of copies 8 Stop Clear Stops an operation at any time In Standby mode clears cancels the copy options such as the resolution the document type setting the copy size and the number of copies 9 Start S...

Page 13: ...ides information on setting up your machine and therefore be sure to follow the instructions in the guide to get the machine ready Online User s Guide Provides you with step by step instructions for using your machine s full features and contains information for maintaining your machine troubleshooting and installing accessories This user s guide also contains the Software Section providing you wi...

Page 14: ...tion Right 100 mm enough space for ventilation Left 100 mm enough space for ventilation Installing the toner cartridge 1 Open the front cover 2 Remove the toner cartridge from its bag Do not use a knife or other sharp object as it might scratch the drum of the toner cartridge 3 Roll the toner cartridge 5 or 6 times to distribute the toner evenly inside the toner cartridge Thoroughly rolling the to...

Page 15: ...til it locks into place completely 7 Close the front cover Make sure that the front cover is securely closed NOTE When printing text at 5 coverage you can expect a toner cartridge life of approximately 3 000 pages 1 000 pages for the toner cartridge that is shipped with the machine 1 Groove 2 Tab Loading paper The paper input tray can hold a maximum of 250 sheets of 20 lb 75 g m2 plain paper 1 Pul...

Page 16: ... the settings on the control panel Changing the size of the paper in the paper input tray To load longer sizes of paper such as Legal sized paper you need to adjust the paper guides to extend the paper input tray 1 After pressing and unlatching the guide lock slide the paper length guide out completely to extend the paper input tray to its full length 2 After inserting paper into the paper input t...

Page 17: ...e provides two USB modes Fast and Slow Fast is the default mode Some PC users may experience poor USB function in the default mode If this occurs select Slow mode to achieve successful results For details about changing the USB mode see page 9 7 Turning the machine on 1 Plug one end of the supplied power cord into the power receptacle on the machine and the other end into a properly grounded AC ou...

Page 18: ... save modes Toner save mode Toner save mode allows your machine to use less toner on each page Activating this mode extends the life of the toner cartridge beyond what one would experience in the normal mode but it reduces print quality 1 Press Menu until Toner Save appears on the top line of the display 2 Press the scroll button or until On appears and press OK NOTE When PC printing you can also ...

Page 19: ...ures Scanner driver TWAIN and Windows Image Acquisition WIA driver are available for scanning documents on your machine Status Monitor This program allows you to monitor the machine s status and alerts you when an error occurs during printing Printer driver features Your printer drivers support the following standard features Paper source selection Paper size orientation and media type Number of c...

Page 20: ...CPU Windows 98 Me NT 4 0 2000 Pentium II 400 MHz or higher Pentium III 933 MHz Windows XP 2003 Vista Pentium III 933 MHz or higher Pentium IV 1 GHz RAM Windows 98 Me NT 4 0 2000 64 MB or more 128 MB Windows XP 2003 128 MB or more 256 MB Windows Vista 512 MB or more 1 GB Free disk space Windows 98 Me NT 4 0 2000 300 MB or more 1 GB Windows XP 2003 1 GB or more 5 GB Windows Vista 15 GB 15 GB or more...

Page 21: ...d open the document cover 2 Place the document face down on the document glass and align it with the registration guide at the top left corner of the glass 3 Close the document cover Be careful not to move the document NOTES Leaving the document cover open while copying may affect copy quality and toner consumption Dust on the document glass may cause black spots on the printout Always keep it cle...

Page 22: ...tisfactory results This may be the result of improper handling unacceptable temperature and humidity levels or other variables over which TOSHIBA TEC has no control Before purchasing large quantities of paper ensure that the paper meets the requirements specified in this user s guide CAUTION Using paper that does not meet these specifications may cause problems requiring repairs Such repairs are n...

Page 23: ...loading paper envelopes or other print materials keep these guidelines in mind Always use paper and other materials that conform with the specifications listed on page 3 2 Attempting to print on damp curled wrinkled or torn paper can cause paper jams and poor print quality For the best print quality use only high quality copier grade paper specifically recommended for use in laser printers Avoid u...

Page 24: ...ncies used in the machine must be able to withstand 208 C 406 4 F the machine s fusing temperature Place them on a flat surface after removing them from the machine Do not leave them in the paper tray for long periods of time Dust and dirt may accumulate on them resulting in spotty printing To avoid smudging caused by fingerprints handle them carefully To avoid fading do not expose printed transpa...

Page 25: ...dversely affect printer rollers Forms and letterhead should be sealed in a moisture proof wrapping to prevent changes during storage Before you load preprinted paper such as forms and letterhead verify that the ink on the paper is dry During the fusing process wet ink can come off preprinted paper reducing print quality Paper Type Guidelines In the manual feeder Use the manual feeder to print tran...

Page 26: ... to select the paper size and type in the application program you use on your PC 1 Press Menu until Paper Setting appears on the top line of the display 2 Press OK when Paper Size appears 3 Press the scroll button or to select the paper tray you want to use and press OK 4 Press the scroll button or to find the paper size you are using and press OK 5 Press Back to return to the upper level 6 Press ...

Page 27: ...e careful not to touch the surface and especially keep children away from the surface The output tray can hold up to 50 sheets of paper Remove the pages so that tray is not overloaded Printing to the rear cover Face up Using the rear cover paper comes out of the machine face up Printing from the manual feeder to the rear cover provides a straight paper path Using the rear cover might improve the o...

Page 28: ... documents from the document glass To select from the predefined copy sizes 1 Press Menu then Reduce Enlarge appears 2 Press the scroll button or to select the size setting you want and press OK To fine tune the size of copies 1 Press Menu then Reduce Enlarge appears 2 Press the scroll button or until Custom 50 200 appears and press OK 3 Press the scroll button or to enter the copy size you want P...

Page 29: ...opying This feature automatically reduces or enlarges the original image to fit on the paper currently loaded in the machine NOTE When the size of the document you want to copy is not same as the size of the paper loaded this function automatically adjusts the size of the document to fit the paper You can not adjust the copy size manually 1 Load the document to be copied on the document glass and ...

Page 30: ...3 You can paste the printed pages together to make one poster sized document 1 Place the document to be copied on the document glass and close the cover 2 Press Menu until Special Copy appears on the top line of the display 3 Press the scroll button or until Poster appears and press OK 4 Customize the copy settings including copy size darkness and original type by using the control panel buttons S...

Page 31: ...roup in Windows delete the job as follows 1 Click the Windows Start button 2 For Windows 98 2000 Me select Settings and then Printers For Windows XP 2003 select Printers and Faxes For Windows Vista select Control Panel Hardware and Sound Printers 3 Double click the TOSHIBA e STUDIO180S icon 4 From the Document menu select Cancel Printing Windows 98 Me or Cancel Windows 2000 XP Vista NOTE You can a...

Page 32: ...e WIA driver Scanning basics Your machine offers the following ways to scan an image From TWAIN compliant software You can use other software including Adobe PhotoDeluxe and Adobe Photoshop From the Windows Images Acquisition WIA driver Your machine supports the WIA driver for scanning images NOTE To scan with your machine you must install the software For details about installing the software see...

Page 33: ...t you can order the following type of toner cartridges for your machine How to purchase To order TOSHIBA authorized toner cartridges contact your local TOSHIBA TEC dealer or the retailer where you purchased your machine Type Yielda a ISO 19752 5 coverage NOTE To assure optimal printing performance we recommend that you use TOSHIBA toner cartridges Part number Standard 3 000 pages T 1820 ...

Page 34: ...s cleared 5 Repeat steps 3 through 4 to clear another setting 6 Press Stop Clear to return to Standby mode Cleaning your machine To maintain print and scan quality follow the cleaning procedures below each time the toner cartridge is replaced or if print and scan quality problems occur CAUTION Cleaning the cabinet of the machine with cleaning materials containing large amounts of alcohol solvent o...

Page 35: ...PC drum of the toner cartridge may require cleaning 1 Before starting the cleaning procedure make sure that paper is loaded in the machine 2 Press Menu until Maintenance appears on the top line of the display 3 Press OK when Clean Drum appears The machine prints out a cleaning page Toner particles on the drum surface are affixed to the paper 4 If the problem remains repeat steps 1 through 3 Cleani...

Page 36: ...y need to change the toner cartridge more often NOTE The 1 000 pages and 3 000 pages toner cartridge have different shapes Redistributing the toner cartridge When the toner cartridge is near the end of its life White streaks or light printing occurs The warning message Toner Low displays on the control panel The Status LED blinks red If this happens you can temporarily reestablish print quality by...

Page 37: ... the toner cartridge 5 or 6 items to distribute the toner evenly inside the toner cartridge Thoroughly rolling the toner cartridge will assure maximum copies per toner cartridge 4 Remove the paper protecting the toner cartridge NOTE If toner gets on your clothing wipe it off with a dry cloth and wash clothing in cold water Hot water sets toner into fabric CAUTION Do not touch the green underside o...

Page 38: ...d after you have printed the specified number of pages or when the life span of each item has expired To purchase consumable and replacement parts contact your TOSHIBA TEC dealer or the retailer where you bought your machine We strongly recommend that these items be installed by a trained service professional except for the toner cartridge see page 8 4 Items Yield Average Transfer roller Approx 50...

Page 39: ...r does not exit continue to step 2 2 Pull the paper input tray out Message Location of Jam Go to Paper Jam 0 Open Close Door In the paper input tray below and page 9 1 Paper Jam 1 Open Close Door In the fuser area or around the toner cartridge In the manual feeder page 9 2 Paper Jam 2 Check Inside In the paper exit area page 9 2 3 Remove the jammed paper by gently pulling it straight out If there ...

Page 40: ...not exit continue to step 2 2 Gently pull the paper out of the output tray Skip to step 9 If you cannot see the jammed paper in the output tray continue to the next step 3 Lift the scan unit 4 Pull the jammed paper out gently 5 Close the scan unit by pushing a tab to the left and hold it down and lowering the cover carefully until the cover is holding down the tab If there is any resistance and th...

Page 41: ...tatus Description Off The machine is off line The machine is in Power Save mode When data is received or any button is pressed it switches to on line automatically Green On The machine is on line and can be used Blinking When the backlight slowly blinks the machine is receiving data from the computer When the backlight normally blinks the machine is scanning the loaded document When the backlight ...

Page 42: ...r in the paper input tray has run out Load paper in the paper input tray See page 2 3 Open Heat Error There is a problem in the fuser unit Unplug the power cord and plug it back in If the problem persists please call for service Over Heat There is a problem in the fuser unit Unplug the power cord and plug it back in If the problem persists please call for service Solving other problems The followi...

Page 43: ...esigned for laser printers Remove each transparency as it exits from the machine Envelopes skew or fail to feed correctly Ensure that the paper guides are against both sides of the envelopes Printing problems Condition Possible cause Suggested solutions The machine does not print The machine is not receiving power Check the power cord connections Check the power switch and the power source The mac...

Page 44: ...print job that you have already printed successfully If possible attach the cable and the machine to another computer and try a print job that you know works Finally try a new printer cable The wrong printer driver was selected Check the application s printer selection menu to ensure that your machine is selected The software application is malfunctioning Try printing a job from another applicatio...

Page 45: ...erent kind or brand of paper If these steps do not correct the problem contact a service representative AaBbCc AaBbCc AaBbCc AaBbCc AaBbCc AaBbCc AaBbCc AaBbCc AaBbCc AaBbCc AaBbCc AaBbCc AaBbCc AaBbCc AaBbCc Vertical lines If black vertical streaks appear on the page The drum inside the toner cartridge has probably been scratched Remove the toner cartridge and install a new one See page 8 4 If wh...

Page 46: ...e paper curl See page 3 2 Turn over the stack of paper in the tray Also try rotating the paper 180 in the tray Try printing to the rear cover Condition Suggested solutions A AaBbCc AaBbCc AaBbCc AaBbCc AaBbCc Wrinkles or creases Ensure that the paper is loaded properly Check the paper type and quality See page 3 2 Turn over the stack of paper in the tray Also try rotating the paper 180 in the tray...

Page 47: ...uides if necessary Ensure that the paper is the proper paper weight 75 g m2 20 lb bond paper is recommended Check for copy paper or pieces of copy paper remaining in the machine after a paper jam has been cleared Scanning problems Toner cartridge produces fewer copies than expected before running out of toner Your originals may contain pictures solids or heavy lines For example your originals may ...

Page 48: ... properly connected and the power is on Then restart your computer The USB cable may be improperly connected or the power may be off Condition Suggested solutions Condition Suggested solutions File in Use message appears during installation Exit all software applications Remove all software from the StartUp Group then restart Windows Reinstall the printer driver Error Writing to LPTx message appea...

Page 49: ...oner cartridge lifeb 3 000 pages at ISO 19752 5 coverage Ships with 1 000 pages toner cartridge Memory 8 MB Non extendable External dimension W x D x H 409 x 362 x 232 mm 16 1 x 14 3 x 9 1 inches Weight 9 3 Kg including consumables Package weight Paper 2 16 Kg Plastic 0 4 Kg Scanner and copier specifications Duty cycle Monthly print Up to 10 000 pages a Sound Pressure Level ISO7779 b The number of...

Page 50: ...d will be affected by operating system used computing performance applica tion software connecting method media type media size and job complexity Up to 18 ppm in A4 19 ppm in Letter First print out time 11 seconds From Ready Print resolution Up to 600 x 600 dpi OS Compatibility Windows 98 Me 2000 XP Vista Interface USB 2 0 ...

Page 51: ... L loading documents document glass 3 1 loading paper in the manual feeder 3 5 in the paper input tray 2 3 M manual feeder 3 5 memory clear 8 1 O order information toner cartridges 7 1 output location select 3 6 output tray 3 6 P paper guidelines 3 3 paper jam clear 9 1 paper load in paper input tray 2 3 in the manual feeder 3 5 paper size setting 3 6 specifications 3 2 paper type setting 3 6 spec...

Page 52: ...2 scanner and copier 10 1 Status LED 9 3 system requirements Windows 2 8 T toner cartridge installing 2 2 maintaining 8 3 order information 7 1 redistributing 8 3 replacing 8 4 toner save mode use 2 6 U USB connecting 3 6 ...

Page 53: ...Software section ...

Page 54: ...Tab 7 Paper Tab 8 Graphic Tab 9 Extras Tab 10 About Tab 10 Printer Tab 10 Using a Favorite Setting 11 Using Help 11 Chapter 3 ADVANCED PRINTING Printing Multiple Pages on One Sheet of Paper N Up Printing 12 Printing Posters 13 Printing a Reduced or Enlarged Document 13 Fitting Your Document to a Selected Paper Size 13 Using Watermarks 14 Using an Existing Watermark 14 Creating a Watermark 14 Editi...

Page 55: ...SHARING THE PRINTER LOCALLY Setting Up a Host Computer 16 Setting Up a Client Computer 16 Chapter 5 USING STATUS MONITOR Opening the Troubleshooting Guide 17 Changing the Status Monitor Program Settings 17 Chapter 6 SCANNING Scanning Process with TWAIN enabled Software 18 Scanning Using the WIA Driver 19 Windows XP 19 Windows Vista 19 ...

Page 56: ...ears during the installation procedure click in the upper right corner of the box to close the window or click Cancel This is recommended for most users All components necessary for printer operations will be installed 1 Make sure that the printer is connected to your computer and powered on 2 Insert the supplied CD ROM into your CD ROM drive If you use Windows Vista when you are asked to allow th...

Page 57: ... installation will start and a test page will not be printed at the end of the installation The installation window that appears in this User s Guide may differ depending on the printer and interface in use 5 After the installation is finished a window asking you to print a test page appears If you choose to print a test page select the checkbox and click Next Otherwise just click Next and skip to...

Page 58: ...pending on the printer and interface in use 4 Select the components you want to reinstall and click Next If you select your printer driver name and reinstall the printer software for local printing the window asking you to print a test page appears Do as follows a To print a test page select the check box and click Next b If the test page prints out correctly click Yes If it doesn t click No to re...

Page 59: ...nting from various Windows applications The exact steps for printing a document may vary depending on the application program you are using Refer to the User s Guide of your software application for the exact printing procedure 1 Open the document you want to print 2 Select Print from the File menu The Print window is displayed It may look slightly different depending on your application The basic...

Page 60: ...r changes permanent make them in the Printers folder The following procedure is for Windows XP For other Windows OS refer to the corresponding Windows User s Guide or online help 1 Click the Windows Start button 2 Select Printers and Faxes 3 Select your printer driver icon 4 Right click on the printer driver icon and select Printing Preferences 5 Change the settings on each tab click OK Layout Tab...

Page 61: ...al Feed when printing on special materials like envelopes and transparencies You have to load one sheet at a time into the Manual Tray or Multi Purpose Tray If the paper source is set to Auto Select the printer automatically picks up print material in the following tray order Manual Tray or Multi Purpose Tray Tray1 Optional Tray2 Type Make sure that Type is set to Printer Default If you load a dif...

Page 62: ...bolder line widths or darker gray scale images Dark This setting is for finer line width higher definition in graphics and lighter gray scale images Advanced Options You can set advanced settings by clicking the Advanced Options button TrueType Options This option determines what the driver tells the printer about how to image the text in your document Select the appropriate setting according to t...

Page 63: ...age Print Odd Pages Your printer prints only the odd numbered pages of the document Print Even Pages Your printer prints only the even numbered pages of the document 1 2 3 1 2 3 About Tab Use the About tab to display the copyright notice and the version number of the driver See Printing a Document on page 6 for more information about accessing printer properties Printer Tab If you access printer p...

Page 64: ...tem from the Favorites drop down list The printer is now set to print according to the Favorites setting you selected To delete a Favorites item select it from the list and click Delete You can also restore the printer driver s default settings by selecting Printer Default from the list Using Help Your printer has a help screen that can be activated by clicking the Help button in the printer prope...

Page 65: ... on One Sheet of Paper N Up Printing You can select the number of pages to print on a single sheet of paper To print more than one page per sheet the pages will be reduced in size and arranged in the order you specify You can print up to 16 pages on one sheet 1 To change the print settings from your software application access printer properties See Printing a Document on page 6 2 From the Layout ...

Page 66: ...ed or Enlarged Document You can change the size of a page s content to appear larger or smaller on the printed page 1 To change the print settings from your software application access printer properties See Printing a Document on page 6 2 From the Paper tab select Reduce Enlarge in the Printing Type drop down list 3 Enter the scaling rate in the Percentage input box You can also click the or butt...

Page 67: ... message displays in the preview window When the First Page Only box is checked the watermark prints on the first page only 4 Select watermark options You can select the font name style size or grayscale level from the Font Attributes section and set the angle of the watermark from the Message Angle section 5 Click Add to add a new watermark to the list 6 When you have finished editing click OK an...

Page 68: ...ST Dear ABC Regards WORLD BEST Using a Page Overlay After an overlay has been created it is ready to be printed with your document To print an overlay with a document 1 Create or open the document you want to print 2 To change the print settings from your software application access printer properties See Printing a Document on page 6 3 Click the Extras tab 4 Select the desired overlay from the Ov...

Page 69: ...ied CD ROM Setting Up a Host Computer 1 Start Windows 2 From the Start menu select Printers and Faxes 3 Double click your printer driver icon 4 From the Printer menu select Sharing 5 Check the Share this printer box 6 Fill in the Shared Name field and then click OK Setting Up a Client Computer 1 Right click the Windows Start button and select Explorer 2 Open your network folder in the left column ...

Page 70: ...plied CD ROM Opening the Troubleshooting Guide Using the troubleshooting guide you can view solutions for error status problems Right click the Status Monitor icon on the Windows task bar and select Troubleshooting Guide Changing the Status Monitor Program Settings Right click the Status Monitor icon on the Windows task bar and select Options The following window opens Display when error occurs du...

Page 71: ...ge being scanned and bit depth settings Thus depending on your system and what you are scanning you may not be able to scan at certain resolutions especially using enhanced dpi Scanning Process with TWAIN enabled Software If you want to scan documents using other software you will need to use TWAIN compliant software such as Adobe PhotoDeluxe or Adobe Photoshop The first time you scan with your ma...

Page 72: ...mera Wizard launches 4 Choose your scanning preferences and click Preview to see how your preferences affect the picture 5 Click Next 6 Enter a picture name and select a file format and destination to save the picture 7 Follow the on screen instructions to edit the picture after it is copied to your computer Windows Vista 1 Place a document face down on the document glass 2 Click Start Control Pan...

Page 73: ...ndows 8 paper type set Windows 8 poster print 13 print document 6 fit to page 13 from Windows 6 N up Windows 12 overlay 15 poster 14 scaling 13 watermark 14 printer properties set Windows 7 printer resolution set Windows 9 printer software install Windows 3 uninstall Windows 5 S scanning TWAIN 18 WIA driver 19 setting darkness 9 favorites 11 image mode 9 resolution Windows 9 toner save 9 true type...

Page 74: ...DP 1820 OME07003600 ...

Page 75: ......

Reviews: