background image

Installation Guidelines

Toshiba DP5000-Series Digital Telephones

14 of 20

Wall Mounting

All of the DP5000-series telephones, except the DP5008, wall mount in the same manner. Attach two 
screws to the wall, slide the telephone down over the screw heads to secure.

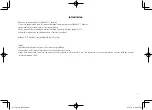
Wall mounting requires two pan head screws spaced vertically 3.25 inches apart and a short line cord.

DP5008 Wall Mount Procedure

1.

Remove the four screws holding the telephone base.

2.

Remove the base, rotate 180 degrees then, replace the base.

3.

Secure the base with the four screws removed in step 1.

4.

Install a short line cord, hang the telephone on two pan head screws in the wall.

Wall Mount

Holes

3.25 in.

(82.5 mm)

Summary of Contents for DP5008

Page 1: ... in leading edge digital telephones Toshiba continues to be proud of its backward compatibility allowing customers a new look on their desktop while maintaining much of their initial telephone system investment The most noticeable enhancements are the backlit displays updated button placement and a high end model with LCD key strips The telephone models are referenced by the total number of keys t...

Page 2: ...e DP5130 SDL telephones have 18 LCD keys 10 are programmable a backlit display and it is easy to make dynamic changes quickly The LM5110 add on module ADM with 10 programmable LCD keys is a natural choice for additional programmable keys on any of the DP series telephones except the DP5008 The KM and DDM modules with 20 and 60 programmable keys respectively are excellent choices for adding additio...

Page 3: ...eady to upgrade their systems they can utilize all the enhanced capabilities of these telephones Even without an upgrade existing customers can connect the new DP5000 series telephones to their system and begin enjoying the new telephones right away New system sales will benefit from the updated look and feel of the DP5000 telephones With a new telephone the Strata CIX product family not only grow...

Page 4: ...els are programmable via eManager 510A05 MyPhoneManager R510A02 both local and remote or user programming mode User programmable line and trunk labels Feature labels user selectable Ease of deployment and dynamic changes Backlight LCD Available on DP5122 SD DP5132 SD DP5130 SDL and LM5110 Place the telephones anywhere regular office reception area high end home studio hotel lounge low light enviro...

Page 5: ...Carbon handset support Notes 1 Setting of headset is by software setting in terminal 2 Carbon type handset Setting is by software setting in terminal This is an improvement of the DKT3000 that required cutting a jumper inside the telephone to use a carbon type handset The table below shows the telephone models that support add on modules and external speaker Models Key expansion External Speaker D...

Page 6: ...tions DP5000 series Telephones and ADMs Physical Augmentations Device Width Depth Without Tilt DP5008 5 9 in 150 mm 6 10 in 155 mm DP5018 S DP5022 SDM DP5022 SD DP5122 SD DP5032 SD DP5132 SD DP5130 SDL 10 16 in 258 mm DDM5060 10 16 in 258 mm KM5020 LM5110 3 54 in 90 mm Width Depth 1 in 25 mm ...

Page 7: ...or table there are a total of six different angles of tilt available When wall mounted there are two angles available The DP5008 base is fixed at 15 degrees Refer to the figures below and the installation section for more detail Figure 1 DP5000 Series Desk top Tilt Angle With Tilt Stand Extension DP5000 Series Tilt Angels Model Tilt Without Stand Tilt with Stand DP5018 S DP5022 SDM DP5022 SD DP512...

Page 8: ...oshiba product line All three generations of telephones DKT2000 DKT3200 and DP5000 can co exist with full functionality in one Strata CIX system with Release 5 1 software or above The DP5000 telephones have three operational modes When connected to Release 5 1 CIX systems they will automatically run in DP5000 Mode When connected to CIX systems with older than Release 5 1 including Release 3 the DP...

Page 9: ...r Description Telephones DP5008 8 Keys including 1 programmable key no display DP5018 S 18 Keys including 10 programmable keys no display DP5022 SDM 22 Keys including 10 programmable keys with display no backlight for CIX40 only Refer to License Requirements below DP5022 SD 22 Keys including 10 programmable keys with display no backlight DP5122 SD 22 Keys including 10 programmable keys with displa...

Page 10: ...phones equipped with one or more ADMs require two pairs of wire from the system to the station to operate at maximum cable length All digital telephones connected to systems with reserve battery power regardless of cable length should use two pair cable The telephone wiring must be terminated at a modular station connect block RJ11 The standard line cord sent with each station is seven feet long T...

Page 11: ...ion Wiring Loop Length Model Maximum line length 24 AWG 1 Pair 1 1 BWDKU and BDKS do not support two pair wiring one pair wiring must be used 2 Pair DP5008 DP5018 S DP5022 SDM DP5022 SD DP5122 SD DP5032 SD DP5132 SD DP5130 SDL 1000 ft 303m 1000 ft 303m DP5018 S DP5022 SDM DP5022 SD DP5122 SD DP5032 SD DP5132 SD DP5130 SDL with DOCA1A for OCA 1000 ft 303m 1000 ft 303m DP5018 S DP5022 SDM DP5022 SD ...

Page 12: ... Only DP5000 Series Telephone and ADM Power Factors The table below shows the 24 VDC power factor for the devices listed Model Maximum line length 24 AWG 1 Pair DP5008 DP5018 S DP5022 SDM DP5022 SD DP5122 SD DP5032 SD DP5132 SD DP5130 SDL 1000 ft 303m DP5018 S DP5022 SDM DP5022 SD DP5122 SD DP5032 SD DP5132 SD DP5130 SDL with 1ADM LM5110 KM5020 675 ft 204m 1000 ft 303m if 22 AWG or larger wiring D...

Page 13: ...ectors ADM Handset Headset Ext Speaker Line Cord Line Cord ADM Cord Handset Cord Headset Cord External Speaker BESCB To CIX system The DP5000 series telephones include the special long tail handset cords required to fit the new tilt bases Cable clips When the tilt stand extension is used simply remove the line cord from under the rear cable clip This will allow the tilt stand extension to deploy w...

Page 14: ...e screw heads to secure Wall mounting requires two pan head screws spaced vertically 3 25 inches apart and a short line cord DP5008 Wall Mount Procedure 1 Remove the four screws holding the telephone base 2 Remove the base rotate 180 degrees then replace the base 3 Secure the base with the four screws removed in step 1 4 Install a short line cord hang the telephone on two pan head screws in the wa...

Page 15: ...base to the telephone base Refer to Figure 3 3 Use the ADM cable included to connect from the telephone ADM connector to the ADM IN connector If a second ADM is attached that cable runs from the first ADM OUT connector to the second ADM IN connector Refer to Figure 3 4 Plug in the DP5000 series telephone line cord If the DDM5060 was attached replace the line cord with the two pair line cord includ...

Page 16: ...1 Log into eManager 2 Select Advanced Configuration Station Assignments 3 From the station list on the right hand side of the screen choose the extension number to change 4 Click on the DKT tab FB 03 Keystrip Button Quantity should be changed to 10 FB 39 LARGE LCD PHONE should be changed to DP5130 5 Click on the Submit button Note To change this DN to another DP5000 series telephone or to a DKT wi...

Page 17: ...ged to LM5110 If more than one LM module is attached change FB41 to LM5110 Up to two LM modules can be connected 6 Click Submit Note To remove an LM module ADM1 or ADM2 1 Change FB 40 ADM1 or FB 41 ADM2 to Not LM5110 2 Click on Submit 3 Change FB 4 to One or None as appropriate 4 Click on Submit Program Keystrip Labels 1 Log into eManager 2 Select Advanced Configuration Station Assignments 3 From ...

Page 18: ...andset is on hook Press the Vol V to increase volume and Vol W to decrease volume This adjusts volume for your telephone s ring tone Hands free Answerback and Speaker Off hook Call Announce simultaneously To adjust handset Beep Tone 1 With the handset off hook dial the Beep Tone Adjustment Code 6101 default code You hear busy tone 2 Press Vol V or W to reach the desired level Volume Control for DP...

Page 19: ...ve FB3 Note The backlight timing and brightness controls have no effect on non display and non backlight models The Bright Dim softkeys will appear on non backlight models but have no effect FB4 FB3 FB2 FB1 Meaning Delay in Seconds On On On On Always On None On On On Off Synchronized 300 On On Off On Synchronized 240 On On Off Off Synchronized 180 On Off On On Synchronized 160 On Off On Off Synchr...

Page 20: ...1 Press Hold 3 6 9 simultaneously 2 Press Contrast key to increase contrast 3 Press Contrast key to decrease contrast 4 Lift the handset off hook on hook to save settings Note Holding the softkey does not continue to change the setting The softkey must be pressed for each step of contrast change Mic Mute Key Mute on the DP5000 series telephones mutes not only the microphone but also the handset mi...

Reviews: