7
11.
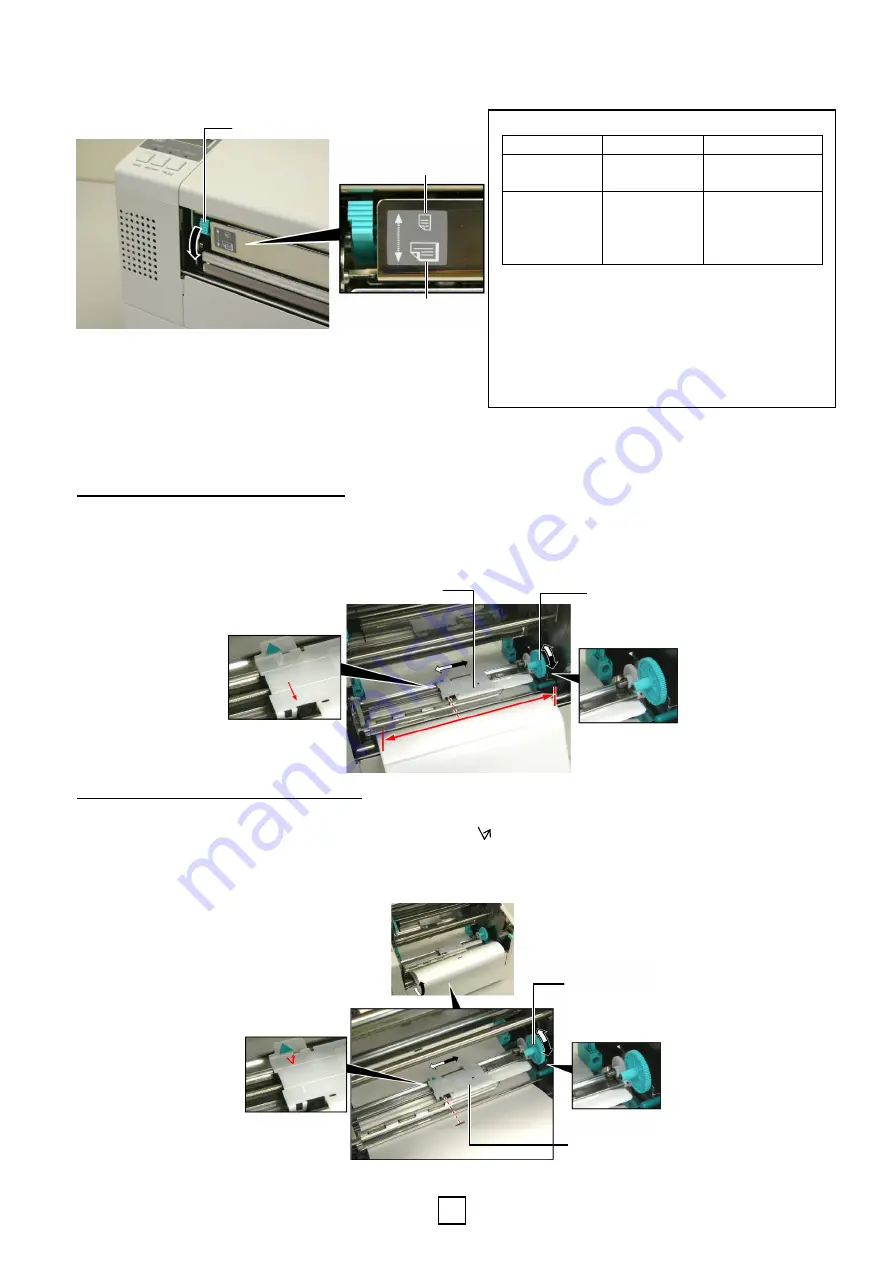
If you are using labels or thick tag paper, then it may be necessary to increase the head pressure by lowering
the Head Pressure Adjust Lever in the figure below.
1.5 Setting Sensor Positions
After loading the media, as outlined in the previous paragraphs, it will usually be necessary to set the Media
Sensors used to detect the print start position for label or tag printing.
Feed Gap Sensor Position Adjustment
1)
With the Print Head Block raised, pass the labels under the Upper Sensor Ass’y as shown in the figure below.
2)
Rotate the Green Sensor Adjust Gear to move the Sensor Ass’y to the left or right to center the arrow (
↑
)
over the label.
3) With the sensor set to the center of the labels, it will be guaranteed to detect the gap between labels even if the
labels are round.
Black Mark Sensor Position Adjustment
1)
If the Black Mark is printed on the top of the tag media then simply rotate the Green Sensor Adjust Gear to
move the Sensor Ass’y so that the Black Mark Indicator ( ) is directly in line with the Black Mark on the top
of the paper.
2) If the Black Mark is printed on the bottom of the tag media then fold the media back to be able to see the
Black Mark and its relationship to the Sensor Ass’y as shown in the figure below.
Head Pressure Adjust Lever
UP
DOWN
NOTE: Head Pressure Adjust Lever Position
Lever position Head pressure Available media
UP
Low
•
Thin tag paper
•
Narrow media
DOWN
High
•
Label
•
Thick tag paper
•
Wide media
•
Full width media
•
When using full width media, be sure to turn the Head
Pressure Adjust Lever to DOWN, regardless of the
thickness.
•
For all kinds of media except the full width media,
turn the Head Pressure Adjust Lever to UP, if the
print quality is to be ensured
.
•
If the print tone is light when using thin tag paper,
turn the Head Pressure Adjust Lever to DOWN.
Upper Sensor Ass’y
Green Sensor
Adjust Gear
Upper Sensor Ass’y
Green Sensor Adjust Gear


