background image

15

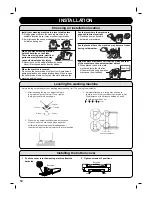
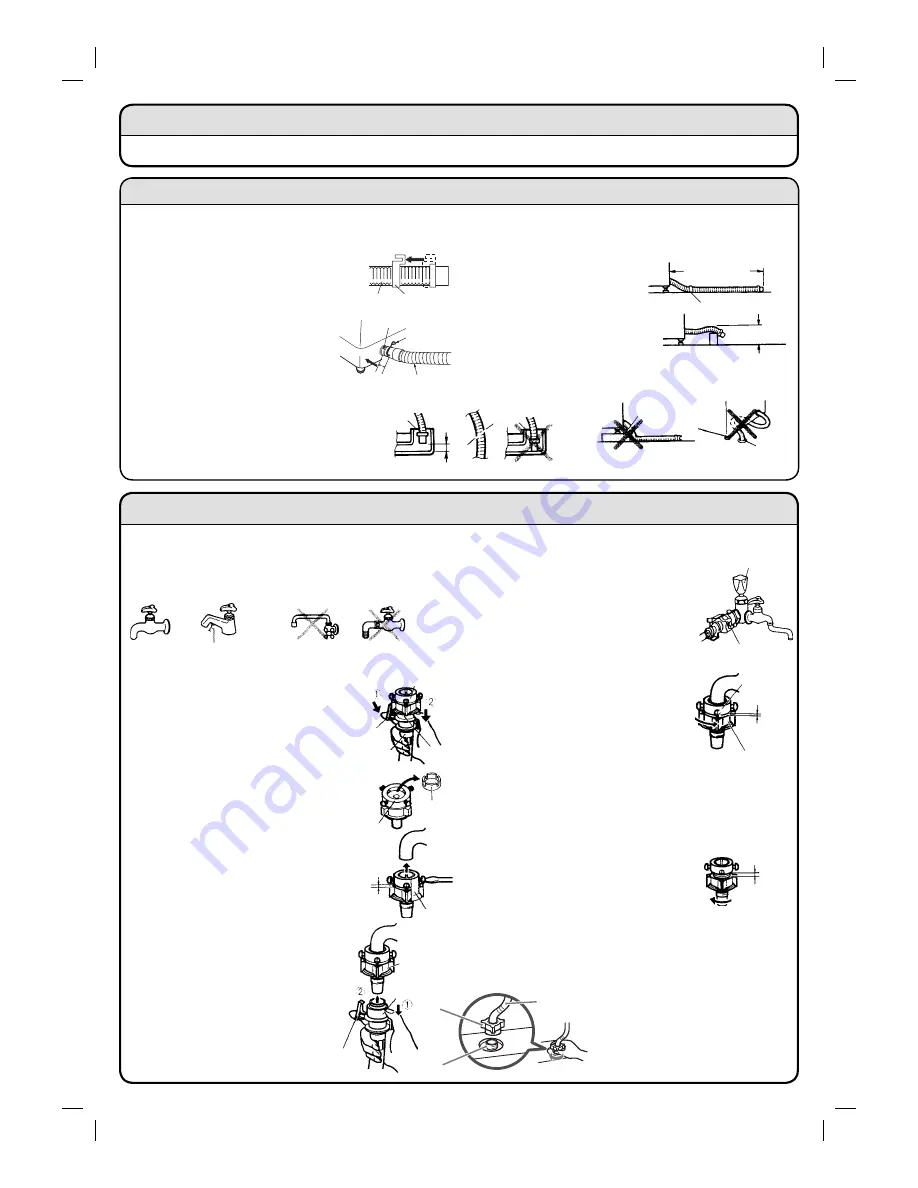
Attaching the water inlet hose to the faucet

If you attach the water inlet hose completely, it may cause a water leakage.

Faucet shape


Wall-mounted faucets are best.

The distance is needed 
1.6 cm or more

Attaching the hose union
1

  Push the lock lever of the water 

supply hose. Pulling the sleeve down, 
lower the entire hose to disconnect the 
hose union.

2

  Check the diameter of the faucet. 

When the faucet mouth is large, 
loose the screws and remove the 
inside ring to facilitate, attachment.

3

  Loose 4 screws of the hose union, 

push the hose union to the water 
faucet.

4

   Tighten the four screws evenly around 

the faucet. In this time check the gap 
is approx. 4 mm between the nozzle 
and the ring.

5

  Remove the seal from the union 

and turn to the arrow destination 
the nozzle to tighten securely.

6

  Check the gap is approx. 1 to 

3 mm between the nozzle and 
the ring.


 If the gap is wide, it may cause the water leak.


 If it cause the water leakage during operation, 

  tighten the nozzle more securely.

 Caution


  If you attach the hose union again because of 

  moving house etc., loose the gap is approx. 4 mm

    between the nozzle and the 

  ring. Then attach it according 
 above methods. 

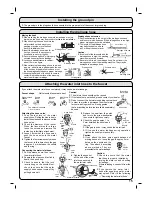
They are 

  preventable the water leakage.

1

  Pull the sleeve down, then insert 

the water inlet hose.

2

  Separate the sleeve until a click is 

heard, then push it up.

3

  Check to ensure that the lock 

lever is hung on the nozzle. Next, 
check to ensure that the water 
supply hose does not come off by 
pulling down on it.

4

  Tighten the hose nut 

on the end of the water 
inlet hose securely to 
the water inlet valve.

Caution:

  Check to ensure that the water 

inlet hose is properly installed by 
turning the water on and checking 
for leakage.

  If there is leakage, connect it from the 

fi rst.

 If you remove the water inlet

hose after supplying water, water 
may splash. Refer to the following 
— “Removing the water inlet hose”.

Wall-mounted 
shaped

Square 
faucet

Movable 
faucet

Multi-home 
faucet

Joint 
seal

Hose Union

Lock 
lever

Water 
inlet
hose

Ring

Inside 
ring

Approx. 
4 mm.

Sleeve

Sleeve

Caution

 The old inlet hose should not be reused.

 If the faucets are not suited, please contact your dealer.

 Do not connect the hot water supplying convenience.

 In order to provide a permanent source of water 

  for your washing machine, it is suggested 
  that a branching water pipe (available separately) 
 be 

used.

Hose union

Branching 
water pipe

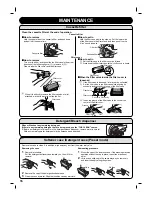
Installing the drainage hose

Moving the hook

  When inserting the drainage hose into a wash pan or onto a 

drain pipe, the hook may be moved to facilitate the installation.

  When hooking the hose hook into the 

slot provided on the body of your 
washing machine, move the hook 
back to its initial position.

  Insert the drainage hose in as far as 

it will go, then use the accessory 
hose band to secure it tightly.

  Secure the hose tightly. An improperly 

secured hose may cause leakage.

  Lock hose band distance to cabinet 

about 10 mm as fi gure.

  When attaching the drainage hose to a wash 

pan, etc., either leave a gap between the end 
of the hose and the adjacent surface, or cut 
the hose diagonally to ensure proper drainage.

 Allowing the fl at end of the hose to come in 

contact with the fl at surface of the washing 
machine will impair drainage.

Caution:

  If the level of the threshold and the 

drainage hose is high, the washing 
machine may not be drained.

  Be careful not to rub the drainage hose. Do not insert the 

drainage hose under the washing machine. They may be 
damaged the drainage hose.

Drainage hose extension

  Pay close attention to the height of the drainage hose and 

articles over which it passes. If the drainage hose is too high, 
proper drainage may not be obtained.

  The length of the drainage hose 

may be extended to as much 
as 3 m if kept the same level.

10 mm

Hook

Hose-band

Drain outlet

Drainage hose

Concrete block

Drainage hose

Gap

3 cm or 
greater

Cut diagonally

Drainage hole

Drainage hose

15 cm or less

Drainage hose cap

3 m or less

Approx. 
1 to 3 mm

Nozzle

Ring

Approx. 
4 mm

Nozzle

Lock 
lever

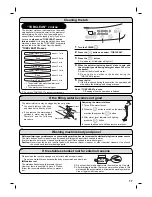
Installing the ground pin

 The ground pin in the plug should be connected to the proper point of the socket for grounding.


Inlet hose

Hose nut

Water inlet valve

Connecting the water inlet hose

Summary of Contents for AW-B1000GM

Page 1: ... CYCLE 10 CUSTOM WASH CYCLES 11 OPTION MODE 12 LAUNDRY GUIDE 13 INSTALLATION 14 15 MAINTENANCE 16 17 BEFORE CALLING THE SERVICEMAN 18 19 HANDLING METHOD FOR EMERGENCY 19 SPECIFICATIONS 19 OWNER S MANUAL AW B1100GM AW B1000GM Thank you for purchasing TOSHIBA Fully Automatic Washing Machine Please read this manual carefully in order to operate the machine properly and safety Please keep this manual ...

Page 2: ...ns that lead to injuries or fire Do not damage the power cord Do not attempt to damage cut or modify the power cord or subject it to excessive bending pulling twisting or binding Also do not yank the metal portion place heavy objects on the power cord or pinch the power cord Doing so may damage the power cord resulting in fire or electrical shock If the power cord is damaged it must be replaced by...

Page 3: ...n Moving parts may cause injury Before use make sure the faucet is open and the connection with water inlet hose is not loose or leakage water Looseness of hose nut hose connections water inlet valve or other areas may cause water leakage or other damage The bottom ventilation of washing machine must not be obstructed by carpet when the washing machine is installed on a carpet floor x x x x x x x ...

Page 4: ...ply using t accompanying the compact det Depending on the kind of d of water consumption by one Adjust the detergent volume particular detergent in use After the start of operation If the lid is closed the estimated residual time to the end of wash ing will be displayed Reservation of the time to complete washing The preset hours are displayed If an error occurs An error code will be displayed Dig...

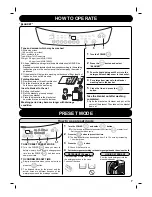
Page 5: ...out 10 minutes later if the operation is not on TUB DRY Button Press this button to evaporate the water from the basket or to dry basket When light up it means this program will automatically operate after finish all processes LID LOCK Indicator While the lid lock operates this indicator will light up START HOLD Button Press this button to start the process Press this button to hold the operation ...

Page 6: ...rom basket in order to prevent mold The program view automatically operate after finish all process Once Automatic TUB DRY is set it is stored in memory no need to reset every time 5 Press button The pulsator automatically detects the laundry amount and indicates the amount of concentrated detergent suitable for the laundry amount 6 Put in the detergent into detergent dispenser according to the de...

Page 7: ...e same way Insert a blanket to the net Roll up the blanket Roll the blanket up loosely except Mayer type blanket Place the blanket into the blanket net hem side first and close the fastener Washing period may become longer with drainage condition 2 1 5 PRESET MODE How to use preset mode TO SET RESET PRESET MODE Turn the POWER when you want to delete memory If you wish to change preset time turn th...

Page 8: ... the water is let into the wash tub The washer will estimate the amount of laundry and display the detergent amount while the lid is open 5 Put the detergent as the display and close the lid If the lid is open during the operation the washer will stop before rinsing and spinning After the operation the buzzer will beep when the washer completes the operation Turn off the faucet and clean the casse...

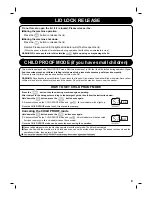
Page 9: ...ode Hold down the button press the button once again A buzzer will sound the CHILD PROOF mode and lid lock indicator will be canceled for rinse to spin cycle lid lock indicator cannot be canceled L Cannot add detergent while the machine operates in child proof mode The lid lock is activated L Open the lid while the machine is in lid lock mode can cause the accident and damage The buzzer will sound...

Page 10: ...If you want to immediately activate Automatic TUB DRY press button after you take out all clothes and close the lid If have any clothes in wash tub spin basket or lid open long time automatic TUB DRY cycle will be cancel Finish Automatic TUB DRY cycle The beep sound will be heard when operation is finished Automatic TUB DRY Automatically drying wash tub spin basket after finish automatic wash cour...

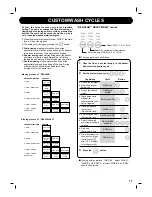
Page 11: ...e Both rinse and spin Spin before rinse Select the desired cycle from washing to spinning Spin only Drain before spin Drain the water from the wash tub Open the lid Press after E2 1 displays turn the power off WASH only WASH and RINSE WASH and SPIN RINSE only RINSE and SPIN WASH RINSE and SPIN SPIN only DRAIN only If using with automatic TUB DRY select WASH RINSE and SPIN or at least RINSE and SPI...

Page 12: ...u want to reset to enable the buzzer After you set the buzzer the washer will keep the setting in memory So it is not necessary to reset the buzzer every time Press If you wish to change the shower rinse to the static rinse For the shower rinse it needs twice for the process But for the static rinse it needs only once Press and hold for 3 seconds 1 Press button to turn on the washer 2 Press the bu...

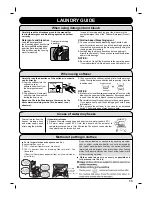
Page 13: ... the dispenser If excessive bleach is used then the whole bleach runs away inevitably Be careful not to spill the softener onto the operating panel If you inadvertently spill the finishing agent with it away immediately Do not leave the softener in the case for an extended period The finishing agent may become hard Water Weighting cap Softener Water Detergent bleaching LAUNDRY GUIDE Cap brim Cap U...

Page 14: ...space of at least 5 cm from the sides and rear of the machine to the nearest vertical object When placed too near to walls or other objects the vibration of the machine during operation may cause them to shake Choosing an installation location Allow 5 cm Leveling the washing machine Installing the bottom cover 1 Push the cover into the washing machine from the backside 2 Tighten screws at 2 positi...

Page 15: ...t hose Ring Inside ring Approx 4 mm Sleeve Sleeve Caution The old inlet hose should not be reused If the faucets are not suited please contact your dealer Do not connect the hot water supplying convenience In order to provide a permanent source of water for your washing machine it is suggested that a branching water pipe available separately be used Hose union Branching water pipe Installing the d...

Page 16: ...ette filter LHow to remove Turn over the filter and then slide the filter case in the arrow direction of the following figure 1 to remove it 2 Clean inside the filter cover and the filter case Wipe or Wash out any remaining detergent If there is any remaining detergent hard to be removed use the TUB CLEAN course Before put detergent or bleach to in the detergent bleach dispenser remove water in it...

Page 17: ...a month Or in case the clothes have been starched please use the TUBCLEAN program to remove the dirt of the starch from the basket TUBCLEAN Process 1 Turn the POWER 2 Press the button and select TUBCLEAN 3 Press the button No indicator All indicator will light off 4 When the pulsator spinning board starts to spin add the chlorine type whitening detergent about 300 ml to the basket Add it at the fi...

Page 18: ...er to p 15 Re attaching the water supply hose Refer to p 15 Reset the end buzzer sound to turn on refer ring to If you wish to turn off the end buzzer sound p 12 CHECK TREATMENT About the drainage hose Is the hose mounted correctly Is the hose routed horizontally Is the hose frozen Is the hose damaged Is the end exposed to water Is the drainage hose clogged Is the lid open Is the lid lock stuck wi...

Page 19: ...rpose of maintaining balance and do not indicate malfunction There are a short pause before the machine begins to spin as the drainage valve opens sufficienty You may hear intermittent motor sound coon sound in spinning process occurs this is a sound which occurs in order to control rotation and not a malfunction This is the prevention measure to prevent the user from sticking his hand into the ba...

Page 20: ...MANUFACTURED BY TOSHIBA CONSUMER PRODUCTS THAILAND CO LTD MADE IN THAILAND ...

Reviews: