


45
LX196 (E/F) Web 213:276
Chapter 5: Using the TV’s features
Using the Locks menu
The Locks menu includes the Enable Rating Blocking, Edit
Rating Limits, Channels Block, Input Lock, Front (control)
Panel Lock, and New PIN Code features. You can use these
features after entering the correct PIN code.
Entering the PIN code
1
Press
Y
and highlight the
Locks
menu icon.
2
Press
b
, which displays the PIN code entry screen.
•
The
Lock System
screen (below) appears if a PIN
code has not been stored. Press the Channel Number
buttons to enter a new four-digit code, enter the code a
second time to confirm, and press
T
.
•
The
Locks/Active
screen (below) appears if the PIN
code is already stored. Use the Number buttons to enter
your four-digit code and press
T
.
If the wrong PIN code is entered, the message “Incorrect PIN
code, please try again!” appears. Highlight
Retry
and press
T
. Enter the code again and press
T
.
When the correct PIN code is entered, the
Locks
menu opens.
If you cannot remember your PIN code
While the PIN code entering screen is displayed, press
E
four
times within five seconds. The PIN code will be cleared and
you can enter a new PIN code.
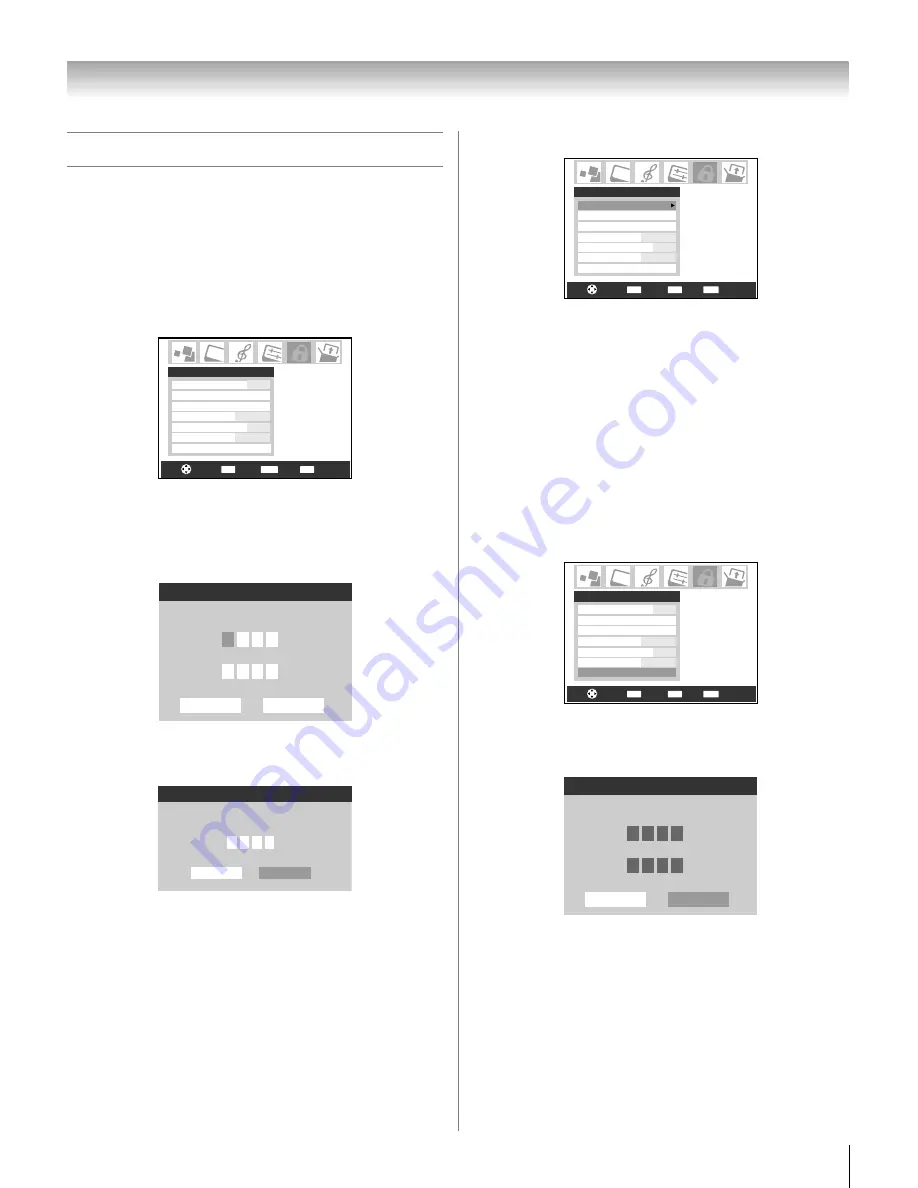
Changing your PIN code
1
Press
Y
and highlight the
Locks
menu icon.
2
Press
b
to display the PIN code entering screen.
3
Enter your four-digit PIN code and press
T
.
4
Press
b
to highlight
New PIN Code
and press
T
.
5
Press the Number buttons to enter a new four-digit code.
Reenter the PIN code to confirm it.
6
Press
T
. The new PIN code is now active.
CH RTN
ENTER
EXIT
Navigate
Select
Back
Exit
Enable Rating Blocking
Edit Rating Limits
Channels Block
Input Lock
Off
Off
Front Panel Lock
New PIN Code
Game Timer
Locks
Off
Off
Please enter a 4 digit PIN code
Confirm PIN code
Cancel
Done
Lock System
Locks
Active
Please enter the 4 digit PIN code
Cancel
* * * *
Done
ENTER
Navigate
Select
Back
MENU
EXIT
Exit
Enable Rating Blocking
Edit Rating Limits
Channels Block
Input Lock
Off
Off
Front Panel Lock
New PIN Code
Game Timer
Locks
Off
Off
ENTER
Navigate
Select
Back
MENU
EXIT
Exit
Enable Rating Blocking
Edit Rating Limits
Channels Block
Input Lock
Off
Off
Front Panel Lock
New PIN Code
Game Timer
Locks
Off
Off
Please enter a 4 digit PIN code
Confirm PIN code
Cancel
Done
New PIN Code
*
*
*
*
*
*
*
*
LX196_EN.book Page 45 Friday, June 23, 2006 5:06 PM


