background image

3

Safety Precautions

This equipment has been designed and manufactured to meet international safety standards but, like any
electrical equipment, care must be taken to obtain the best results and for safety to be assured. Please read
the points below for your own safety. They are of a general nature, intended to help with all electronic
consumer products and some points may not apply to the goods you have just purchased.

DON'T

remove any fixed cover as this may expose

dangerous voltages.

DON'T

obstruct the ventilation openings of the

equipment with items such as newspapers,
tablecloths, curtains, etc. Overheating will cause
damage and shorten the life of the equipment.

DON'T

allow electrical equipment to be exposed to

dripping or splashing or objects filled with liquids,
such as vases, to be placed on the equipment.

DON’T

place hot objects or naked flame sources,

such as lighted candles or nightlights on, or close to
equipment. High temperatures can melt plastic and
lead to fires.

DON'T

use makeshift stands and NEVER fix legs

with wood screws. To ensure complete safety,
always fit the manufacturer’s approved stand or
legs with the fixings provided according to the
instructions.

DON'T

listen to headphones at high volume, as

such use can permanently damage your hearing.

DON'T

leave equipment switched on when it is

unattended, unless it is specifically stated that it is
designed for unattended operation or has a
standby mode. Switch off using the switch on the
equipment and make sure your family know how to
do this. Special arrangements may need to be
made for infirm or handicapped people.

DON'T

continue to operate the equipment if you

are in any doubt about it working normally, or it is
damaged in any way – switch off, withdraw the
mains plug and consult your dealer.

ABOVE ALL

– 

NEVER let anyone, especially

children, push anything into holes, slots or any
other openings in the case – this could result
in a fatal electric shock.

NEVER guess or take chances with electrical
equipment of any kind – it is better to be safe
than sorry.

TO FULLY DISCONNECT THE TV, SWITCH OFF
THE MAINS SOCKET AND REMOVE THE
POWER PLUG.

Leave at least 10cm clearance around the television
to allow adequate ventilation. This will prevent
overheating and possible damage to the TV. Dusty
places should also be avoided.

Damage may occur if the TV is left in direct sunlight
or near a heater. Avoid places subject to extremely
high temperatures or humidity, or locations where the
temperature is likely to fall below 5°C (41°F).

The mains supply required for this equipment is
230v AC 50Hz. Never connect to a DC supply or
any other power source. DO ensure that the TV is
not standing on the mains lead. DO NOT cut off
the mains plug from this equipment, this
incorporates a special Radio Interference Filter, the
removal of which will impair its performance. In the
UK, the fuse fitted in this plug is approved by ASTA
or BSI to 

BS1362

. It should only be replaced by a

correctly rated and approved type and the fuse
cover must be refitted. 
IF IN DOUBT PLEASE CONSULT A COMPETENT
ELECTRICIAN.

DO

read the operating instructions before you

attempt to use the equipment.

DO

ensure that all electrical connections (including

the mains plug, extension leads and inter-

connections between pieces of equipment) are

properly made and in accordance with the

manufacturers’ instructions. Switch off and withdraw

the mains plug before making or changing

connections.

DO

consult your dealer if you are ever in doubt

about the installation, operation or safety of your

equipment.

DO

be careful with glass panels or doors 

on equipment.

Air Circulation

Do not

Heat Damage

Mains Supply

Do

Summary of Contents for 43VJ33 Series

Page 1: ...43 50VJ33 Series Owner s manual true experience 43 50VJ33 FC Eng 17 6 04 9 19 Page 1 ...

Page 2: ...nce 11 Picture controls picture preferences noise reduction picture position aspect ratio 12 FEATURES The timer and time display setting the TV to turn off and time display 13 Panel lock disabling the buttons on the TV 13 Stereo and bilingual transmissions stereo or dual language broadcasts 13 Input selection and AV connections input and output sockets for connected equipment 14 TELETEXT Setting u...

Page 3: ...y switch off withdraw the mains plug and consult your dealer ABOVE ALL NEVER let anyone especially children push anything into holes slots or any other openings in the case this could result in a fatal electric shock NEVER guess or take chances with electrical equipment of any kind it is better to be safe than sorry TO FULLY DISCONNECT THE TV SWITCH OFF THE MAINS SOCKET AND REMOVE THE POWER PLUG L...

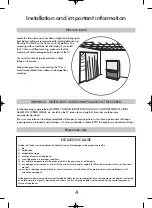
Page 4: ...h have a permanent still image superimposed e g broadcast network logos it is always advisable to reduce BOTH the brightness and contrast settings WARNING NEVER LEAVE A STATIONARY IMAGE ON THE SCREEN Please take note EXCLUSION CLAUSE Toshiba shall under no circumstances be liable for loss and or damage to the product caused by i fire ii earthquake iii accidental damage iv intentional misuse of the...

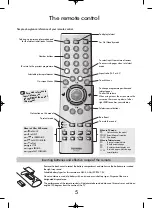
Page 5: ...odel To bring up on screen information and for the teletext initial index function To select input from external sources To access sub pages when in teletext mode To select mode On screen Menus Selectable picture preferences Aspect ratio 16 9 or 4 3 Number buttons To return to the previous programme For On Standby mode To display teletext When in VCR or DVD mode press mto PAUSE press wto EJECT pre...

Page 6: ...monitor external equipment return to normal TV by pressing the desired programme position button To recall external equipment press Bto select between EXT1 EXT2 EXT3 WE RECOMMEND THAT YOU USE SCART LEADS IN ADDITION TO AERIAL CABLES WHEREVER POSSIBLE Aerial cables Connect the aerial to the socket on the rear of the television If you use a decoder and or a video recorder it is essential that the ae...

Page 7: ...e described in detail throughout the manual A wide variety of external equipment can be connected via the sockets located on the side front of the TV Whilst all the necessary adjustments and controls for the TV are made using the remote control the buttons on the TV may be used for some functions Power Button Power Button RED Power On RED Power On To alter the volume press j To alter the programme...

Page 8: ...s You must allow the television to complete the search When the search is complete the TV will automatically return to programme position 1 This may not be a clear picture or the signal may be weak so the station order may be changed by using Programme sorting on page 11 If the television cannot be connected to a video decoder with a Scart lead or if a station on another system is required use Man...

Page 9: ... has been stored or the facility to skip the channel is ON See page 10 Channel The channel number on which a station is being broadcast Manual fine tuning Only used if interference weak signal is experienced See page 18 Station Station identification Use the P or Q and Sor Rbuttons to enter up to seven characters Station Programme System Colour Search Programme skip Channel Manual fine tuning Use ...

Page 10: ...turn Programme skip off repeat the procedure for each position Skipped programme positions cannot be selected by Pf P and P e Q or by the controls on the side front of the TV but can still be accessed by the number buttons on the remote control 3 4 5 Use P or Q to highlight the programme position to be skipped and press OK to select Press Rto select Programme skip Use P or Q to turn Programme skip...

Page 11: ...just the effect The difference will only be noticeable on sound with a strong bass Press nagain to turn Bass Boost off Press MENU and Sor Rto select the Sound option from the top bar Press Q to highlight Bass Treble or Balance and Sor Rto change the setting Sound Bass 8 Treble 0 Balance 0 EXIT To exit Selecting programme positions Sound controls Bass Treble and Balance 1 2 11 Sorting programme pos...

Page 12: ...ces 1 2 Picture Contrast 50 Brightness 50 Colour 50 Tint 0 Sharpness 0 Noise Reduction ON EXIT To exit Picture position Noise Reduction enables you to soften thescreen representation of a weak signal to reduce the noise effect Noise Reduction Select Noise Reduction from the Picture menu Select between ONand OFF to obtain the best picture The differences may not always be noticeable 1 The position ...

Page 13: ...ngual transmissions The time display facility allows the current time to be seen on the TV screen Press 8 9whilst watching a normal TV broadcast to see a time display from the broadcaster It will remain on screen for about 5 seconds Stereo Press OI II to select Stereo or Mono Bilingual Bilingual transmissions are rare If they are transmitted the word Dual will display Choose the required programme...

Page 14: ...rt 2 then select EXT 1 as the EXT2 output The signal received through Scart 1 will output directly through Scart 2 Most VCRs and decoders send a signal through the Scart lead to switch the TV to the correct Input socket Alternatively press the external source selection button Buntil the picture from connected equipment is shown An S e g EXT2S indicates the input is set for an S Video signal Press ...

Page 15: ...using the numbered buttons pressing the coloured buttons or pressing P f P to advance to the next page and P e Q to go back to the previous page Select Teletext from the Set up menu With S or R choose AUTO or LIST then press EXIT The teletext character set will be automatically chosen by the language setting in the Set up menu Selecting Modes Navigating pages using Auto Teletext information 1 2 Th...

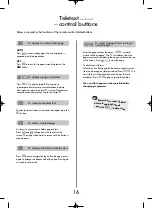
Page 16: ...as and when they are broadcast Press8 9again to cancel the display The news flash page must be cancelled before changing programmes To display an index initial page T At times it is convenient to hold a page of text Press qand qwill appear in the top left of the screen The page will be held on screen until the button is pressed again To hold a wanted page q To discover the solutions on quiz and jo...

Page 17: ...picture but no sound Q A Make sure the VCR or DVD player is connected to the TV as shown on page 6 then select the correct input by pressing B Why doesn t the video DVD being played show on screen Q A When using an external source for instance a poor quality video tape if there is little or no colour improvements may sometimes be achieved The colour is factory set to AUTO to automatically display ...

Page 18: ...r that sound mute has not been selected Why is there a picture but no sound Q A Blue screen in the Feature menu is ON When no signal is being received the TV will turn off the sound and switch the TV screen to blue After 15 minutes the TV will switch to Standby mode Why has the screen turned blue Q Select the Manual tuning menu Highlight the station and press OK then press R to select Manual fine ...

Page 19: ... dry cloth We recommend that you do not use any proprietary polishes or solvents on the screen or cabinet as this may cause damage Disposal When the set reaches the end of its useful life please dispose of it in accordance with Local Government Regulations or at a recycling centre For your own records ...

Page 20: ...1 Questions and Answers 17 Remote Control 5 Scart 6 Sharpness 12 Sound Mute 11 Standby 7 Stereo 13 Switch on TV 7 Teletext 15 Time Display 13 Timer 13 Tint 12 Treble 11 Tuning a programme position for your VCR 9 Tuning Auto 8 Tuning Manual 9 Volume 11 Subject INDEX Page Subject INDEX Page Programme Positions 100 Stereo Nicam 2 carrier system Visible Screen Size approx 43ins 109cm 50ins 126cm Displ...

Reviews: