background image

14

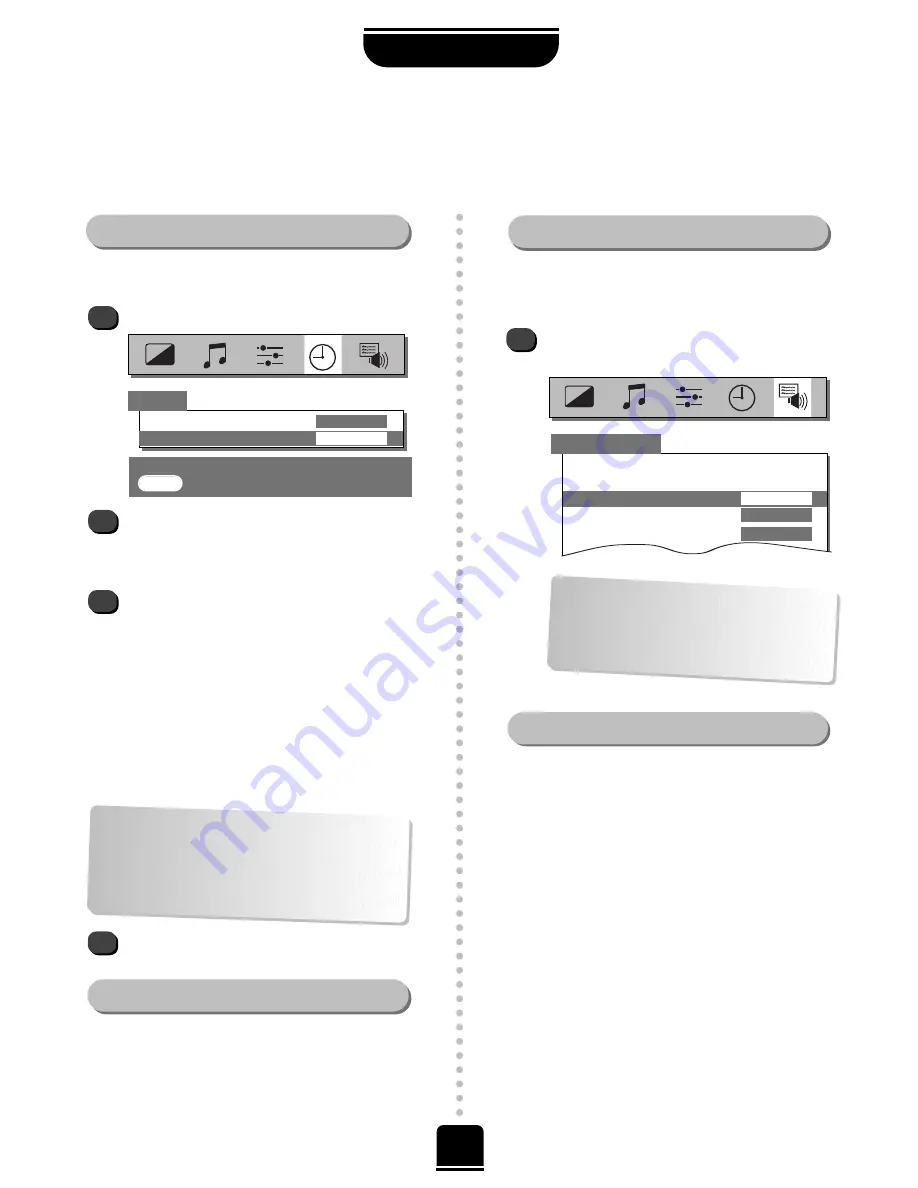
Select the 

Timer

option from the top menu bar.

Select the 

On timer 

(or the 

Off timer

). If, for

example, you want the TV to turn ON (or OFF) in
one and a half hours time, enter 01:30 using the
numbered buttons on the remote control.

If setting the 

Off timer

press 

EXIT

. If setting the

On timer

, you must enter the programme

position number you want to watch. You must 
put the set into Standby mode by pressing the 

i

button. 

Any equipment connected with Scart leads must
also be put into Standby mode to prevent them
being displayed when the timer switches on. 

When the 

On timer

has been set, the GREEN 

On timer indicator on the front of the TV will be lit
(

see page 6

)

.

If the 

On timer

has been set, you do not have to wait to

watch the television. You can bring the set back to life by

pressing the 

i

button. However, the GREEN timer light

will stay on until the set time period has passed, at which

point the TV will go to the chosen channel. This feature

can help you avoid missing your favourite programmes.

If stereo or dual language broadcasts are transmitted the

word Stereo or Dual will appear on the screen,

disappearing after a few seconds. The display will

reappear each time you change programme positions,

provided that the broadcast is in stereo. If the broadcast is

not in stereo the word Mono will appear.

ADDITIONAL FEATURES

The timer, time display, panel lock  

and stereo/bilingual transmissions

The time display facility allows you to see the current time

on the TV screen.

If you press the 

8

/

9

button on the remote control

whilst watching a normal TV broadcast you will see a
time display from the broadcaster.
It will remain on the screen for about 5 seconds.

1

2

1

3

4

The Time Display

Stereo… 

Choose the required programme number.

Press the 

O

I/II

button repeatedly, to select between

Stereo

and 

Mono

.

Bilingual… 

Bilingual transmissions are rare. If they 

are

transmitted the word 

Dual

will display. 

Choose the

required programme number and if the word 

Dual

does

appear press the 

O

I/II

button to select between 

Dual 1

,

Dual 2 

or 

Mono

.

Panel Lock

From the 

Feature menu

select 

Panel lock

and

choose 

ON

or 

OFF

with the

S

or

R

buttons.

Timer

0  –  9 

: To set

EXIT   

: To exit

You can tell the TV to turn itself 

ON

or 

OFF 

after a

certain time.

Panel lock 

allows you to disable the buttons on the front

of the TV set. You can though, still use all of the 

buttons on the remote control.

The Timer

Stereo and Bilingual transmissions

To cancel the 

On timer

, enter zero in each

position including the programme position.

Off timer

00:00

On timer

01:30  P 2

Feature menu

AV connection
Picture position

Panel lock

ON

Automatic format

ON

Blue screen

ON

Convergence

When 

Panel lock

is 

ON

, you will be reminded

on the screen when you press any of the front

panel buttons. Once the set has been switched

off it can ONLY be brought out of standby

using the remote control.

Summary of Contents for 42PW23P

Page 1: ...owner s manual colour television 42PW23P TOSHIBA The power to open people s eyes ...

Page 2: ...balance 11 Widescreen viewing 12 Picture controls adjusting the picture position automatic format widescreen picture preferences and noise reduction NR 13 The timer and time display informing the TV to turn on off and time display 14 Panel lock disabling the buttons on the front of the TV 14 Stereo and bilingual transmissions stereo or dual language broadcasts 14 AV connections and input selection...

Page 3: ... normally or it is damaged in any way switch off withdraw the mains plug and consult your dealer ABOVE ALL NEVER let anyone especially children push anything into holes slots or any other openings in the case this could result in a fatal electric shock NEVER guess or take chances with electrical equipment of any kind it is better to be safe than sorry Leave at least 10cm clearance around the telev...

Page 4: ...nent still image superimposed e g broadcast network logos it is always advisable to reduce BOTH the brightness and contrast settings THIS DAMAGE IS EXPENSIVE TO REPAIR AND IS NOT PROTECTED BY YOUR WARRANTY AS IT IS THE RESULT OF MISUSE 4 SETTING UP Installation and other points to follow Locate the television away from direct sunlight and strong lights Soft indirect lighting is recommended for com...

Page 5: ...unction on this model To bring up on screen information and for the teletext initial index function To select input from external sources To access sub pages when in teletext mode This may operate in a different way to your previous TV see page 16 To select mode On screen Menus Selectable picture preferences Widescreen viewing Number buttons To return to the previous programme For On Standby mode ...

Page 6: ...l main power switches IN OUT IN OUT the back of your TV video recorder decoder a decoder could be Digital Satellite Analogue Satellite or any other compatible decoder SAT IN OUT VCR TV We recommend Scart 1 for a decoder Scart 2 for a VCR and Scart 3 for additional equipment N N O N Y O N Y RED Power On GREEN On Timer is set ORANGE Bilingual transmission being received On the front of the TV If the...

Page 7: ...button The search will begin for all available stations x x x x x xx x x x will flash and the bullet will move along the line as the search progresses Allow the television to complete the search B G Continental Europe D K Eastern Europe I UK L1 L2 France Searching Channel 21 Station Auto tuning EXIT To exit 8 7 9 6 When the search is complete the TV will automatically return to programme position ...

Page 8: ...ience interference weak signal See page 10 Station Station identification You can use the P and Q or Sand R buttons to enter up to seven characters Programme System Search Programme skip Channel Manual fine tuning 2 3 4 5 OK To select EXIT To exit Manual tuning Prog Sys Channel Station 0 I 60 VCR 1 I 22 BBC1 2 I 28 BBC2 3 I 25 ITV 4 I 32 CH4 5 I 69 Using the P or Q button highlight the programme p...

Page 9: ...epeat from step 4 Or press MENU to return to the list of channels and select the next number to tune Press EXIT when you have finished tuning in 11 5 6 Press the MENU button and then the Sor R button to select the Set up option from the top bar Press Q to highlight Programme sorting and R to select The list of stations is now showing With the Q or P button highlight the station you want to move an...

Page 10: ...rammes from being viewed for example a certain film by your children whilst you are out for the evening you can skip the programme position and take the remote control with you The television will still function as normal using the controls on the front of it but the set will not show the skipped programme position OK To store EXIT To exit MENU To return Manual fine tuning Select Manual tuning fro...

Page 11: ...n sound with a strong bass When an active Super Woofer is connected the n button will control it When you connect a Super Woofer make sure you choose Woofer EXT from the AV connection option in the Feature menu Sound control Bass treble and balance adjustments EXIT To exit Selecting and changing programme position Enter the desired programme position number using the numbered buttons on the remote...

Page 12: ...y zooming in and selecting the image without distortion WIDE SUBTITLE SUBTITLE SUBTITLE WIDE When subtitles are included on a letterbox format broadcast this setting will raise the picture to ensure that all the text is displayed Use this setting when watching a widescreen DVD widescreen video tape or a 16 9 broadcast when available Due to the range of widescreen formats 16 9 14 9 20 9 etc you may...

Page 13: ...settings as required and press EXIT when you have finished In Cinema Picture position Back Horizontal position Vertical position Automatic format Widescreen NR Digital Noise Reduction Select NR from the Picture menu Select between ONand OFF to obtain the best picture The differences may not always be noticeable 1 NR enables you to soften thescreen representation of a weak signal 2 This television ...

Page 14: ...EATURES The timer time display panel lock and stereo bilingual transmissions The time display facility allows you to see the current time on the TV screen If you press the 8 9button on the remote control whilst watching a normal TV broadcast you will see a time display from the broadcaster It will remain on the screen for about 5 seconds 1 2 1 3 4 The Time Display Stereo Choose the required progra...

Page 15: ...e you will output the signal received through Scart 1 directly out to Scart 2 you will be able to record the stereo decoder transmission in stereo Most video recorders and decoders send a signal through the Scart lead to switch the TV to the correct Input socket Alternatively press the external source selection button Brepeatedly until you see the picture from your equipment You must use this butt...

Page 16: ... will appear along side the page number indicating sub pages which have loaded to the left or right of the one on the screen If there are many sub pages it will take a long time for them all to load and this will depend on the speed with which the broadcaster transmits them To access the sub pages in memory press the X X B B button then use the S SandR R buttons to view them Whilst in sub pages mo...

Page 17: ...evious ones will be lost If you do not press OK to confirm your change you will not have stored your choice and it will be forgotten when you leave the teletext screen You may view other pages by simply entering the 3 digit page number but DO NOT press OK or you will lose the favourite already stored Press the 6 7button to access teletext In AUTO mode if FASTEXT is available you will see four colo...

Page 18: ...display teletext Press again to superimpose the teletext over a normal broadcast picture Press again to return to normal TV mode You cannot change programmes until you return to normal TV q 6 7 2 To enlarge the teletext display size Press the sbutton once to enlarge the top half of the page press again to enlarge the bottom half of the page Press again to revert to the normal size 5 4 6 To select ...

Page 19: ...dphone jack will mute the sound from all speakers Whilst all the necessary adjustments and controls for your new TV are made using the remote control the buttons on the front of the TV may be used for some functions Front connections For example to alter the volume press the j buttons and to alter the programme position press the e eF f f buttons press the MENU button and control the sound and pic...

Page 20: ...e Woofer EXT from the AV connection option in the Feature menu SCART 2 EXT 2 CONNECTING OTHER EQUIPMENT Back connections DIGITAL TELEVISION RECEIVER DECODER If your TV automatically switches over to monitor the external equipment you can return to normal TV simply by pressing the desired programme position button To recall the external equipment press the Bbutton repeatedly to select between EXT1 ...

Page 21: ...e remote control to see your top menu bar This white menu bar will show five different topics shown in symbols As you select each symbol by pressing the Sor R button its respective options will appear below To use the options press the Q button on the remote control to move you down through them The PICTURE Menu The SOUND Menu The SET UP Menu When watching an external source When watching a TV bro...

Page 22: ...y set to AUTO in the Set up menu to automatically display the best colour system To check that you have the best colour From the Set up menu select Colour With the Sor R button choose between AUTO PAL SECAM NTSC 4 43 or 3 58 A This is sometimes due to condensation if the room temperature rises rapidly or if the TV is moved from a cold room to a warm room If you leave the set turned on for a while ...

Page 23: ...ove it by pressing the CALL button Why is there a message permanently on the screen Q FOR YOUR GUIDANCE 23 Q Q A When you connect a Super Woofer make sure you choose Woofer EXT in the AV connection menu Why doesn t my External Super Woofer work Q A There are none broadcast or they have not yet loaded Press the X B button to access See teletext section Why do I not have any teletext sub pages Q A B...

Page 24: ...___________________14 Noise Reduction ________________________________________________13 Panel Lock ________________________________________________________14 Picture Position __________________________________________________13 Picture Preferences ____________________________________________13 Programme Selection _________________________________________11 Programme Skip__________________________...

Reviews: